- About Apple USB power adapters
- 5W USB power adapter
- 10W USB power adapter
- 12W USB power adapter
- 18W USB-C power adapter
- 20W USB-C power adapter
- Learn about USB power adapter certifications
- Learn more about USB power adapters
- С iOS 13 все айфоны поддерживают USB-флешки. Как подключить?
- Переходники от Apple. Проверенный, но дорогой вариант
- Переходники с AliExpress. Дешево и работает
- How to connect the Apple USB SuperDrive
- Check compatibility
- Connect and use your SuperDrive
- Eject a disc
- Learn more
- USB-OTG и Apple. Подключаем любые USB-флешки к iPhone и iPad
- Using USB accessories with iOS and iPadOS
- Unlock your device
- Allow access to USB accessories
About Apple USB power adapters
This overview will help you identify a USB power adapter from Apple. Apple USB power adapters and cables are included with many products and are available separately from Apple and authorized Apple resellers.
Customer safety is a top priority at Apple. That’s why all our products—including USB power adapters—undergo rigorous testing for safety and reliability and are designed to meet government safety standards around the world.
As part of our efforts to reach our environmental goals, iPhone models no longer include a power adapter in the box. iPhone continues to work with existing power adapters and USB-A to Lightning cables, such as those included in prior models. iPhone models now include in the box a newer USB‑C to Lightning cable that supports fast charging and is compatible with USB‑C power adapters and computer ports that you might already have. You can use either a USB-A to Lightning cable or the newer USB-C to Lightning cable with your iPhone.
You can use any of the adapters listed below to charge your iPhone, iPad, Apple Watch, or iPod. You can also use a Mac USB-C Power Adapter or third-party adapters that comply with applicable safety standards. For more information about charging your iPhone, iPad, Apple Watch, or iPod, refer to the Safety, Handling, and Support section of the iPhone User Guide, iPad User Guide, Apple Watch User Guide, or iPod User Guide.
5W USB power adapter
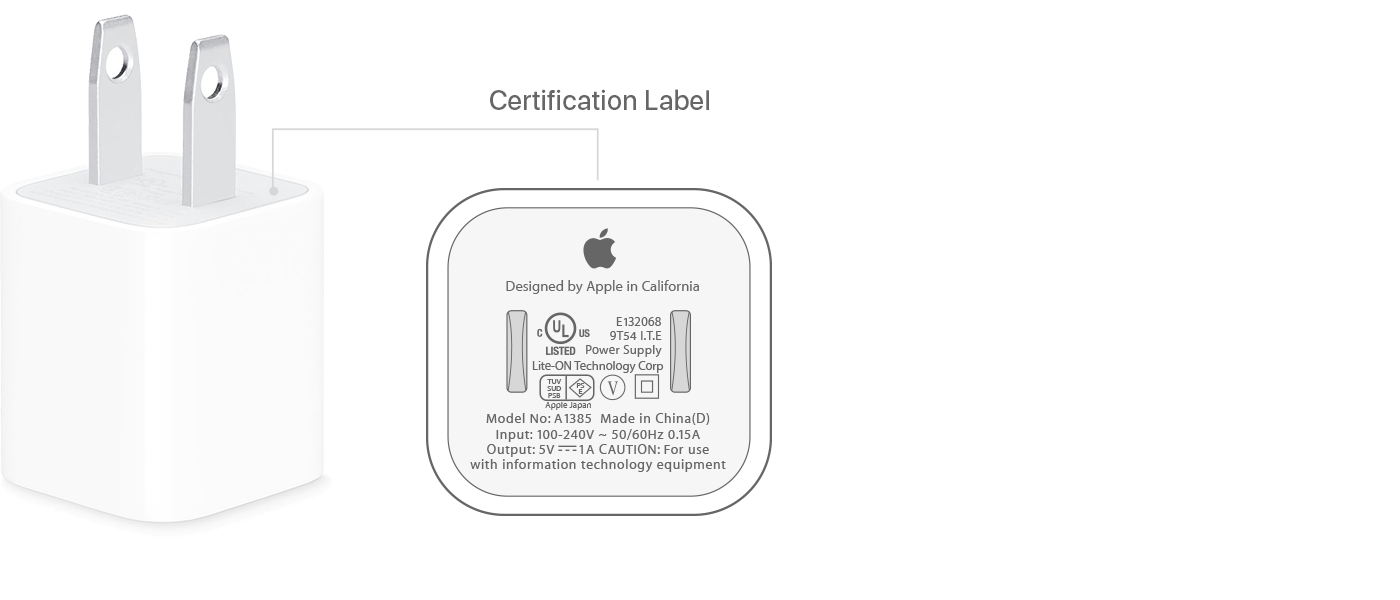
Most iPhone models earlier than iPhone 11 came with a 5W power adapter in the box.

10W USB power adapter
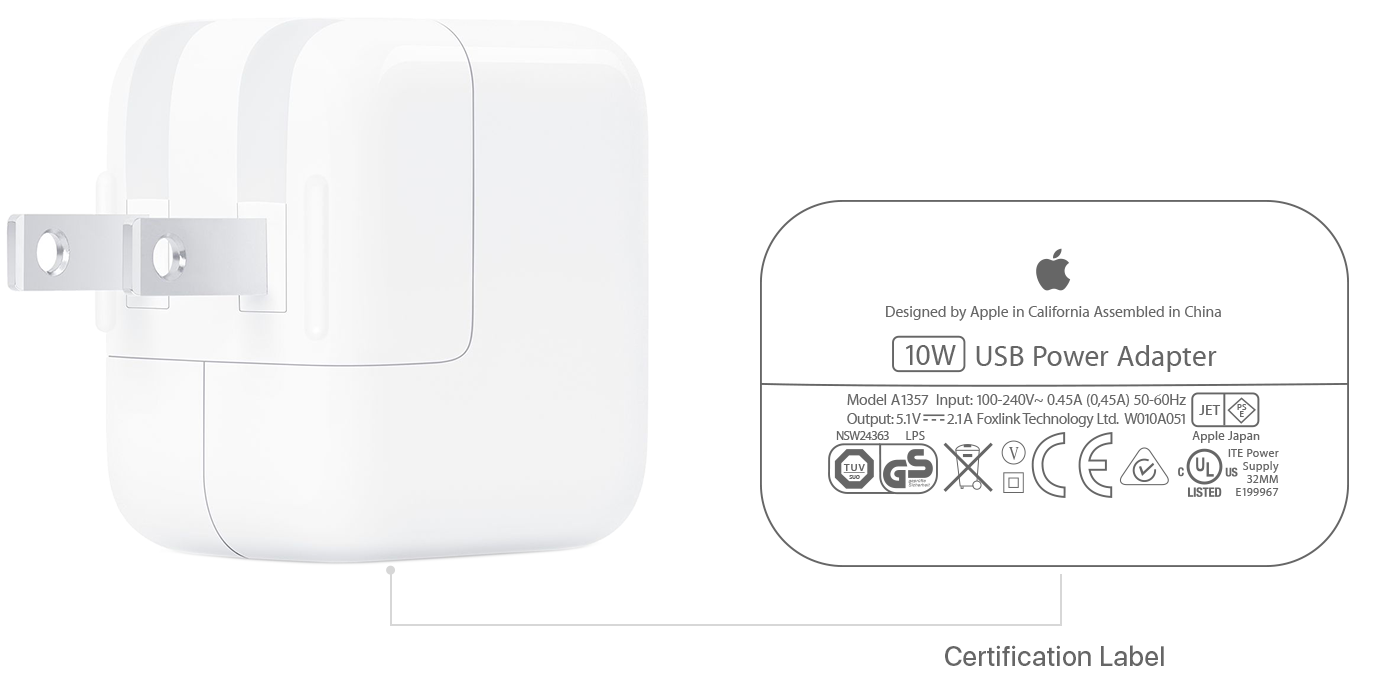
These devices come with a 10W power adapter in the box:
- iPad Air 2
- iPad Air
- iPad mini 4
- iPad mini 3
- iPad mini 2
- iPad 2
12W USB power adapter
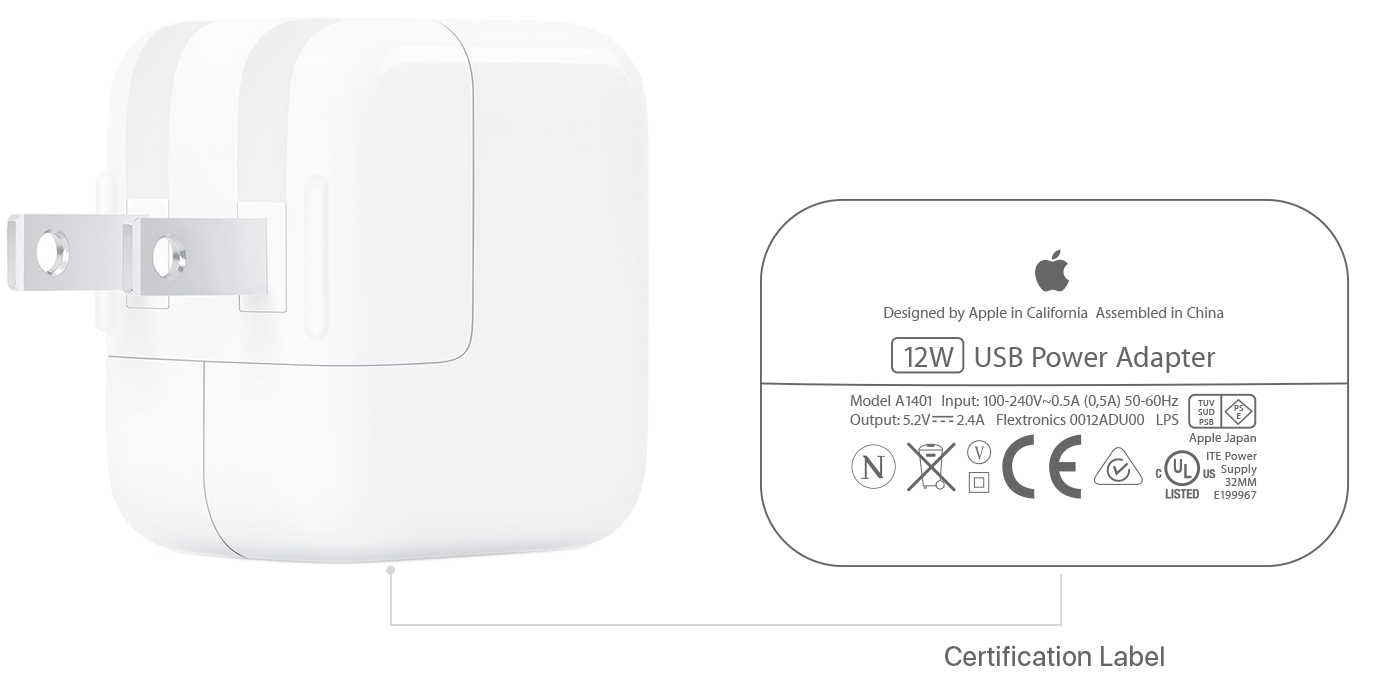
These devices come with a 12W power adapter in the box:
- iPad Pro 12.9-inch (2nd generation)
- iPad Pro 12.9-inch (1st generation)
- iPad Pro (10.5-inch)
- iPad Pro (9.7-inch)*
- iPad Air (3rd generation)*
- iPad mini (5th generation)*
- iPad (7th generation)*
- iPad (6th generation)*
- iPad (5th generation)*
* In some countries and regions, this model ships with the 10W power adapter.
18W USB-C power adapter
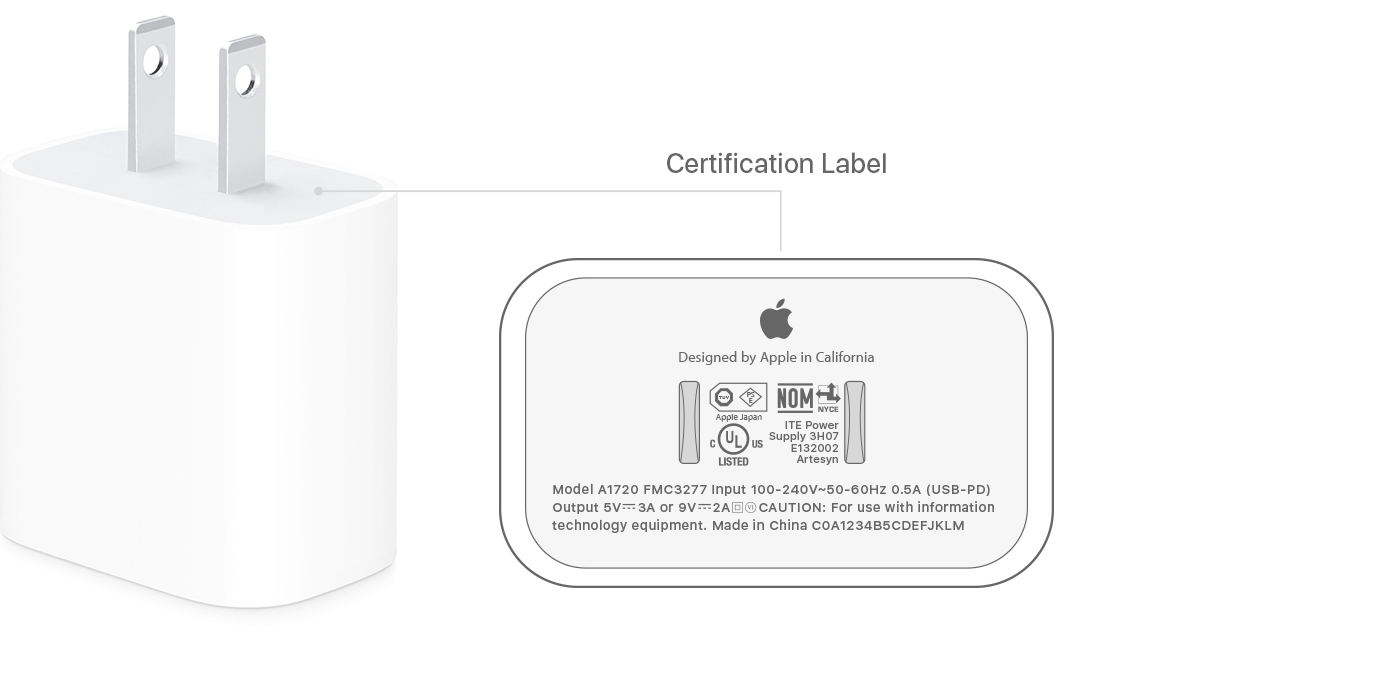
These devices come with an 18W power adapter in the box:
- iPad Pro 12.9 inch (4th generation)
- iPad Pro 12.9 inch (3rd generation)
- iPad Pro 11-inch (2nd generation)
- iPad Pro 11-inch
The Apple 18W USB-C power adapter can fast charge your iPhone 8 or later.
20W USB-C power adapter
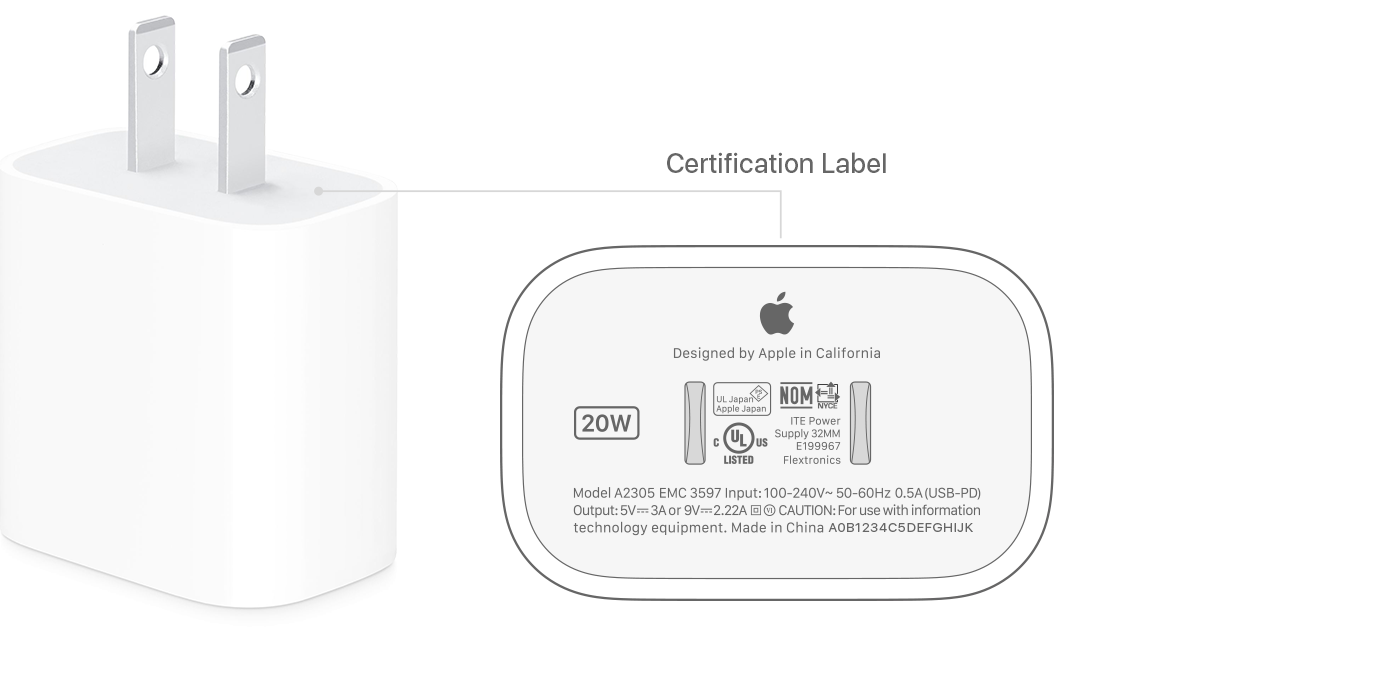
These devices come with a 20W power adapter in the box:
- iPad mini (6th generation)
- iPad (9th generation)
- iPad Pro 12.9-inch (5th generation)
- iPad Pro 11-inch (3rd generation)
- iPad (8th generation)
- iPad Air (4th generation)
Learn about USB power adapter certifications
When an iOS or iPadOS device comes with an Apple USB power adapter, that adapter is certified to meet government safety standards in countries and regions where the device is available. Many of these countries and regions, including the United States, have adopted the Safety of Information Technology Equipment standard, IEC/UL 60950-1.
Apple USB power adapters are designed for use with power sources rated to provide 100V AC to 240V AC at 50Hz to 60Hz. The Type A (flat parallel-blade design) Apple 5W USB, 18W, and 20W USB-C power adapters, as well as the 10W and 12W USB power adapters (with Type A AC plug attached) also comply with the IEC/UL 60950-1 and IEC/UL 62368-1 standards for use with power sources rated to provide 115V AC at 400Hz.
Learn more about USB power adapters
These power adapters are also available separately from Apple and authorized Apple resellers.
Источник
С iOS 13 все айфоны поддерживают USB-флешки. Как подключить?
В iOS 13 множество нововведений, одним из которых является полноценная поддержка внешних накопителей различных форматов. К iPhone на iOS 13 можно подключать как обычные USB-флешки и SD-карты, так и даже гибкие магнитные диски из 90-х. Для этого правда, нужен специальный переходник — все-таки USB-разъема в айфонах благодаря iOS 13 не появилось. Рассказали какие переходники подходят для подключения к iPhone внешних накопителей.
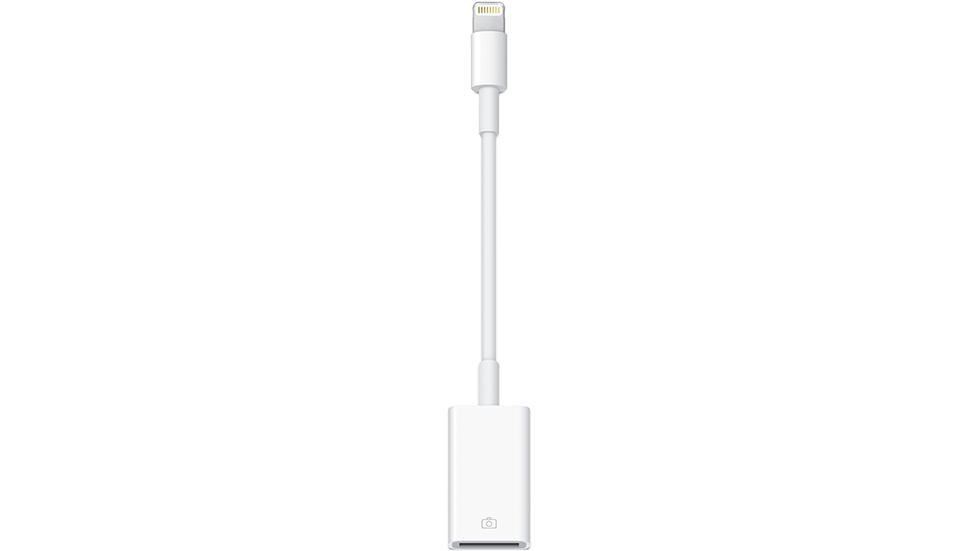
Переходники от Apple. Проверенный, но дорогой вариант
Начнем с самых проверенных вариантов — адаптеров от Apple. Компания давно выпускает переходники с Lightning на USB и SD-карты. Они, как и всё в принципе у Apple, дорогие.
Купить адаптер Lightning/USB для подключения любых USB-флешек и устройств, например, камер, можно за 2939 рублей в интернет-магазине Apple. У партнеров компании в России такие переходники давно закончились. Купить подешевле не получится.
Также у Apple есть фирменный адаптер для чтения SD-карт. Он все еще остается у некоторых ритейлеров по уменьшенной цене — 2890 рублей.
Главный плюс этих дорогих адаптеров в том, что с ними не возникнет никаких проблем в будущем. В отличие от несертифицированных переходников, Apple точно не запретит ими пользоваться после запуска очередной новой версии iOS (такие прецеденты уже были с неоригинальными кабелями Lightning).
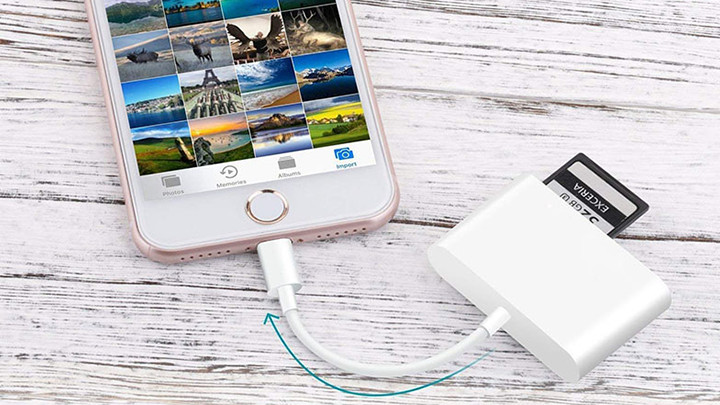
Переходники с AliExpress. Дешево и работает
На AliExpress нет повального засилья переходников с Lightning на USB и SD-карты. Но предложенные варианты действительно рабочие, причем их работоспособность проверена и на iPhone под управлением iOS 13.
Переходник с Lightning на USB для подключения внешних накопителей на AliExpress продается за 627 рублей. Это проверенная модель, которой владельцы пользовались еще в iOS 12, без полноценной поддержки флешек на iPhone. Там флешка тоже появлялась в приложении «Файлы», но возможности по работе с файлами были сильно ограничены.
Если же вам хочется помимо USB-накопителей подключать к iPhone SD- и даже TF-карты, то следует взять модель подороже. За 797 рублей продается универсальный переходник с Lightning на все три перечисленных разъема. Работает прекрасно, в том числе и на iOS 13.
Ранее мы рассказывали о том, как правильно подготовиться к выходу iOS 13. Прошивка выходит уже 19 сентября!
Источник
How to connect the Apple USB SuperDrive
Find out which Macs can use the Apple USB SuperDrive and how to connect it.

Check compatibility
The Apple USB SuperDrive is compatible with Mac models from 2008 and later that don’t have a built-in optical drive.
Connect and use your SuperDrive
To use your SuperDrive, connect it to a USB-A port on your Mac * , then insert a disc. Make sure that the aluminum enclosure of the SuperDrive is facing up.
To connect your SuperDrive to a Thunderbolt 3 (USB-C) or USB-C port on your Mac, you can use one of these adapters:
Eject a disc
To eject a disc, click Finder in the Dock, then choose File > Eject. Or, if your keyboard has an eject key, press and hold  .
.
Learn more
* If your SuperDrive doesn’t respond when connected to an external display or USB hub, connect your SuperDrive to a USB port directly on your Mac.
Источник
USB-OTG и Apple. Подключаем любые USB-флешки к iPhone и iPad

Испокон веков отсутствие возможности подключать флешки к iPhone вызывало ехидные смешки у пользователей Android.
На самом деле, это было не совсем правдой. Теоретически USB-носители к iOS подключались и раньше, однако должны были удовлетворять нескольким критериям — то бишь в реальности из нескольких флешек дома могла не подойти ни одна. Китайские производители развернули на этом целую индустрию, выпуская флеш-носители со встроенным разъемом Lightning, и придавая им причудливую форму, чтобы использовать такие носители «на ходу». Кроме того, для таких флешек необходимо специальное приложение, и у каждого китайского вендора оно свое — зачастую не очень красивое и с иероглифами.
- Кстати, если у тебя устройство с iOS 12 или старше — это как раз твой вариант)) выбирай известный бренд, тогда проблем с софтом и подключением точно не будет. Например, точно будет беспроблемной
→ Lightning-флешка SanDisk
Однако с приходом iOS и iPadOS 13 всё изменилось
Операционная система теперь поддерживает намного больше USB-носителей и аксессуаров, при наличии соответствующего универсального переходника. И, самое главное, больше не нужно сторонних программ — встроенное приложение «Файлы» работает с подключенными носителями на нативном уровне.
Но не всё так просто. Многие пользователи, которые попробовали подключить флешку к устройству на iOS 13 обнаружили, что она всё так же не читается системой. Всё дело в одной маленькой хитрости, которую надо знать, выбирая переходник для подключения USB-флешки к iPhone или iPad.
Питание
Это и есть та самая хитрость. Сейчас объясню. Кому не интересно — переходите к следующему подзаголовку.
Любая флешка нуждается в питании, так как состоит из сложных микросхем — они ведь не работают от воздуха. То есть, когда мы подключаем флеш-носитель к устройству, происходит симбиоз: флешка берет у устройства питание через разъем подключения, при этом давая нам возможность работать с информацией на ней через этот же разъем. И вот тут проблема: подавляющее большинство флеш-накопителей требуют питания больше, чем отдает обычный переходник Lightning-USB.
К слову, даже оригинальный «Apple Camera Connection Kit» пропускает через себя всего 100mA тока, так как предполагается, что подключенный через него фотоаппарат имеет свой аккумулятор и не требует питания у iPhone или iPad (на флешки этот переходник не рассчитан вообще).
Большинство же USB-флешек требует до 200mA. Получается, чтобы иметь возможность подключить любую флешку к iOS 13 и работать с ней — нужен переходник, пропускающий через себя не менее 200mA.
Корявый скриншот из карточки товара — ищите такую надпись
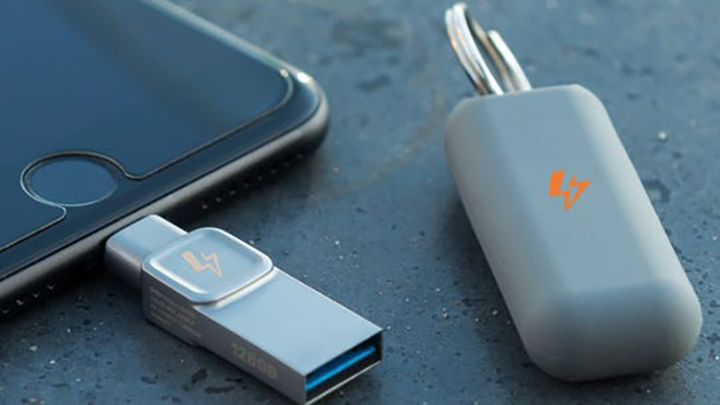
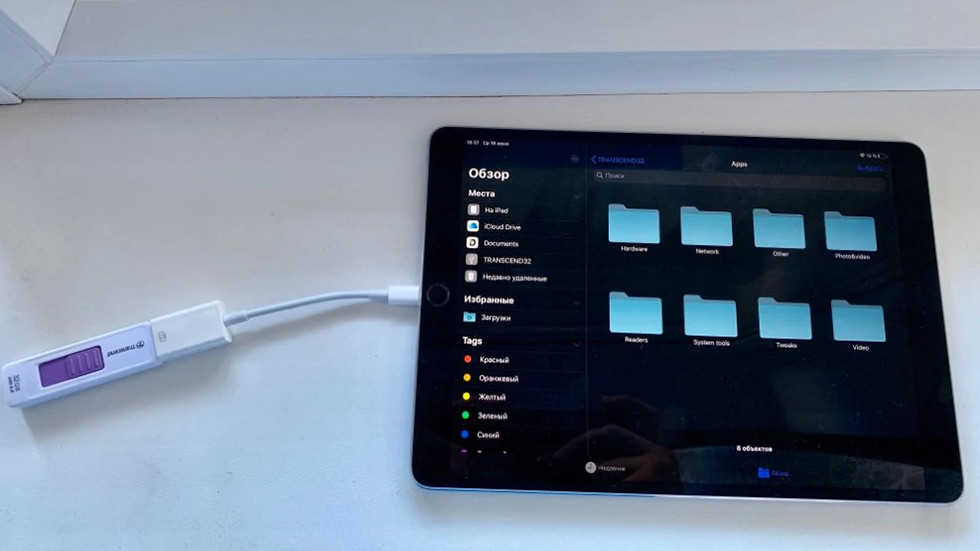
Необходимый переходник
И я нашел такой на просторах AliExpress. Более того, я заказал его сразу после релиза новой iOS 13 осенью 2019 года. Переходник приехал и оправдал все мои ожидания. С его помощью мой iPad адекватно распознал каждую флешку, которая есть у меня дома — и свежие USB 3.0, и очень старые 2.0, которые я покупал себе, еще будучи школьником.
- Вот это тот самый переходник →Lightning to USB (200mA power)
- Есть еще второй вариант, но мне он нравится меньше → Lightning to USB (200mA, with power connector)
«32GB» — это название моей самой старой флешки, ей уже порядка 10 лет
Стоит сказать, что подключить через него SSD-накопитель с помощью переходника «SATA3 — USB» у меня не удалось, так как SSD-диски требуют намного больше питания. Возможно, здесь как раз поможет второй адаптер Lightning по ссылке выше или же переходник на SATA3 — оба с возможностью подключения дополнительного питания. Внешнего HDD-диска с собственным питанием для проверки у меня просто нет под рукой. Просто имей в виду этот момент, если собираешься подключать именно жесткие диски.
Источник
Using USB accessories with iOS and iPadOS
You might need to unlock your passcode-protected iPhone, iPad, or iPod touch to connect it to a Mac, PC, or a USB accessory.
Unlock your device
Starting with iOS and iPadOS, if you use USB accessories with your iPhone, iPad, or iPod touch, or if you connect your device to a Mac or PC, you might need to unlock your device for it to recognize and use the accessory. Your accessory then remains connected, even if your device is subsequently locked.
If you don’t first unlock your password-protected iOS or iPadOS device—or you haven’t unlocked and connected it to a USB accessory within the past hour—your iOS or iPadOS device won’t communicate with the accessory or computer, and in some cases, it might not charge. You might also see an alert asking you to unlock your device to use accessories.
If the USB accessory is still not recognized after you unlock your device, disconnect your device from the accessory, unlock your device, and then reconnect the accessory.
Your iPhone, iPad, or iPod touch charges as usual when it’s connected to a USB power adapter.
Allow access to USB accessories
You can allow your iOS or iPadOS device to always access USB accessories, for example, if you use a USB assistive device to enter your passcode on your locked iPhone. Many assistive devices will automatically turn on the setting to allow USB devices the first time they’re connected.
If you don’t connect to USB accessories regularly, you might need to turn on this setting manually.
In Settings, go to Face ID & Passcode or Touch ID & Passcode, and turn on USB Accessories under Allow Access When Locked.
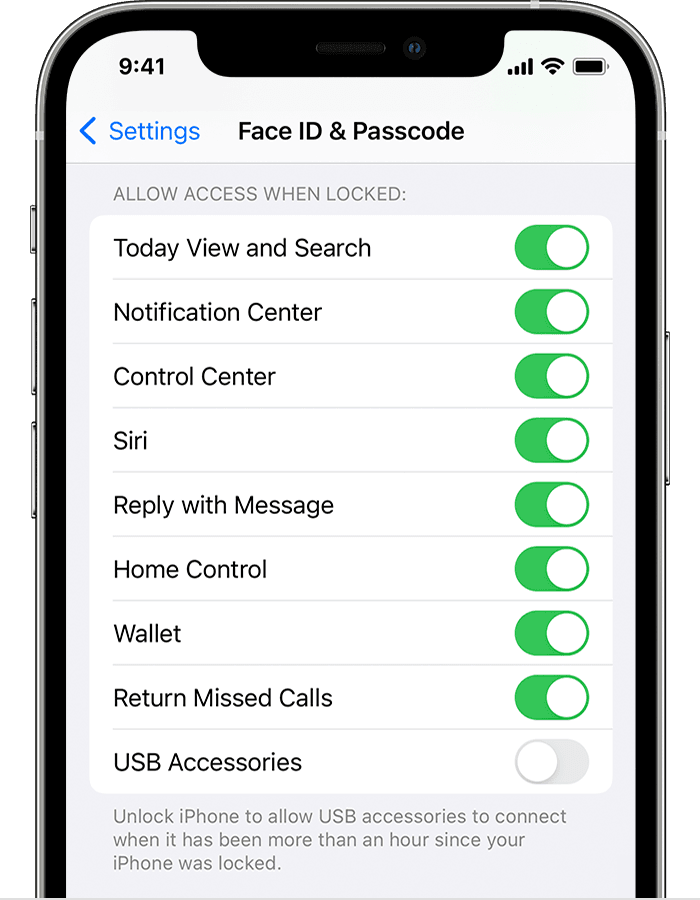
When the USB Accessories setting is off, as in the image above, you might need to unlock your iOS or iPadOS device to connect USB accessories.
Administrators can control the USB Accessories setting on supervised iOS or iPadOS devices using Apple Configurator or mobile device management.
Information about products not manufactured by Apple, or independent websites not controlled or tested by Apple, is provided without recommendation or endorsement. Apple assumes no responsibility with regard to the selection, performance, or use of third-party websites or products. Apple makes no representations regarding third-party website accuracy or reliability. Contact the vendor for additional information.
Источник


