Включенная отладка по USB на Android устройстве может потребоваться для самых разных целей: прежде всего, для выполнения команд в adb shell (прошивка, кастомный рекавери, запись экрана), но не только: например, включенная функция может пригодиться и для восстановления данных на Android.
В этой пошаговой инструкции подробно о том, как включить отладку по USB на Android 5-7 (в общем-то, то же самое будет и на версиях 4.0-4.4), в видео показано включение отладки на Android 9 Pie и на смартфонах Samsung Galaxy.
Скриншоты и пункты меню в руководстве соответствуют почти чистой ОС Android 6 на телефоне Moto (то же самое будет на Nexus и Pixel), но принципиальной разницы в действиях на других устройствах, таких как Samsung, LG, Lenovo, Meizu, Xiaomi или Huawei не будет, все действия практически те же самые, также в статье присутствуют текстовые пути для настроек на других версиях Android и марках телефонов.
Включение отладки по USB на Android телефоне или планшете
Для того, чтобы появилась возможность включить отладку по USB, сначала необходимо включить режим разработчика Android, сделать это можно следующим образом.
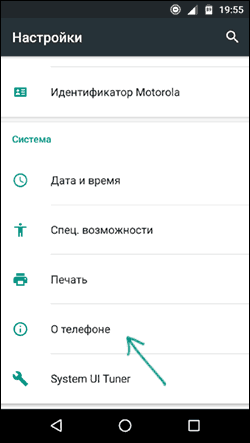
Зайдите в Настройки и нажмите пункт «О телефоне» или «О планшете», на Samsung — «Сведения о телефоне» — «Сведения о ПО». На чистом Android 9.0 зайдите в пункт «Система» — «О телефоне».
Найдите пункт «Номер сборки» (на телефонах Xiaomi и некоторых других — пункт «Версия MIUI») и несколько раз нажимайте по нему, пока не увидите сообщение о том, что вы стали разработчиком.
Теперь в меню «Настройки» вашего телефона появится новый пункт «Для разработчиков» и можно переходить к следующему этапу (может быть полезно: Как включить и отключить режим разработчика на Android).
Процесс включения отладки по USB также состоит из нескольких очень простых шагов:
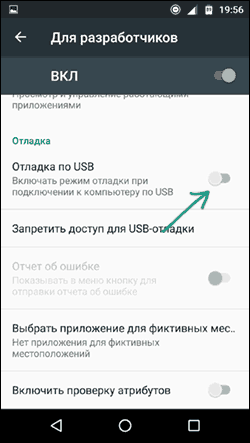
Зайдите в «Настройки» — «Для разработчиков». На Android 9, например, на Nokia — в Настройки — Система — Дополнительно — Для разработчиков. На некоторых китайских телефонах, например, на Xiaomi — в Настройки — Дополнительно — Для разработчиков или Настройки — Расширенные настройки — Для разработчиков. Если вверху страницы есть переключатель, который установлен в положение «Выкл», переключите его в «Вкл».
В разделе «Отладка» включите пункт «Отладка по USB», чтобы включить режим отладки по USB.
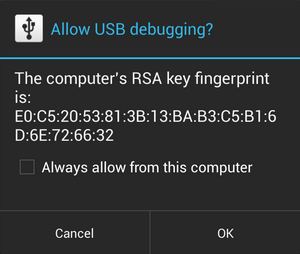
Подтвердите включение отладки в окне «Разрешить отладку по USB», внимательно прочитав предупреждение.
На этом всё готово — отладка по USB на вашем Android телефоне включена и ее можно использовать с нужными вам целями.
Видео инструкция
В дальнейшем, вы можете отключить отладку в том же разделе меню, а при необходимости — отключить и убрать из меню Настроек пункт «Для разработчиков» (ссылка на инструкцию с необходимыми действиями была приведена выше).
А вдруг и это будет интересно:
17.07.2021 в 22:27
Здравствуйте! С помощью «Для разработчиков» и «Отладки USB» я удалял проблему связи, через кабель компьютер видел и изображения, и видео, и я оперировал ими. И это прекрасно! Но есть пару но. 1. На всё время данной связи связи с интернетом не было (пока я работал с файлами через кабель, файлы, направляемые ко мне как и всегда через вай-фай, отсутствовали. И как только восстановил через Google связь, файлы гурьбой прилетели). 2. Второе но — после восстановления интернета связь через кабель с компьютером опять отсутствует. Как и ранее. Есть ли вариант разовой настройки на связи одновременно и с интернетом, и компьютером по USB навсегда, кто знает?
28.09.2021 в 17:24
13.10.2021 в 18:30
Спасибо, никак не мог разобраться с просмотром файлов с телефона Redmi 4 на ПК, очень помогли.
Источник
Enabling USB Debugging on an Android Device
The steps to enable USB debugging depend on the version of Android running on the target device, as indicated in the following table:
Android Device
Instructions
Android 4.0 and newer (Jelly Bean)
Enable the USB Debugging option under Settings > Developer options.
For Android 4.2 and newer, Developer options is hidden by default; use the following steps:
On the device, go to Settings > About .
Tap the Build number seven times to make Settings > Developer options available.
Then enable the USB Debugging option. Tip: You might also want to enable the Stay awake option, to prevent your Android device from sleeping while plugged into the USB port.
Kindle Fire devices
Select Settings > Security and set Enable ADB to On. For more information, see the Amazon documentation.
If you are running Android 4.2.2 or later, you may see the following dialog when you connect your device to your PC running RAD Studio:
Click OK to allow USB debugging on your PC. If you accidentally click Cancel, disconnect your device from your PC and connect it back to make the dialog show up again on your device.
Troubleshooting
If your Android device is not correctly detected by RAD Studio or the system Device Manager, follow the steps above to verify that USB debugging is enabled.
For general information about development setup for Android devices, see the Android documentation.
Источник
Remote debug Android devices
Published on Monday, April 13, 2015
Technically, I’m a writer
Remote debug live content on an Android device from your Windows, Mac, or Linux computer. This tutorial teaches you how to:
Set up your Android device for remote debugging, and discover it from your development machine.
Inspect and debug live content on your Android device from your development machine.
Screencast content from your Android device onto a DevTools instance on your development machine.
Figure 1. Remote Debugging lets you inspect a page running on an Android device from your development machine.
# Step 1: Discover your Android device
The workflow below works for most users. See Troubleshooting: DevTools is not detecting the Android device for more help.
Open the Developer Options screen on your Android. See Configure On-Device Developer Options.
Select Enable USB Debugging.
On your development machine, open Chrome.
Go to chrome://inspect#devices .
Make sure that the Discover USB devices checkbox is enabled.
Figure 2. The Discover USB Devices checkbox is enabled
Connect your Android device directly to your development machine using a USB cable. The first time you do this, you usually see that DevTools has detected an offline device. If you see the model name of your Android device, then DevTools has successfully established the connection to your device. Continue to Step 2.
Figure 3. The Remote Target has successfully detected an offline device that is pending authorization
If your device is showing up as Offline, accept the Allow USB Debugging permission prompt on your Android device.
# Troubleshooting: DevTools is not detecting the Android device
Make sure that your hardware is set up correctly:
If you’re using a USB hub, try connecting your Android device directly to your development machine instead.
Try unplugging the USB cable between your Android device and development machine, and then plugging it back in. Do it while your Android and development machine screens are unlocked.
Make sure that your USB cable works. You should be able to inspect files on your Android device from your development machine.
Make sure that your software is set up correctly:
If your development machine is running Windows, try manually installing the USB drivers for your Android device. See Install OEM USB Drivers.
Some combinations of Windows and Android devices (especially Samsung) require extra set up. See Chrome DevTools Devices does not detect device when plugged in.
If you don’t see the Allow USB Debugging prompt on your Android device try:
Disconnecting and then re-connecting the USB cable while DevTools is in focus on your development machine and your Android homescreen is showing. In other words, sometimes the prompt doesn’t show up when your Android or development machine screens are locked.
Updating the display settings for your Android device and development machine so that they never go to sleep.
Setting Android’s USB mode to PTP. See Galaxy S4 does not show Authorize USB debugging dialog box.
Select Revoke USB Debugging Authorizations from the Developer Options screen on your Android device to reset it to a fresh state.
If you find a solution that is not mentioned in this section or in Chrome DevTools Devices does not detect device when plugged in, please add an answer to that Stack Overflow question, or open an issue in the webfundamentals repository!
# Step 2: Debug content on your Android device from your development machine
Open Chrome on your Android device.
In the chrome://inspect/#devices , you see your Android device’s model name, followed by its serial number. Below that, you can see the version of Chrome that’s running on the device, with the version number in parentheses. Each open Chrome tab gets its own section. You can interact with that tab from this section. If there are any apps using WebView, you see a section for each of those apps, too. In Figure 5 there are no tabs or WebViews open.
Figure 4. A connected remote device
In the Open tab with url text box, enter a URL and then click Open. The page opens in a new tab on your Android device.
Click Inspect next to the URL that you just opened. A new DevTools instance opens. The version of Chrome running on your Android device determines the version of DevTools that opens on your development machine. So, if your Android device is running a very old version of Chrome, the DevTools instance may look very different than what you’re used to.
# More actions: pause, focus, reload, or close a tab
Below the URL you can find a menu to pause, focus, reload or close a tab.
Figure 5. The menu for pausing, reloading, focusing, or closing a tab
# Inspect elements
Go to the Elements panel of your DevTools instance, and hover over an element to highlight it in the viewport of your Android device.
You can also tap an element on your Android device screen to select it in the Elements panel. Click Select Elementon your DevTools instance, and then tap the element on your Android device screen. Note that Select Element is disabled after the first touch, so you need to re-enable it every time you want to use this feature.
# Screencast your Android screen to your development machine
Click Toggle Screencastto view the content of your Android device in your DevTools instance.
You can interact with the screencast in multiple ways:
Clicks are translated into taps, firing proper touch events on the device.
Keystrokes on your computer are sent to the device.
To simulate a pinch gesture, hold Shift while dragging.
To scroll, use your trackpad or mouse wheel, or fling with your mouse pointer.
Some notes on screencasts:
Screencasts only display page content. Transparent portions of the screencast represent device interfaces, such as the Chrome address bar, the Android status bar, or the Android keyboard.
Screencasts negatively affect frame rates. Disable screencasting while measuring scrolls or animations to get a more accurate picture of your page’s performance.
If your Android device screen locks, the content of your screencast disappears. Unlock your Android device screen to automatically resume the screencast.
Last updated: Monday, April 13, 2015 • Improve article
Источник
Can We Enable USB Debugging using ADB Command?
If you’re looking for a way to enable USB debugging and Developer options using an ADB command, you must be in a desperate situation. If you are in a situation in which the only way to save your phone is to turn on Developer options or USB debugging from PC when the phone is locked. So, the question is, can we enable USB debugging using a command from the computer, or is there a USB debugging enabler tool for available for phones with a broken screen?
I found that question in the comment posted by one of our users. Though I already knew that it’s not possible to enable USB debugging using ADB commands on Android devices with a locked or broken screen, I decided to do research. Having spent hours on Google searching for some miraculous workaround, I came across some people claiming to enable USB debugging using a command on their broken device.
Can we Enable USB debugging from PC?
Well, the obvious answer is a “no” and here’s the explanation. We all know that ADB requires authorization from an Android device in order to communicate with it. It’s only by allowing the USB debugging and validating the computer’s RSA key fingerprint that we let the ADB daemon connect to our phone and control it. This is a security feature otherwise anyone who gets a temporary possession of our Android phone can easily manipulate it.
It’s only in the Android Recovery Mode when the Apply update from ADB option is enabled that the ADB daemon can detect your device regardless of whether or not USB debugging is active in the device Settings.
However, if you try the ADB shell commands, you’ll get the following error in return.
If you have a rooted Android device and have TWRP recovery installed on it, there are better chances that you can successfully mount System and Data partitions using ADB commands.
Please note that Fastboot doesn’t require USB debugging enabled. You can boot your device into the Fastboot Mode and try
fastboot oem unlock
The oem unlock command can unlock your phone’s bootloader but in doing so, it’ll also perform a factory data reset.
Enabling USB Debugging using ADB Command
Github user Pantasio claims he was able to enable USB debugging via Recovery Mode using ADB commands. I am not sure if the allegedly working trick described Pantasio will work for you or not, but it certainly didn’t work on my unlocked Samsung Galaxy Note 10 Plus. Obviously, I turned off the Developer options on my phone before following his steps. If you still want to give it a shot, follow the instructions.
Now, let’s come to the steps to enable USB debugging using ADB commands on devices with a broken or damaged screen. The method described below will work only on Android devices with an unlocked bootloader.
Boot your Android device into the Recovery Mode.
Download the latest SDK Platform-tools.zip and extract it.
Open the ‘platform-tools‘ folder and launch a command window by clicking on File > Open Windows PowerShell in the folder window. In case you have set up system-wide ADB and Fastboot, you can launch the command window from any screen of your PC.
Anyway, type the following command and press the Enter key.
If you get the device ID as an alphanumeric value in the command window, it means that your ADB can detect your device in the Recovery Mode. (Lucky you! :D) I could not get past this step.
Now type adb shell and hit the Enter key. After that, execute the mount data and mount system commands to mount the respective directories on your device.
Now, you have to pull the persist.sys.usb.config file from your phone to the PC. To do that execute the following command. Don’t forget to replace the location where you want to save the pulled file with yours.
Open the persist.sys.usb.config file with a text editor and edit it to “mtp,adb” and save it. Now use the adb push command to send it back to your device.
It’s time now to download the build.prop file of your device to your PC.
Open the build.prop file with a text editor like NotePad++ and add the following lines to it.
Save the file after you have made the above changes to build.prop and push it back to your phone using the following command.
If you followed every step carefully and didn’t miss anything, USB debugging should be enabled on your device. You can now reboot your phone to the system using the following command.
Your phone will boot up with USB debugging enabled but there’s a catch here! Next time, when you try to run ADB commands, you’ll still have to allow USB debugging or verify the RSA key fingerprint on your phone. If you are somehow able to see the RSA notification on your phone’s display, tap on OK.
Disable USB Debugging using ADB Command
Well, enabling USB debugging on a device with a locked or broken screen might not be possible but you can easily disable is using an ADB command if it’s already enabled. I tested it on Samsung Galaxy Note 10 Plus, Redmi K20 Pro, Galaxy S20, and OnePlus 8 successfully. This should work on all Android devices regardless of the manufacturer.
Launch the Command Prompt or open a PowerShell window. You can do that in 3 ways.
Connect your device to the computer and execute the following command after running adb shell .
Now go to Settings > Developers options and you will find that USB debugging has been disabled.
Turn off Developer Options using ADB Command
Disabling the Developer options on Android on a normal device is very easy. However, if you aren’t able to navigate to the device settings and want to turn it off, there is an ADB command for that too.
Open a command window on your computer.
Connect your device to the computer via a USB cable.
Type adb shell , press the Enter key, and then issue the following command to turn off the Developer options on your Android device.
As soon as you hit the Enter key on your keyboard, Developer options will be turned off on your Android device.
That’s it! To check whether you have successfully turned off Developer options using ADB command or not, go to device settings.
Thus, we saw that enabling USB debugging using ADB command is not possible because USB debugging is the very thing that facilitates ADB to interact with and Android device. That’s why I always advise people to turn on Developer options and enable USB debugging on their Android phone or tablet as it could be a life-saver in certain tricky situations.


 on your DevTools instance, and then tap the element on your Android device screen. Note that Select Element is disabled after the first touch, so you need to re-enable it every time you want to use this feature.
 to view the content of your Android device in your DevTools instance.


