- How to Use iPhone as Mouse for Mac (And Keyboard)
- Use iPhone as Mouse For Mac
- Step 1: Download the apps on both the devices
- Step 2: Connect via Wi-Fi
- Step 3: Connect via IP address or QR code
- Step 4: iPhone as track-pad
- Step 5: iPhone as a keyboard
- Bonus Options
- Step 6: iPhone as a media controller
- Step 7: iPhone as an app launcher
- Step 8: Operate Mac’s browser controls via iPhone
- Step 9: MacBook system controls on your iPhone
- Closing Words
- How to use your iPhone as a keyboard for your Mac or PC
- Using your iPhone or iPad as a keyboard for your computer
- The QWERTY keyboard
- The function keyboard
- The numeric keypad
- Using Mobile Mouse Remote
- Wrapping up
- Use iTunes to sync your iPhone, iPad, or iPod with your computer
- What you can sync with iTunes
- Sync or remove content using iTunes
- Sync your content using Wi-Fi
How to Use iPhone as Mouse for Mac (And Keyboard)
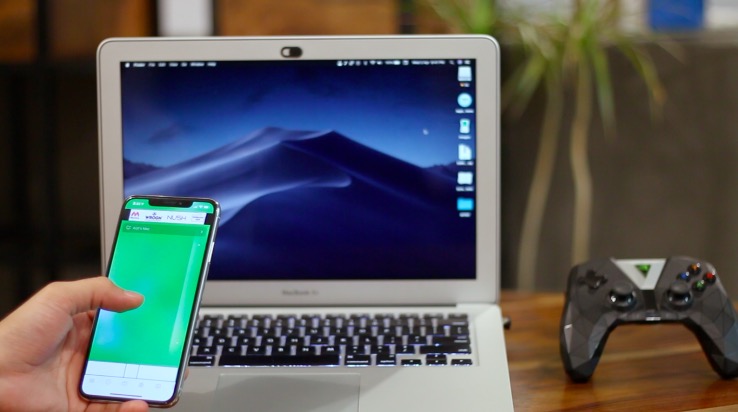
We are often caught in a situation where we wish to control our MacBook from our iPhones. Be it a movie night on your cozy couch or music playback at your house party. Not everyone uses those big and expensive Bluetooth speakers but we still always need to have control of the media. So I found just the app that some of you might find really handy as it is all solutions under one name. Let’s see how it works.
Use iPhone as Mouse For Mac
To use the iPhone as a trackpad on your Mac, we’ll use a simple app called Remote Mouse. The app has both free and paid versions which differ in services. Services like mouse controls, app launcher, portrait keyboard are available in the free version. While the landscape keyboard, media controls, and system control are all part of the pro version of the app. But for most parts, you can perform all necessary actions in the free version itself.
Download Remote Mouse iOS | macOS (free, $2)
Step 1: Download the apps on both the devices
To use your iPhone to control your Mac you’ll need to install Remote Mouse on both your iPhone as well as Computer. Links are shared above and both the app versions are available natively on the app store.


Step 2: Connect via Wi-Fi
Once you’ve downloaded the apps on both the devices, open the app on your iPhone and look for connections on top of your screen. Initially, it will say ‘Connection Failed’.

Tap on the marked section and you should be able to see your MacBook’s name. Remember to keep both the devices on the same Wi-Fi network. If you still don’t see your device name, launch the macOS app again. Once visible, simply tap on it to connect.

Step 3: Connect via IP address or QR code
If you’re not on a Wi-Fi connection you can simply tap on the ‘+’ sign on the top right corner to explore more options. You’d still need to be on 3G or 4G network though.

Here you may tap on either option. Click on history to connect to the device you have previously connected. Or if you are a new user head to the other options.


To connect the devices via IP address, first head to your macOS application. If the app is launched it’s probably sitting on your menu bar as it has no such interface.

Click on Show IP Address and you’ll see a small pop-up window with the address.

On your iPhone app where you tapped on the ‘+’ sign. Now select the IP address option and insert the IP address shown on your macOS app.


To connect via QR code, click on ‘Show QR code’ on your macOS app. A small pop-up window will appear with a QR code.

On your iPhone app tap on ‘Scan QR code’. Allow the camera permission and scan the QR code on your Mac’s screen.


Step 4: iPhone as track-pad
Once your devices are connected simply open your iPhone app. The empty screen is your trackpad with a scroller on your right and mouse buttons at the bottom. You can move around the cursor, scroll pages and click links via your iPhone itself. You can even make swipe gestures as you do on your Mac’s trackpad.

Step 5: iPhone as a keyboard
While your devices are connected you can access the keyboard on your iPhone to input data on your MacBook. Just tap on the keyboard sign at the bottom of your iPhone app and a keyboard will pop-up on your screen. If you’re on a paid version you can even use the keyboard in landscape mode.

Bonus Options
Step 6: iPhone as a media controller
On your iPhone app tap on the media button at the bottom to access the media controls for your MacBook. You can play/pause, rewind/forward and control pretty much all basic functions via this remote.

Step 7: iPhone as an app launcher
You can launch almost all the apps on your MacBook that are visible on your launchpad. Click on the app window like icon at the bottom of your iPhone app and you’ll see all the apps on your Mac’s launchpad. Click on any app to launch it on your Mac and navigate through the trackpad and keyboard.

Step 8: Operate Mac’s browser controls via iPhone
Although you already have so much control of your MacBook with the mouse and keyboard controls. But the app on your iPhone gives you furthermore control of your browser by giving you some quick control options in a special tab. Click on the browser tab of your iPhone app to the options. You can access the back button, zoom in / zoom out web pages and even tap on some quick website links that you frequently use.

Step 9: MacBook system controls on your iPhone
As if it wasn’t already more than enough, you can even take control of your Mac’s system controls from your iPhone itself. Meaning that you don’t have to get up from that couch even after the movie is finished. You can Log-off, sleep or even Shut-down your system from your iPhone app itself. It’s a paid feature again, but worth it.

Closing Words
You and I have the same thought right now, this app should probably work on changing its name. It does more than what the name suggests and so I ended up telling you more than I intended to. But these are some gaps between iOS and macOS that most of us were looking forward to filling. Well, go ahead and try the app. Start with the free version and if it proves to be good for you, a $2 purchase will make it even better. As always let us know your thoughts and experience in the comments below.
Источник
How to use your iPhone as a keyboard for your Mac or PC

Mobile Mouse Remote is a great app that turns your iOS device into a powerful utilitarian accessory for your Mac or PC.
So far, we’ve shown you how the app can be used as a mouse or trackpad for your computer and how you can use the app as a remote control for your computer, but it also has a lot of keyboard functionality built into it to make your device into a software-based keyboard for your computer.
In this piece, we’ll show you how you can use Mobile Mouse Remote to type or perform keyboard commands on your Mac or PC directly from your iPhone or iPad.
Using your iPhone or iPad as a keyboard for your computer
Using your iOS device as a keyboard for your Mac or PC can be super handy. A few of the scenarios I can think of right off the bat are:
- When presenting on a larger screen or projector
- When watching videos from your computer via your TV
- When you want a separate numeric keypad
- When your hardware keyboard isn’t working
Apart from these scenarios, I think you’ll find that Mobile Mouse Remote, which conveniently includes this functionality built right into it along with everything else we mentioned earlier, will come in handy for a number of other things too…
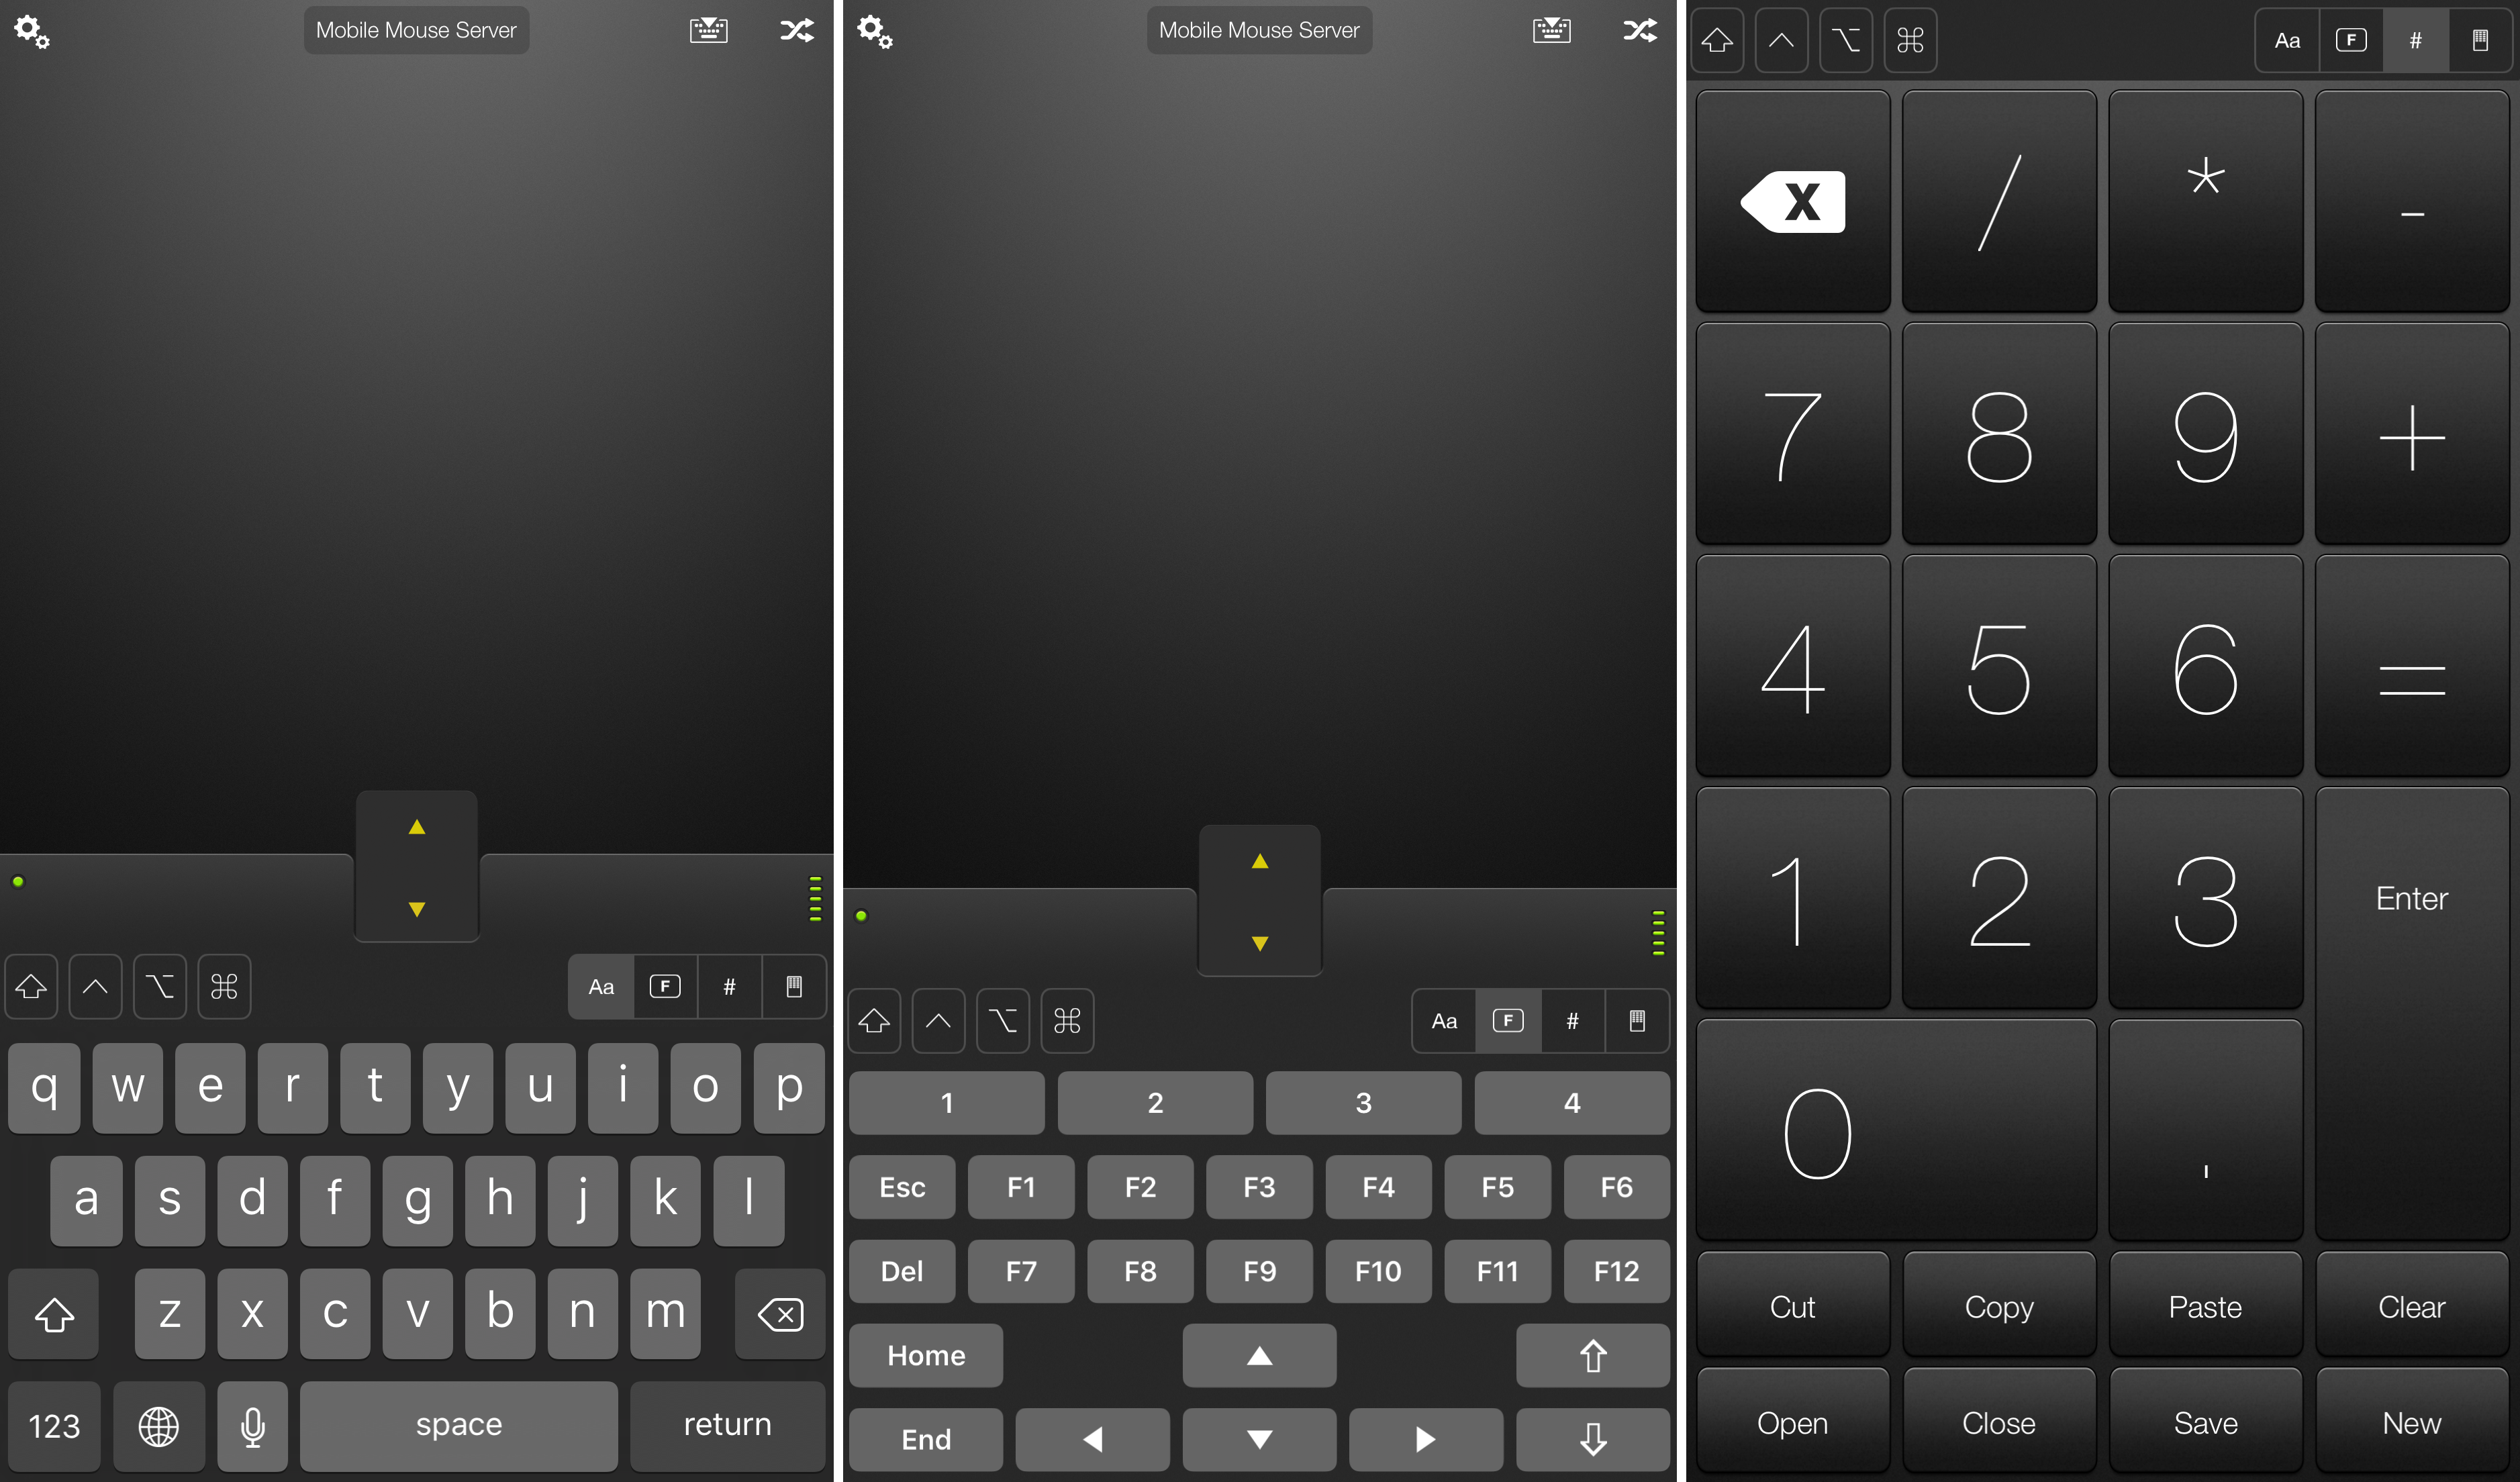
As you can see from the image above, Mobile Mouse Remote has more than just a basic QWERTY keyboard, but also includes a built-in number pad, and a keyboard made specifically for function keys and directional keys.
The keyboards are switched between with the buttons just above the U, I, O, and P keys. Using these switching keys, you can easily go from typing, to carrying out a command on your Mac, to numeric input. Moreover, the number pad even includes cut/copy/paste options, which will be super useful for a wide variety of situations too.
The QWERTY keyboard
Mobile Mouse Remote’s integrated QWERTY keyboard comes with all of the same keys that you’d expect from the iOS keyboard, but it includes some Mac keys that your iOS keyboard doesn’t have; these include Command and Control among others.
The function keyboard
Mobile Mouse Remote’s function keyboard includes your F1 through to the F12 keys, as well as keys for Escape, Delete, Home, and End. The four multi-directional arrow keys, as well as up and down scroll keys are included as well for your convenience, as are the numbers 1 through 4 at the top.
Like with the QWERTY keyboard, you also still get access to the Control and Command keys, as well as a Shift key. These come in handy for when you’re performing keyboard commands.
The numeric keypad
Mobile Mouse Remote’s numeric keypad is a useful piece of software that lets you have the numeric keypad on your Mac. This is a feature that Apple has phased out of the mobile computer industry, and only offers on their desktop computers, but now with this app, you can have the comfort of a numeric keypad even on your MacBook, MacBook Air, or MacBook Pro.
It includes useful shortcuts to copying, cutting, and pasting text, as well as saving files and creating new files in supported apps.
Using Mobile Mouse Remote
Mobile Mouse Remote utilizes your home Wi-Fi connection to connect your iOS device to your computer, but with an in-app purchase, you can connect over various other connection mediums instead, such as Bluetooth, Peer-to-Peer, and USB connection.
In any case, you’ll have to download the Mobile Mouse Server app on your Mac or PC to use your iPhone, iPod touch, or iPad with your computer. It’s a free download, but keep in mind that the Mobile Mouse Remote app itself, which can be had from the App Store, is a $1.99 download and in-app purchases do cost extra.
We covered how to pair the two in our post about using your iPhone as a mouse or trackpad with your Mac or PC, so you can refer there for how to get started with this app combo.
Wrapping up
Using your iOS device as a keyboard for your Mac or PC has never been easier. There are tons of keyboard apps to choose from in the App Store, but the $1.99 Mobile Mouse Remote app has a great App Store rating from many happy users, and it should be obvious from all the features we’ve just showed you why that is.
What would you use your iPhone as a keyboard for your computer for? Share in the comments!
Источник
Use iTunes to sync your iPhone, iPad, or iPod with your computer
Learn how to sync music, movies, and more using iTunes on your Mac or PC.
If you’re using macOS Mojave or earlier or a Windows PC, use iTunes to sync content to your devices. Before you use iTunes to sync content to your iOS or iPadOS device, consider using iCloud, Apple Music, or similar services to keep content from your Mac or PC in the cloud. This way, you can access your music, photos, and more on your devices when you aren’t near your computer. Learn more about using Apple Music or iCloud Photos instead of iTunes.
If you use iCloud or other services like Apple Music to keep your content up-to-date across all of your devices, some syncing features through iTunes might be turned off.
What you can sync with iTunes
- Albums, songs, playlists, movies, TV shows, podcasts, and audiobooks.
- Photos and videos.
- Contacts and calendars.
iTunes features might vary by country or region.
Sync or remove content using iTunes
- Open iTunes and connect your device to your computer with a USB cable.
- Click the device icon in the upper-left corner of the iTunes window. Learn what to do if you don’t see the icon.

- From the list under Settings on the left side of the iTunes window, click the type of content that you want to sync or remove. * To turn syncing on for a content type, select the checkbox next to Sync.
- Select the checkbox next to each item that you want to sync.
- Click the Apply button in the lower-right corner of the window. If syncing doesn’t start automatically, click the Sync button.


* You can only sync your device with one iTunes library at a time. If you see a message that your device is synced with another iTunes library, your device was previously connected to another computer. If you click «Erase and Sync» in that message, all content of the selected type on your device will be erased and replaced with content from this computer.
Sync your content using Wi-Fi
After you set up syncing with iTunes using USB, you can set up iTunes to sync to your device with Wi-Fi instead of USB.
- Connect your device to your computer with a USB cable, then open iTunes and select your device. Learn what to do if your device doesn’t appear on your computer.
- Click Summary on the left side of the iTunes window.
- Select «Sync with this [device] over Wi-Fi.»
- Click Apply.
When the computer and the device are on the same Wi-Fi network, the device appears in iTunes. The device syncs automatically whenever it’s plugged in to power and iTunes is open on the computer.
Источник


