- A comprehensive guide to implementing Modern Paging on Android(JAVA)
- itsdevbrat/Paging2
- You can’t perform that action at this time. You signed in with another tab or window. You signed out in another tab or…
- Paging2 library for Android
- Урок 14. Paging Library. Основы
- PagedListAdapter
- PagedList
- DataSource
- Практика
A comprehensive guide to implementing Modern Paging on Android(JAVA)

As far as implementing this topic is concerned there are tutorials out there, but most of them are incomplete, with no ins and outs explained. Most of them don’t even discuss how can we show a loading spinner while data is being fetched. I have been through that hard time. So let me save yours!
So in this article I will discuss paging along with some advanced topics
- How to implement multiple view types
- Show a loading spinner when data is being fetched
And thats all there is to learn in this library.
itsdevbrat/Paging2
You can’t perform that action at this time. You signed in with another tab or window. You signed out in another tab or…
Well, you can directly use the code to quickly plugin this feature into your app, or else you can continue reading to further understand the topic.
Let’s start by quickly understanding what paging is?
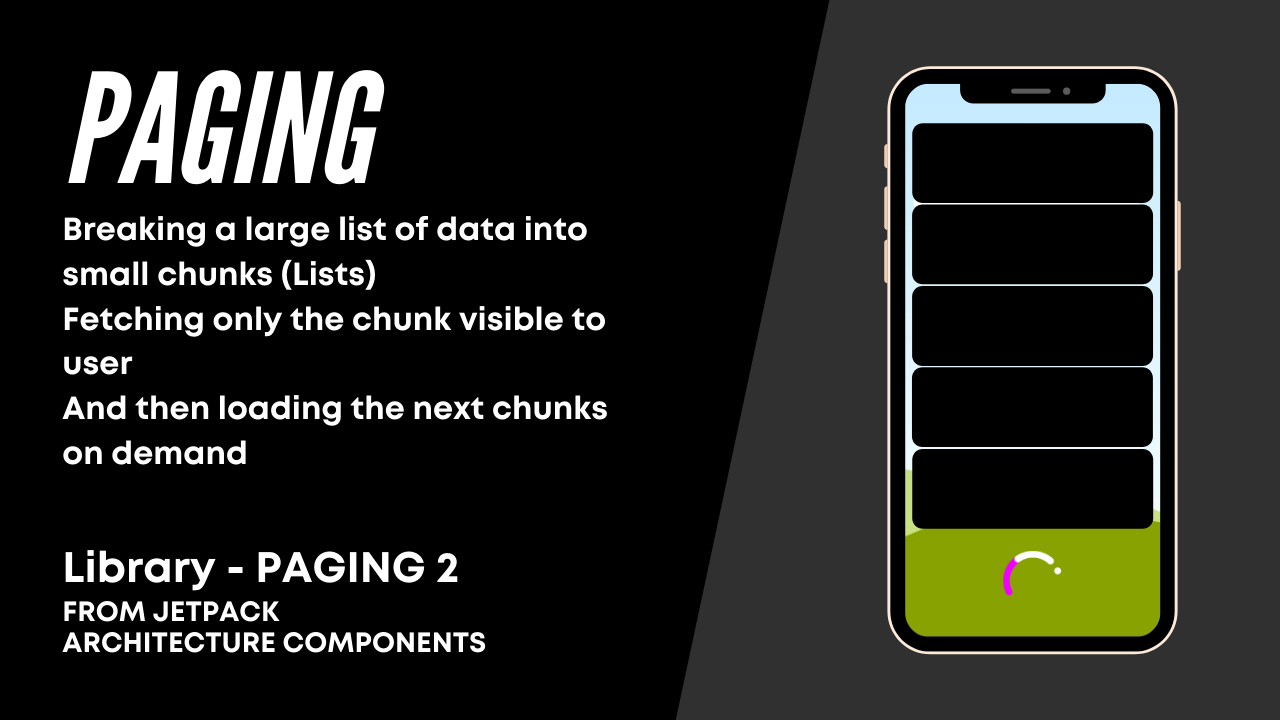
So basically if you have thousands of items to show in your Recycler View, it doesn’t make sense to download all the thousands of items in one network call.
- Will utilize too much bandwidth
- User can hardly see 5 to 10 items at a time
So that’s where we do pagination or paging, we only download a small chunk, for eg: 10 items at a time, and if the user reaches towards 10th item download the next 10 items and keep doing this.
At this point, if you think that “Oh!, Its quite simple to implement, attach a recycler scroll listener to the recycler view, and if the user reaches the end of the first 10 posts make a back-end call, fetch and load the next 10 posts and so on” Well, this is correct and this is how we used to implement paging on android before the paging library was introduced by google. So you might be thinking then why a library was introduced for this.
Well, there were some gotchas with the previous implementation!
- Lots of network call duplication
- Memory inefficiency
That’s why folks at google created a library specifically for this as a part of Android Jetpack Architecture Components.
Well, there is a Paging3 library introduced by google but that’s a Kotlin first library and I tried to port it to JAVA but I was not able to as some of the Kotlin features were not present in JAVA
So for JAVA developers, I guess we have to go with Paging2 for now.
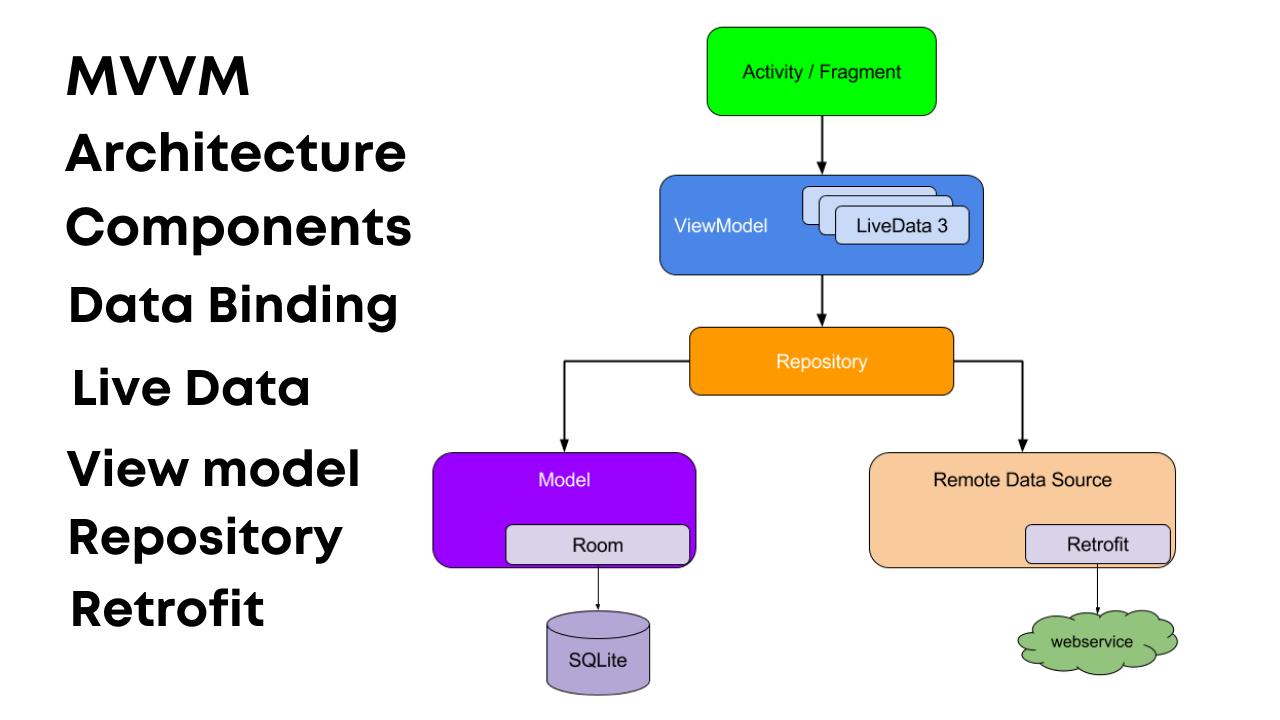
Disclaimer: If you are hearing Jetpack Architecture Components for the first time or if you are not aware of the terms in the below diagram, I would suggest you to start learning about these and come back.
Building android apps with Jetpack Architecture Components is a modern way of creating Android Applications that are efficient, performant, and has fewer lines of code
Before starting with Paging Library there is one fundamental topic I want you to be clear upon and that’s the evolution of Recycler-View Adapters in android

From the above classification, we can conclude that if you are still using recycler adapter for your recycler views you need to level up and start using a list adapter instead, as a list adapter forces you to write an efficient recycler view.
“But wait, we were implementing paging right then why this topic?” Because to implement paging we can’t use this simple recycler adapter not even a list adapter we have to use a PagedListAdapter and this is nothing but a further extension to the list adapter however with an identical implementation. So, now we’ve got our fundamentals clear now we can move on to understanding the Paging2 library
Paging2 library for Android
So there will be a total of 6 important components that we’ll have to understand and implement.

As from the name itself you would have figured out that this component is going to supply us the data for the recycler view.
So, from where is the data source gonna get the data? Well, that could be any source either from a web API or a local database.
However, in this library, we have 3 types of data sources and based on our use -case we have to choose one.

We use this data source when we have to load data at arbitrary positions, i.e when there is a possibility that the user first loads the first 10 items(1–10) and then jumps to a position where it should load the next 10 items starting from let’s say 70th item(70–80).
for eg: A contacts app.

2. Item Keyed Data Source
We use this data source when the next chunk of data to load depends on the last item in the current chunk loaded.

3. Page Keyed Data Source
We use this data source when the chunks are given page numbers.
For eg: see the below animation

For this article, I am going to use the page keyed data source as it is very commonly implemented in most APIs out there. The API that we are going to use for this implementation is a custom JSON Placeholder API. However, you have to just change the URL according to your API endpoint rest all will be the same.
This API returns a list of 20 posts based on the page number provided as a query parameter.
Lets look at the DataSource class,
PostsDataSource extends PageKeyedDataSource which has 3 methods that we have to override
And in all these 3 methods
We have to perform 2 basic steps,
- Make and API call
- Once the response is available pass it to the callback.onResult(…) method
Lets look at these 3 methods now,
- loadInitial(..): This method is called only once and is called to fetch the first page.
- loadAfter(…):This method is called to make an API call to download the next page data (after the current page) as the user reaches towards end of the current page.
- loadBefore(..): This need not be implemented as previous pages have already been loaded.
To show a loading spinner when data is being fetched we have a MutableLiveData that holds the loading state.
Based on this loading state value we will later in our PagedListAdapter decide which viewType to show,
- Loading state is ONGOING or FAILED we will show a LoadingView.
- Loading state is SUCCESS we will show the PostView.
This component is there to create an instance of the above-selected data source in our case a P ageKeyedDataSource instance
Why not create the instance directly using the new keyword? Well, this has to do with implementing clean architecture using factory design pattern in java. ( Using a factory class to instantiate an object is one of the 23 design patterns)
Well, the code is commented well, and is self explanatory.
Well, if you have ever implemented MVVM in android you might know about this component. Still, for those who don’t know, this component’s main functionality is to abstract away the implementation details of how to fetch the data and whether to fetch data from the internet or local database.
In our implementation, this will create a PostDataSource instance using PostDataSourceFactory create(..) and will return an instance of a PagedList based on the PagedListConfig passed.
PagedListConfig is basically the configuration of how many items to download in each page which is decided by pagesize, how many pages to fetch for the first load of Recycler-View items and many more.
Paged list is like an ArrayList (as this also implements AbstractList) which holds chunked data (pages) from a data source.
This component is the mediator between the data layer (repository) and the UI layer (activity/fragment).
It calls the repository to get the data as a paged list and pass it to the activity or fragment.
This component is responsible to get the data as a paged list from the view model component and create an instance of a PagedListAdapter and pass the paged list that it receives from the ViewModel to the PagedListAdapter.
As we discussed at the start of the post that we will have to use a PagedListAdapter to implement paging using the Paging2 library.
Well, the implementation is identical to RecyclerAdapters implementation hence doesn’t need much explanation.
However as promised at the start of article we will discuss how to implement multiple viewTypes and show a loading spinner when data is being fetched
Well getaItemViewType(..) method is used to implement multiple viewTypes.
For eg: in our implementation we are using this method to show 2 viewTypes one is the Post view and the other is loading view
- If we are at the last position of current page and loading state is either ONGOING or FAILED we show a loading spinner
- Else we will show the Post view
Now let’s have a look at the overall data flow

- The ViewModel triggers the repository method to create the PostDataSource using the PostDataSourceFactory.
- The data is fetched by the DataSource and is passed on to DataSourceFactory.
- BoundaryCallback is a function that triggers fetching of pages for the first time it calls loadInitial (…) and then loadAfter(…) method as the user reaches to the end of the page being displayed each and every time.
- The data is in turn passed to Repository and a PagedList is built out of it.
- This PagedList is then passed on to the UI layer through the ViewModel where the PagedListAdapter takes care of displaying the data.
Finally let’s have a look at our folder structure
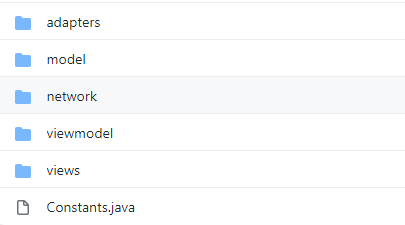
1. Adapters will have the PostRecyclerAdapter, LoadingViewHolder, and PostViewHolder classes
2. The model folder will have PostDataSource in the datasources folder, POJO for a Post in entities folder, and PostRepository in the repositories folder.

3. The network folder has the Api interface and RetrofitClient implementation
4. The viewmodel folder will have the MainActivityViewModel and MainActivityViewModelFactory classes
5. The views folder will have the MainActivity class
6. Constants file to hold any constants to be used throughout the project. We are currently storing the load state constants i.e ONGOING, FAILED, and SUCCESS
Well, I have discussed all the fundamentals along with 6 important components that you will need to implement to perform paging.
However there are few things that I haven’t discussed as they are pretty easy and fall under normal android development topics,
- The retrofit implementation for performing network calls
- The XML for activity/fragment or the recycler view item
- The MainActivityViewModelFactory class to instantiate the MainActivityViewModel
So, hope you liked this. If you have any suggestions or improvements that I should do in my articles let me know them in the comments section.
Источник
Урок 14. Paging Library. Основы
В этом уроке начнем знакомство с Paging Library. Рассмотрим общую схему работы связки PagedList и DataSource.
Полный список уроков курса:
Paging Library содержит инструменты для постраничной подгрузки данных. Т.е. когда данные подгружаются не все сразу, а по мере прокрутки списка. Давайте сначала рассмотрим в общих чертах, чем этот способ отличается от обычного, а потом выполним несколько примеров.
Для подключения к проекту добавьте в dependencies
Итак, мы хотим отобразить данные в списке. Данные могут быть откуда угодно: база данных, сервер, файл со строками и т.д. Т.е. любой источник, который может предоставить нам данные для отображения их в списке. Для удобства давайте называть его общим словом Storage.
Обычно мы получаем данные из Storage и помещаем их в List в адаптер. Далее RecyclerView будет у адаптера просить View, а адаптер будет просить данные у List.
Получается такая схема:
RecyclerView >> Adapter >> List
где List сразу содержит все необходимые данные и ничего не надо больше подгружать.
С Paging Library схема будет немного сложнее:
RecyclerView >> PagedListAdapter >> PagedList > DataSource > Storage
Т.е. обычный Adapter мы меняем на PagedListAdapter. А вместо List у нас будет связка PagedList + DataSource, которая умеет по мере необходимости подтягивать данные из Storage.
Рассмотрим подробнее эти компоненты.
PagedListAdapter
PagedListAdapter — это RecyclerView.Adapter, заточенный под чтение данных из PagedList.
Как видите, он очень похож на RecyclerView.Adapter. От него также требуется биндить данные в Holder.
1) Ему сразу надо предоставить DiffUtil.Callback. Если вы еще не знакомы с этой штукой, посмотрите мой материал.
2) Нет никакого хранилища данных (List или т.п.)
3) Нет метода getItemCount
Пункты 2 и 3 обусловлены тем, что адаптер внутри себя использует PagedList в качестве источника данных, и он сам будет заниматься хранением данных и определением их количества.
Чтобы передать адаптеру PagedList, мы будем использовать метод адаптера )» target=»_blank» rel=»noopener noreferrer»>submitList.
PagedList
Если не сильно вдаваться в детали, то PagedList — это обертка над List. Он тоже содержит данные и умеет отдавать их методом get(position). Но при этом он проверяет, насколько запрашиваемый элемент близок к концу имеющихся у него данных и при необходимости подгружает себе новые данные с помощью DataSource.
Т.е. у PagedList в списке уже есть, например, 40 элементов. Адаптер просит у него элемент с позицией 31. PagedList дает ему этот элемент и при этом понимает, что адаптер просил элемент, близкий к концу его данных. А значит есть вероятность, что скоро адаптер придет за элементами с позицией 40 и далее. Поэтому PagedList обращается к DataSource за новой порцией данных, например, от 41 до 50.
Создается PagedList с помощью билдера:
От нас требуется предоставить пару Executor-ов. Один для выполнения запроса данных в отдельном потоке, а второй для возврата результатов в UI поток.
На вход конструктору билдера необходимо предоставить DataSource и PagedList.Config. Про DataSource мы поговорим чуть позже, а PagedList.Config — это конфиг PagedList. В нем мы можем задать различные параметры, например, размер страницы.
Создание PagedList.Config может выглядеть так:
Подробно все его параметры мы рассмотрим позже.
Вариант реализации MainThreadExecutor:
DataSource
DataSource — это посредник между PagedList и Storage. Возникает вопрос: зачем нужен этот посредник? Почему PagedList не может напрямую попросить очередную порцию данных у Storage? Потому что у Storage могут быть разные требования к способу запроса данных.
Например, базе данных мы можем дать позицию и желаемое количество записей, и в ответ получим порцию данных, начиная с указанной позиции. А вот сервер может работать совсем по-другому. Например, он отдает данные постранично и будет ожидать от нас номер следующей страницы, чтобы отдать новую порцию данных. Также у сервера бывает схема, когда с очередной порцией данных он присылает нам токен. Этот токен необходимо использовать для получения следующей порции данных.
Paging Library предоставляет три разных DataSource, которые должны нам помочь связать между собой PagedList и Storage. Это PositionalDataSource, PageKeyedDataSource и ItemKeyedDataSource. В отдельном уроке мы еще подробно рассмотрим, в чем разница между ними. А пока будем работать с PositionalDataSource, т.к. он проще и понятнее остальных.
Практика
Давайте перейдем к практическому примеру и все станет понятнее. В качестве DataSource будем использовать PositionalDataSource.
Итак, чтобы вся схема заработала, нам надо создать DataSource, PagedList и адаптер:
DataSource передаем в PagedList. PagedList передаем в адаптер. Адаптер передаем в RecyclerView.
EmployeeStorage — это созданный мною класс, который эмулирует Storage и содержит 100 Employee записей. Не привожу здесь реализацию этого класса, потому что она не имеет значения. В реальном примере вместо него будет база данных или сервер (Retrofit), к которым мы обращаемся за данными.
MyPositionalDataSource наследует PositionalDataSource и должен реализовать пару методов:
Когда мы создаем PagedList, он сразу запрашивает порцию данных у DataSource. Делает он это методом loadInitial. В качестве параметров он передает нам:
requestedStartPosition — с какой позиции подгружать
requestedLoadSize — размер порции
Используя эти параметры, мы запрашиваем данные у Storage. Полученный результат передаем в callback.onResult
Когда мы прокручиваем список, PagedList подгружает новые данные. Для этого он вызывает метод loadRange. В качестве параметров он передает нам позицию, с которой надо подгружать данные, и размер порции.
Используя эти параметры, мы запрашиваем данные у Storage. Полученный результат передаем в callback.onResult
Я добавил логов в эти методы, чтобы было видно, что происходит.
О том, что означает второй параметр в callback.onResult, поговорим во второй части. А потоки, в которых будет выполняться этот код, обсудим в третьей части.
Для наглядности я сделал гифку, в которой вы можете видеть, какие логи появляются по мере прокрутки списка.

Разбираемся, что происходит.
Сразу после запуска в логах видим строку:
loadInitial, requestedStartPosition = 0, requestedLoadSize = 30
PagedList запросил первоначальную порцию данных размером 30 элементов (requestedLoadSize), начиная с нулевого (requestedStartPosition). DataSource передает эти параметры в Storage, получает данные и возвращает их в PagedList. В итоге адаптер отображает эти записи.
Откуда взялось число 30? По умолчанию размер первоначальной загрузки равен размер страницы * 3. Размер страницы мы установили равным 10 (в PagedList.Config методом setPageSize), поэтому requestedLoadSize равен 30.
Теперь начинаем скроллить список вниз. Когда список показал запись с позицией 20, PagedList запросил следующую порцию данных:
loadRange, startPosition 30, loadSize = 10
Почему он сделал это именно по достижении записи с позицией 20? За это отвечает параметр prefetchDistance. По умолчанию он равен pageSize, т.е. 10. Соответственно, когда до конца списка остается 10 записей, PagedList подгружает следующую порцию.
По мере прокрутки списка, подгружаются следующие порции данных
loadRange, startPosition = 40, loadSize = 10
loadRange, startPosition = 50, loadSize = 10
loadRange, startPosition = 60, loadSize = 10
loadRange, startPosition = 70, loadSize = 10
loadRange, startPosition = 80, loadSize = 10
loadRange, startPosition = 90, loadSize = 10
loadRange, startPosition = 100, loadSize = 10
После сотой записи список не прокручивается. Так происходит потому, что мой EmployeeStorage содержит всего 100 записей. При попытке получить у него 10 записей, начиная с позиции 100, он просто вернет пустой список. Когда DataSource передаст этот пустой список в callback.onResult, это будет сигналом для PagedList, что данные закончились. После этого PagedList больше не будет пытаться подгружать данные и список не будет скроллиться.
На этом пока остановимся, иначе будет слишком много новой информации. Рекомендую прочитать урок 2-3 раза, чтобы материал лучше зашел. В следующем уроке продолжим.
Присоединяйтесь к нам в Telegram:
— в канале StartAndroid публикуются ссылки на новые статьи с сайта startandroid.ru и интересные материалы с хабра, medium.com и т.п.
— в чатах решаем возникающие вопросы и проблемы по различным темам: Android, Kotlin, RxJava, Dagger, Тестирование
— ну и если просто хочется поговорить с коллегами по разработке, то есть чат Флудильня
— новый чат Performance для обсуждения проблем производительности и для ваших пожеланий по содержанию курса по этой теме
Источник


