- How to get developer options on Android
- How to access developer options in Android
- How to Transfer Apps to a New Android Device
- Using the Google Backup Method
- Switch On Google Backup
- Transfer Your Apps to Your New Device
- Checking Your Google Play Store App Library
- Using Third-Party Apps
- Transferring from iPhone to Android
- Android Basics : How to Disable Doze & App Standby for Individual Apps
- Problems with Doze & App Standby
- Disabling Doze & App Standby for Certain Apps
How to get developer options on Android


There’s a hidden set of developer options on Android devices that you can access if you know how. Whether you want to enable USB debugging, unlock your bootloader so you can root your Android phone, or change the animation draw speed to give your phone a slicker feel, this is where you can do that and a lot more. Whatever your reason for wanting to access the hidden options, you have to unlock them first. Our guide below gives you the basics on how to get to the developer options.
By default, the developer options in Android phones are hidden. This is because they’re designed for use by developers who want to test various functionalities and make changes that may impact the phone’s performance. It’s not smart to go tinkering with the developer options without a specific purpose and an understanding of what each option refers to. But now that you’ve been warned, here’s how you can get developer options on Android.
How to access developer options in Android


You can unlock the developer options on any Android smartphone or tablet by locating the build number in your Settings menu and tapping it multiple times. However, the exact location of the aforementioned build number may differ depending on your phone’s manufacturer. The following example uses a Samsung Galaxy S20 FE running Android 11.
- Go to Settings >About Phone.
- Tap Software Info >Build Number.
- Tap Build Number seven times. After the first few taps, you should see the steps counting down until you unlock the developer options. You may also have to tap in your PIN for verification. Once developer options are activated, you will see a message that reads, You are now a developer.
- Go back to the Settings pane, where you will now find Developer options as an entry.
- Tap it and toggle the switch on if it is not already, and from there, you can proceed to make adjustments to your phone.
On phones running Android 10, you’ll usually find the About Phone menu under Settings > System > About Phone — all the other steps above are the same.
It’s simple to deactivate developer options straight from your Settings if you don’t need to access them anymore. The first step to do this is to head over to Settings, click Developer Options, and hit Off. And, you’re done. Yes, really. That’s all there is to it. After you’ve completed this step, you will no longer be able to access Developer Options from the Settings menu. But, you can still modify these settings later if you change your mind and want to return them to their initial state. Simply follow the directions mentioned above.
You can also investigate other more advanced settings using Android’s developer options. Remember that developer mode was initially intended for app debugging and manipulating system responses and functionality. The selections within developer mode typically include debugging, networking, input, hardware-accelerated rendering, media, monitoring, and applications. It’s up to you how you want to customize the settings, as you can categorize them according to your specific preferences.
We recommend visiting the official Android Developer website to get more insight on this subject and examine the developer options’ full list. Know that these options may be different depending on the device you’re using. Typically, the choices depend on the type and model of the device you are working with.
Источник
How to Transfer Apps to a New Android Device
Ben Stockton is a freelance tech writer from the United Kingdom. In a past life, he was a UK college lecturer, training teens and adults. Since leaving the classroom, he’s been a tech writer, writing how-to articles and tutorials for MakeUseOf, MakeTechEasier, and Cloudwards.net. He has a degree in History and a postgraduate qualification in Computing. Read more.
A new Android device means transferring all of your content, including your favorite apps, from old to new. You don’t have to do this manually as Google offers built-in support for backing up and restoring your content. Here’s how you do it.
These steps may vary based on your device manufacturer, Android version, and may only be available on newer builds of Android. If you don’t have these steps available at all, you can use a third-party app provided by your device manufacturer to transfer your apps instead.
Using the Google Backup Method
Google uses your Google account to back up your content, including apps, using your included Drive storage. You’ll need to make sure you’ve enabled Google Backup on your old device before you make any transfers.
Switch On Google Backup
To start, access your device “Settings” menu in the app drawer or by swiping down to access your notification shade and then tap the gear icon.
![]()
Next, tap on “System.” If you have a Samsung device, the option is “Accounts and Backup.”
![]()
In the next menu, Samsung owners will need to tap “Backup and Restore.” Other Android device owners can ignore this step.
![]()
Tap on “Backup.” Samsung owners, ensure that “Back Up My Data” is toggled on and then select “Google Account.”
![]()
Make sure that “Back Up to Google Drive” is toggled on and tap “Back Up Now” to ensure your apps are completely backed up.
![]()
You can also tap “App data” to scroll through and check that every app you want to transfer is listed. If they are, you’re ready to start transferring, so switch over to your new device.
Transfer Your Apps to Your New Device
When you power up a new Android device or a device that has been reset to factory settings, you’ll be given the option to restore your content (including apps) from your Google Drive backup.
Again, it’s important to note these instructions may also vary depending on your version of Android and your device’s manufacturer.
Power on your new device and follow any initial instructions until you’re given the option to begin restoring your data. Choose “A Backup from the Cloud” to begin the process.
![]()
On the next screen, you might be asked to sign in to your Google account, so do this first. You will then see a list of recent backups from the Android devices linked to your Google account.
To proceed, tap the backup from whichever device you want to restore.
![]()
You’ll be given a list of content options to restore, including your device settings and contacts. “Apps” might be deselected, so tap the checkbox next to it and then select “Restore.”
![]()
As your data is restored, you can finish the rest of the setup process and begin using your device.
![]()
Once the restoration is complete, your apps (and other content) will be transferred to your new device from your Google Drive backup, ready for you to use.
Checking Your Google Play Store App Library
If you already set up your new device before restoring or transferring data, it might be worth looking at what apps you have previously installed using your Google account. Your apps library on the Play Store will let you quickly install any apps you might be missing on your new device.
To start, open the Google Play Store app and then expand the hamburger menu in the top-left corner.
Tap “My Apps & Games.”
![]()
Listed in the library tab will be devices “Not on This Device.” Tap “Install” next to any (or all) of the apps you want to install on your device.
![]()
Using Third-Party Apps
The best and most reliable method for most users is to use the built-in Google Backup method to transfer your apps and other content. If that option doesn’t work for you, third-party apps are available.
Like the Google Backup method, these will allow you to transfer your apps from one Android device to another. Most of these options are available from the Google Play Store and sometimes preinstalled.
The best and most reliable are those offered by device manufacturers such as LG Mobile Switch, Huawei Backup, and Samsung Smart Switch. You can also find other third-party apps, but these have a mixed reputation, with users reporting they don’t work as well on certain devices.
Samsung Smart Switch, for instance, will let you transfer apps and your other content from one Samsung device to another. You can do this wirelessly or connect your devices together using a suitable USB cable.
Transferring from iPhone to Android
Android and iOS are two entirely different environments, so it isn’t possible to directly transfer your iPhone apps to an Android device. Many developers offer their apps across both platforms, however, and Google can look for any matching apps for you during the new device setup process.
When you begin setting up a new Android device, rather than choosing to transfer from a Google Drive backup, tap the option to transfer data from your iPhone and then follow the on-screen instructions.
![]()
Samsung device owners can also use the Smart Switch app, which offers its own “Download Matching Apps” option during the transfer process.
Источник
Android Basics : How to Disable Doze & App Standby for Individual Apps
Android Marshmallow introduced a pair of new battery-saving features called Doze and App Standby, and according to the general consensus, both features are a rousing success. Average battery life has increased dramatically for virtually every phone or tablet running Android 6.0, so there’s nothing to complain about here, right?
Unfortunately, there are a few drawbacks with the new system. By design, Doze cuts back on syncing after a certain amount of time, and App Standby effectively hibernates apps you haven’t used in a while. This has led to a lot of users complaining about missed notifications and broken functionality, so if you’re having issues, I’ll show you how to disable the features below.
Problems with Doze & App Standby
Recently, users have discovered that they’re missing notifications from Gmail, Inbox, Hangouts, and Google Opinion Rewards, just to name a few. Non-Google apps can also suffer from missed notifications with Doze & App Standby enabled, so if you’ve been experiencing syncing issues with a particular app, this guide’s for you.
On top of that, the always-listening feature in the new Nexus 5X and Nexus 6P seems to have issues when Doze & App Standby are enabled for the «OK Google Enrollment» app. After a period of time, the «OK Google» hotword detection will stop working when the screen is off, and since this was a big selling point for many users, you may want to follow these steps to fix it.
Disabling Doze & App Standby for Certain Apps
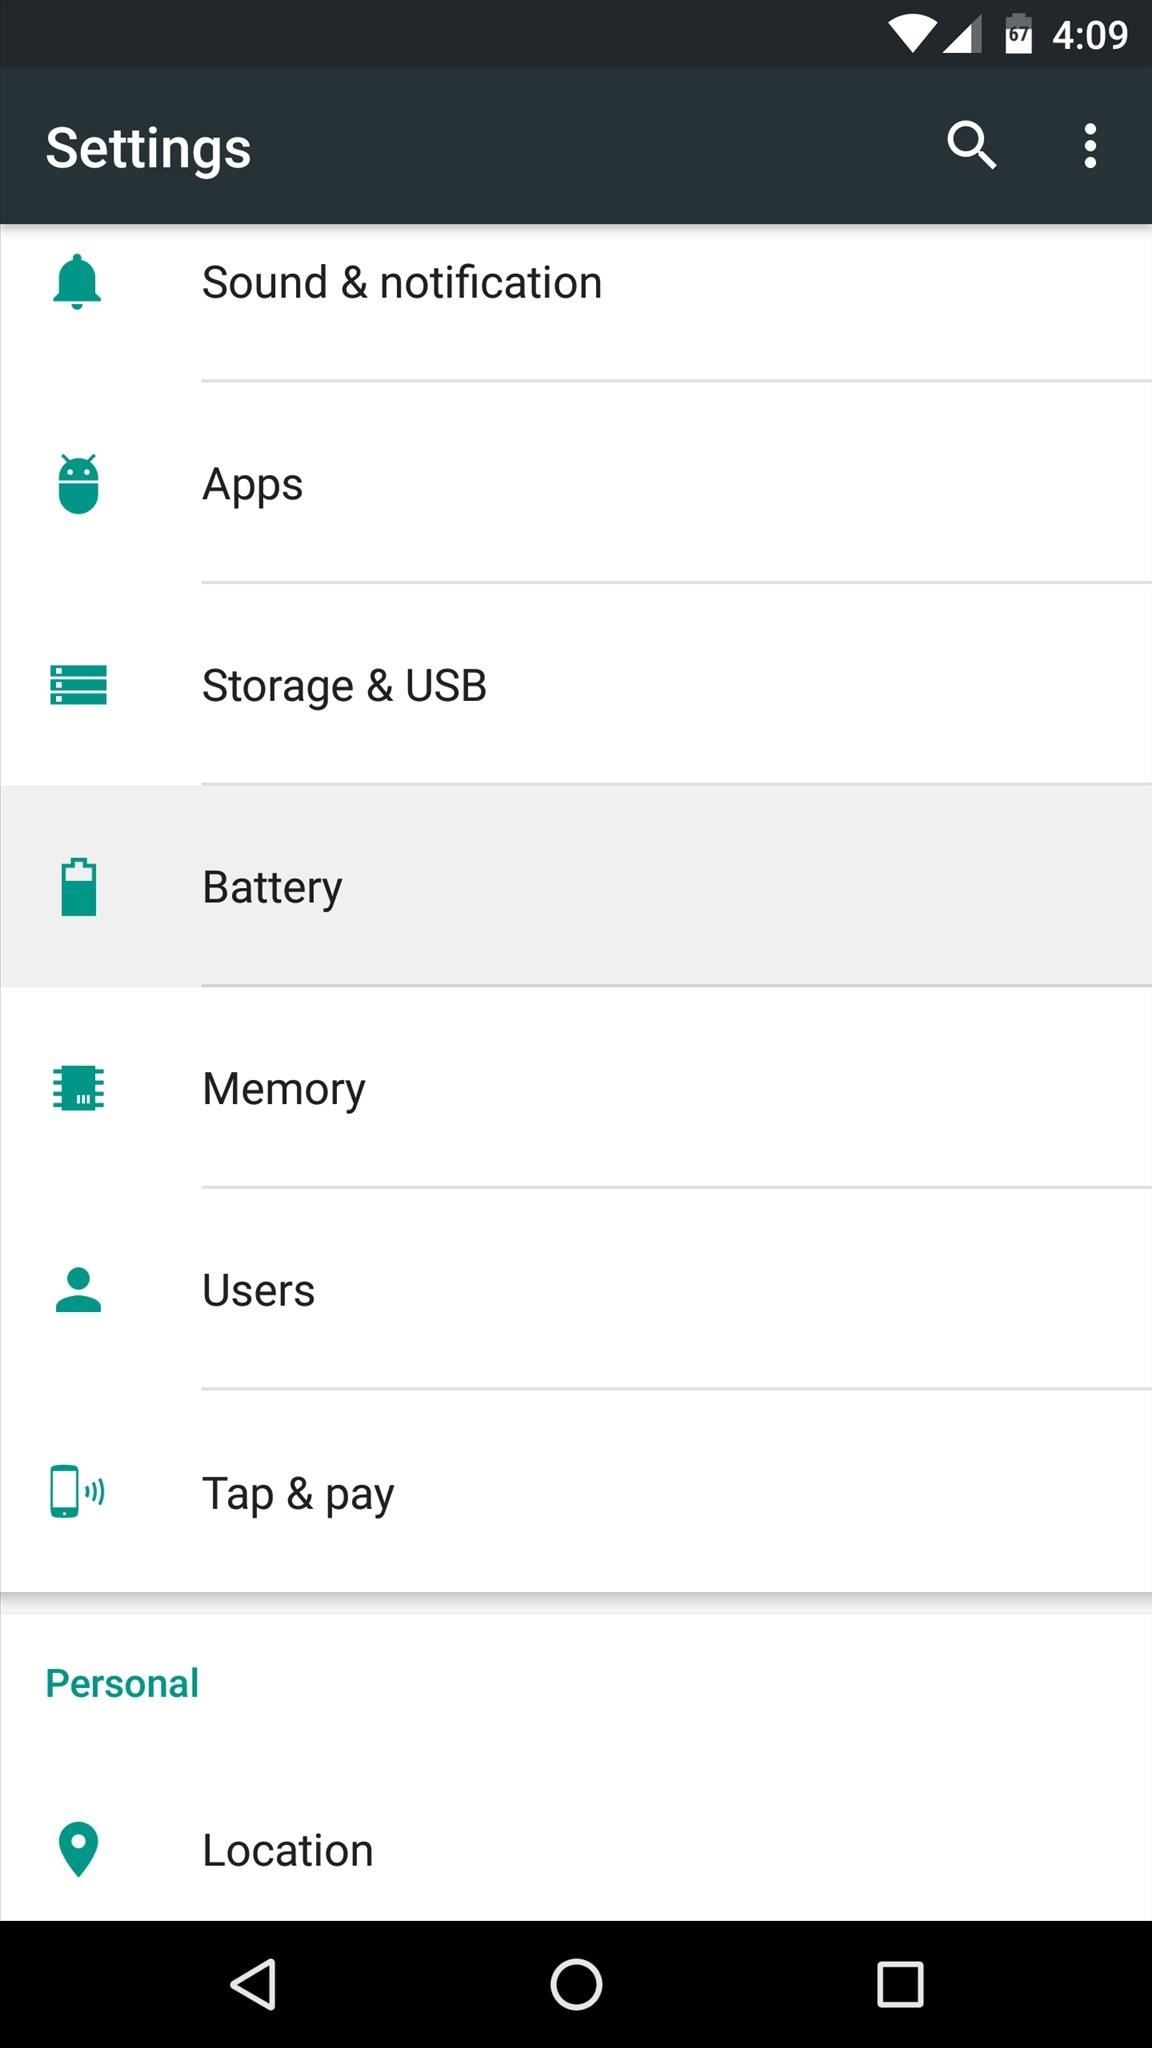
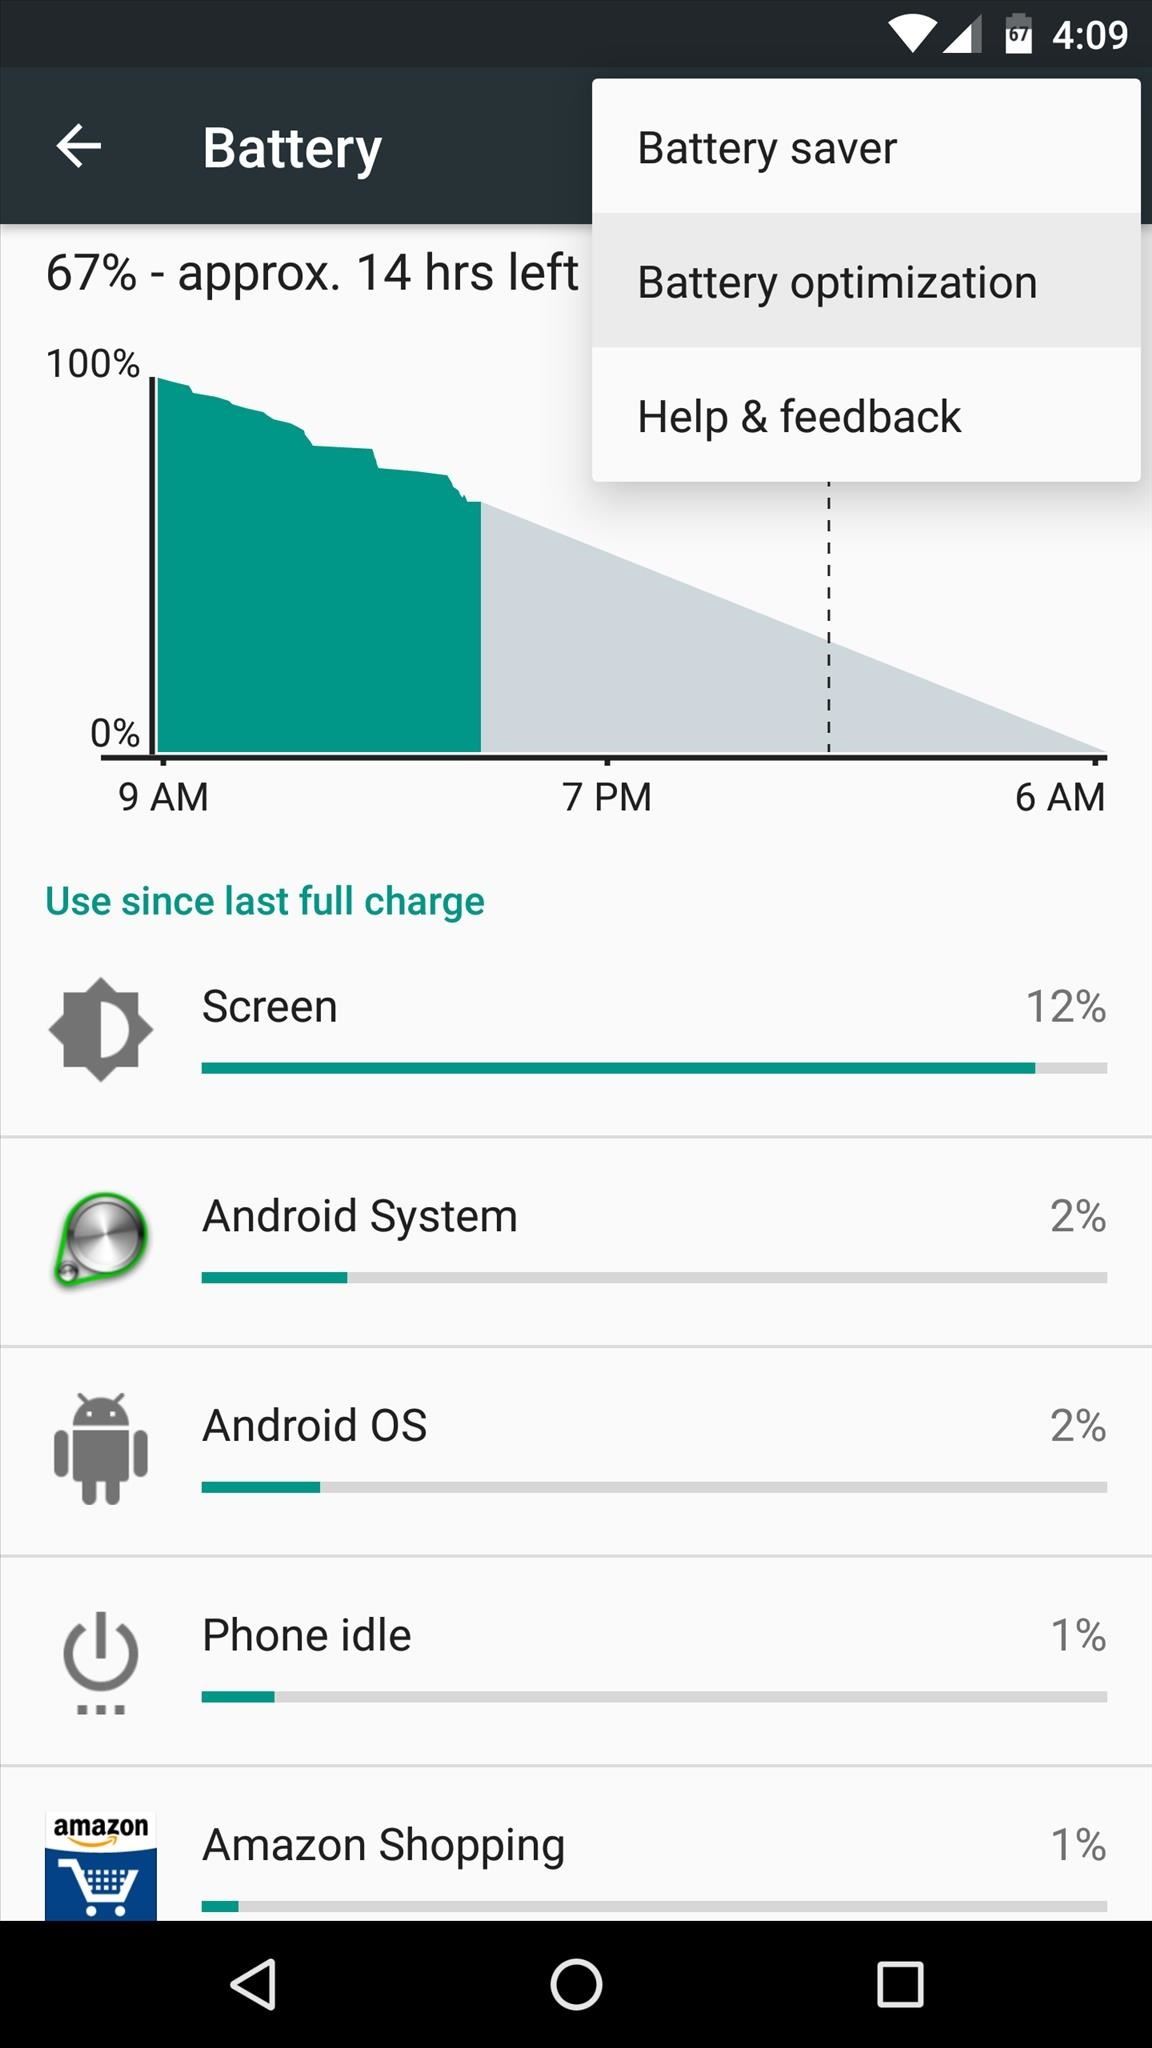
To resolve issues related to Doze & App Standby, start by heading to Android’s main Settings menu. From here, select the «Battery» option, then tap the three-dot menu button at the top of the screen and choose «Battery optimization.»
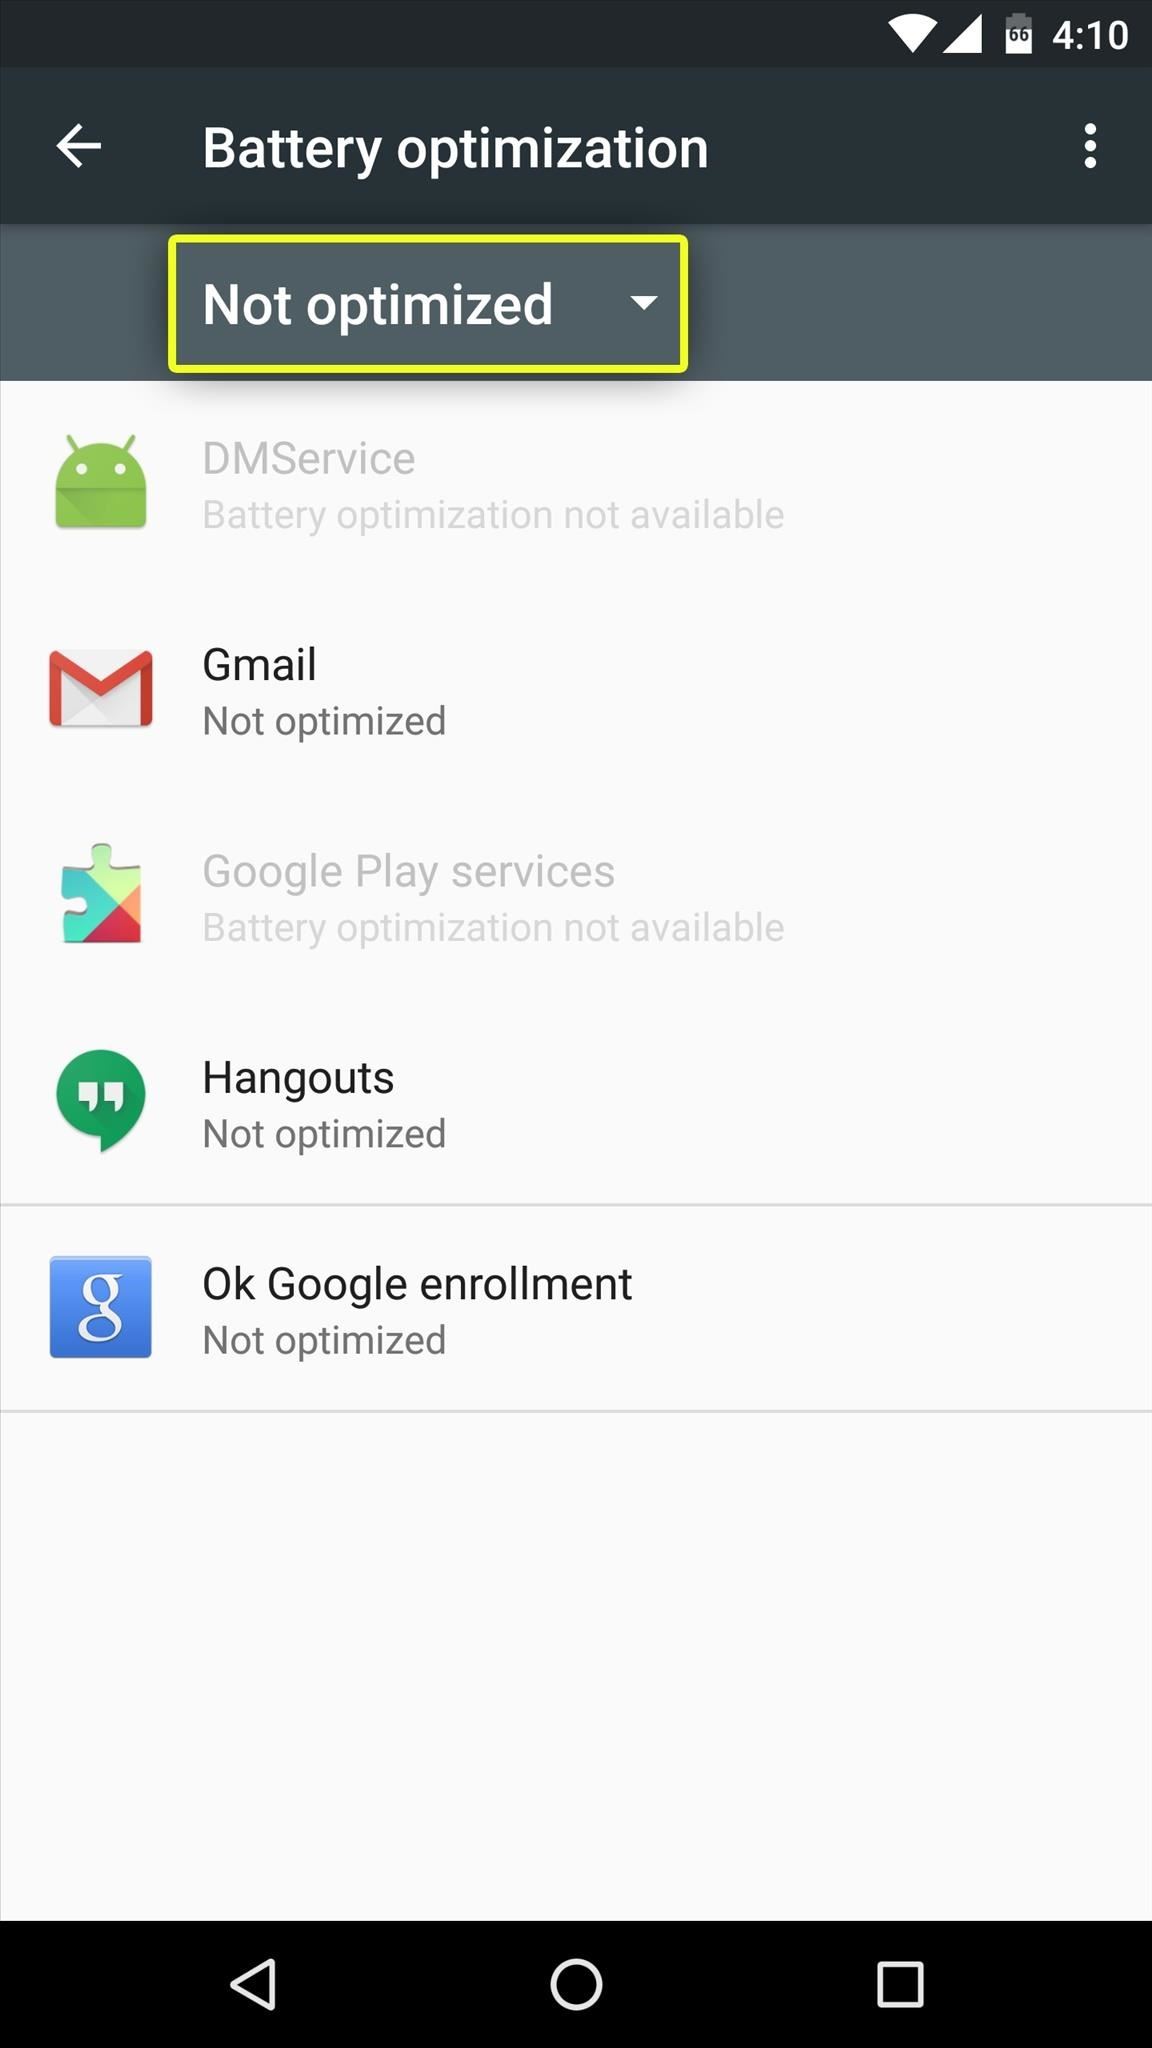
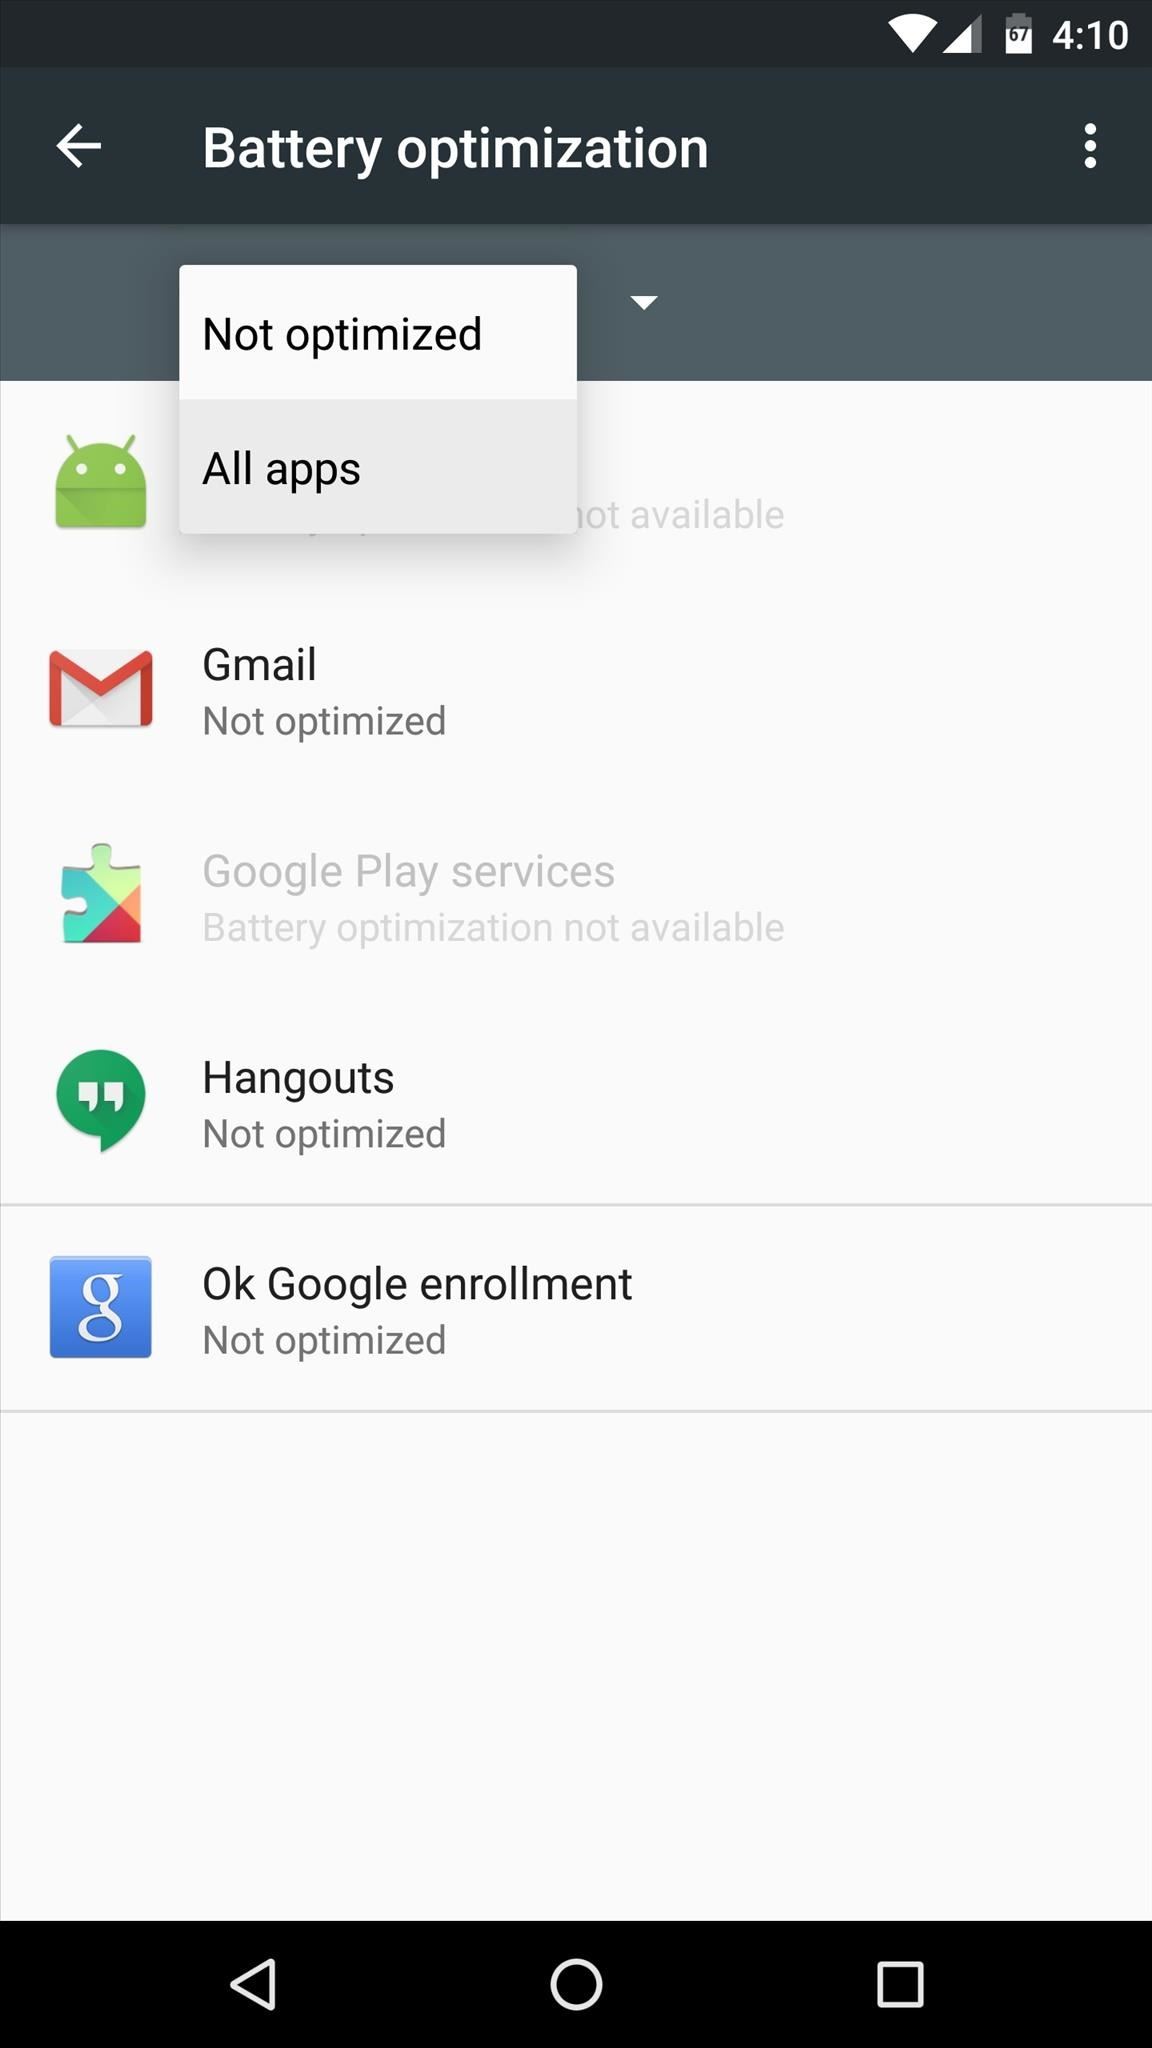
On the following screen, you’ll see a list of apps that have already been excluded from Doze & App Standby. Since you’re likely trying to exclude a different app, however, simply tap the drop-down menu at the top of the screen and select «All apps.»
At this point, you’ll see a list of all apps that are being affected by Doze & App Standby. From here, simply find the app you’re having troubles with and select it. Next, choose «Don’t optimize» on the popup, then press «Done.» From now on, Doze & App Standby will not affect this app, so your issues should be resolved.

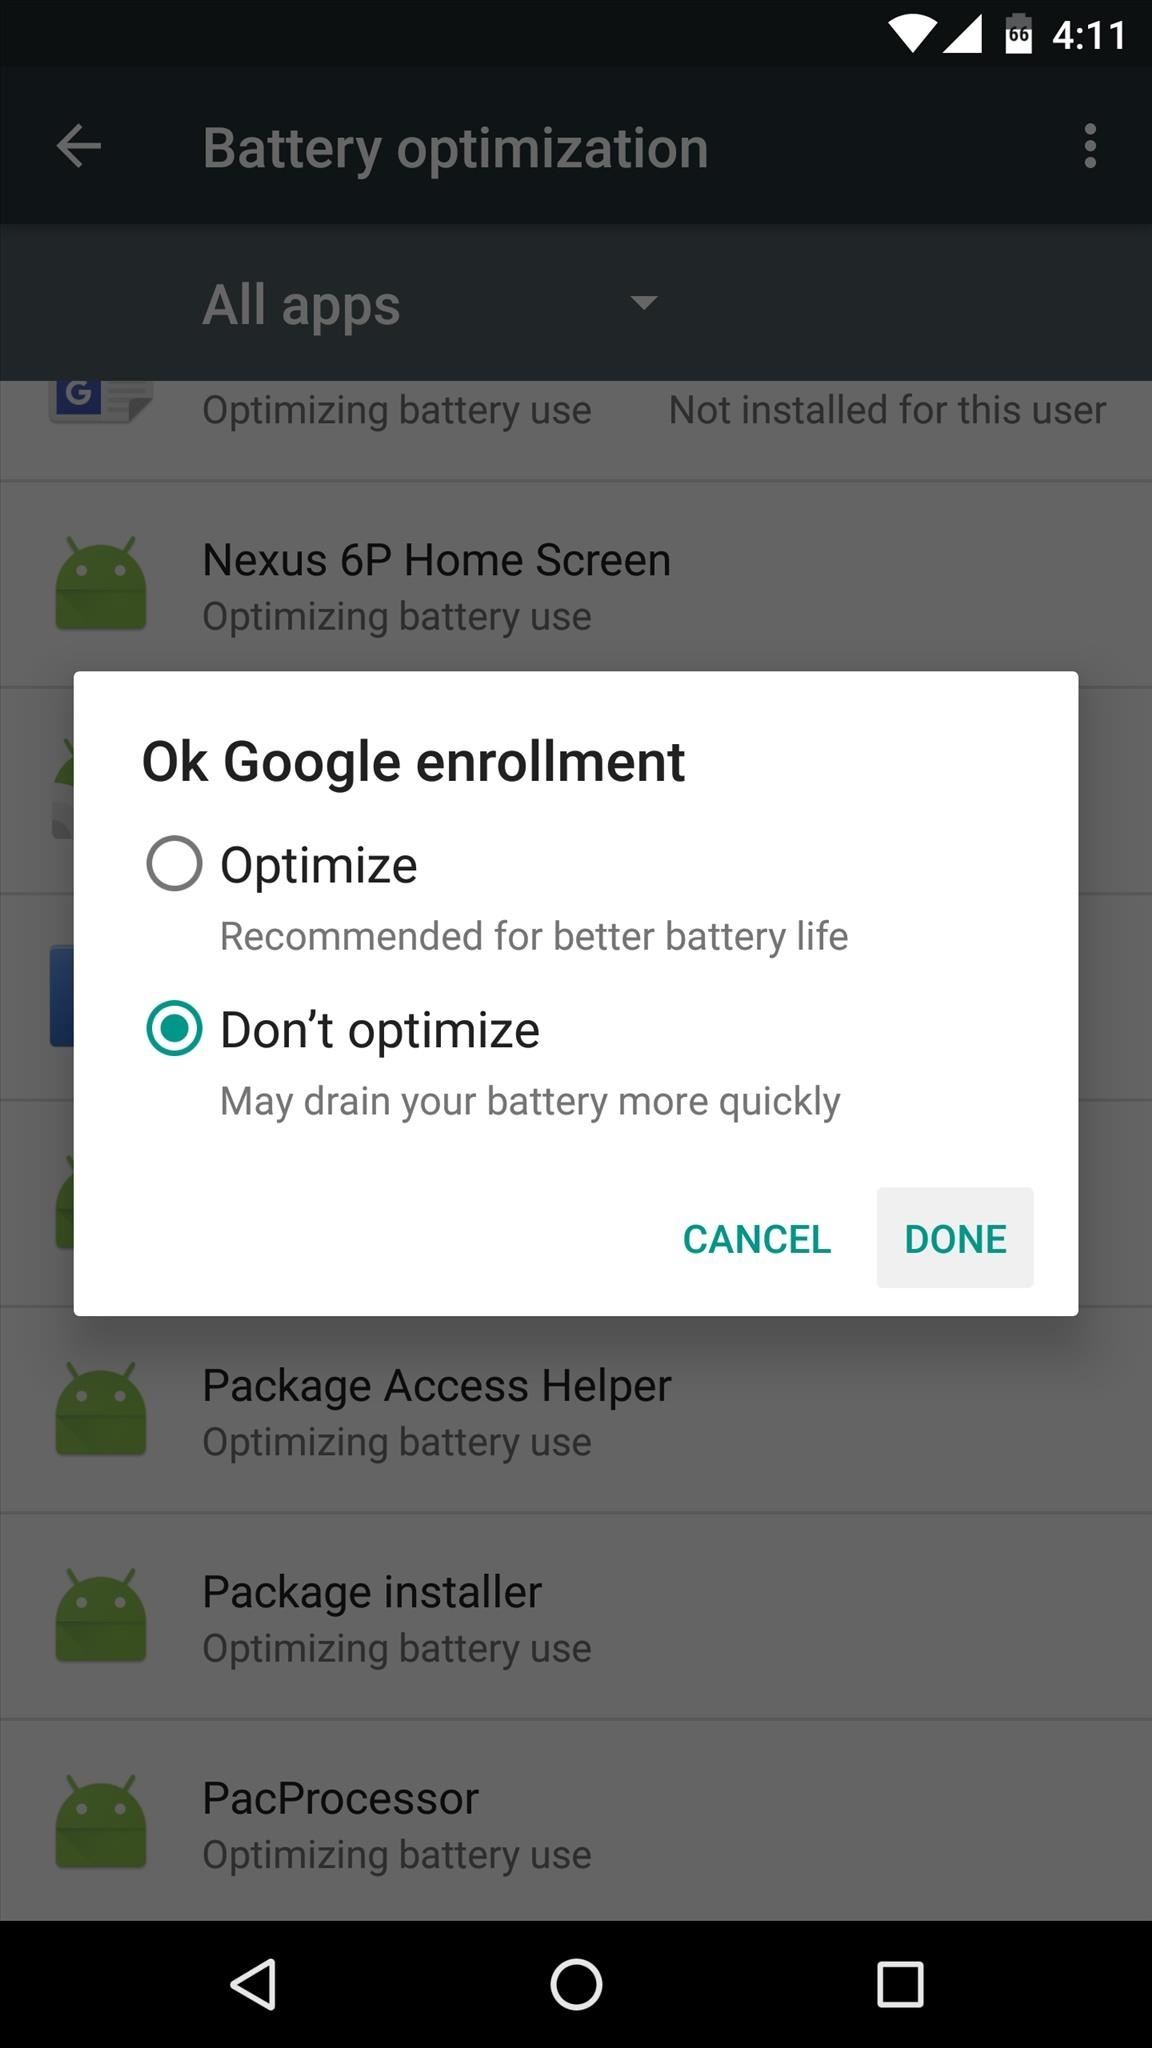
You can repeat this same process for any apps that seem to be having issues with delayed notifications. If you’re using a Nexus 5X or Nexus 6P and have been experiencing issues with the always-listening hotword detection, do the same for the «OK Google Enrollment» app, and the feature will be much more consistent. But be aware that doing this will cause a bit of extra battery drain, so try to refrain from disabling battery optimization for too many apps.
Follow Android Hacks on Facebook or Twitter, or Gadget Hacks on Facebook, Google+, or Twitter.
Keep Your Connection Secure Without a Monthly Bill. Get a lifetime subscription to VPN Unlimited for all your devices with a one-time purchase from the new Gadget Hacks Shop, and watch Hulu or Netflix without regional restrictions, increase security when browsing on public networks, and more.
Источник


