- Use Switch Control on your device to control another Apple device
- Use your iPhone, iPad, or iPod touch to control another device
- Use your Mac to control another device
- Stop controlling another device
- Stop controlling a Mac
- Stop controlling an iPhone, iPad, or iPod touch
- Turn off Switch Control
- Turn off Switch Control on an iPhone, iPad, or iPod touch
- Turn off Switch Control on a Mac
- Sync content between your Mac and iPhone or iPad over Wi-Fi
- Use Continuity to connect your Mac, iPhone, iPad, iPod touch, and Apple Watch
- Transfer photos and videos from your iPhone, iPad, or iPod touch
- Use iCloud Photos
- Import to your Mac
- Import to your Windows PC
- Use the Finder to share files between your Mac and your iPhone, iPad, iPod touch
- Other ways to share
- What you need to use the Finder to share files
- See the iOS and iPadOS apps that can share files with your Mac
- Copy from your Mac to your device
- Copy from your device to your Mac
- Open shared files
- Back up shared files
- Delete shared files from your device
Use Switch Control on your device to control another Apple device
With Use Other Devices for Switch Control, you can control your other Apple devices remotely on the same Wi-Fi network without adjusting any switch connections. This enables you to navigate your Mac or Apple TV with the same switch setup that you use to control your iPhone.
Use your iPhone, iPad, or iPod touch to control another device
- Connect your devices to the same Wi-Fi network.
- Sign in to iCloud with the same Apple ID on both devices.
- If you want to control a Mac, choose Apple menu > System Preferences on your computer.
- Select Accessibility. In the sidebar, choose Switch Control.
- Check the checkbox next to «Allow platform switching to control your computer.»
- If you haven’t already, turn on Switch Control on your iPhone, iPad, or iPod touch.
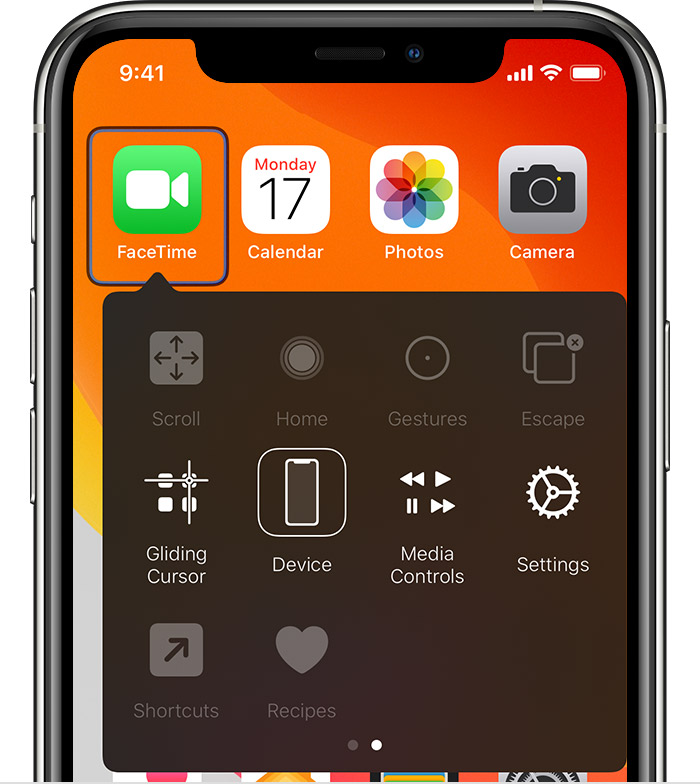
- Use your switch to navigate the Switch Control menu. Select Device.

- Select Use Other Device.
- Select the device that you want to control, then select Connect. Now you can use the switch connected to your iPhone, iPad, or iPod touch to control the other device.

Use your Mac to control another device
- Connect your devices to the same Wi-Fi network.
- Sign in to iCloud with the same Apple ID on both devices.
- If you haven’t already, turn on Switch Control on your Mac.
- Use your switch to navigate the Switch Control Home panel. Choose Devices.
- Select the device that you want to control, then select Connect. Now you can use the switch connected to your Mac to control the other device.

Stop controlling another device
To stop controlling another device, press and hold your switch for ten seconds. Your switch will control the original device again.
You can also follow these steps:
Stop controlling a Mac
- Use your switch to navigate the Switch Control Home panel. Choose Devices.
- Select Disconnect. Your switch will control the original device again.
Stop controlling an iPhone, iPad, or iPod touch
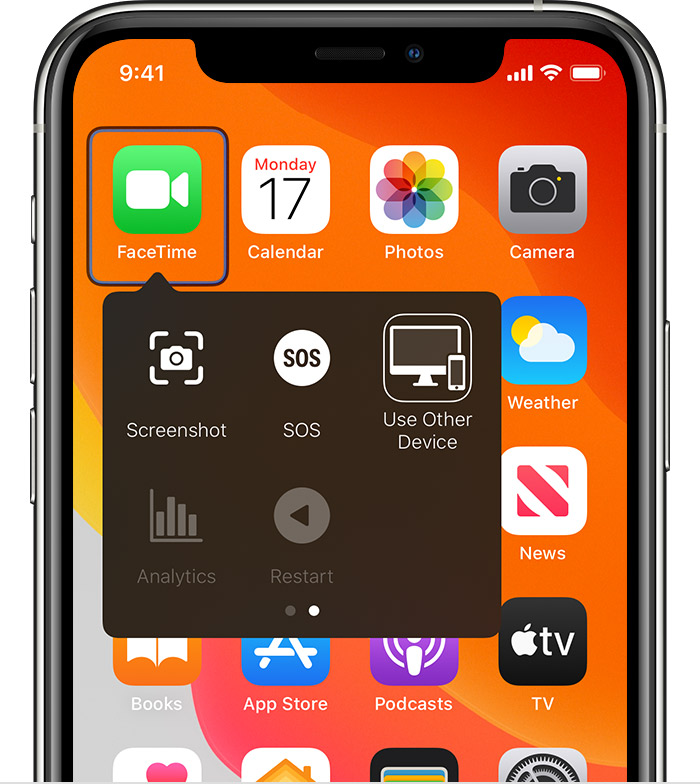
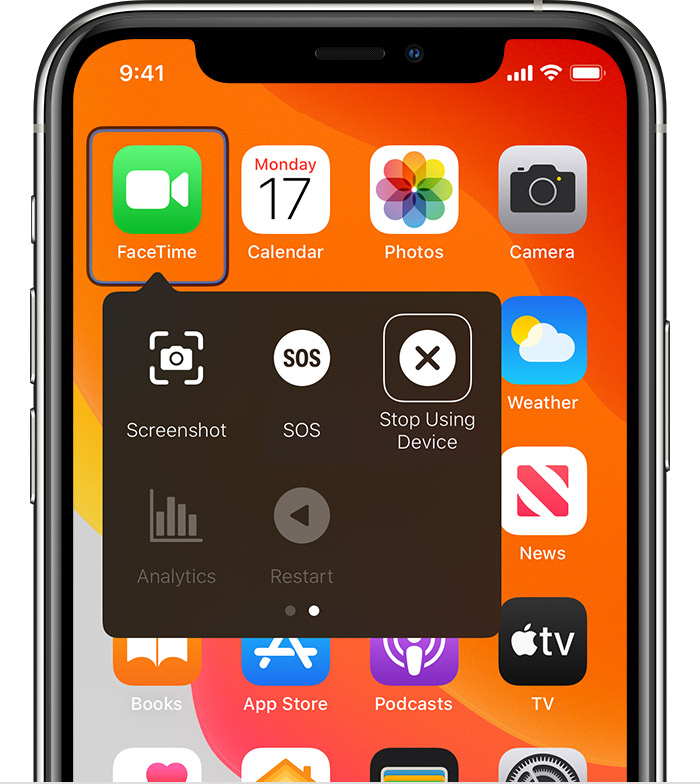
- Use your switch to navigate the Switch Control menu. Select Device.
- Select Stop Using Device. Your switch will control the original device again.
Turn off Switch Control
If you’d like to turn off Switch Control entirely, follow these steps for your device:
Turn off Switch Control on an iPhone, iPad, or iPod touch
Use your switch to navigate to Settings > Accessibility > Switch Control, and turn the setting off.
You can also triple-click the Home button or the Side button on certain models at any time to exit Switch Control.
Turn off Switch Control on a Mac
Use your switch to navigate to System Preferences > Accessibility > Switch Control, and deselect Enable Switch Control.
Источник
Sync content between your Mac and iPhone or iPad over Wi-Fi
You can sync your Mac and device when they’re connected over same Wi-Fi network. To set up Wi-Fi syncing, first connect your device to your Mac using a USB or USB-C cable. You then turn on Wi-Fi syncing and choose the settings you want. Whenever your device connects to your Mac over Wi-Fi, you can select it in the sidebar and sync it. (You can turn on automatic syncing if you want.) Your device must have iOS 5 or later or iPadOS 13 or later.
Connect your device to your Mac using a USB or USB-C cable.
In the Finder  on your Mac, select the device in the Finder sidebar.

If you connect your device to your Mac using a USB cable and can’t see the device in the Finder sidebar, see If your device doesn’t appear in the sidebar.
Click General in the button bar.

Select the “Show this [device] when on Wi-Fi” tickbox.

Use the button bar to turn on and select sync settings.
Whenever your device connects to your Mac, the device’s icon appears in the sidebar. Select the device in the Finder sidebar to view or change syncing options.
Important: If you can’t see your device in the sidebar, choose Finder > Preferences, then select the CDs, DVDs and iOS Devices tickbox.
You can choose to sync your Mac and your device automatically whenever you connect them. See Turn automatic syncing on or off on Mac.
Before disconnecting your device from your Mac, click the Eject button  in the Finder sidebar. The device icon disappears, but Wi-Fi syncing remains turned on. The icon reappears automatically the next time your Mac and device are connected to the same WI-Fi network.
Note: To restore your iPhone or iPad and revert it to its factory settings, you must connect the device to your Mac using a USB or USB-C cable.
Syncing over Wi-Fi is slower than syncing over a cable. If you connect a device to your Mac while the device is syncing over Wi-Fi, syncing continues over the cable. If you disconnect the device’s cable from the Mac while syncing, syncing stops even if Wi-Fi syncing is on. Syncing resumes when you reconnect the device using a cable or over Wi-Fi.
Источник
Use Continuity to connect your Mac, iPhone, iPad, iPod touch, and Apple Watch
When you sign in to your Apple ID on all of your devices, you can use Continuity features that make it seamless to move between your devices. Click a feature below to learn about it, such as how to automatically unlock your Mac when you’re wearing your Apple Watch or how to use your iPad to extend the workspace of your Mac.
AirDrop: Wirelessly send documents, photos, videos, websites, map locations, and more to a nearby iPhone, iPad, iPod touch, or Mac.
AirPlay to Mac: Share, play, or present content from another Apple device to the screen of your Mac.
Apple Pay: Shop online on your Mac and complete your purchase using Apple Pay on your iPhone or Apple Watch.
Auto Unlock: Get instant access to your Mac when wearing your Apple Watch, and quickly approve other requests to enter your Mac administrator password.
Continuity Camera: Use your iPhone, iPad, or iPod touch to scan documents or take a picture and have it appear instantly on your Mac.
Continuity Markup: Use your iPad, iPhone, or iPod touch to add sketches, shapes, and other markup to a Mac document, and see the changes live on your Mac.
Continuity Sketch: Create a sketch on your iPad, iPhone, or iPod touch, and easily insert it into a document on your Mac.
Handoff: Start work on one device, then switch to another nearby device and pick up where you left off.
Instant Hotspot: Connect to the Personal Hotspot on your iPhone or iPad (Wi-Fi + Cellular) from your Mac, iPad, iPod touch, or another iPhone, without entering a password.
iPhone Cellular Calls: Make and receive calls from your Mac, iPad, or iPod touch when those devices are on the same network as your iPhone.
Sidecar: Use your iPad as a second display that extends or mirrors your Mac desktop. Or use it as a tablet input device to draw with Apple Pencil in Mac apps.
Text Message Forwarding: Send and receive SMS and MMS messages from your iPhone on your Mac, iPad, and iPod touch.
Universal Clipboard: Copy content such as text, images, photos, and videos on one Apple device, then paste the content on another Apple device.
Information about products not manufactured by Apple, or independent websites not controlled or tested by Apple, is provided without recommendation or endorsement. Apple assumes no responsibility with regard to the selection, performance, or use of third-party websites or products. Apple makes no representations regarding third-party website accuracy or reliability. Contact the vendor for additional information.
Источник
Transfer photos and videos from your iPhone, iPad, or iPod touch
Learn how to transfer photos and videos from your iPhone, iPad, or iPod touch to your Mac or PC. You can also make your photos available on all your devices with iCloud Photos.
Use iCloud Photos
iCloud Photos keeps your photos and videos safe, up to date, and available automatically on all of your Apple devices, on iCloud.com, and even your PC. When you use iCloud Photos, you don’t need to import photos from one iCloud device to another. iCloud Photos always uploads and stores your original, full-resolution photos. You can keep full-resolution originals on each of your devices, or save space with device-optimized versions instead. Either way, you can download your originals whenever you need them. Any organizational changes or edits you make are always kept up to date across all your Apple devices. Learn how to set up and use iCloud Photos.
The photos and videos that you keep in iCloud Photos use your iCloud storage. Before you turn on iCloud Photos, make sure that you have enough space in iCloud to store your entire collection. You can see how much space you need and then upgrade your storage plan if necessary.
Import to your Mac
You can use the Photos app to import photos from your iPhone, iPad, or iPod touch to your Mac.
- Connect your iPhone, iPad, or iPod touch to your Mac with a USB cable.
- Open the Photos app on your computer.
- The Photos app shows an Import screen with all the photos and videos that are on your connected device. If the Import screen doesn’t automatically appear, click the device’s name in the Photos sidebar.
- If asked, unlock your iOS or iPadOS device using your passcode. If you see a prompt on your iOS or iPadOS device asking you to Trust This Computer, tap Trust to continue.
- Choose where you want to import your photos. Next to «Import to,» you can choose an existing album or create a new one.
- Select the photos you want to import and click Import Selected, or click Import All New Photos.
- Wait for the process to finish, then disconnect your device from your Mac.
Import to your Windows PC
You can import photos to your PC by connecting your device to your computer and using the Windows Photos app:
- Make sure that you have the latest version of iTunes on your PC. Importing photos to your PC requires iTunes 12.5.1 or later.
- Connect your iPhone, iPad, or iPod touch to your PC with a USB cable.
- If asked, unlock your iOS or iPadOS device using your passcode.
- If you see a prompt on your iOS or iPadOS device asking you to Trust This Computer, tap Trust or Allow to continue.
If you have iCloud Photos turned on, you need to download the original, full resolution versions of your photos to your iPhone before you import to your PC. Find out how.
When you import videos from your iOS or iPadOS device to your PC, some might be rotated incorrectly in the Windows Photos app. You can add these videos to iTunes to play them in the correct orientation.
If you’re having trouble importing photos from your iOS or iPadOS device to Windows 10, try these steps:
- On your iOS or iPadOS device, open the Settings app. Tap Camera, then tap Formats.
- Tap Most Compatible. From now on, your camera will create photos and videos in JPEG and H.264 formats.
Источник
Use the Finder to share files between your Mac and your iPhone, iPad, iPod touch
With macOS Catalina or later, you can use the Finder to share files between your iOS and iPadOS devices and your Mac.
Other ways to share
Learn about other ways you can share files between your Mac and your devices. These features work wirelessly.
iCloud Drive lets you securely access all of your documents from your iPhone, iPad, iPod touch, Mac, or PC. No matter which device you’re using, you’ll always have the most up-to-date documents when and where you need them.
With Handoff, you can start a document, email, or message on one device and pick up where you left off on another device. Handoff works with Apple apps such as Mail, Safari, Maps, Messages, Reminders, Calendar, Contacts, Pages, Numbers, and Keynote. It also works with some third-party apps.
AirDrop lets you instantly share your photos, videos, documents, and more with other Apple devices that are nearby.
What you need to use the Finder to share files
- macOS Catalina or later
- An iPhone, iPad, iPod touch with the latest version of iOS or iPadOS
- An iOS or iPadOS app that works with File Sharing
See the iOS and iPadOS apps that can share files with your Mac
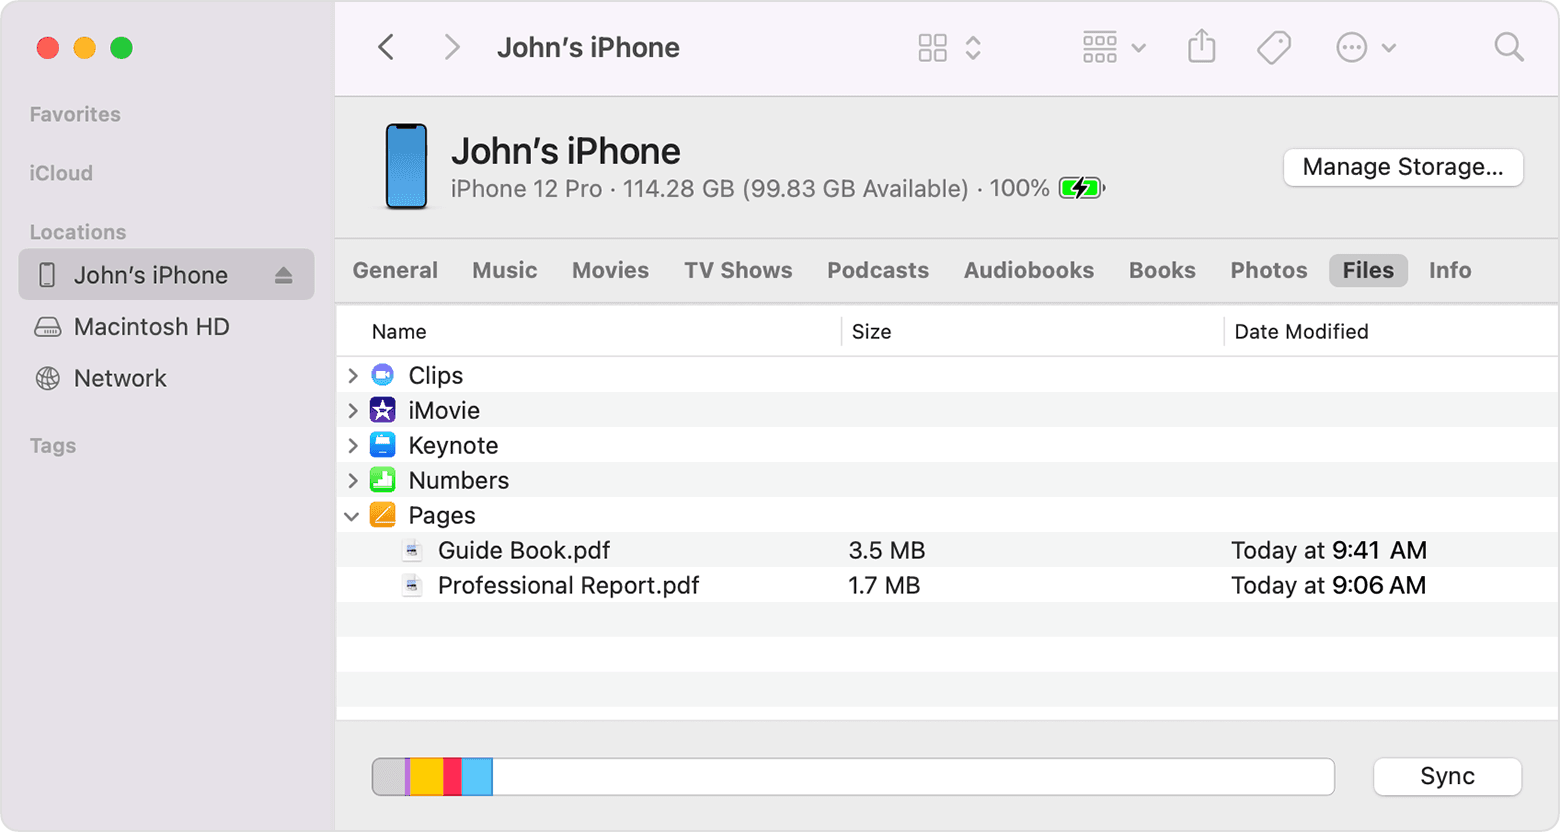
- Open a Finder window.
- Connect your iPhone, iPad, or iPod touch to your computer with a USB cable.
- Select your device in the Finder. Learn what to do if your computer doesn’t recognize your device.
- Click the Files tab to see a list of apps that can share files. If you don’t see a Files section, your device doesn’t have any apps that can share files.
- Click the triangle next to an app to see the files that you can share.
Copy from your Mac to your device
- Select the files that you want to copy. Select only files that work with the app. Check the app’s user guide to see which ones work.
- Drag the files to the app on your device. The Finder copies the files to your device.
Copy from your device to your Mac
- Select the files that you want to copy.
- Drag the files to a folder on your computer. The Finder copies the files to your computer.
Open shared files
On your iPhone, iPad, or iPod touch, use the app that you chose in the Files tab to open files that you shared from your computer.
Depending on the file type, some apps can’t open files in other apps or locations. You can see the list of files in the Files tab of the Finder when your device is connected to your computer.
Back up shared files
When iCloud or your computer backs up your device, it backs up your shared files as well.
If you delete an app with shared files from your iOS or iPadOS device, you also delete those shared files from your device and your iCloud or computer backup. To avoid losing shared files, copy the files to your computer before deleting the app from your device.
Delete shared files from your device
- Open a Finder window on your Mac.
- Connect your device to your computer using a USB cable.
- Select your device in the Finder. Learn what to do if your computer doesn’t recognize your device.
- Select the app from the list in the Files section.
- In the Documents list, select the file that you want to delete, then press the Delete key on your keyboard.
- When the Finder asks you to confirm, click Delete.
There might be other ways to delete files from an app. See the app’s user guide to find out more.
Источник


