- Как использовать устаревший HTTP-клиент Apache на Android Marshmallow?
- Проблема
- Вопрос
- ОТВЕТЫ
- Ответ 1
- Ответ 2
- Ответ 3
- Ответ 4
- Ответ 5
- Ответ 6
- Ответ 7
- Ответ 8
- Ответ 9
- Ответ 10
- Ответ 11
- Ответ 12
- Как добавить Apache HTTP API (устаревший) в качестве зависимости времени компиляции для build.grade для Android M?
- Xamarin.Forms Map Initialization and Configuration
- Map initialization
- Platform configuration
- Android
- Get a Google Maps API key
- Specify the Google Play services version number
- Specify the requirement for the Apache HTTP legacy library
- Specify the WRITE_EXTERNAL_STORAGE permission
- Specify location permissions
- Request runtime location permissions
- Universal Windows Platform
- Release builds
Как использовать устаревший HTTP-клиент Apache на Android Marshmallow?
В Android Marshmallow Google полностью удалил поддержку HTTP-клиента Apache (ссылка здесь), потому что это doesn Хорошая производительность по сравнению с альтернативами.
Это также может быть причиной того, что огромное количество приложений разбилось на Android Marshmallow.
Проблема
Google позволяет вам использовать этот API, а не как встроенный в него, добавив эту строку в файл gradle:
Итак, это то, что я сделал:
Когда я это пробовал, он скомпилировался отлично (никаких ошибок не показывалось, и я мог запускать приложение с доказательством концепции, так как у него нет специального кода), но когда я попытался использовать некоторые из классов, которые Я знаю, что это часть старого API (например, класса HttpClient), я вижу, что это не позволяет мне это делать.
Я знаю, что не рекомендуется использовать это решение, но мы должны иметь приложение, готовое работать там хотя бы временно, пока мы не будем работать на 100% на всех вещах, которые должны измениться для Android Marshmallow, и мы не хотим сюрпризы в виде сбоев.

Вопрос
Почему это происходит? Правильно ли я использовал его?
ИЗМЕНИТЬ: сообщите об этом здесь:
ОТВЕТЫ
Ответ 1
Android Studio жаловалась, что org.apache.http классы, такие как
Итак, я добавил org.apache.http.legacy.jar , который находится в Android/Sdk/platforms/android-23/optional с папкой app/libs
Я также добавил эту строку в мой app.gradle файл
Но если вы используете больше библиотек, вы можете использовать этот способ
Это устранило все мои ошибки, которые были вызваны тем, что Google удалил поддержку HTTP-клиента Apache.
Ответ 2
useLibrary ‘org.apache.http.legacy’ не работал у меня, пока я не обновил версию инструментов Gradle в моем основном файле build.gradle моего проекта Android Studio, как показано ниже:
Ответ 3
Отличное решение здесь, запустив простую проверку пути файла. запустив
Вы получите что-то вроде ниже
/Users/ «вашеимя» /Development/android -sdk-macosx/platforms/android-MNC/android.jar /Users/ «вашеимя» /Development/android -sdk-macosx/platforms/android-MNC/optional/org.apache.http.legacy.jar
Итак, вы идете, там есть банка. По какой-то причине это не добавилось в проект. но вы всегда можете добавить его вручную, я думаю.
Ответ 4
После многих неудачных часов работало:
1. Найдите банку apache. Он должен находиться где-то вроде:
2. Скопируйте org.apache.http.legacy.jar в папку libs.
Или щелкните правой кнопкой мыши на libs → paste или используйте файл-проводник, чтобы перейти в папку libs вашего проекта и вставить.
Если у вас нет папки libs, как и я, создайте новый проект и импортируйте все соответствующие файлы в соответствующие места.
3. Нажмите ok см. это
4. Самый важный шаг: щелкните правой кнопкой мыши папку apache и выберите Add As Library . см. это
Надеюсь, это поможет кому-то продолжить свою жизнь.
Ответ 5
Библиотека Legacy Apache, расположенная в
Итак, вы можете скопировать его внутри проекта libs или просто использовать
в /app/build.gradle
Ответ 6
Я знаю, что это глупая причина, но в списке попробуйте.
Недавно я столкнулся с этой проблемой, и это вызвано ограничением длины пути. Я думаю, что он имеет максимум 256 символов.
Переместите свой проект, и сборка будет успешной. Надейтесь на эту работу для вас.
Ответ 7
Сначала вы должны проверить, что в папке libs


Ответ 8
Ответ выше просто помогает запускать отладочные сборки и выпускает сборки, которые используют gradle.
Вставьте это внутри тега приложения в файл манифеста во всех экземплярах проекта, которые используют устаревшие классы apache:
Это помогает тем, кто все еще использует сценарии Eclipse и ant во время компиляции.
Ответ 9
Включить это в sdk/platform/android-23/optional/optional.json
Ответ 10
Простым способом решения этой проблемы является C:\Users\username\AppData\Local\Android\sdk\platform. Здесь удалите ваш android-23 и от менеджера SDK обновите свой API 23 снова. Это решит вашу проблему.
Ответ 11
из build.gradle, и я также добавил эту строку в мой файл app.gradle
Но если вы используете больше библиотек, вы можете использовать этот способ
Ответ CoPLaS устраняет мои проблемы.
Ответ 12
Как использовать устаревший HTTP-клиент Apache на Android Marshmallow?
Чтобы продолжить использование HTTP-классов Apache для API 23 +:
Источник
Как добавить Apache HTTP API (устаревший) в качестве зависимости времени компиляции для build.grade для Android M?
Как упоминалось здесь , Android M не будет поддерживать Apache HTTP API. В документации говорится:
вместо этого используйте класс HttpURLConnection.
Чтобы продолжить использование API-интерфейсов Apache HTTP, сначала необходимо объявить следующую зависимость времени компиляции в файле build.gradle:
Я преобразовал большую часть использования HttpClient в моем проекте в HttpURLConnection, однако мне все еще нужно использовать HttpClient в некоторых областях. Следовательно, я пытаюсь объявить org.apache.http.legacy как зависимость времени компиляции, но получаю сообщение об ошибке в build.gradle:
Метод Gradle DSL не найден: ‘useLibrary ()’
Мой вопрос: как мне объявить org.apache.http.legacy как зависимость времени компиляции в моем проекте?
Любая помощь очень ценится. Спасибо
Build.gradle верхнего уровня — /build.gradle
Специфичный для модуля build.gradle — /app/build.gradle
Другая альтернатива — просто добавить зависимость jbundle. Это больше подходит для Android Studio, поскольку Android Studio не выдает сообщение «не удается разрешить символ . »
Debug’. > Невозможно вычислить хэш /Users/ /Documents/
Примечание для Android 9 (Pie).
Дополнительно к useLibrary ‘org.apache.http.legacy’ вам необходимо добавить в AndroidManifest.xml:
В вашем файле build.gradle добавьте useLibrary ‘org.apache.http.legacy’ в соответствии с Android 6.0 Changes > Apache HTTP Client Removal примечаниями.
Чтобы избежать ошибок отсутствия ссылок, добавьте в зависимости
при использовании ‘при условии’ зависимость не будет включена в apk
Только что скопированный файл: org.apache.http.legacy.jar из Android/Sdk/platforms/android-23/optional папки в папку проекта app/libs .
Сработал шарм на 23.1.1.
Я решил эту проблему так:
1.) Установите путь к классам в файле сборки верхнего уровня, как указано в GUG:
2.) В файле сборки конкретного модуля:
Поскольку ответы немного устарели, я поставлю свое решение (которое сработало для меня), оно может быть полезно для кого-то еще . Я взял свое решение из официальной документации Apache, без обходного пути.
2 / в остальной части приложения замените на org.apache.http , cz.msebera.android.httpclient и весь ваш импорт (зависимости) будет исправлен. вы можете просто нажать ctrl + shift + R и заменить его во всем проекте.
это должно помочь:
Чтобы избежать ошибок отсутствия ссылок, добавьте в зависимости
FWIW удаление библиотеки Apache было предсказано некоторое время назад. Наш хороший друг Джесси Уилсон дал нам подсказку еще в 2011 году: http://android-developers.blogspot.com/2011/09/androids-http-clients.html
Google прекратил работу над ApacheHTTPClient некоторое время назад, поэтому любую библиотеку, которая до сих пор полагается на нее, следует включить в список устаревших библиотек, если сопровождающие не обновят свой код.
Я не могу сказать вам, сколько технических споров у меня было с людьми, которые настаивали на использовании HTTP-клиента Apache. Есть несколько крупных приложений, которые могут сломаться, потому что руководство моих предыдущих работодателей, которые я не называю, не слушало своих ведущих инженеров или не знало, о чем они говорили, когда игнорировало предупреждение . мост.
Я выигрываю.
Чтобы решить эту проблему, убедитесь, что вы используете инструменты сборки версии «23.0.0 rc2» со следующими инструментами построения зависимостей Gradle:
Источник
Xamarin.Forms Map Initialization and Configuration
The Map control uses the native map control on each platform. This provides a fast, familiar maps experience for users, but means that some configuration steps are needed to adhere to each platforms API requirements.
Map initialization
The Map control is provided by the Xamarin.Forms.Maps NuGet package, which should be added to every project in the solution.
After installing the Xamarin.Forms.Maps NuGet package, it must be initialized in each platform project.
On iOS, this should occur in AppDelegate.cs by invoking the Xamarin.FormsMaps.Init method after the Xamarin.Forms.Forms.Init method:
On Android, this should occur in MainActivity.cs by invoking the Xamarin.FormsMaps.Init method after the Xamarin.Forms.Forms.Init method:
On the Universal Windows Platform (UWP), this should occur in MainPage.xaml.cs by invoking the Xamarin.FormsMaps.Init method from the MainPage constructor:
For information about the authentication token required on UWP, see Universal Windows Platform.
Once the NuGet package has been added and the initialization method called inside each application, Xamarin.Forms.Maps APIs can be used in the shared code project.
Platform configuration
Additional configuration is required on Android and the Universal Windows Platform (UWP) before the map will display. In addition, on iOS, Android, and UWP, accessing the user’s location requires location permissions to have been granted to the application.
Displaying and interacting with a map on iOS doesn’t require any additional configuration. However, to access location services, you must set the following keys in Info.plist:
- iOS 11 and later
- NSLocationWhenInUseUsageDescription – for using location services when the application is in use
- NSLocationAlwaysAndWhenInUseUsageDescription – for using location services at all times
- iOS 10 and earlier
- NSLocationWhenInUseUsageDescription – for using location services when the application is in use
- NSLocationAlwaysUsageDescription – for using location services at all times
To support iOS 11 and earlier, you can include all three keys: NSLocationWhenInUseUsageDescription , NSLocationAlwaysAndWhenInUseUsageDescription , and NSLocationAlwaysUsageDescription .
The XML representation for these keys in Info.plist is shown below. You should update the string values to reflect how your application is using the location information:
The Info.plist entries can also be added in Source view while editing the Info.plist file:

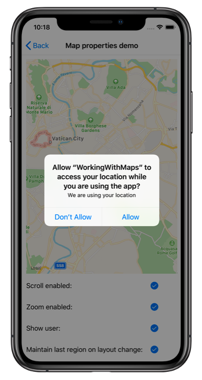
A prompt is then displayed when the application attempts to access the user’s location, requesting access:
Android
The configuration process for displaying and interacting with a map on Android is:
- Get a Google Maps API key and add it to the manifest.
- Specify the Google Play services version number in the manifest.
- Specify the requirement for Apache HTTP Legacy library in the manifest.
- [optional] Specify the WRITE_EXTERNAL_STORAGE permission in the manifest.
- [optional] Specify location permissions in the manifest.
- [optional] Request runtime location permissions in the MainActivity class.
For an example of a correctly configured manifest file, see AndroidManifest.xml from the sample application.
Get a Google Maps API key
To use the Google Maps API on Android you must generate an API key. To do this, follow the instructions in Obtaining a Google Maps API key.
This embeds the API key into the manifest. Without a valid API key the Map control will display a blank grid.
com.google.android.geo.API_KEY is the recommended metadata name for the API key. For backwards compatibility, the com.google.android.maps.v2.API_KEY metadata name can be used, but only allows authentication to the Android Maps API v2.
For your APK to access Google Maps, you must include SHA-1 fingerprints and package names for every keystore (debug and release) that you use to sign your APK. For example, if you use one computer for debug and another computer for generating the release APK, you should include the SHA-1 certificate fingerprint from the debug keystore of the first computer and the SHA-1 certificate fingerprint from the release keystore of the second computer. Also remember to edit the key credentials if the app’s Package Name changes. See Obtaining a Google Maps API key.
Specify the Google Play services version number
This embeds the version of Google Play services that the application was compiled with, into the manifest.
Specify the requirement for the Apache HTTP legacy library
If your Xamarin.Forms application targets API 28 or higher, you must add the following declaration within the element of AndroidManifest.xml:
This tells the application to use the Apache Http client library, which has been removed from the bootclasspath in Android 9.
Specify the WRITE_EXTERNAL_STORAGE permission
If your application targets API 22 or lower, it may be necessary to add the WRITE_EXTERNAL_STORAGE permission to the manifest, as a child of the element:
This is not required if your application targets API 23 or greater.
Specify location permissions
If your application needs to access the user’s location, you must request permission by adding the ACCESS_COARSE_LOCATION or ACCESS_FINE_LOCATION permissions to the manifest (or both), as a child of the element:
The ACCESS_COARSE_LOCATION permission allows the API to use WiFi or mobile data, or both, to determine the device’s location. The ACCESS_FINE_LOCATION permissions allows the API to use the Global Positioning System (GPS), WiFi, or mobile data to determine a precise a location as possible.
Alternatively, these permissions can be enabled by using the manifest editor to add the following permissions:
These are shown in the screenshot below:

Request runtime location permissions
If your application targets API 23 or later and needs to access the user’s location, it must check to see if it has the required permission at runtime, and request it if it does not have it. This can be accomplished as follows:
In the MainActivity class, add the following fields:
In the MainActivity class, add the following OnStart override:
Provided that the application is targeting API 23 or greater, this code performs a runtime permission check for the AccessFineLocation permission. If permission has not been granted, a permission request is made by calling the RequestPermissions method.
In the MainActivity class, add the following OnRequestPermissionsResult override:
This override handles the result of the permission request.
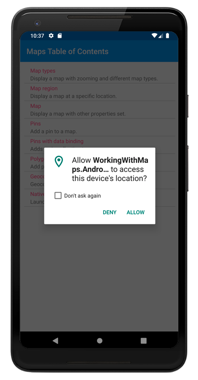
The overall effect of this code is that when the application requests the user’s location, the following dialog is displayed which requests permission:
Universal Windows Platform
On UWP, your application must be authenticated before it can display a map and consume map services. To authenticate your application, you must specify a maps authentication key. For more information, see Request a maps authentication key. The authentication token should then be specified in the FormsMaps.Init(«AUTHORIZATION_TOKEN») method call, to authenticate the application with Bing Maps.
On UWP, to use map services such as geocoding you must also set the MapService.ServiceToken property to the authentication key value. This can be accomplished with the following line of code: Windows.Services.Maps.MapService.ServiceToken = «INSERT_AUTH_TOKEN_HERE»; .
In addition, if your application needs to access the user’s location, you must enable the location capability in the package manifest. This can be accomplished as follows:
In Solution Explorer, double-click package.appxmanifest and select the Capabilities tab.
In the Capabilities list, check the box for Location. This add the location device capability to the package manifest file.
Release builds
UWP release builds use .NET native compilation to compile the application directly to native code. However, a consequence of this is that the renderer for the Map control on UWP may be linked out of the executable. This can be fixed by using a UWP-specific overload of the Forms.Init method in App.xaml.cs:
This code passes the assembly in which the Xamarin.Forms.Maps.UWP.MapRenderer class resides, to the Forms.Init method. This ensures that the assembly isn’t linked out of the executable by the .NET native compilation process.
Failure to do this will result in the Map control not appearing when running a release build.
Источник


