- Authorize or deauthorize your computer for iTunes Store purchases
- How to authorize a Mac or PC
- See your authorized computers
- Deauthorize a computer
- If you run out of authorizations, deauthorize all
- About authorizing other Apple devices
- Get help
- If your computer doesn’t recognize your iPhone, iPad, or iPod
- Additional steps for Mac
- Use iTunes to sync your iPhone, iPad, or iPod with your computer
- What you can sync with iTunes
- Sync or remove content using iTunes
- Sync your content using Wi-Fi
- Move your content to a new Mac
- Get ready
- Use Migration Assistant
- On your new Mac
- On your old Mac
- On your new Mac
- On your old Mac
- Download and use iTunes for Windows
- If you can’t access the Microsoft Store
- Explore iTunes for Windows
- Manually manage and sync your iPhone, iPad, or iPod touch
- Change settings and manage your account
Authorize or deauthorize your computer for iTunes Store purchases
Learn how to authorize your computer before you use it to sync or play content that you download from the iTunes Store.
When you authorize your Mac or PC, you give it permission to access your music, movies, and other content.
- You can authorize up to 5 computers, which means that you can play your content on 5 different computers.
- You can’t authorize a computer from another computer or from your iPhone, iPad, or iPod touch.
Before you sell or give away your computer or send it in for service, deauthorize your computer to remove its access to protected purchases. For other devices, learn how to see where you’re signed in or remove devices.
Store availability and features might vary by country or region.
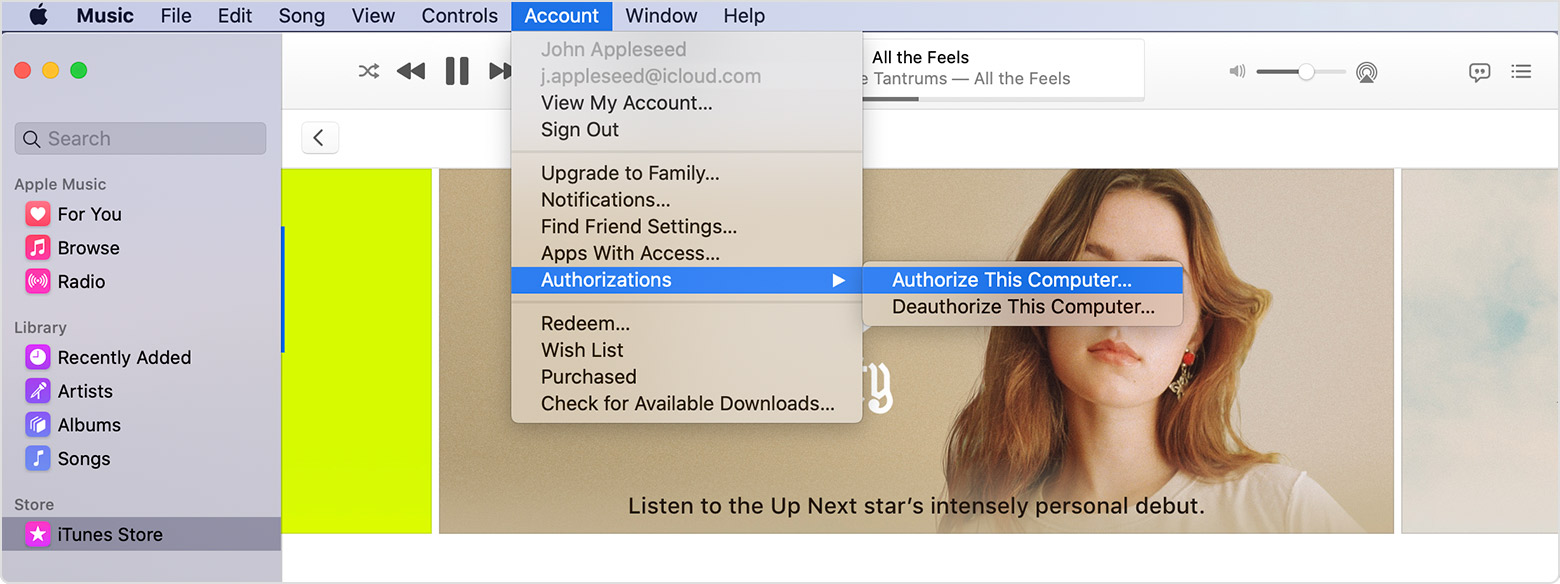
How to authorize a Mac or PC
- On a Mac, open the Music app, Apple TV app, or Apple Books app. On a PC, open iTunes for Windows.
- Sign in with your Apple ID.
- In the menu bar on your Mac or PC, choose Account > Authorizations > Authorize This Computer.
 If you’re asked to authorize your computer again, it won’t use a new authorization. Apple ID uses the same authorization for the same computer.
 If you’re asked to authorize your computer again, it won’t use a new authorization. Apple ID uses the same authorization for the same computer.
See your authorized computers
To automatically sign in to your Account Information page from your computer, click here. Or follow these steps:
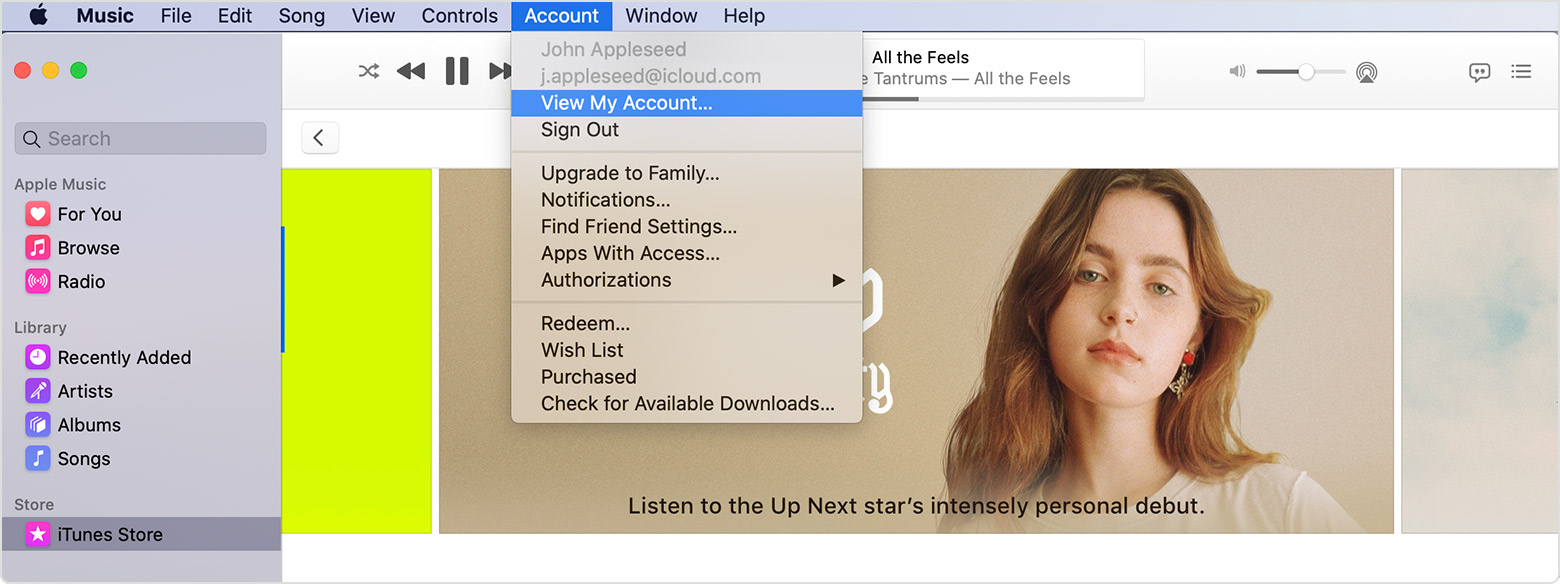
- On a Mac, open the Music app, Apple TV app, or Apple Books app. On a PC, open iTunes for Windows.
- Sign in with your Apple ID.
- In the menu bar on your Mac or PC, choose Account > View My Account.
- Sign in with your Apple ID.
- On the Account Information page, scroll to the Apple ID Summary section. You’ll see the number of computers that you’ve authorized with your Apple ID. You can’t see the names of those computers. If you haven’t authorized 2 or more computers, you won’t see this section.
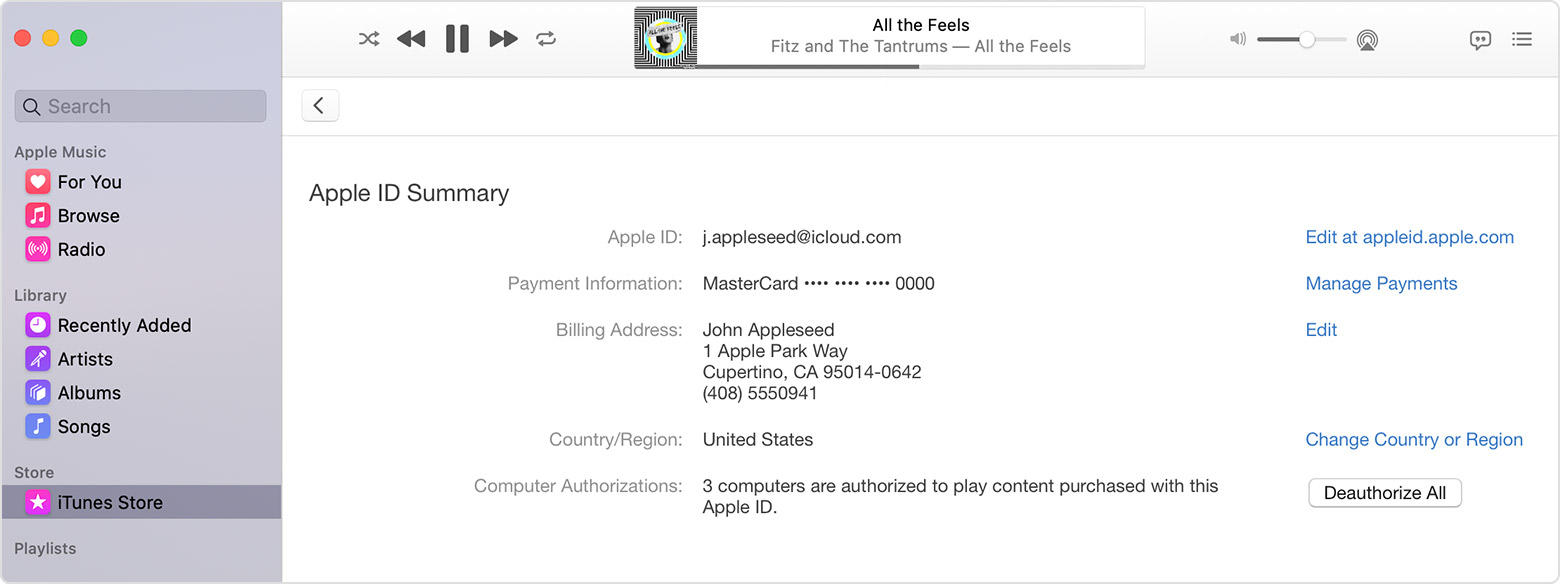
If the number of authorized computers listed is more than what you expect, you might not have deauthorized the computers that you no longer use, gave away, or sold. You need to deauthorize all of your computers and then authorize each one that you still use.
Deauthorize a computer
- On a Mac, open the Music app, Apple TV app, or Apple Books app. On a PC, open iTunes for Windows.
- From the menu bar at the top of your computer screen, choose Account > Authorizations > Deauthorize This Computer.
- Sign in with your Apple ID.
- Choose Deauthorize.
If you run out of authorizations, deauthorize all
If one of your 5 authorizations is on a computer that you don’t use anymore, deauthorize it. If you sold or gave away a computer that’s used one of your 5 authorizations, you need to choose Deauthorize All on the Account Information page. Then authorize each computer that you still use.
About authorizing other Apple devices
You don’t need to authorize your iPhone, iPad, iPod touch, or other Apple device. These devices don’t use your available authorizations. Learn how to check your Apple ID device list to see where you’re signed in and how to remove a device.
Get help
- Learn what to do if your computer keeps asking you to authorize when you try to play your content.
- You can deauthorize all computers once per year.
- If you don’t see Account in the menu bar at the top of your computer screen or the top of the Music app or iTunes window, check your Restrictions. You might have access to the iTunes Store turned off.
Store availability and features might vary by country or region.
Information about products not manufactured by Apple, or independent websites not controlled or tested by Apple, is provided without recommendation or endorsement. Apple assumes no responsibility with regard to the selection, performance, or use of third-party websites or products. Apple makes no representations regarding third-party website accuracy or reliability. Contact the vendor for additional information.
Источник
If your computer doesn’t recognize your iPhone, iPad, or iPod
If you connect your device to your computer with a USB cable and your computer doesn’t recognize your iPhone, iPad, or iPod, learn what to do.
If your computer doesn’t recognize your connected device, you might see an unknown error or a «0xE» error. Follow these steps and try to connect your device again after each step.
- Make sure that your iOS or iPadOS device is turned on, unlocked, and on the Home screen.
- Check that you have the latest software on your Mac or Windows PC. If you’re using iTunes, make sure you have the latest version.
- If you see a Trust this Computer alert, unlock your device and tap Trust. If you can’t unlock your device because you forgot your passcode, find out what to do.
- Unplug all USB accessories from your computer except for your device. Try each USB port to see if one works. Then try a different Apple USB cable.*
- Restart your computer.
- Restart your iPhone, iPad, or iPod touch.
- Follow these additional steps for your Mac or Windows PC.
- Try connecting your device to another computer. If you have the same issue on another computer, contact Apple Support.
Additional steps for Mac
- Connect your iOS or iPadOS device and make sure that it’s unlocked and on the Home screen.
- On your Mac, choose Finder > Preferences from the Finder menu bar, then click Sidebar at the top of the preferences window. Make sure that «CDs, DVDs and iOS Devices» is checked.
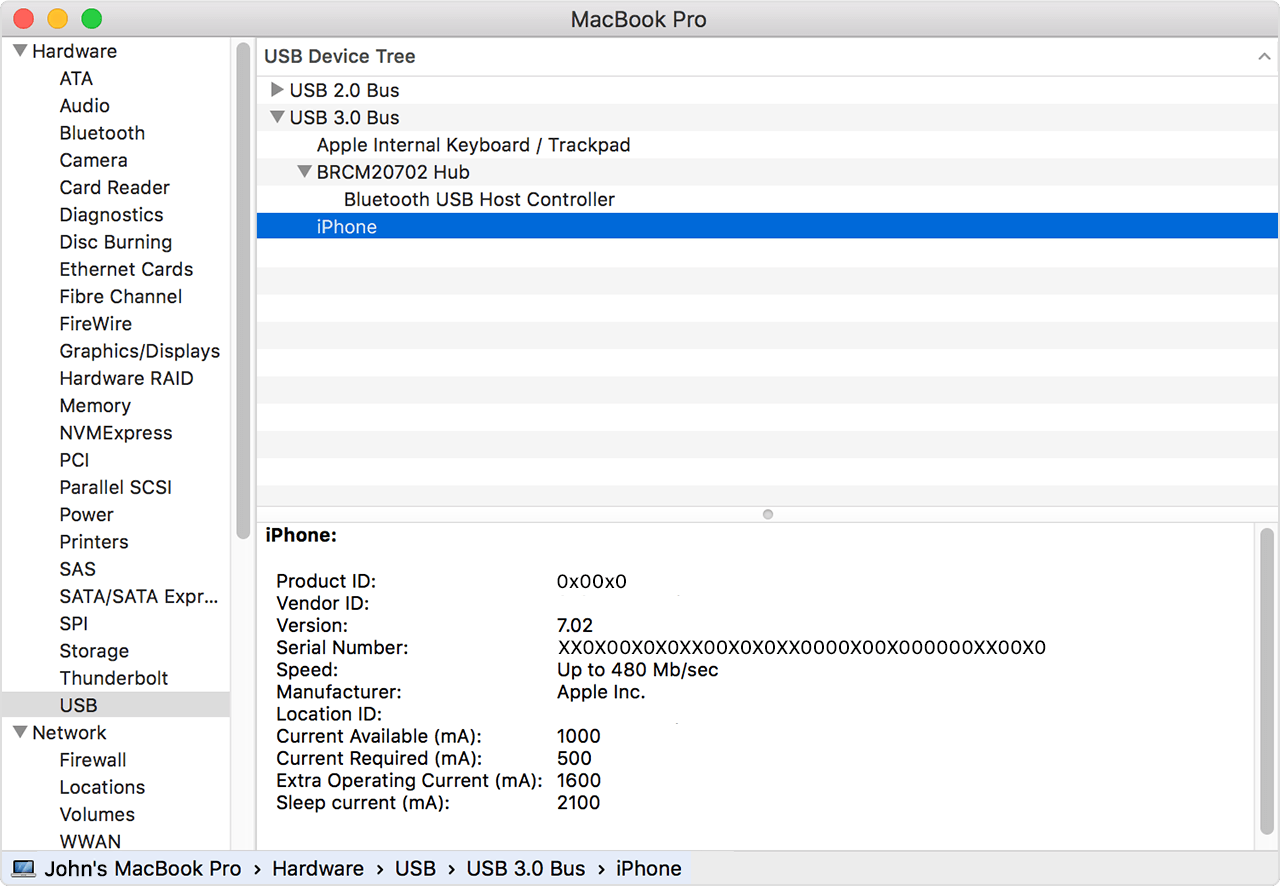
- Press and hold the Option key, then choose System Information from the Apple menu . From the list on the left, select USB.
- If you see your iPhone, iPad, or iPod under USB Device Tree, get the latest macOS or install the latest updates. If you don’t see your device or still need help, contact Apple Support.
Information about products not manufactured by Apple, or independent websites not controlled or tested by Apple, is provided without recommendation or endorsement. Apple assumes no responsibility with regard to the selection, performance, or use of third-party websites or products. Apple makes no representations regarding third-party website accuracy or reliability. Contact the vendor for additional information.
Источник
Use iTunes to sync your iPhone, iPad, or iPod with your computer
Learn how to sync music, movies, and more using iTunes on your Mac or PC.
If you’re using macOS Mojave or earlier or a Windows PC, use iTunes to sync content to your devices. Before you use iTunes to sync content to your iOS or iPadOS device, consider using iCloud, Apple Music, or similar services to keep content from your Mac or PC in the cloud. This way, you can access your music, photos, and more on your devices when you aren’t near your computer. Learn more about using Apple Music or iCloud Photos instead of iTunes.
If you use iCloud or other services like Apple Music to keep your content up-to-date across all of your devices, some syncing features through iTunes might be turned off.
What you can sync with iTunes
- Albums, songs, playlists, movies, TV shows, podcasts, and audiobooks.
- Photos and videos.
- Contacts and calendars.
iTunes features might vary by country or region.
Sync or remove content using iTunes
- Open iTunes and connect your device to your computer with a USB cable.
- Click the device icon in the upper-left corner of the iTunes window. Learn what to do if you don’t see the icon.
- From the list under Settings on the left side of the iTunes window, click the type of content that you want to sync or remove. * To turn syncing on for a content type, select the checkbox next to Sync.
- Select the checkbox next to each item that you want to sync.
- Click the Apply button in the lower-right corner of the window. If syncing doesn’t start automatically, click the Sync button.


* You can only sync your device with one iTunes library at a time. If you see a message that your device is synced with another iTunes library, your device was previously connected to another computer. If you click «Erase and Sync» in that message, all content of the selected type on your device will be erased and replaced with content from this computer.
Sync your content using Wi-Fi
After you set up syncing with iTunes using USB, you can set up iTunes to sync to your device with Wi-Fi instead of USB.
- Connect your device to your computer with a USB cable, then open iTunes and select your device. Learn what to do if your device doesn’t appear on your computer.
- Click Summary on the left side of the iTunes window.
- Select «Sync with this [device] over Wi-Fi.»
- Click Apply.
When the computer and the device are on the same Wi-Fi network, the device appears in iTunes. The device syncs automatically whenever it’s plugged in to power and iTunes is open on the computer.
Источник
Move your content to a new Mac
Use Migration Assistant to copy all of your documents, apps, user accounts, and settings to a new Mac from another computer.
Migration Assistant copies all of your files from your old Mac to your new Mac so that you don’t have to copy them manually.
- If your files are currently on a PC, follow the PC migration steps instead.
- If you’re moving content from a Time Machine backup, follow the steps to restore your Mac from a backup instead.
Get ready
- Install all available software updates on both computers. If your old Mac isn’t using OS X Lion or later, and your new Mac isn’t using OS X Mavericks or later, follow the Mountain Lion migration steps instead.
- If both computers are using macOS Sierra or later, place them near each other with Wi-Fi turned on. If either one is using OS X El Capitan or earlier, make sure that both are on the same network.
- On your old Mac, choose Apple menu > System Preferences, then click Sharing. Make sure that a name appears in the Computer Name field.
Use Migration Assistant
You’re now ready to use Migration Assistant to move your files from the old Mac to the new one.
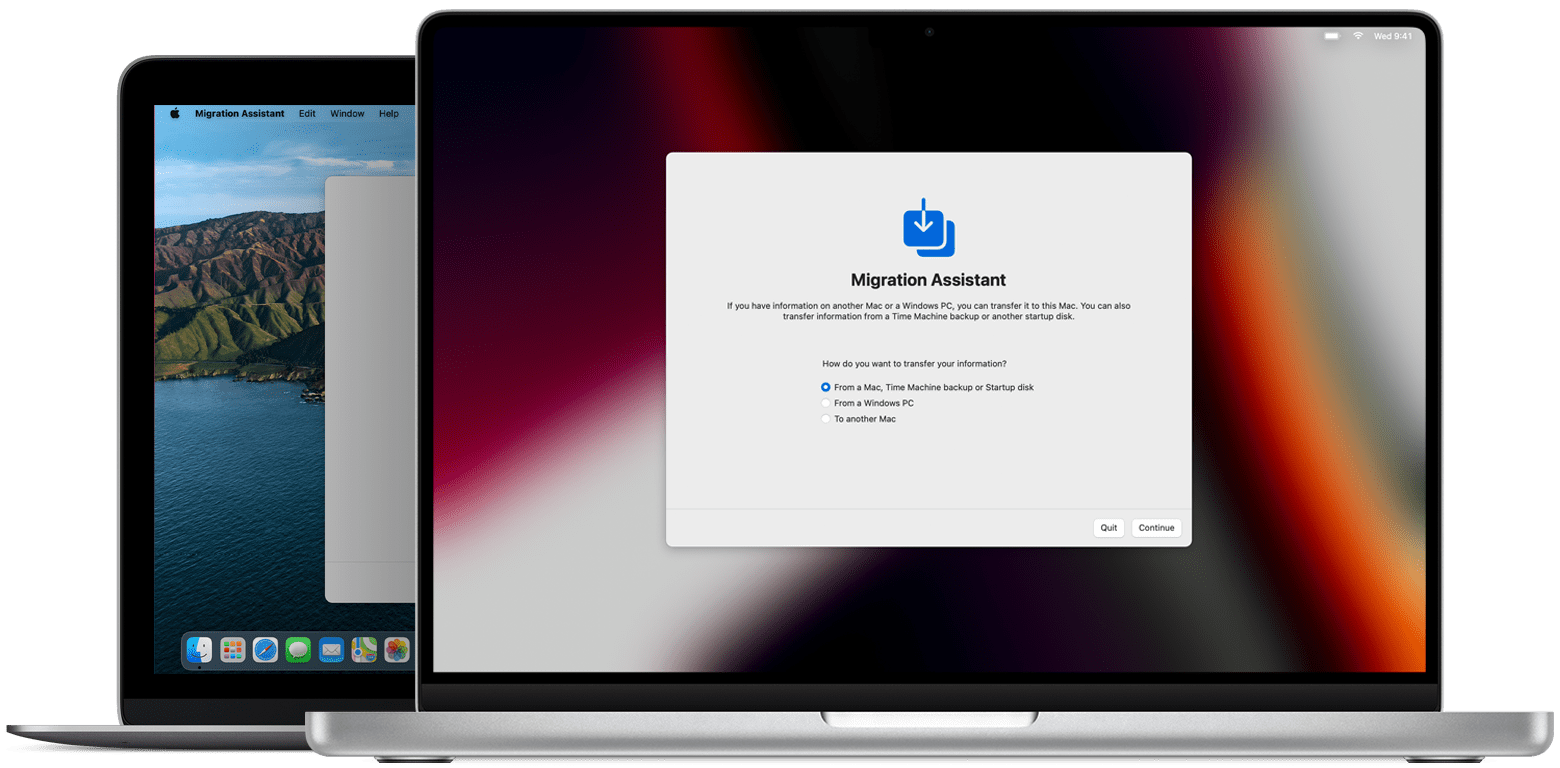
On your new Mac
- Open Migration Assistant, which is in the Utilities folder of your Applications folder. Then click Continue.
- When Migration Assistant asks you for permission to make changes, enter your administrator password, then click OK.
- When asked how you want to transfer your information, select the option to transfer from a Mac, Time Machine backup, or startup disk. Then click Continue.
On your old Mac
- Open Migration Assistant, then click Continue.
- When asked how you want to transfer your information, select the option to transfer to another Mac. Then click Continue.
On your new Mac
When asked to select a Mac, Time Machine backup, or other startup disk, select the other Mac. Then click Continue.
![]()
On your old Mac
If you see a security code, make sure that it’s the same code shown on your new Mac. Then click Continue.
Источник
Download and use iTunes for Windows
With iTunes for Windows, you can manage your entire media collection in one place. Subscribe to Apple Music to access millions of songs. Buy music and movies from the iTunes Store. And sync content from your computer to your iPhone, iPad, or iPod touch.
If you can’t access the Microsoft Store
![]()
Explore iTunes for Windows
To navigate iTunes, use the buttons in the navigation bar at the top of the iTunes window. To switch to a media type, like Music, Movies, TV Shows, Podcasts, or Audiobooks, click the pop-up menu in the upper-left corner.
Listen to music
Subscribe to Apple Music to access millions of songs, buy music from the iTunes Store, listen to Radio, or listen to music imported into iTunes.
Listen to Apple Podcasts
Discover and subscribe to podcasts that entertain, inform, and inspire. Browse free episodes and shows about a variety of topics.
![]()
Watch movies and TV shows
Browse categories to find movies and TV shows that you can buy, or find movies you can rent.
Listen to audiobooks
Browse categories to find audiobooks that you can buy.
Store availability and features might vary by country or region. See what you can buy in your country or region.
![]()
Manually manage and sync your iPhone, iPad, or iPod touch
You can use iTunes for Windows to back up and update your iPhone, iPad, or iPod touch, and to sync content from your computer to your device.
You can also use iCloud for Windows to access your photos, contacts, calendars, files, and more across all of your devices.
![]()
Change settings and manage your account
- Choose Account > View My Account to view information about your purchase history, manage your subscriptions, change your payment information, and more.
- Choose Account > Sign Out to sign out of iTunes with your Apple ID and remove access to your content from iTunes.
- Choose Edit > Preferences to change things like your language, set restrictions, and more.
If you change your language in iTunes, you might have to quit iTunes and reopen it.
Источник


