- Android — Animations
- Tween Animation
- Example
- Using animations in Android application — Tutorial
- 1. Android Animations
- 1.1. Using animations
- 1.2. Define the rate of change for an animation
- 1.3. Using animations with arbitrary properties
- 1.4. Layout animations
- 1.5. Animations for Activity transition
- 2. Android Basics
- 3. Exercise: Using the properties animations API
- 4. Activity animations in Android with shared views
- Simple Animations in Android
- Property Animations
- Animations Using ValueAnimator
- Animations Using ObjectAnimator
- Transitions
- Summary
Android — Animations
Animation is the process of creating motion and shape change
Animation in android is possible from many ways. In this chapter we will discuss one easy and widely used way of making animation called tweened animation.
Tween Animation
Tween Animation takes some parameters such as start value , end value, size , time duration , rotation angle e.t.c and perform the required animation on that object. It can be applied to any type of object. So in order to use this , android has provided us a class called Animation.
In order to perform animation in android , we are going to call a static function loadAnimation() of the class AnimationUtils. We are going to receive the result in an instance of Animation Object. Its syntax is as follows −
Note the second parameter. It is the name of the our animation xml file. You have to create a new folder called anim under res directory and make an xml file under anim folder.
This animation class has many useful functions which are listed below −
| Sr.No | Method & Description | |||||||||||||||||
|---|---|---|---|---|---|---|---|---|---|---|---|---|---|---|---|---|---|---|
| 1 |
| Steps | Description |
|---|---|
| 1 | You will use Android studio IDE to create an Android application and name it as My Application under a package com.example.sairamkrishna.myapplication. |
| 2 | Modify src/MainActivity.java file to add animation code |
| 3 | Modify layout XML file res/layout/activity_main.xml add any GUI component if required. |
| 4 | Create a new folder under res directory and call it anim. Confim it by visiting res/anim |
| 5 | Right click on anim and click on new and select Android XML file You have to create different files that are listed below. |
| 6 | Create files myanimation.xml,clockwise.xml,fade.xml,move.xml,blink.xml,slide.xml and add the XML code. |
| 7 | No need to change default string constants. Android studio takes care of default constants at values/string.xml. |
| 8 | Run the application and choose a running android device and install the application on it and verify the results. |
Here is the modified code of MainActivity.java.
Here is the modified code of res/layout/activity_main.xml.
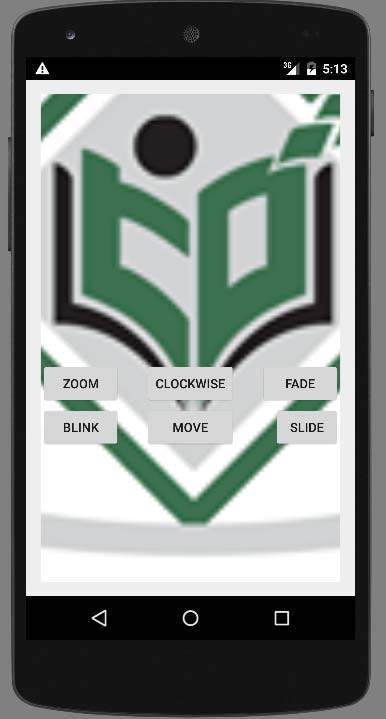
Here abc indicates about logo of tutorialspoint
Here is the code of res/anim/myanimation.xml.
Here is the code of res/anim/clockwise.xml.
Here is the code of res/anim/fade.xml.
Here is the code of res/anim/blink.xml.
Here is the code of res/anim/move.xml.
Here is the code of res/anim/slide.xml
Here is the modified code of res/values/string.xml.
Here is the default code of AndroidManifest.xml.
Let’s try to run your application. I assume you have connected your actual Android Mobile device with your computer. To run the app from Android studio, open one of your project’s activity files and click Run  icon from the toolbar. Android studio will display following images
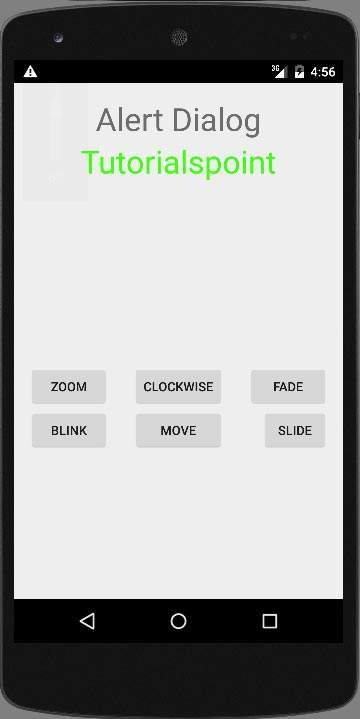
Select zoom button, it will display following screen −
Now select slide button, it will display following screen
Now select move button, it will display following screen
Now the clockwise button, it will display following screen
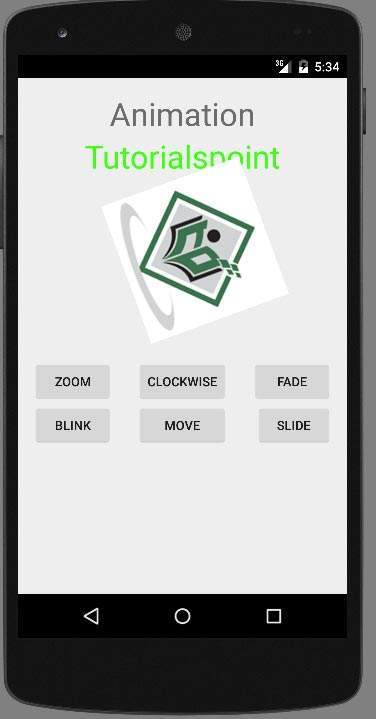
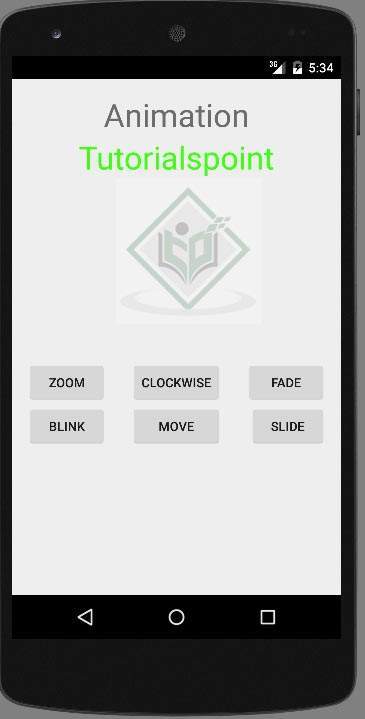
Now Fade button, it will display following screen
Note − If you run it in emulator , you may not experience smooth animation effect. You have to run it in your android mobile in order to experience the smooth animation.
Источник
Using animations in Android application — Tutorial
Android Property Animation API. This tutorial describes how to use the animation API in Android.
1. Android Animations
1.1. Using animations
Android allows changing object properties over a certain time interval via the properties animation API.
The superclass of the animation API is the Animator class. The ObjectAnimator class can be used to modify attributes of an object.
You can also add an AnimatorListener class to your Animator class. This listener is called in the different phases of the animation. You can use this listener to perform actions before or after a certain animation, e.g. add or remove a View from a ViewGroup .
The animate() method on a View object returns an ViewPropertyAnimator object for the view. It provides a fluent API to typical animations which can be performed on views.
The following code shows an example.
You can also register action, which are executed before the start or after the end of the animation.
1.2. Define the rate of change for an animation
Via the setInterpolator() method you register an TimeInterpolator object with an animation. It defines the rate of change for an animation.
The standard is linear. The Android platform defines a few default ones. For example, the AccelerateDecelerateInterpolator class defines that the animation starts and ends slowly but accelerates through the middle.
1.3. Using animations with arbitrary properties
The animation system cannot automatically understand every type. Via the setEvaluator method you can set an object of type TypeEvaluator . It allows creating animations for arbitrary types, by providing custom evaluators for these types.
1.4. Layout animations
The LayoutTransition class allows setting animations on a layout container and a change on the view hierarchy of this container will be animated.
1.5. Animations for Activity transition
Animations can be applied to Views but it is also possible to apply them on the transition between activities.
The ActivityOptions class allows defining defaults or customer animations.
2. Android Basics
The following description assumes that you have already basic knowledge in Android development.
Please check https://www.vogella.com/tutorials/Android/article.html — Android development tutorial, to learn the basics. Also see https://www.vogella.com/android.html — Android development tutorials, for more information about Android development.
3. Exercise: Using the properties animations API
This exercise demonstrates the usage of the Properties animation API.
Create a new Android project with the top level package name com.vogella.android.animation.views and an activity called AnimationExampleActivity. The layout file should be called activity_main.xml.
Change your layout file to the following code.
Create the following menu resource.
Change your activity similar to the following listing.
Create a new xml layout file called target like the following.
Create a new HitActivity activity.
If you run this example and press the different buttons, the animation should start. Via the toolbar, you can start your HitActivity .
4. Activity animations in Android with shared views
Android 5.0 adds the capability to animate between activities and to have shared views between these activity. If you define a shared part the old view with be animating into the position and size of the new view.
To test this create a project with the top level package called com.vogella.android.activityanimationwithsharedviews .
Create two activity with two different layout, both containing a ImageView with the same android:transitionName property.
Источник
Simple Animations in Android
Dec 14, 2018 · 9 min read
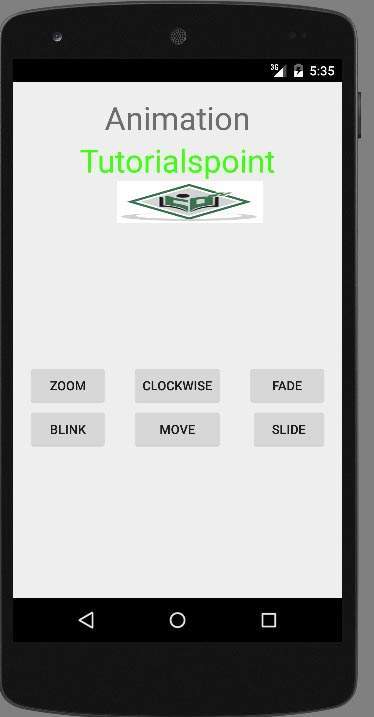
Animations in Android are a cool way to make your UI stand out and are also useful to notify users when the UI changes state. There are many different types of animations and can get very complicated, that is why this blog post is to help you start out with simple animations.
Android supports animations for both views and transitions between activities, however, the addition of transitions between activities is fairly new. There are three animation systems that work differently for different cases:
- Property Animations — This most popular type of animation, introduced in Android 3.0, is used to change the properties of an object. If you want to handle animation when you click a view, use Property Animations as they change the state as well as behavior.
- View Animations — Used to do simple animations like changing size, position, and rotation. They are easy to build but are slower and less flexible than Property Animations. The problem with View Animations is that, though the View state changes, its property still remains at the original position. Due to this, View Animations have been used less often since Property Animations were introduced.
- Transition Animations — This animation is the latest addition being introduced to Android 4.0 devices. The Transitions API framework enables layout changes within an activity. There are Transitions of a view, an Activity or a Fragment. Activity Transitions animates the transition as an activity enters the screen when an Intent is executed while Fragment Transitions animates the transition as a fragment enters or exits the screen when a transaction occurs.
Powered by these a nimation frameworks, there are two other types of animations that are lesser known and used:
- Layout Animations — This type of animation enables us to do animations on a ViewGroup such as a LinearLayout, a RelativeLayout or a ListView. Using the Transitions API, the animations to the view changes can be specified. For lower versions, layout animations can still be enabled, but there is no way to dictate how the transitions occur.
- Drawable Animations — Used to animate by displaying drawables in quick succession.
Property Animations
The primary motivation for the introduction of Property Animations was that before there could only be animations of Views with buttons, TextViews, LinearLayout etc. and you could only move, rotate, scale and fade a View. Thus, being able to animate properties of objects other than a View is what Property Animations do.
The table below shows the properties commonly animated on views in Property Animations:
The animation in Property Animations is done by ValueAnimator. This class keeps track of animation duration and start and end values of the property that it is animating. The image below shows the UML diagram of how this class interacts:
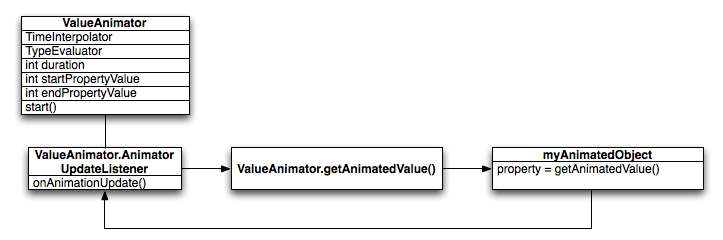
As seen above in the diagram, A ValueAnimator as two important properties TimeInterpolator and TypeEvaluator. A TimeInterpolater keeps track of the rate of change of an animation which allows animations to have non-linear motion. The different types of interpolators are:
- Accelerate Decelerate — The rate of change starts and ends slowly but accelerates through the middle.
- Accelerate — The rate of change starts out slowly and then accelerates.
- Anticipate — The change starts backward then flings forwards.
- Anticipate Overshoot — The change starts backward then flings forward and overshoots the target value and finally goes back to the final value.
- Bounce — The change bounces at the end.
- Decelerate — The rate of change starts out quickly and then decelerates.
- Fast Out Linear In — Corresponding to fast_out_linear_in in R.interpolator.
- Fast Out Slow In — Corresponding to fast_out_slow_in in R.interpolator.
- Linear — The rate of change is constant.
- Linear Out Slow In — Corresponding to linear_out_slow_in in R.interpolator.
- Overshoot — The change flings forward and overshoots the last value then comes back.
A TypeEvaluator is an interface that allows the creation of animations on arbitrary property types such as int, float, rgb, etc. or use a custom TypeEvaluator.
Animations Using ValueAnimator
ValueAnimator allows the developer to have more control over animations and customize them at each step of execution. In order to initiate ValueAnimator, you will need to call one of these methods: ofInt(), ofFloat(), or ofObject(). For example:
You can then change the state of the view by setting the duration, repeats, interpolator and other properties mentioned above which can be seen in the code below:

The same thing can be achieved using a resource file, in /res/animator/valueanimator, shown below:
You would then write in the Activity you want to animate:
Animations Using ObjectAnimator
The ObjectAnimator is a subclass of ValueAnimator and provides support for animating properties on target objects. The constructors of the ObjectAnimator take the object that is targeted that will be animated. It also takes in the name of the property that you want to perform on the object. Set and get methods can also be used to further animate the object and the animation will call these methods.
The code below shows an example of how an ObjectAnimator can be initialized and used to create a button that fades out when clicked on:

Properties supported by ObjectAnimation include ALPHA, ROTATION, ROTATION_X, SCLAE_X, SCALE_Y, TRANSLATION_X, TRANSLATION_Y, TRANSLATION_Z, X, Y, Z in order to improve performance on these animations. An example would be:
Using a different interpolator we can achieve this animation:

which can be done by:
The same thing as above can be written using a resource file, /res/animator/objectanimator/, as shown:
Then in your activity, you would connect the resource file and the animation as shown:
Starting from API 23, it is possible to use PropertyValuesHolder and Keyframe in resource files to create more complex animations. PropertyValuesHolders allows animators to animate several properties in conjunction with one another. Using Keyframes allows animations to follow more complex paths from the start to the end values. In addition, an optional interpolator can be specified. The interpolator will be applied on the interval between the keyframe that the interpolator is set on and the previous keyframe. When no interpolator is supplied, the default AccelerateDecelerateInterpolator, which increases the speed first and then decreases the speed, will be used.
Transitions
Transitions were introduced in Android KitKat with Scenes and Transitions APIs. This is all done with the Transition API which holds information about animations that will be run on its targets during a scene change. A Scene is the state of all views in the layout container. A Transition is the set of Animators that is applied to views in your specified Scene in order to perform smooth transitions from one scene to another. Transitions between Activities and Fragments was introduced to Android 5.0, it is a fairly new concept so I will be focusing on simple transitions on views. The diagram below shows how the transition framework creates an animation.

It is important that your API is at version 19 or higher or the Transition API will not work.
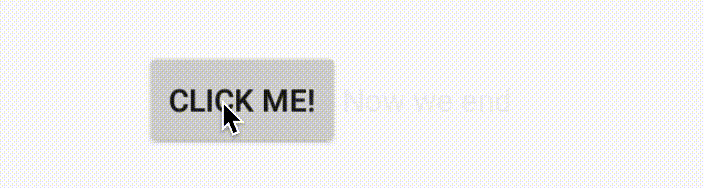
Take for example we want to a text to appear when we click a button:
We are setting the visibility of the TextView to gone because we do not want to see the text until the button is clicked on. Then in your activity, you would include:

As we did with ViewAnimator and ObjectAnimator, we can change the duration (setDuration(int)), interpolator (setInterpolator(TimeInterpolator)), and delay(setStartDelway(int)) of the transition.
There is a new package that allows you to implement more transitions to your views that are not in the Transition API from android. This package is called transitioneverywhere which can be implemented by first putting the following code in your grade file:
Then in your activities that were using the Transitions API, import android.transition.*, you want to replace this import with import com.transitionseverywhere.*. Transitions that can be used in this new package are:
- ChangeBounds — It animates changes to view position and size. In the example above, ChangeBounds moves the button depending on if the text is shown or not.
- Fade — It extends Visibility class and performs fade in and fade out. In the example above, it is what makes the TextView visible and not visible.
- TransitionSet — A Transition that is a set of another Transition. They can start together or sequentially, to change it call setOrdering().
- AutoTransition — A subclass of TransitionSet that creates a default transition that automatically fades, moves and resizes your views during a scene change.
- Slide — Like Fade transition, extends Visibility class. This allows a view during a scene slide in from one of the sides. For example, you can do Slide(Gravity.LEFT). This requires API 21 or higher to work. You would do to allow the text to slide from the left, assuming that your TextView visibility is initially set to gone:
- ChangeImageTransform — This will animate an image for a situation when scaleType of an ImageView is changed. In most cases, it is paired with ChangeBounds to animate position, size, and scaleType of the image.
- ChangeText — You can also change the text with a click of a button as shown below:
Summary
As seen animations in Android can be fairly easy and fun! This post only touches the surface of the possible animations and transitions that are possible in Android, however, this will allow you to start playing with animations. Look at the Android documentation on animations and the Transition API in order to do more complicated animations and even transitions between Activities.
Источник


