- Use rules to manage emails you receive in Mail on Mac
- Mail Support
- Mail Settings Lookup
- Incoming Mail Server
- Outgoing Mail Server
- Outgoing Mail Server (Mac OS)
- Incoming Mail Server
- Outgoing Mail Server (iOS)
- Featured topics
- Add an email account to your iOS device
- If your info on iCloud won’t sync
- Use emoji and symbols on your Mac
- About your Apple ID email addresses
- Email addresses you use with your Apple ID
- Apple ID email address
- Change your Apple ID email address
- Reset your Apple ID password
- Get a verification code
- Additional email addresses
- Add an additional email address
- Delete an additional email address
- Rescue email address
- Add or edit a rescue email address
- Delete a rescue email address
- Reset your security questions
- Learn more
- Add an email account to your iPhone, iPad, or iPod touch
- How to set up your email account automatically
- How to set up your email account manually
- Enter account settings manually
- Do more with Mail
- Организация электронной почты на компьютере Mac
- Организация сообщений по разговору
- Перемещение сообщений в почтовые ящики
- Создание нового почтового ящика для сообщений
- Перемещение сообщений в почтовый ящик
- Отмена подписки на списки рассылки
- Блокировка отправителей
- Назначение отправителям статуса VIP
- Метки сообщений
Use rules to manage emails you receive in Mail on Mac
You can create rules that help you manage incoming email messages and automate tasks, such as replying to or deleting messages. For example, you can create a rule that highlights messages from a specific person, or that automatically moves messages from your inbox to other mailboxes.
In the Mail app  on your Mac, choose Mail > Preferences, then click Rules.
To review an example of a rule, select a provided rule, then click Edit. To close the rule, click Cancel.
Click Add Rule, then type a name for the rule.
Indicate whether any or all of the conditions must be true for the rule to be applied to a message.
Specify the conditions.
To use different header fields in conditions, choose “Edit header list” from the bottom of the first pop-up menu. To add your own header, click the Add button  in the Message Headers window.
Choose actions to perform on messages that meet the conditions. To specify multiple actions, click the Add button  .
.
When you’re done, click OK, then decide to apply rules to existing messages already in mailboxes or to new messages.
You can apply rules to existing messages later by choosing Message > Apply Rules.
If you have multiple rules, they’re applied in the order in which they appear in the list of rules; drag a rule up or down to change the order.
Mail stops applying rules to a message when it encounters the Stop Evaluating Rules action, or when a message is transferred to another mailbox by rules used on a mail server or computer or device synced to your computer.
If you use iCloud Drive, your rules are available on your other Mac computers that have iCloud Drive turned on and Mail selected in in iCloud Drive options. Files attached to rules, such as sound files or scripts, aren’t available. See Use iCloud Drive to store documents.
Источник
Mail Support
Mail Settings Lookup
Need to verify your email settings? Simply enter your email address below and we will use it to provide your Mail settings.
Incoming Mail Server
Kerberos Version 5 (GSSAPI)
Authenticated POP (APOP)
Outgoing Mail Server
Outgoing Mail Server (Mac OS)
Kerberos Version 5 (GSSAPI)
Authenticated POP (APOP)
Incoming Mail Server
Kerberos Version 5 (GSSAPI)
Authenticated POP (APOP)
Outgoing Mail Server (iOS)
Kerberos Version 5 (GSSAPI)
Authenticated POP (APOP)
Note: Apple may collect and use your domain address (i.e. yahoo.com, gmail.com, etc.) for purposes of improving our products and services. Otherwise, your full email address will not be stored and will not be used by Apple or shared with any other entities.
Featured topics
How-to and troubleshooting tips to get the most out of the Mail app
Add an email account to your iOS device
There are two ways you can set up an email account in the Mail app on your iPhone, iPad, or iPod touch — automatically or manually. Learn which option is best for you.
If your info on iCloud won’t sync
Learn what to do if you need help. For example, the changes you made to Contacts, Calendars, or Reminders on one device didn’t appear on all of your devices.

Use emoji and symbols on your Mac
macOS includes features that make it easy to find and type special characters like emoji, accents, and currency symbols.
Источник
About your Apple ID email addresses
Learn how to add, change, or delete the different types of email addresses that you can use with your Apple ID account.
Email addresses you use with your Apple ID
Your Apple ID uses email addresses to sign you in to your account with Apple. With your Apple ID, you can access services like the App Store, Apple Music, iCloud, iMessage, FaceTime, and more. We use your email addresses to send you information about your account, and to help friends and family communicate and share with you.
Apple ID email address
In most cases, your Apple ID is also the primary email address of your Apple ID account.
Additional email addresses
Add extra email addresses to your account to help people find you on Apple services like FaceTime, iMessage, and Find My.
Rescue email address
Most people have a notification email address instead of a rescue email address. Apple uses this to send you important account and security related information. If you don’t use two-factor authentication or two-step verification (learn how to check what security method you use), you have the option to add a rescue email address to your account for more security. You can see it when you sign in to your Apple ID account page.
Before you can use a new or updated Apple ID, we’ll send you a verification email to make sure that the email address belongs to you.

Apple ID email address
When you create an Apple ID, you enter an email address. This email address is your Apple ID and the username that you use to sign in to Apple services like Apple Music and iCloud. It’s also the contact email address for your account. Be sure to check your email address regularly. We’ll send you email notifications to help you manage your account and make the most of your Apple ID.
Change your Apple ID email address
Reset your Apple ID password
If you know your current Apple ID password and want to change it, follow these steps on your iPhone, iPad, iPod touch, or Mac. If you’ve forgotten your Apple ID password and need to reset it, follow these steps.*
Get a verification code
With two-factor authentication, you’ll need a verification code to sign in with your Apple ID on a new device or browser. Learn how to get and use the code on a trusted device, or get a text or phone call.
* If you use two-factor authentication, in some cases you might be able to speed up the account recovery process or reset your password immediately by verifying a six-digit code sent to your primary email address.
Additional email addresses
Many of us have more than one email address that friends and family use to reach us. Add an email address that you commonly use to your Apple ID account, so people can easily find and communicate with you on Apple services like FaceTime, iMessage, Shared Albums, iWork collaboration, and Find My.
Add an additional email address
- Sign in to your Apple ID account page.
- Click Edit in the Account section.
- Under Reachable at, select Add More.
- Enter your additional email address. Make sure you’re not already using it as an Apple ID.
- We’ll send a verification to that address. Didn’t get the email?
- Enter the verification code and click Verify.
Delete an additional email address
- Sign in to your Apple ID account page.
- Click Edit in the Account section.
- To delete one of your additional email addresses, click next to the address.
Rescue email address
Having a rescue email address is optional but recommended if you do not have two-factor authentication or two-step verification. If you ever forget your security questions, you can use your rescue email address to reset them. We also send any account security-related notifications to your rescue email address. If you have two-factor authentication or two-step verification, you have a notification email address instead of a rescue email address and won’t need to remember security questions.
Add or edit a rescue email address
- Sign in to your Apple ID account page.
- Click Edit in the Security section. You might be asked to answer one or more security questions before you continue.
- To add a rescue email address:
- Under Rescue Email, click Add an Email Address, then enter your rescue email address. We send a verification to that address. Didn’t get the email?
- Enter the verification code and click Verify.
- To edit a rescue email address:
- Select Change Email Address under the address you want to edit, then enter the new address. We send a verification to that address. Didn’t get the email?
- Enter the verification code and click Verify.
If you had a rescue email address on file when you upgraded to two-factor authentication or two-step verification, you can also use these steps to edit your notification email address. If you remove the notification email, you won’t be able to add a new one.
Delete a rescue email address
- Sign in to your Apple ID account page.
- Click Edit in the Security section. You might be asked to answer one or more security questions before you continue.
- To delete a rescue email address, click next to the address.
Reset your security questions
If you’ve forgotten the answers to your security questions, follow these steps to verify your identity and reset your security questions. If you set up two-factor authentication or two-step verification, you won’t need to remember any security questions.
Learn more
If you receive suspicious email, learn how to identify fraudulent email.
FaceTime is not available in all countries or regions.
Источник
Add an email account to your iPhone, iPad, or iPod touch
There are two ways that you can set up an email account in the Mail app on your iOS device — automatically or manually. Learn which option is best for you.
How to set up your email account automatically
If you use an email provider like iCloud, Google, or Yahoo, Mail can automatically set up your email account with just your email address and password. Here’s how:
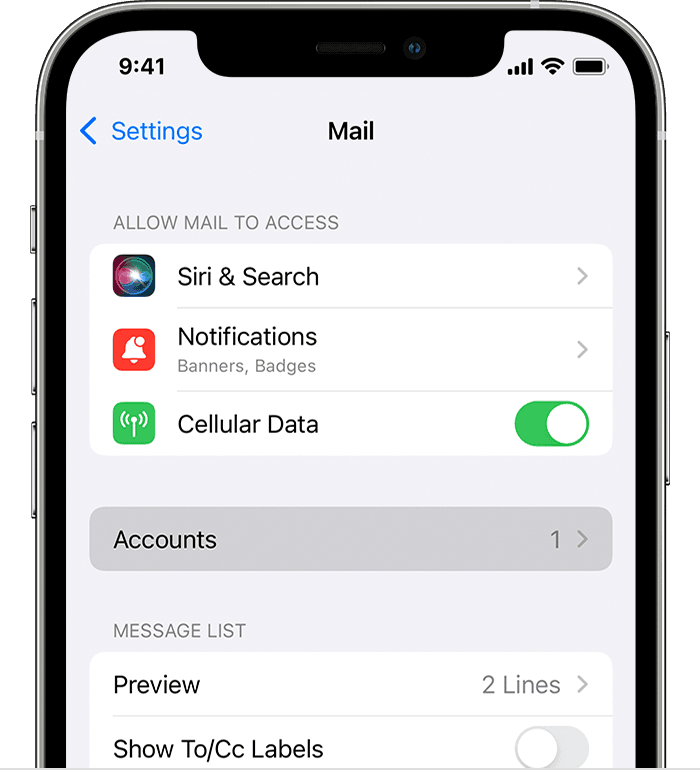
- Go to Settings > Mail, then tap Accounts.

- Tap Add Account, then select your email provider.
- Enter your email address and password.
- If you see Next, tap Next and wait for Mail to verify your account.
- If you see Save, tap Save.
If you don’t see your email provider, tap Other to add your account manually.
How to set up your email account manually
If you need to set up your email account manually, make sure that you know the email settings for your account. If you don’t know them, you can look them up or contact your email provider. Then follow these steps:
- Go to Settings > Mail, then tap Accounts.
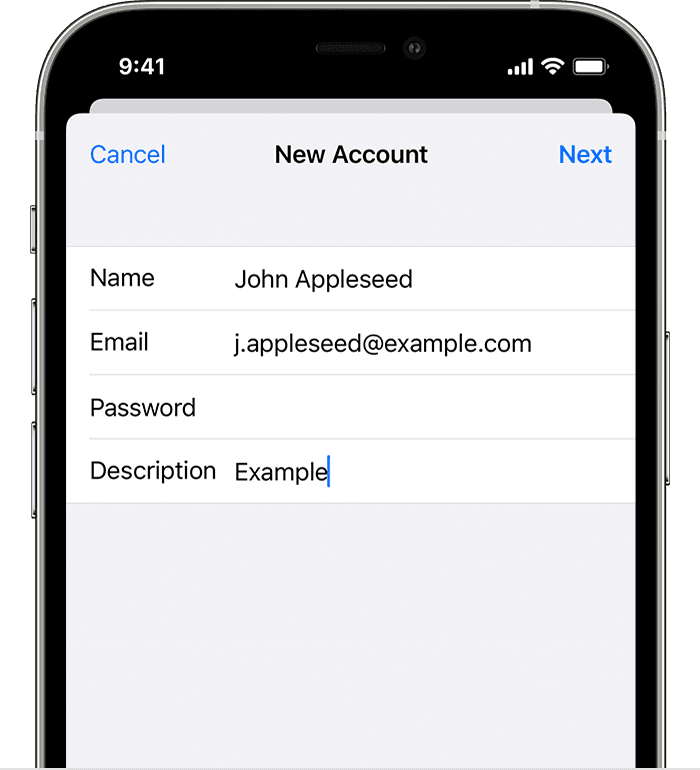
- Tap Add Account, tap Other, then tap Add Mail Account.
- Enter your name, email address, password, and a description for your account.
- Tap Next. Mail will try to find the email settings and finish your account setup. If Mail finds your email settings, tap Done to complete your account setup.
![]()
Enter account settings manually
If Mail can’t find your email settings, then you need to enter them manually. Tap Next, then follow these steps:
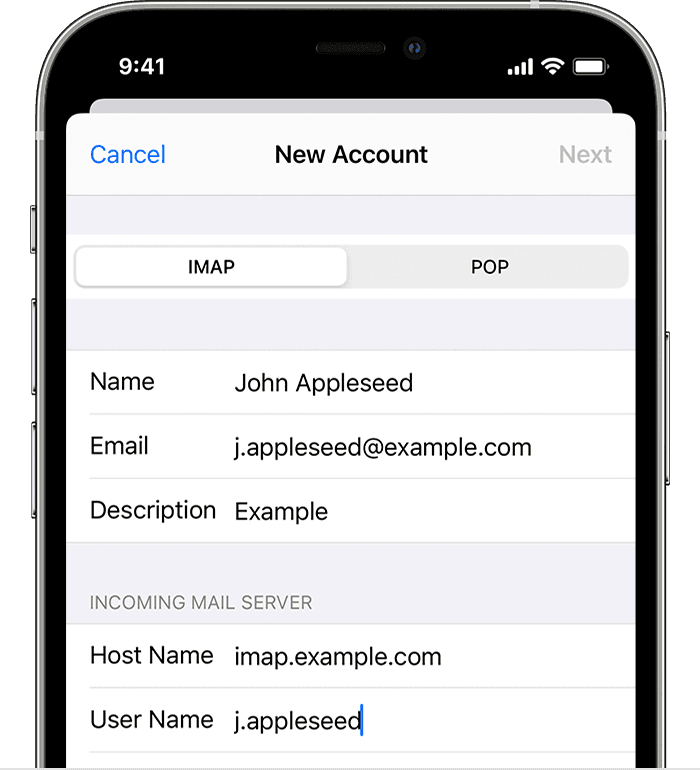
- Choose IMAP or POP for your new account. If you aren’t sure which one to choose, contact your email provider.
- Enter the information for Incoming Mail Server and Outgoing Mail Server. Then tap Next. If you don’t have this information, try to look it up.
- If your email settings are correct, tap Save to finish. If the email settings are incorrect, you’ll be asked to edit them.
If you still can’t set up your email account or save your email settings, contact your email provider.
Do more with Mail
Information about products not manufactured by Apple, or independent websites not controlled or tested by Apple, is provided without recommendation or endorsement. Apple assumes no responsibility with regard to the selection, performance, or use of third-party websites or products. Apple makes no representations regarding third-party website accuracy or reliability. Contact the vendor for additional information.
Источник
Организация электронной почты на компьютере Mac
Как управлять почтовым ящиком и упростить работу с важными сообщениями.
Организация сообщений по разговору
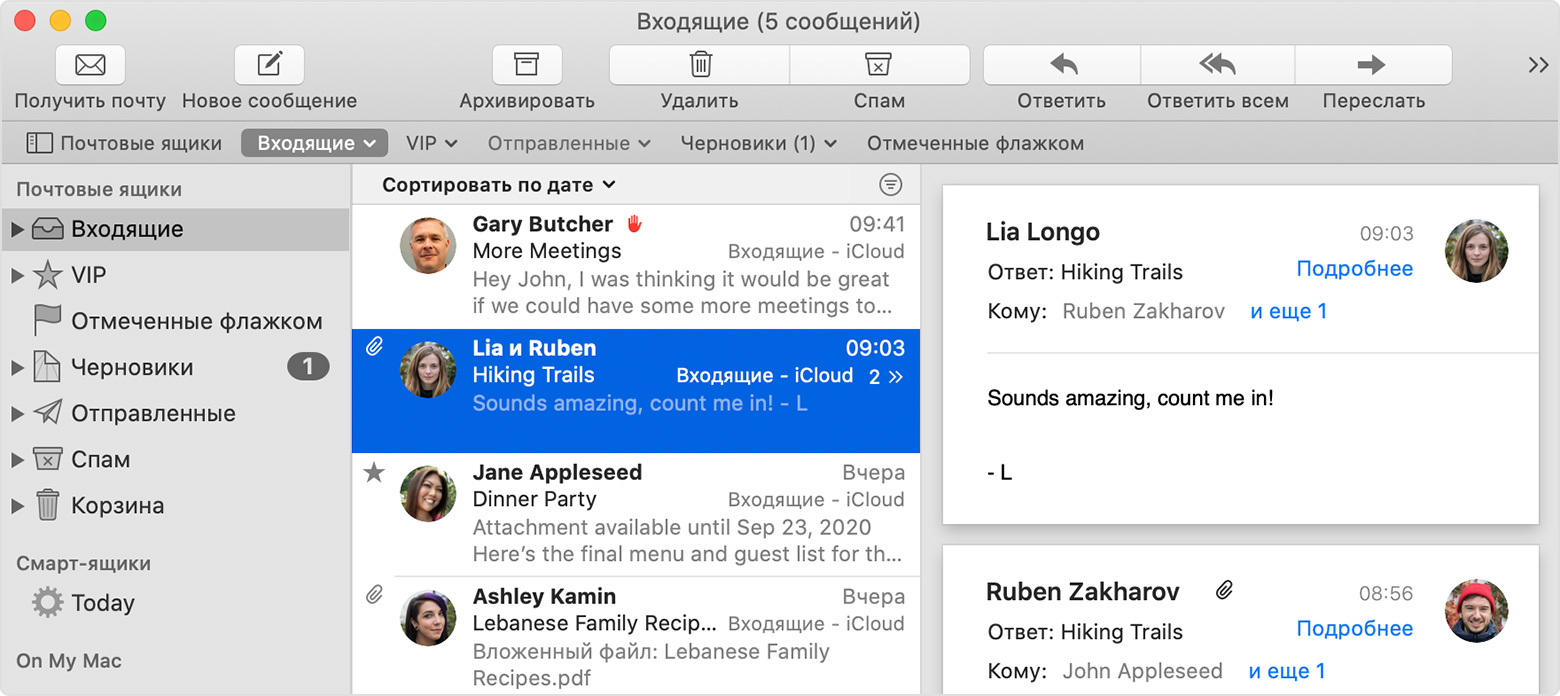
Разговор (или ветка) включает исходное сообщение и все ответы на него. Когда вы организовываете сообщения по разговору, каждый разговор сворачивается. Это означает, что в вашем почтовом ящике отображается только самое последнее сообщение из разговора. При выборе этого сообщения в области предварительного просмотра отображаются все сообщения из разговора.
Пункт «Вид» в строке меню предлагает несколько вариантов организации сообщений по разговору:
- Организовывать по разговорам: включение или отключение просмотра разговора.
- Выделять разговоры: выделение разговоров, чтобы их было проще заметить в почтовом ящике.
- Развернуть все разговоры: отображение каждого сообщения во всех разговорах в вашем почтовом ящике.
- Свернуть все разговоры: отображать только самое последнее сообщение во всех разговорах в вашем почтовом ящике.
Перемещение сообщений в почтовые ящики
Перемещение сообщений в почтовые ящики — это отличный способ организовать сообщения, которые вы хотите сохранить.
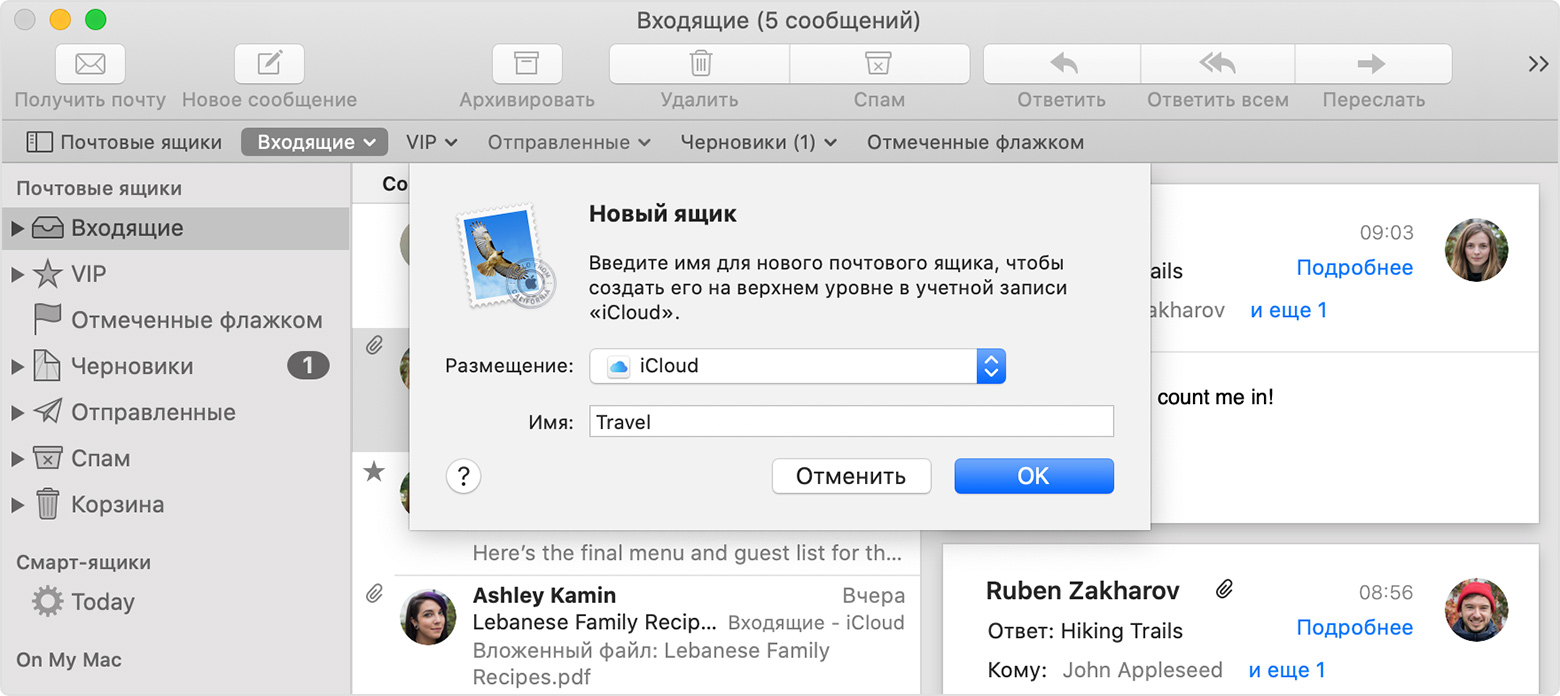
Создание нового почтового ящика для сообщений
- Выберите «Почтовый ящик» > «Новый ящик» в строке меню.
- Присвойте вашему почтовому ящику имя и выберите его местоположение.
- Выберите в качестве местоположения папку «На моем Mac», чтобы почтовый ящик был доступен только на вашем компьютере Mac.
- Выберите другое местоположение, например IMAP или iCloud, чтобы почтовый ящик был доступен на всех других устройствах, использующих ту же учетную запись.
Перемещение сообщений в почтовый ящик
- Перетащите сообщение в созданный вами почтовый ящик, используя боковое меню.
- Или выберите сообщение, а затем нажмите кнопку перемещения на панели инструментов, чтобы переместить сообщение в предлагаемый почтовый ящик. Предлагаемый почтовый ящик меняется в зависимости от того, куда вы перемещали похожие сообщения ранее, поэтому точность предложений будет увеличиваться вместе с количеством сообщений, которые вы переместили. Вы также можете нажать на стрелку рядом с кнопкой перемещения для выбора конкретного почтового ящика или использовать фильтры для автоматического перемещения сообщений в почтовые ящики.
Отмена подписки на списки рассылки
Когда приложение «Почта» обнаруживает, что сообщение было отправлено как часть рассылки, над его текстом отображается баннер «Письмо из почтовой рассылки». Чтобы удалить свой адрес из списка рассылки, нажмите «Отказаться от подписки» в баннере. Узнайте больше об отмене подписки на списки рассылки.

Блокировка отправителей
Фильтрация заблокированной почты является разновидностью фильтрации спама. Вы можете использовать обе функции одновременно.
После блокировки отправителя вы все равно будете получать сообщения от него, но при этом приложение «Почта» будет добавлять символ блокировки рядом с его именем в списке сообщений. Приложение также добавляет заголовок «Это сообщение от заблокированного отправителя» над каждым таким сообщением.
- Откройте сообщение от отправителя, которого вы хотите заблокировать.
- Нажмите на стрелку рядом с именем отправителя в заголовке сообщения, затем выберите в меню пункт «Заблокировать контакт». Для снятия блокировки выберите пункт «Разблокировать контакт».

Вы можете управлять блокировкой в настройках приложения «Почта»: выберите «Почта» > «Настройки», нажмите «Спам», затем перейдите на вкладку «Заблокировано».
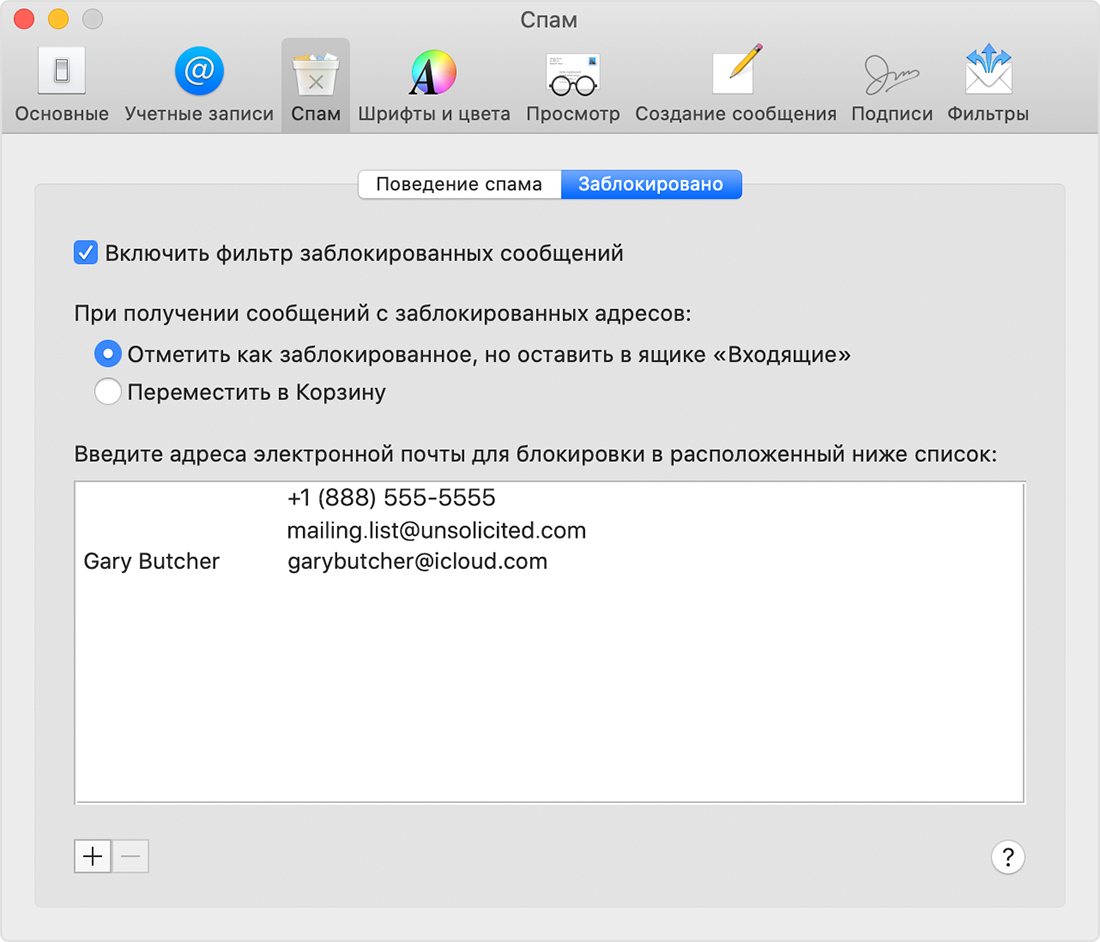
- Убедитесь, что установлен флажок «Включить фильтр заблокированных сообщений». Если вы снимите этот флажок, приложение «Почта» все еще будет помнить отправителей, которых вы заблокировали, но перестанет их блокировать.
- Для автоматического перемещения новых заблокированных сообщений в корзину установите флажок «Переместить в Корзину».
- Для удаления заблокированного отправителя из списка выберите его адрес электронной почты, затем нажмите кнопку удаления (-) под списком.
- Для блокировки одного из ваших контактов нажмите кнопку добавления (+), затем выберите его имя, чтобы заблокировать все адреса электронной почты и номера телефонов, связанные с этим контактом в приложении «Контакты». Вы также можете удалить (-) адреса электронной почты и номера телефонов по отдельности.
Ваш список блокировки применяется в приложениях «Почта», «Сообщения», «Телефон» и FaceTime на всех ваших устройствах, где используются контакты iCloud и где вход в iCloud выполнен с помощью вашего идентификатора Apple ID.
Назначение отправителям статуса VIP
Когда вы назначаете отправителю статус VIP, все сообщения от него в вашем почтовом ящике также отображаются в почтовом ящике VIP в боковом меню. Вы можете назначить до 100 отправителей со статусом VIP. Они будут доступны на всех ваших устройствах, на которых используются контакты iCloud и вход в iCloud выполнен с помощью вашего идентификатора Apple ID.
- Откройте сообщение от отправителя.
- Переместите указатель влево от его имени в заголовке сообщения.
- Нажмите на звездочку рядом с его именем.

Метки сообщений
Когда вы отмечаете сообщение, рядом с этим сообщением в вашем почтовом ящике и в заголовке сообщения появляется значок в виде флажка .

- Для установки метки выберите сообщение, затем выберите флажок в меню «Флажок» на панели инструментов.
- Для удаления флажка снова выберите тот же флажок или нажмите «Снять флажок».
Чтобы просмотреть только те сообщения, которые вы отметили:
- Нажмите «Отмеченные флажком» в строке «Избранное», чтобы просмотреть все отмеченные сообщения, или нажмите на стрелку рядом с этим пунктом и выберите конкретный флажок.
- Помимо этого, вы можете выбрать отмеченный флажком почтовый ящик в боковом меню. Если вы использовали флажки нескольких цветов, отмеченный флажком почтовый ящик будет содержать почтовые ящики для каждого цвета. Чтобы показать их, нажмите на раскрывающий треугольник рядом с почтовым ящиком.
Узнайте больше о флажках, в том числе о возможности их переименования. Например, можно переименовать «Красный» в «Срочно».
Источник


