- Правильная работа с БД в Android
- Применение SQLiteOpenHelper и Database Inspector в Android-разработке
- Что такое SQLite?
- Класс SQLiteOpenHelper
- ▍Метод onCreate()
- ▍Метод onUpgrade()
- ▍Пример
- Database Inspector в Android Studio
- How to use SQLite Database in Android
- Objective
- Step 1 Create Layouts
- Step 2 Database Creation (SQLiteHelper.java)
- 2.1 Make SQLiteHelper class
- 2.1.1 onCreate() method
- 2.1.2 onUpgrade() method
- 2.1.3 Steps For How to use SQLite Manager (SQLite manager Firefox tutorial)
- Step 3 Create model class for contact (ContactModel.java)
- Step 4 CRUD Operations (Insert/ Update/ Delete/ Select Records)
- 4.1 Insert Records
- 4.1.1 Why do we need SQLiteDatabase Object?
- 4.1.2 ContentValues
- 4.1.3 Insert Row
- 4.2 Update Rows
- 4.3 Delete Records
- 4.4 Select Records
- 4.4.1 What is Cursor?
- 4.4.2 Fetching Records from database
- Step 5 Calling SQLiteHelper class methods
- 5.1 Making SQLiteHelper class object
- 5.2 Add Record
- 5.2.1 Start TableManipulationActivity with ADD_RECORD request
- 5.2.2 onButtonClick() method
- 5.2.3 onActivityResult(int requestCode, int resultCode, Intent data)
- 5.2.4 Display all records
- 5.3 Update Record
- 5.3.1 onUpdateRecord()
- 5.4 Delete Record
- Step 6 Get all table name list into array from sqlite database
- Tejas Jasani
Правильная работа с БД в Android
Приветствую всех дроидеров в эти непростые для нас времена.
Честно говоря, заколебала эта шумиха о патентах, войнах и т.д., но в данной статье речь пойдет не об этом.
Я не собирался писать статью на данную тему, так как везде всего полно о работе с базой данных в Android и вроде бы все просто, но уж очень надоело получать репорты об ошибках, ошибках специфичных и связанных с БД.
Поэтому, я рассматрю пару моментов с которыми я столкнулся на практике, чтобы предостеречь людей, которым только предстоит с этим разбираться, а дальше жду ваших комментариев на тему решения указанных проблем после чего внесу изменения в пост и мы сделаем отличный туториал, который будет образцом работы с SQLite в Android не только для начинающих, но и для тех, кто уже знаком с основами и написал простые приложения.
Способы работы с БД
Существует три способа работы с данными в БД, которые сразу бросаются на ум:
1) Вы создаете пустую структуру базы данных. Пользователь работает с приложением(создает заметки, удаляет их) и база данных наполняется. Примером может служить приложение NotePad в демо-примерах developer.android.com или на вашем дроид-девайсе.
2) Вы уже имеете готовую БД, наполненную данными, которую нужно распространять с приложением, либо парсите данные из файла в assets.
3) Получать данные из сети, по мере необходимости.
Если есть какой-то еще один или два способа, то с радостью дополню данный список с вашей помощью.
Все основные туториалы расчитаны как раз на первый случай. Вы пишите запрос на создание структуры БД и выполняете этот запрос в методе onCreate() класса SQLiteOpenHelper, например так:
Примерно так. Более полный вариант класса и других составляющих можно посмотреть по ссылке внизу статьи.
Дополнительно можно переопределить методы onOpen(), getReadableDatabase()/getWritableDatаbase(), но обычно хватает того, что выше и методов выборки данных.
Далее, экземпляр этого класса создаем в нашем приложении при его запуске и выполняем запросы, то бишь проблемная часть пройдена. Почему она проблемная? Потому что, когда пользователь качает приложения с маркета, то не задумывается о вашей базе данных и может произойти что угодно. Скажем сеть пропала или процесс другой запустился, или вы написали уязвимый к ошибкам код.
Кстати, есть еще один момент, на который стоит обратить внимание. Переменную экземпляра нашего класса можно создать и хранить в объекте Application и обращаться по мере необходимости, но нужно не забывать вызывать метод close(), так как постоянный коннект к базе — это тяжелый ресурс. Кроме того могут быть коллизии при работе с базой из нескольких потоков.
Но есть и другой способ, например, создавать наш объект по мере необходимости обращения к БД. Думаю это вопрос предпочтения, но который также необходимо обсудить.
А теперь самое главное. Что, если нам понадобилось использовать уже сушествующую БД с данными в приложении?
Немного погуглив, Вы сразу наткнетесь на такую «замечательную статью» — www.reigndesign.com/blog/using-your-own-sqlite-database-in-android-applications в которой, как покажется, есть нужная панацея. Но не тут то было. В ней еще и ошибок несколько.
Вот они:
1) В методе createDataBase() строка:
SQLiteDatabase dbRead = getReadableDatabase();
и далее код… содержит crash приложения на НТС Desire, потому что получаем БД для чтения(она создается), но не закрывается.
Добавляем строкой ниже dbRead.close() и фикс готов, но момент спорный.
Вот что говорит дока на тему метода getReadableDatabase():
Create and/or open a database. This will be the same object returned by getWritableDatabase() unless some problem, such as a full disk, requires the database to be opened read-only. In that case, a read-only database object will be returned. If the problem is fixed, a future call to getWritableDatabase() may succeed, in which case the read-only database object will be closed and the read/write object will be returned in the future.
Like getWritableDatabase(), this method may take a long time to return, so you should not call it from the application main thread, including from ContentProvider.onCreate().
И так. Данный метод не стоит вызывать в главном потоке приложения. В остальном все понятно.
2) Ошибка: No such table android_metadata. Автор поста выкрутился, создав данную таблицу заранее в БД. Не знаю на сколько это правильный способ, но данная таблица создается в каждой sqlite-бд системой и содержит текущую локаль.
3) Ошибка: Unable to open database file. Здесь много мнений, разных мнений, которые Вы можете прочесть по ссылкам ниже.
Возможно, что проблемы связаны с тем, что один поток блокирует БД и второй не может к ней обратиться, возможно проблема в правах доступа к приложению(было замечено, что чаще проблемы с БД проявляются на телефонах марки НТС именно на тех моделях, которые нельзя рутануть, хотя не только на них, например на планшетах Асер), но как бы то ни было проблемы эти есть.
Я склоняюсь к варианту, что проблема в потоках, не зря ведь нам не рекомендуют вызывать методы создания базы в главном потоке.
Возможно выходом из этого будет следующее решение(рассматривается вариант №2). Используя первый вариант работы с базой, наполнить ее данными после создания, например:
Данный подход еще нужно проверить на практике, но так как этот пост нацелен на выработку верного коллективного решения по данной тематике, то комментарии и пробы на даннную тему только приветствуются.
Мораль истории такова: если вы нашли какой-то хороший кусок кода для вашего решения, то проверьте его, не поленитесь, прежде чем копипастить в свой проект.
Вцелом, данный пост показывает(касательно способа №2) как делать не надо, но и также содержит пару любопытных мыслей.
Метод getReadableDatabase() можно переопределить например так:
Кстати: следуя практике самой платформы, поле первичного ключа стоит называть «_id».
Пишите в комментарии свои используемые практики. Мы сделаем данный пост лучше для всех, а может и мир станет чуточку добрее.
UPD Только что проверил свой подход. Все работает в эмуляторе, но будьте осторожны.
Файлик data.txt лежит в assets такой:
Zametka #1
Zametka #2
Zametka #3
Zametka #4
И класс приложения:
Отмечу, что данный класс используется только для демонстрации и проверки того, что произойдет при вызове методов getReadableDatabase()/getWritableDatabase() и создании базы. В реальных проектах код нужно адаптировать.
Кроме того в базе появилась табличка android_metadata(без моего участия), поэтому указанная выше ошибка решена.
Надеюсь кому-то пригодится.
Любопытные дополнения №1(от хабраюзера Kalobok)
Источник
Применение SQLiteOpenHelper и Database Inspector в Android-разработке
Автор статьи, перевод которой мы публикуем сегодня, хочет рассказать об использовании баз данных SQLite в Android-разработке. В частности — он коснётся тут двух вопросов. Во-первых — речь пойдёт о классе SQLiteOpenHelper , который применяется для работы с базами данных в коде приложений. Во-вторых — он уделит определённое внимание инструменту Database Inspector, инспектору баз данных, встроенному в Android Studio.

Что такое SQLite?
SQLite — это опенсорсная реляционная СУБД, похожая на MySQL. SQLite входит в состав стандартной библиотеки Android, где реализован движок базы данных, не нуждающийся в применении клиент-серверной архитектуры, не требующий особой настройки, поддерживающий транзакции. Для работы SQLite не нужен сервер баз данных. Всё, что нужно, хранится в обычных файлах. Полноценная БД SQLite, в которой имеется множество таблиц, триггеров, индексов и представлений, содержится в единственном, самом обыкновенном файле. Стандартная поддержка СУБД SQLite имеется во всех мобильных телефонах и в большинстве компьютеров. При этом работа с SQLite не требует решения задач по администрированию или настройке баз данных.
Android-разработчик, для выполнения CRUD-операций из своего приложения, может пользоваться пакетом android.database.sqlite.SQLiteDatabase , в котором реализованы все необходимые API.
Класс SQLiteOpenHelper
SQLiteOpenHelper — это класс, встроенный в пакет android.database.sqlite.SQLiteDatabase . Это — вспомогательный класс, который отвечает за создание баз данных SQLite и за управление их версиями. Для того чтобы воспользоваться возможностями этого класса, нужно создать его подкласс, в котором надо переопределить два метода — onCreate() и onUpgrade() . Этот класс позволяет открывать существующие базы данных, создавать новые базы данных и обновлять версии баз данных.
▍Метод onCreate()
Метод onCreate() вызывается при создании базы данных. Он, в процессе жизненного цикла приложения, вызывается лишь один раз. А именно, его вызов производится при первом обращении к методу getReadableDatabase() или getWritableDatabase() . Эти методы принадлежат классу SQLiteOpenHelper .
В следующем примере показано создание экземпляра класса DatabaseHelper , являющегося наследником SQLiteOpenHelper :
Вот код конструктора DatabaseHelper :
Класс SQLiteOpenHelper вызывает метод onCreate() после создания базы данных и создания экземпляра класса SQLiteDatabase . Этот метод, напомним, вызывается лишь один раз, при создании базы данных:
▍Метод onUpgrade()
Метод onUpgrade() вызывается в тех случаях, когда нужно обновить версию существующей базы данных:
▍Пример
Создадим простое Android-приложение и разберём практический пример работы с классом SQLiteOpenHelper . Это приложение, применяя данный класс, позволит нам добавлять записи о работниках некоей компании в таблицу Empdata базы данных Company.db .
Приложение имеет весьма простой интерфейс, описанный в файле activity_main.xml .

Вот содержимое файла MainActivity.java :
Вот содержимое Employee.java :
Вот файл DatabaseHelper.java :
В коде DatabaseHelper.java видно, что класс DatabaseHelper является наследником класса SQLiteOpenHelper .
После того, как база данных создана, можно приступать к работе с ней. В частности — создавать и обновлять поля её таблиц. При решении этих задач можно пользоваться объектом типа ContentValues , который позволяет хранить пары ключ-значение. Именно такие объекты используются для добавления новых записей в таблицы базы данных (с помощью метода insert() объекта SQLiteDatabase ) и для обновления существующих записей (с помощью метода update() ).
Database Inspector в Android Studio
Инструмент Database Inspector позволяет исследовать базы данных, используемые в приложениях, выполнять запросы к ним, модифицировать их, делая всё это во время работы приложений. Database Inspector имеется в Android Studio начиная с версии 4.1. Этот инструмент особенно полезен при отладке механизмов программ, ответственных за работу с базами данных. Database Inspector работает и с обычной реализацией SQLite, и с библиотеками, построенными на её основе, вроде Room. Database Inspector работает лишь с библиотекой SQLite, входящей в состав операционных систем Android, уровень API которых не ниже 26.
Для того чтобы открыть базу данных в Database Inspector нужно выполнить следующие действия:
- Запустите приложение в эмуляторе или на устройстве, подключённом к компьютеру. На эмуляторе или на устройстве должно присутствовать API не ниже 26 уровня.
- Выполните команду меню View > Tool Windows > Database Inspector .
- Выберите процесс выполняющегося приложения из выпадающего меню.
- В панели Databases появятся записи о базах данных, которые имеются в выбранном приложении. Теперь можно работать с этими базами данных.

Исследование базы данных с помощью Database Inspector
Обратите внимание на то, что есть одна проблема, связанная с аварийным завершением работы программ на эмуляторе Android 11 при подключении к Database Inspector. Если вы с этой проблемой столкнётесь — здесь вы можете найти сведения о том, как с ней справиться.
Применяете ли вы SQLite в Android-разработке?
Источник
How to use SQLite Database in Android
To download the code, login with one of the following social providers.
Login Login 
Be patient. we are fetching your source code.
Objective
What is SQLite:
In Android, SQLite is used as database. So before we start coding our app, let’s understand few things about SQLite. SQLite is used as a Local Database in android.
Four Major things to understand about SQLite:
- SQLite is RDBMS (Relational Database Management System)
- SQLite is written in C programming language
- SQLite is embedded within the Android operating System, so you don’t need anything external on Android to use SQLite
- To manipulate data (insert, update, delete) in SQLite database – we’ll use SQL (Structured Query Language)
SQLite is used as a database for android application development. If you would like to learn more about the above 4 points, please refer the following link:
To get more details about SQLite in general, please refer the following link:
Android SQLite Example:
We are going to create a project where you will be able to insert/ update/ delete the user records from database.
The final output should look something like following:
[SCREENSHOT – FIRST SCREEN]
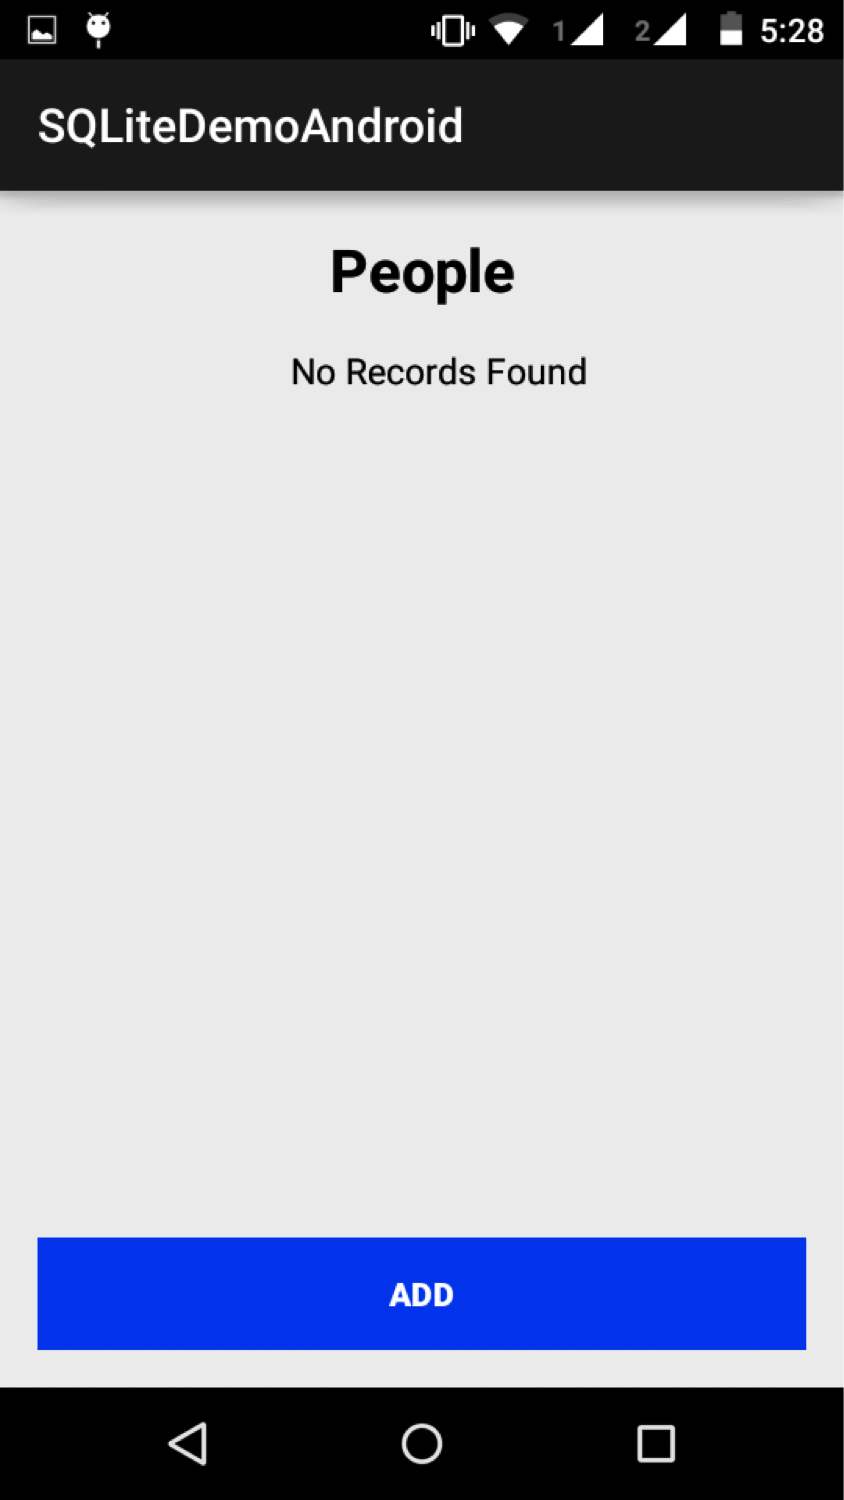
As you can see from the screenshots above initially user will see a list (which would be empty right now, since there are no records) and button called ‘Add‘.
[SCREENSHOT – SECOND SCREEN]
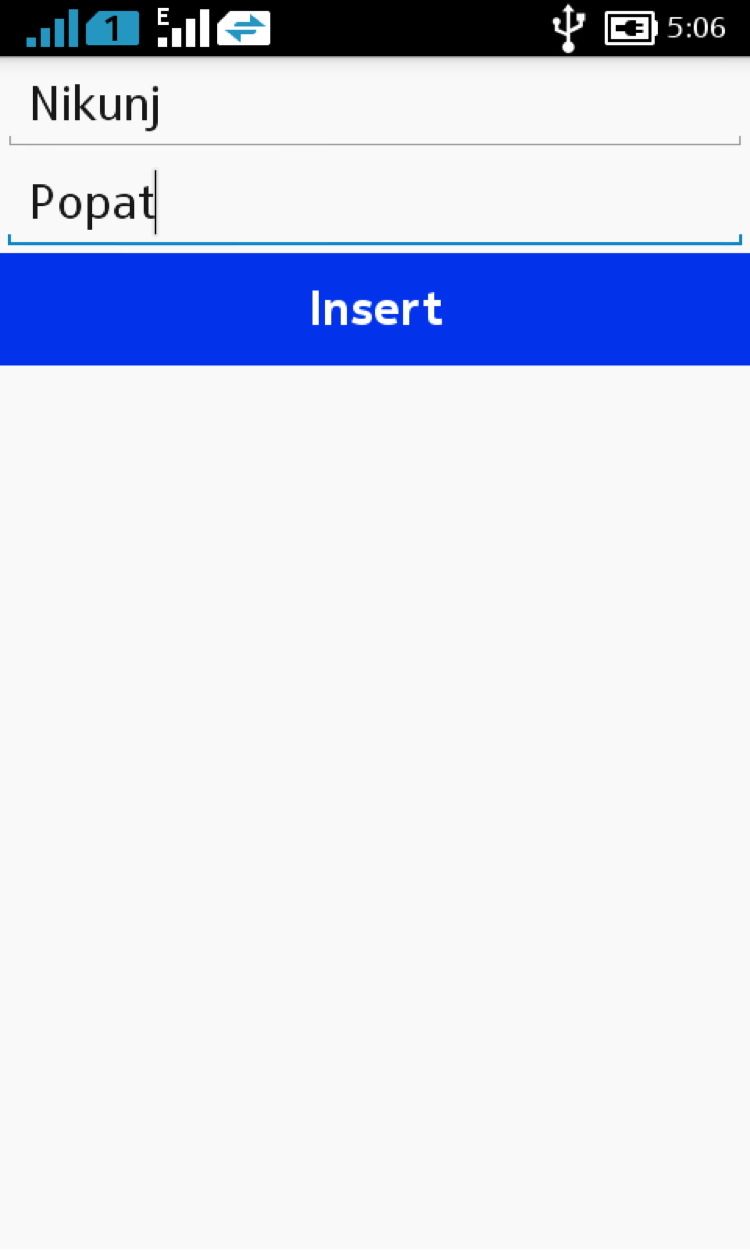
When user press the Add button, we’ll show him the form where user can add two fields
- First Name
- Last Name
[SCREENSHOT – FIRST SCREEN AFTER ADDING THE RECORD]
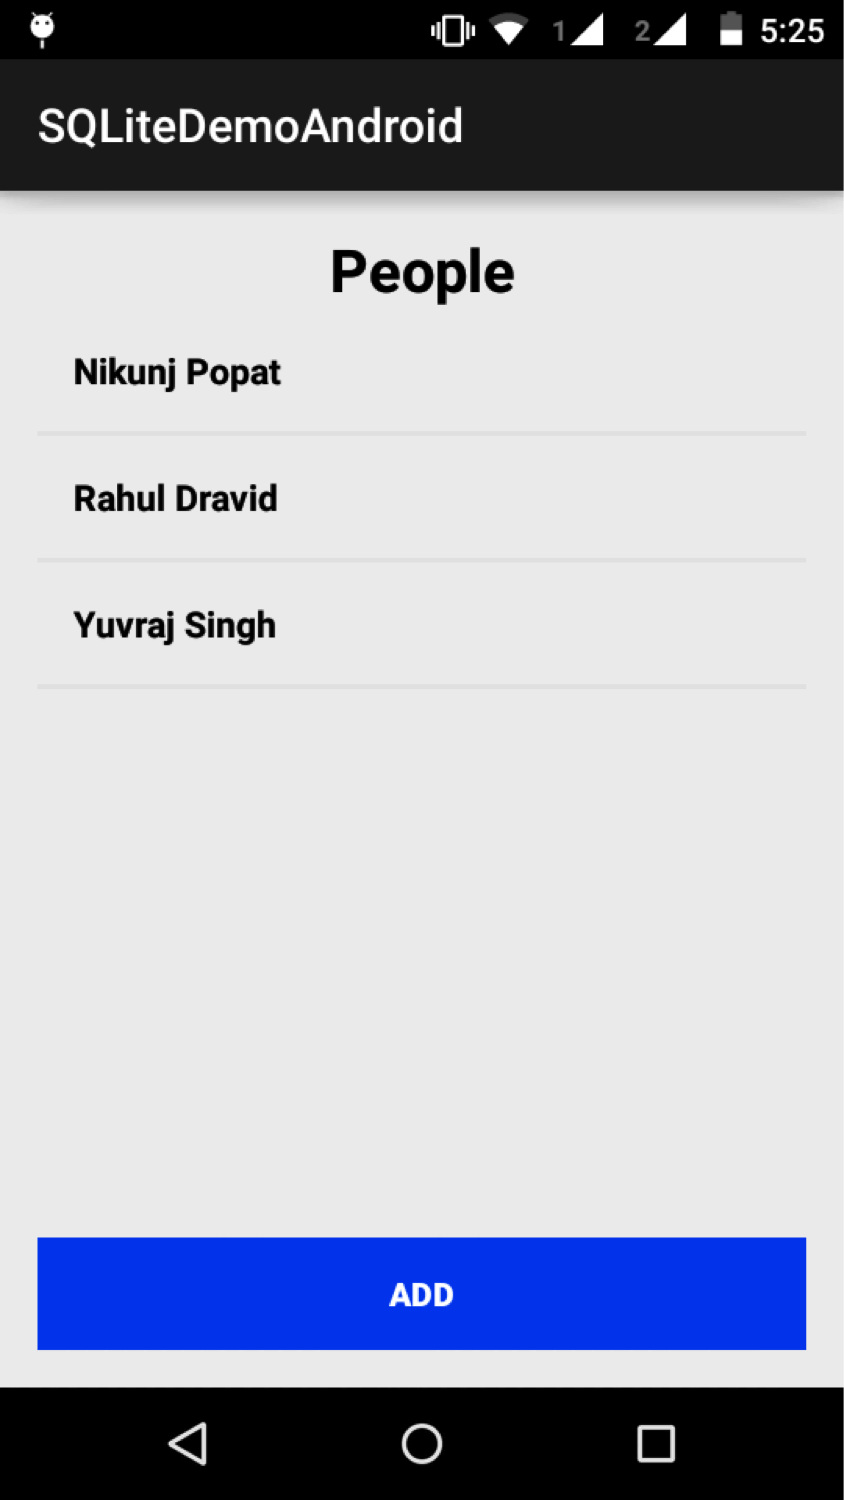
By clicking the Insert button, record will be saved into SQLite database and user can see added record on the first screen.
[SCREENSHOT – LONG CLICK]
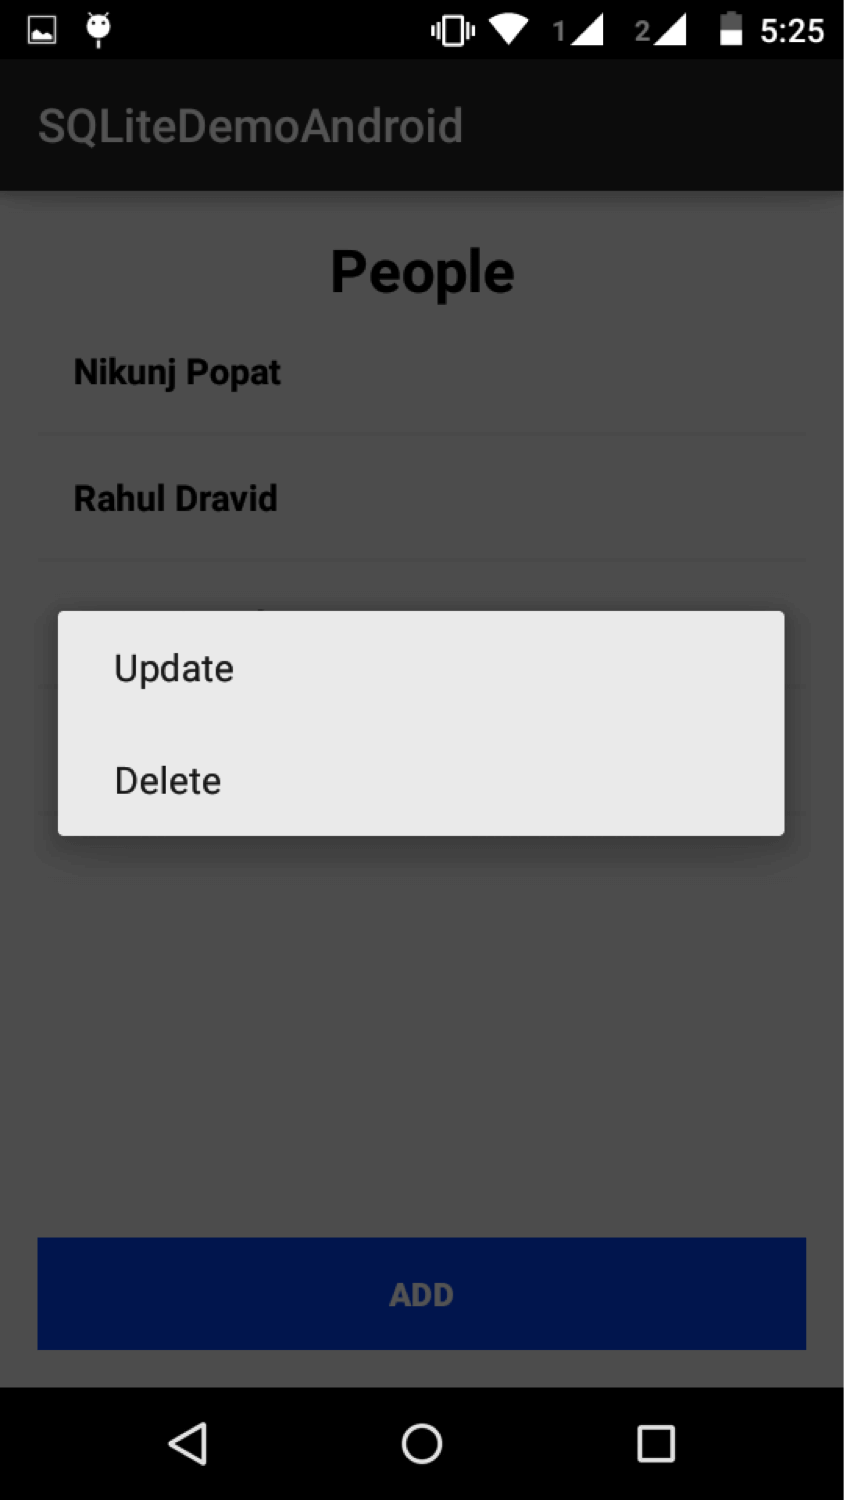
By long pressing on record you can Delete or Update record.
- When you press on delete record the particular record will be deleted from SQLite database.
- When you press on update record you, you would be taken back to the screen where you inserted your record. And from that screen you can update the record.
Let’s start coding our Android app.
Step 1 Create Layouts
We will need to create three layouts for our project
Layout 1: activity_main.xml
This layout holds all the records and an Add button to add records. When there are no contacts, we are showing the “No Records” and when user inserts the data, we hide that section.
Layout 2: inflate_record layout
We are using this layout to inflate the records we are inserting.
Layout 3: table_manipulation.xml
This xml file for two DML (Data Manipulation Language – used for insert/ update/ delete queries) statements of SQLite Database i.e. insert and update.
Here, we have two fieds:
- EditText for FirstName and LastName
- A Button for Insert/ Update records
Let’s learn how to create database and table in SQLite database and do the operations (select/insert/update/delete) on table records.
Let’s get into java files now.
Step 2 Database Creation (SQLiteHelper.java)
2.1 Make SQLiteHelper class
Here, SQLiteDatabase.db is the name of your database, and database version is 1. When you make an object of SQLiteHelper class, it calls super class constructor and creates the SQLite database.
SQLiteOpenHelper class has two abstract methods that you need to override in SQLiteHelper class.
2.1.1 onCreate() method
Let’s check the code and understand these methods in detail:
This method is called when database is created for the first time. This is where the creation of tables should happen. If you wish to insert records at the time of creating tables, even the code to insert the records should be written here.
Parameters:
| db | The Database |
Here, we are making a table named PEOPLE in SQLite android.
| Column Name | Data Type | Constraints |
| Id | Integer | auto increment |
| FirstName | varchar | |
| LastName | varchar |
db.execSQL() Execute a single SQL statement that is NOT a SELECT or any other SQL statement that returns data.
For more details about execSQL() method please refer the following link:
2.1.2 onUpgrade() method
This method is called when the database needs to be upgraded (Database version changed). The implementation should use this method to drop tables/ add tables or to do anything else it needs to upgrade to the new schema version.
Parameters:
| db | The Database |
| oldVersion | The old database version |
| newVersion | The new database version |
That’s all we are going to do in our SQLiteHelper class.
If you are interested in knowing more about SQLiteOpenHelper class, please refer following link:
We are done with two things now:
- We have created a database — SQLiteDemo.db
- We have create a table — People
The structure for People table:
| Column Name | Data Type | Constraints |
| ID | int | Auto Increment |
| FIRST_NAME | varchar | |
| LAST_NAME | varchar |
If you would like to see your database in action, you can download the FireFox plugin from the following link:
2.1.3 Steps For How to use SQLite Manager (SQLite manager Firefox tutorial)
- In Android Studio, go to Tools Menu >> DDMS or You can directly click on the Android Device Monitor icon appears on menu bar
- Device Monitor window will open. Select your connected device/emulator from device tab and then go to File Explorer tab. In File Explorer tab go to data >> data >> select your project. Now Click on the Pull a file from the device icon(top right corner) and save it with .db extension.
- Open Mozilla Firefox and then go to Tools Menu >> SQLite Manager.
- Now In SQLite Manger Go to Database Menu >> Connect Database.Then select your database.
P.S.: You can directly create database using the plugin mentioned above. And then you have to import that database in your project directory.
Step 3 Create model class for contact (ContactModel.java)
You’re doing awesome work till now! Now sit back and relax a bit.
We’ll do all the manipulation of data through a model class. So let’s first see our model class (Model is kind of skeleton of the data we want to use). We are working with contacts over here, so I have named my class as ContactModel.
We need following three things for the contact:
We have declared them as String variables in our model class and we have generated getter and setter methods for ID, First Name and Last Name.
Step 4 CRUD Operations (Insert/ Update/ Delete/ Select Records)
Now we will learn about Inset, Update, Delete and display data from android SQLite database.
Please open SQLiteHelper.java class
4.1 Insert Records
I would be showing you 2 ways to do each of the operations; there is not much difference in them but its better if you learn both the ways.
>> Method 1:
- Our first task would be to insert records in the database which we have just created. To do that, check out the following code. We’ll be using object of SQLiteDatabase class in all the operations, so I have declared it as a class level object.
To insert the record, first we are getting SQLiteDatabase object by calling getReadableDatabase() method of SQLiteOpenHelper class. We have set ContactModel class as an argument such that we can get the values of First Name and Last Name from that model.
4.1.1 Why do we need SQLiteDatabase Object?
SQLiteDatabase will help you to insert, update and delete the records from table and it also helps you to display table records.
For more details about SQLiteDatabase please refer following link:
If you would like to learn more about getReadbleDatabase() method, please refer following link:
4.1.2 ContentValues
If you want to insert / update records, you can do it through ContentValues class by using the put() method.
If you would like to learn more about ContentValues, please refer following link:
4.1.3 Insert Row
>> Method 1:
This is a convenient method for inserting a row into the database.
Parameters:
| TABLE_NAME | String | In which table you want insert data. | ||||||||||||
| nullColumnHack | String | Optional, may be null. SQL doesn’t allow inserting a completely empty row without naming at least one column name. If your provided values are empty, no column names are known and an empty row can’t be inserted. If not set to null, the nullColumnHack parameter provides the name of nullable column name to explicitly insert a NULL into in the case where your values are empty. | ||||||||||||
| Values |
| Table | The table to update in |
| Value | A map from column names to new column values. null is a valid value that will be translated to NULL. |
| whereClause | The optional WHERE clause to apply when updating. Passing null will update all rows. |
| whereArgs | You may include is in the where clause, which will be replaced by the values from whereArgs. The values will be bound as Strings. |
Returns:
- The number of rows affected.
For more details about update() method please refer the following link:
>> Method 2:
Here, we are using database.execSQL() instead of database.update() method. And in the end we are closing the database.
4.3 Delete Records
>> Method 1:
database.delete() is convenient method for deleting rows in the database.
Parameters:
| Table | the table to delete from |
| whereClause | the optional WHERE clause to apply when deleting. Passing null will delete all rows. |
| whereArgs | You may include ?s in the where clause, which will be replaced by the values from whereArgs. The values will be bound as Strings. |
Returns
- The number of rows affected if a whereClause is passed in, 0 otherwise. To remove all rows and get a count pass 1 as the whereClause.
For more details about delete() method please refer the folloiwng link:
>> Method 2:
Here, again we are using database.execSQL() method to run the delete query and to delete the record.
Challenge:
- Can you write a query to delete the whole table and not just all the records
4.4 Select Records
Before we get into the actual code of selecting the records, we need to understand the concept of Cursor which is very important in this context.
4.4.1 What is Cursor?
When we query the database in Android, we get the result in cursor object containing the result of the query
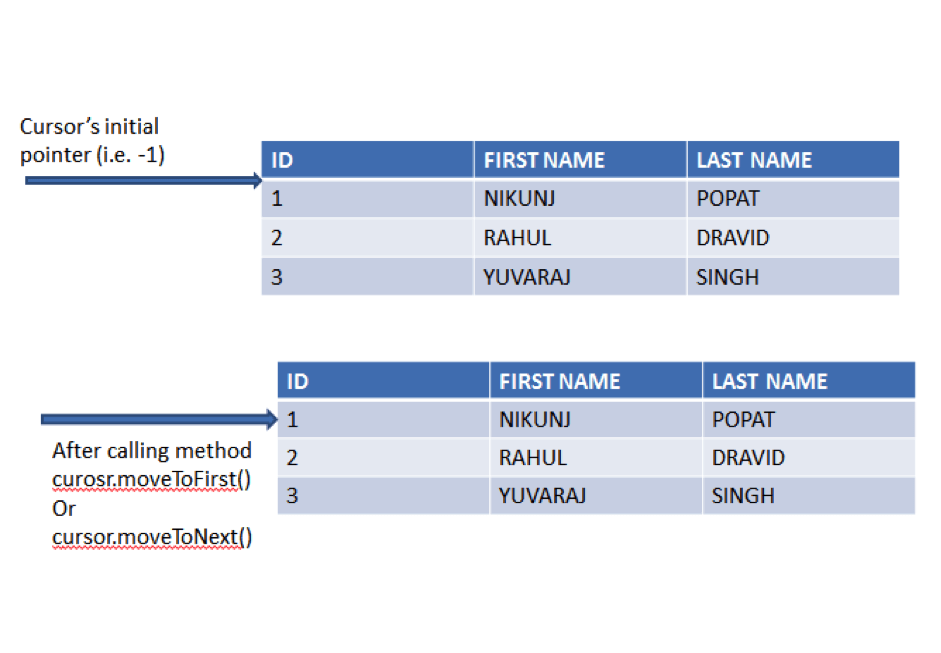
Two important points to remember about cursor:
- Cursors store query result records in rows and there are many methods which enables you to access the data stored in cursor.
- We should use Cursor.close() method when Cursors is no longer used.
For more details about Cursor please refer following link:
Now we are getting back to fetching the records from database.
4.4.2 Fetching Records from database
I’ll show you two ways to achieve this.
>> Method 1:
First of all, we are querying the database and fetching the records into cursor.
What is query() method?
- The query() method is highly overloaded, and there are variations of the method.
The one we are using is given below:
The method Queries the given table, and returns a cursor over the result set.
Parameters:
| table | The table name to compile the query against. |
| columns | A list of which columns to return. Passing null will return all columns, which is discouraged to prevent reading data from storage that isn’t going to be used. |
| selection | A filter declaring which rows to return, formatted as an SQL WHERE clause (excluding the WHERE itself). Passing null will return all rows for the given table. |
| selectionArgs | You may include is in selection, which will be replaced by the values from selectionArgs, in order that they appear in the selection. The values will be bound as Strings. |
| groupBy | A filter declaring how to group rows, formatted as an SQL GROUP BY clause (excluding the GROUP BY itself). Passing null will cause the rows to not be grouped. |
| Having | A filter declare which row groups to include in the cursor, if row grouping is being used, formatted as an SQL HAVING clause (excluding the HAVING itself). Passing null will cause all row groups to be included, and is required when row grouping is not being used. |
| oerderBy | How to order the rows, formatted as an SQL ORDER BY clause (excluding the ORDER BY itself). Passing null will use the default sort order, which may be unordered. |
For more details about database.query() method please refer the following link:
Now coming back to rest of the code of getAllRecrods() method:
- if (cursor.getCount() > 0): First, we are checking if we have got any records in Cursor or not.
- for (int i = 0; i cursor.getString(0) It retrieves first column value (i.e. ID)
- cursor.getString(1) It retrieves second column value(i.e. First Name)
- cursor.getString(2) It retrieves third column value (i.e. Last Name)
Then we are fetching data column wise
- cursor.close() After fetching all the records we are closing the cursor since it is very important to close the cursor for safe coding.
>> Method 2:
Now we are fetching records using rawQuery() method that is quite similar to query() method.
The only thing which is different in both the methods is following line of code.
We are using this method:
Parameters:
| sql | The SQL query. The SQL string must not be ; terminated |
| selectionArgs | You may include is in where clause in the query, which will be replaced by the values from selectionArgs. The values will be bound as Strings. |
Returns
For more information about database.rawQuery() please refer following link:
We are done with all the database related operations; the next part is about how we are calling the database methods in our Android project. So you can skip the following part if you just wanted to learn about database operations in Android.
Step 5 Calling SQLiteHelper class methods
5.1 Making SQLiteHelper class object
Here, we are making an object of SQLiteHelper class. While calling parameterized constructor of SQLiteHelper class it calls super class
i.e.
- SQLiteOpenHelper class constructor.
SQLiteOpenHelper class will create/open the database that we have discussed above.
5.2 Add Record
By pressing add button it calls an onAddRecord() method. onAddRecord() method Starts new activity called TableManipulationActivity with request code ADD_RECORD.
>> Make an intent object to go from MainActivity to TableManipulationActivity.
>> Put extra values to intent
>> And start an activity for getting result for ADD_RECORD.
5.2.1 Start TableManipulationActivity with ADD_RECORD request
In TableManipulationActivity get Extra value that we have set on last activity.
If request is for inserting the record, then we set the text of the button as Insert.
5.2.2 onButtonClick() method
>> First it will check if Firstname or Lastname is empty. If one of the fields is empty then we’ll not move forward.
>> Otherwise, we will make an object of intent and put First name and Last name as an extra values of intent.
>> Now set the result RESULT_OK. (Standard activity result: operation succeeded).
>> finish() the current activity.
5.2.3 onActivityResult(int requestCode, int resultCode, Intent data)
When we start any activity for result (Remember: startActivityForResult() method), after finishing or getting back from that particular activity onActivityResult() method will called from the last activity (Here, MainActivity).
>> Here, we are checking for resultCode. If resultCode is RESULT_OK then we are getting extra values that we have set on last activity (i.e. Firstname and Lastname).
>> After getting First name and Last name holding that data by ContactModel class.
>> Now check for requestCode. It requestCode is ADD_RECORD then insert record to the table.
5.2.4 Display all records
After calling insertRecord() method we will call displayAllRecords() method to display all the inserted records.
Get all records from Table.
ArrayList contacts = sQLiteHelper.getAllRecords();
- Getting list of contacts by calling getAllRecords() method of SQLiteHelper Class.
- Here, we know that SQLiteHelper.getAllRecords() method returns ArrayList of ContactModel Class.
Use Holder class to display records:
Holder class contains one TextView to display full name and two String values for first name and last name holding.
>> Make an instance of Holder class.
>> Get layout as a view using inflate method.
>> Get TextView reference from layout.
>> Now setTag view which is ID.
>> Set First Name and Last Name of holder class from ContactModel class.
>> Finaly, set person name to TextView by merging first name and last name.
5.3 Update Record
By long pressing on records you will ask for update or delete record
>> First set values for alert dialog (Update, Delete)
>> Set long click listener on inflated view.
>> Make AlertDialog.Builder for alert dialog and set both the items to alert dialog.
>> Now set click listener for both the items that we have added to alert dialog.
- DialogInterface: dialog reference
- which: index of the item that is clicked.
>> Update index is 0, when it is called then rowID will be store by calling getTag() method view and onUpdateRecord() method will be called with first name and last name.
5.3.1 onUpdateRecord()
Here, we are doing same that we have done on onAddRecord() for making instance of an intent.
- We are passing first name and last name with intent to show it on edit text of TableManipulationActivity.
- And at the end we are calling startActivityForResult() method with the request of UPDATE_RECORD.
>> Start TableManipulationActivity with UPDATE_RECORD request.
>> In TableManipulationActivity get Extra value that we have set on last activity.
- String request = getIntent().getExtras().get(Constants.DML_TYPE).toString();
>> If request is for updating the record then set the text of the button as Update.
- btnDML.setText(Constants.UPDATE);
>> onButtonClick() method:
- onButtonClick() method is the same method that we have shown at the time of AddRecord.
>> onActivityResult(int requestCode, int resultCode, Intent data):
- Here, onActivityResult() method will called with UPDATE_RECORD request.
>> Here, we already stored FirstName and LastName into ContactModel’s contact object.
>> In update we also need rowID which is being affected. So here we also setting rowID.
>> And Finally, calling updateRecord() method of SQLiteHelper class.
5.4 Delete Record
>> For deleting a record long press on record and select Delete.
>> You will be asked for confirmation if you would like to delete the record.
>> Here, we are making alert dialog for confirmation of deleting record.
>> We are deleting the row based rowID, so we have just set the rowID to ContactModel class.
>> And call deleteRecord() method of SQLiteHelper class by passing object of ContactModel class.
Step 6 Get all table name list into array from sqlite database
To get all the table names from the current database.
I hope you find this blog post very helpful while with How to use SQLite Database in Android. Let me know in comment if you have any questions regarding How to use SQLite Database in Android. I will reply you ASAP.
Learning Android sounds fun, right? Why not check out our other Android Tutorials?
Got an Idea of Android App Development? What are you still waiting for? Contact us now and see the Idea live soon. Our company has been named as one of the best Android App Development Company in India.
Tejas Jasani

An entrepreneur who has founded 2 flourishing software firms in 7 years, Tejas is keen to understand everything about gaming — from the business dynamics to awesome designs to gamer psychology. As the founder-CEO of a company that has released some very successful games, he knows a thing or two about gaming. He shares his knowledge through blogs and talks that he gets invited to.
Источник


