- A Full Guide to Use a Flash Drive on Android Phone [Partition Magic]
- Summary :
- Quick Navigation :
- How to Use a Flash Drive on Android
- How to Use a Flash Drive on Android
- Check Your Android USB Port
- Check If Your Android Supports USB On-The-Go (OTG)
- Prepare a USB OTG Cable
- Prepare a Flash Drive Formatted as FAT32
- How to Connect a USB Flash Drive to Android
- How to Safely Disconnect an Android Flash Drive
- Bottom Line
- How to install and use Flash Player on your Android device
- Installing Flash on Android
- Using Flash on Android
- Closing Words
- How to install Flash on an Android phone or tablet
- Installing Flash on Android devices running Android 4.1 or newer
- Puffin
- Photon Flash Player & Browser
- Installing Flash on Android devices running Android 4.0 or older
- Step 1: Configure security settings
- Step 2: Download Flash from Adobe’s website
- Step 3: Install Flash Player
- Step 4: Reactivate Security Settings
A Full Guide to Use a Flash Drive on Android Phone [Partition Magic]
By Irene | Follow | Last Updated January 29, 2021
Summary :
Do you know how to connect a USB flash drive to your Android phone? If you don’t know, this article from MiniTool will show you some tips about how to use a USB flash drive on an Android phone.
Quick Navigation :
Sometimes, you may need to connect a flash drive to your Android. As we all know, the USB port on your Android does not match that of a flash drive. How can you make it? Well, this article will give you some instructions on how to use such a drive with Android.
How to Use a Flash Drive on Android
- Check your Android USB port
- Check if your Android supports USB On-The-Go (OTG)
- Prepare a USB OTG cable
- It should be formatted as FAT32
- Connect it to Android
- Tab the pop-up file manager on Android to browse the files on the USB
How to Use a Flash Drive on Android
You can connect a USB drive to an Android so that you can use it on Android and transfer files at ease. The question is: how to connect the USB drive to an Android? Well, the way to connect the flash drive to your Android may depend on what types of USB port your Android has.
Check Your Android USB Port
If you have an Android with a USB Type-C port and you have USB drive with both a USB-C interface and a USB-A interface, you can use the USB drive on Android without the need for an adapter. If you are using the traditional USB-A flash drive, you will need an adapter such as the USB On-The-Go (OTG) cable.
However, currently, most Android use Micro USB interface (USB Micro-B) for data migration and charging. Although USB type-C port appears on some android nowadays with the maturity of technology, Micro USB interface is still widely used in various mobile portable devices including Android.
So, generally speaking, when people asking how to connect a flash drive to an Android, the USB interface of the Android refers to the Micro USB interface. For these Android users, they have to resort to a USB OTG cable.
In conclusion, if you have an Android with a USB-C port, you can buy a new flash drive with both a USB-C interface and an A interface or adopt the USB OTG cable if you are using the traditional USB-A drive. If your Android has the traditional Micro USB port, you have no choice but to use the adapter USB OTG cable to make the connection.
No matter what, a USB OTG cable is vital, but what’s more important is that your Android should support USB OTG.
Check If Your Android Supports USB On-The-Go (OTG)
USB On-The-Go enables your Android to act as a USB host, allowing your Android to connect additional hardware such as flash drive, keyboard and so on.
However, not all Android support USB On-The-Go. So before applying this method, you should check if your Android supports USB OTG first. There are many USB OTG Checker apps, which can quickly scan your Android to check it supports USB OTG. You can download one via the Google Play store.
You can also visit your Android’s manufacturer’s website. If you see USB OTG listed in the specifications, it means the device supports USB OTG. If your Android is not compatible, you are unable to use the USB OTG cable to connect your USB drive to Android.
Prepare a USB OTG Cable
The USB OTG cable has a male Micro USB connector on one side and female USB-A jack on the other, which enables you to connect the USB drive to the Android.
You can plug your USB drive into the USB A jack, and then plug the other end of the USB OTG cable into your Android. In this case, the USB drive can be connected to your Android, which is very convenient.
If your Android supports USB OTG, you can connect your drive to your Android via USB OTG cable. However, most Android don’t come with a USB OTG cable. If you do not have one, you can buy a USB OTG cable from Amazon.
Prepare a Flash Drive Formatted as FAT32
Prepare a USB drive to be used on your Android. If the USB drive is formatted as NTFS, you need to format it to FAT32, as NTFS doesn’t work properly with Android.
If you don’t know how to format USB drive to FAT32 file system, you can keep reading.
Format your Android Flash Drive to FAT32
To make sure the flash drive can be read on your Android, a proper file system is vital. If you want to use it with Android, the file system for the USB drive should be FAT32.
If you need to format Android flash drive to FAT32, MiniTool Partition Wizard Free Edition is recommended.
MiniTool Partition Wizard Free Edition is an all-in-one partition manager. It can help you move/resize partition, extend partition, format partition, convert FAT to NTFS, convert MBR to GPT disk, migrate OS to SSD/HD, backup partition and so on.
With its simple procedures, powerful features and user-friendly interface, it has become the most popular partition manager for Windows users. So if you want to format USB drive to FAT32, MiniTool Partition Wizard Free Edition is your best choice.
Before you format USB drive to FAT32, you need to connect the Android flash drive that you need to format to your computer. Then you can follow the detailed guide below.
Step 1. Download MiniTool Partition Wizard Free Edition by clicking the following button. Install it on your computer and launch it to get the main interface.
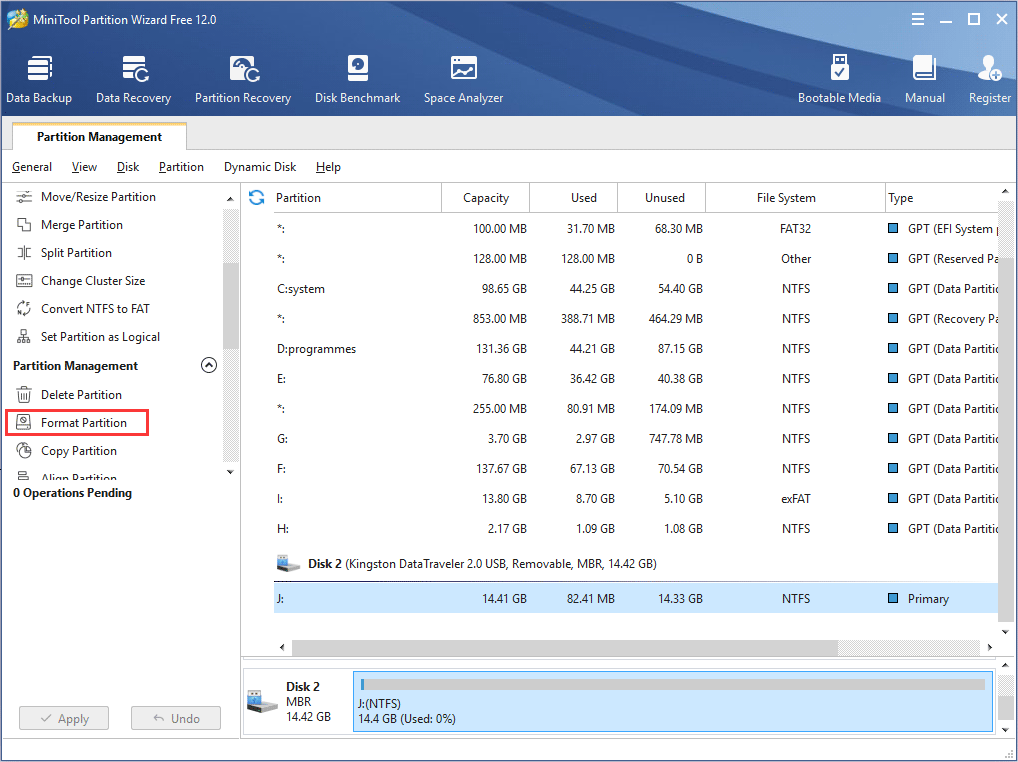
Step 2. Select the target partition, and then choose Format from the left action pane.
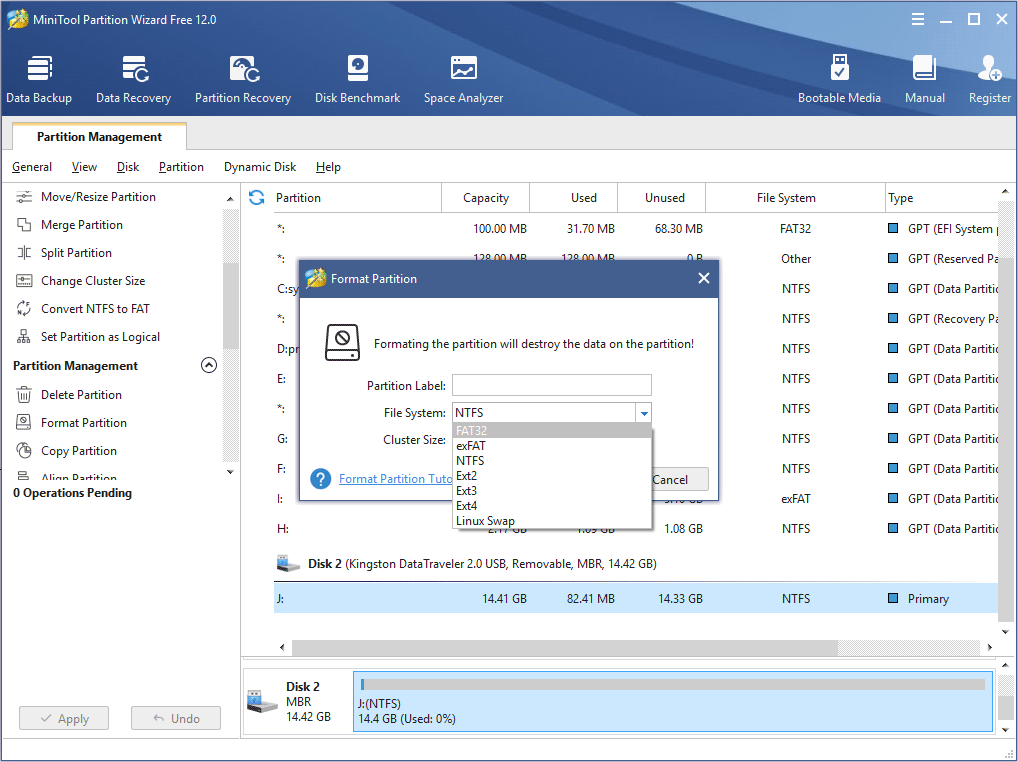
Step 3. On the Format partition page, choose FAT32 file system and click OK button.
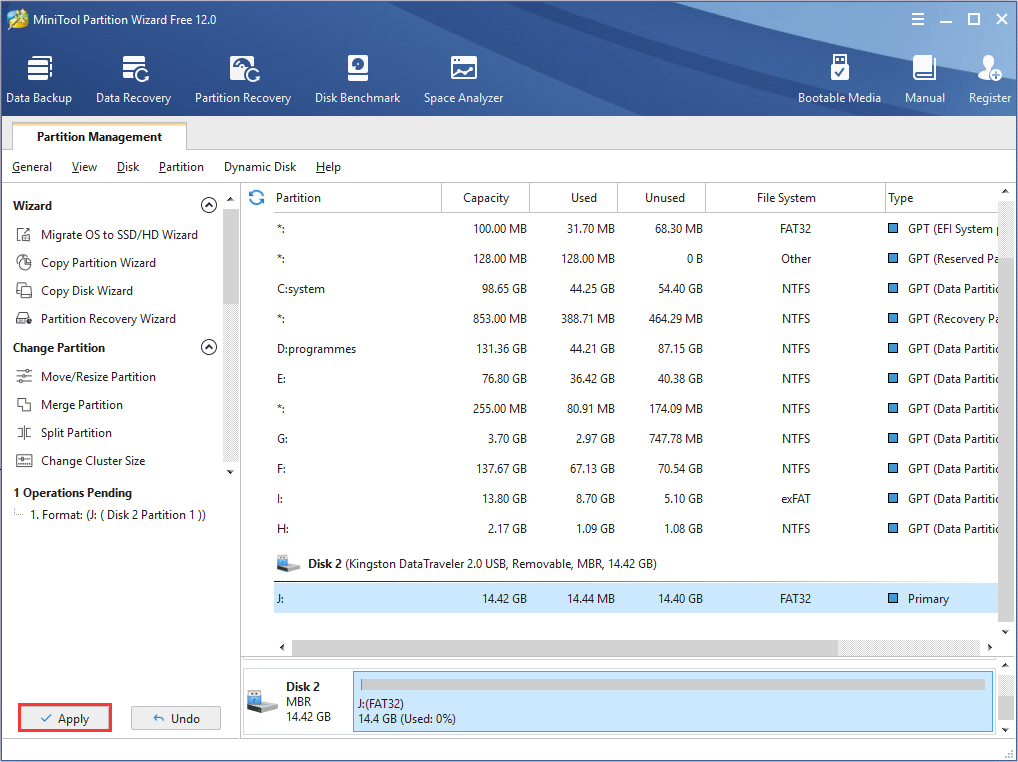
Step 4. At last, click Apply button on the top left corner to allow the change.
If there is no important file on the Android flash drive, you can format it to FAT32 using the following method. However, if there are important files stored on your USB drive, such as loads of movies that you want to play after connecting the USB drive to your Android device, what should you?
You can move them to another drive and restore them after formatting, but it consumes much time. If your Android flash drive is formatted as NTFS, here is another method for you: convert NTFS to FAT32 without data loss.
Convert Android Flash Drive from NTFS to FAT32
In most cases, a USB drive will be formatted to NTFS by default. If it is NTFS, you can convert the USB drive to FAT32 with MiniTool Partition Wizard Pro Edition.
Like the above steps, you just need to get MiniTool Partition Wizard Pro Edition by clicking the button. After installing the partition manager, select the USB drive and choose Convert NTFS to FAT32. At last, follow the prompts to apply the pending operation.
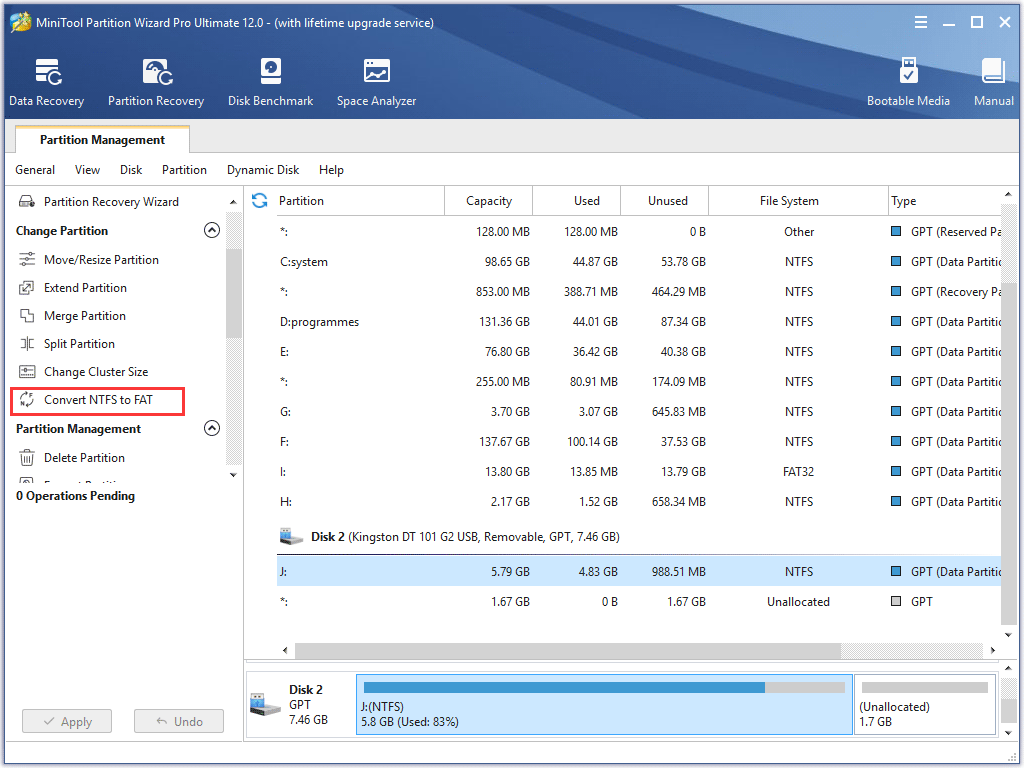
So if formatting is not a good idea for you, you can convert NTFS to FAT32 without data loss with MiniTool Partition Wizard Pro.
How to Connect a USB Flash Drive to Android
After having a USB OTG cable and formatting or converting the USB drive to FAT32, you can connect the drive to your Android. If you don’t know how to make the connection, this guide is helpful.
Step 1. Plug your cable into your Android.
Step 2. Plug your USB drive into the female connector of the cable.
Step 3. Then the file explorer on your Android should automatically pop up after detecting the USB drive.
Step 4. If the USB drive is not properly formatted, it will require you to erase and format your drive. If your USB drive is properly formatted with MiniTool Partition Wizard, you are able to tab the notification and open the file explorer to view the contents of the drive as if they were originally stored on your Android.
Then you are able to transfer files from android to this removable drive and play media files from the USB drive. Remember that do not remove the storage device while using it, as this will cause unexpected data loss on the USB drive.
If you need to copy and paste certain files from the flash drive to your Android device, you can long-press on the items you want to move and perform the proper operation. If you want to remove the Android USB drive, to avoid data loss, you should safely disconnect the Android flash drive.
How to Safely Disconnect an Android Flash Drive
When you don’t need the Android USB drive, you can follow this instruction below to safely disconnect the USB drive.
Step 1. Swipe down from the top of the screen.
Step 2. Tap the USB mass storage connected. Then you can now safely disconnect your flash storage device.
Now you should know how to safely disconnect the Android flash drive. It is not a difficult thing to connect and disconnect a flash drive to your Android.
After knowing how to connect a flash drive to an Android, you can use the USB drive on Android at ease no matter if you want to transfer files or play media files stored on the USB drive.
Bottom Line
After reading this post, you should know how to connect and use a USB drive on Android.
If you have any question about how to format Android flash drive or how to use such a drive on Android, you can leave a message in the following comment zone and we will reply as soon as possible. If you need any help when using MiniTool software, you may contact us via [email protected] .
Источник
How to install and use Flash Player on your Android device
So, Adobe made the decision to cease any mobile Flash development some time ago which had the consequence that newer versions of Android shipped without it. While many may see that as a step in the right direction, it means that Flash-based contents on the Internet cannot be accessed on the device.
This includes the majority of online game sites, several video hosting sites, and other media sites that make use of Flash.
The following guide looks at possibilities that you have to enable Flash on your Android device. While you may still be limited somewhat in terms of the application that you can use to make use of Flash Player, it is better than not having access to Flash at all.
Installing Flash on Android
Adobe Flash is no longer available on Google Play, which means that you have to download the Android version of it from another source. Note that you can only download older versions of Flash, and that this may pose a security risk. It is generally not recommended to install Flash unless you really, really need it.
The official source is Adobe’s archived Flash Player versions page where you find Flash versions for Android listed. Do not get confused too much by the versions displayed here though. Even though it lists only 4.0 as supported, it works just fine on newer Android devices as well.
Just tap on the latest version of the file to download it to your Android device.
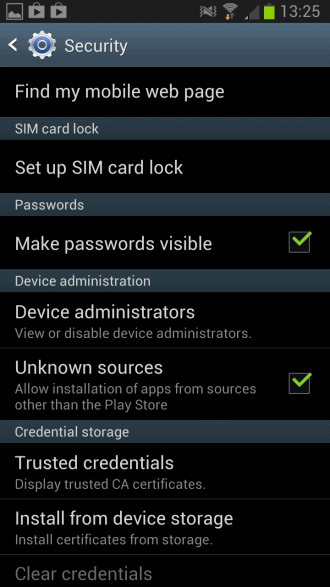
Note: To install it, you need to enable the installation from unknown sources in the settings. To do so select Settings > Security > Unknown Sources under Device Administration. Note that the menus may have different names on your system.
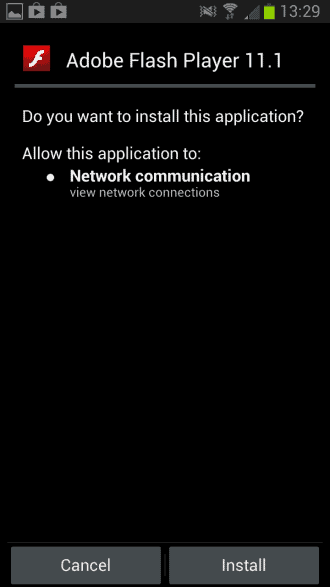
Once done, open the default file browser on your system or the notifications area of your phone if the downloaded Flash Android file is still listed there, and tap on it. You may be asked to pick a program to install it on the system, and both choices that you can make here are just fine so do not worry about them.
Once you tap on the install button Flash is installed on your device.
Using Flash on Android
Now that Adobe Flash Player is installed on your device, you need to find a program to use it with. You cannot just use any browser as many do not support the Flash plugin (anymore).
Probably the best choice in this regard is the Firefox web browser for Android. You can download and install the latest version on Google Play.
Once installed it will pick up the Flash plugin automatically. You can make a configuration change however:
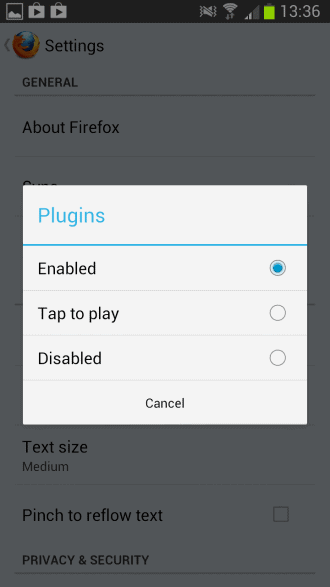
- Tap on the menu button when Firefox is open on your Android smartphone or tablet.
- Select Settings from the context menu and locate the Plugins preference here.
- Tap on it to either set plugins to be enabled at all time, or activated only when you tap on them. Here you can also disable plugins but that is not really something that you want to do if you want to access Flash contents on the Internet.
Please note that while Flash may run on most sites you visit, but some may detect the user agent of your device to prevent Flash contents from being displayed at all. You may be able to overcome that by installing the Phony extension for Firefox mobile which lets you change your phone’s or tablet’s user agent to avoid this.
Closing Words
Running Flash, especially a version that is no longer updated, poses a security risk and you need to be aware of that. One option that you have to avoid many of the issues associated with that, is to make sure plugins are configured as «tap to play» in Firefox so that they do not run automatically.
Источник
How to install Flash on an Android phone or tablet

When Google released Android 4.1 Jelly Bean in 2012, Flash support found itself on the cutting room floor, no longer downloadable in the Google Play Store and dropped from the mobile platform. Convenient for watching TV on your phone or playing a slew of online games, Flash was an application that set the Android ecosystem apart from iOS, for better and worse.
Android users today operate their phones out-of-the-box sans Flash, yet many still want a way to get the software platform back again. Luckily, Adobe realized this and now allows Android users to download its Flash player directly from the company’s website. Because Flash is no longer supported on Android devices, you won’t find any security updates, bug fixes, or official support. You may experience stability issues when downloading and using Flash, too, many of which worsen when using modern devices running more recent versions of Android like Marshmallow, Nougat, Oreo, and Pie.
That said, read on if you’re still set on installing Flash on your device.
Installing Flash on Android devices running Android 4.1 or newer
If you’re running Android 4.1 — aka Jelly Bean — or newer, all you need to do is install a browser that supports Flash on your device. These are becoming rare, however. Let’s take a look at two options that we can currently recommend if you feel it necessary to deal with Flash content on your Android device.
Puffin

In short, if you need to access Flash content on your Android device, your best bet is to install the Puffin browser. It runs Flash in the cloud, though it does so as if it were running locally on your device. You can play games, watch video, and access a multitude of Flash content. It also boasts quick speeds and encrypts your browsing activity, a plus if you’re concerned about online security. Puffin also offers all sorts of other tools and an array of themes.
What’s the catch? The cloud servers that are handling your browsing are based in the United States. If there are location restrictions on the content you’re trying to access, then the content may not be available for users outside of the U.S. The browser is also blocked in countries such as China, Saudi Arabia, and the United Arab Emirates. Still, Puffin remains your best option if you need to access Flash on your Android device.
Photon Flash Player & Browser

Another great way to access Flash content, both on the web and on your phone, is Photon Flash Player & Browser. The app not only supports Flash videos but also Flash games — so if you’re feeling a little nostalgic, you can play some of those classic online games. As you would expect, the app supports formats like FLV and SWF, though it also supports more modern formats — so if you want to make this your default browser you can do so.
Another great feature here is that the Photon Flash Player & Browser claims to act as a VPN when you’re using it. In other words, it ensures that even when you’re on a public network, your browsing is secure and private. Plus, it unblocks content.
Installing Flash on Android devices running Android 4.0 or older
Before we get started, you’ll want to make sure that your phone or tablet is running an operating system between Android 2.2 and 4.1. You can find which OS your device is running by going to Settings > About phone (or About tablet).
Step 1: Configure security settings
Once the prerequisites above are in order, the real fun of installing Flash on your Android device can begin. First, access your phone’s security settings to allow for application downloads outside of Google Play. To do this, go to Settings > Applications (for older Android operating systems), or Settings > Security (for Android 4.1 Jelly Bean), and check the box next to Unknown sources. It should ask you to confirm your selection, and when it does, select OK. Now that your security settings have changed, navigate back to your home screen and open your browser. Again, Google Chrome will not work for this on Android devices using Jelly Bean 4.1 or newer.

Step 2: Download Flash from Adobe’s website
Navigate to Adobe’s Flash Player archives in your browser and scroll down until you arrive at the listings for Android Flash player downloads, where you’ll find two separate sections: one with download links for recent operating system versions and one for versions compatible with Android OS 2.1-2.3 and 3.0. Adobe’s most recent Flash Player updates for Android (11.1.111.73 for Android 2.x and 3.x and 11.1.115.81 for Android 4.0.x) were released in 2013, and lead off the top of both sections. We recommended that you choose the most recent, compatible download for your Android device.

Once you click on the compatible download, the Flash Player Installer should begin automatically. When the download finishes, navigate back to your home screen or close the browser.
Step 3: Install Flash Player
Next, access the Notifications on your phone and tap on the file titled “install_flash_player.apk”. Once you see the download alert, tap Install to begin installing Flash on your Android device.

Next, tap Done after the installation is finished and click back into your phone’s stock browser to enable the new plug-ins. If you are using an Android 3.0 or later, go to your browser’s Menu then click Settings > Advanced > Enable Plug-ins. If you’re using Android 2.2, or 2.3, enter your browser’s Menu and click on More Settings > Enable Plug-ins. Once the plug-ins are active, your Android phone should begin using Flash. You can run a Flash test by visiting this site; You’ll see a brief Flash animation at the top, followed by the version information.
Step 4: Reactivate Security Settings
Now that the download is complete, be sure to go back into your Settings folder — or the Security folder, if you’re running Android 4.1 — and de-select the Unknown sources box to keep your Android device secure. Once the security settings are back to normal, you’ll be free to use Flash Player on your Android phone or tablet. If you have trouble with the download, or would like to reference Adobe’s site for help, you can always visit the Flash Player FAQs page.
Источник


