- Cloud Firestore + Android это просто
- Возможности
- Создание и подключение к проекту
- Структура хранения данных
- Получение и запись данных
- Подписываемся на изменения
- Загрузка большого количества данных
- Заключение
- 10 best cloud storage services and apps for Android
- The best cloud storage services and apps for Android
- Amazon Drive
- Autosync
- Dropbox
- Google Drive
- Microsoft OneDrive
- Nextcloud
- Resilio Sync
- Tresorit
- Upload files with Cloud Storage on Android
- Upload Files
- Kotlin+KTX
- Upload from data in memory
- Kotlin+KTX
- Upload from a stream
- Kotlin+KTX
- Upload from a local file
- Kotlin+KTX
- Get a download URL
- Kotlin+KTX
- Add File Metadata
- Kotlin+KTX
- Manage Uploads
- Kotlin+KTX
- Monitor Upload Progress
- Kotlin+KTX
- Handle Activity Lifecycle Changes
- Kotlin+KTX
- Continuing Uploads Across Process Restarts
- Kotlin+KTX
- Kotlin+KTX
- Error Handling
- Full Example
- Kotlin+KTX
Cloud Firestore + Android это просто
 Не так давно Google зарелизил Cloud Firestore. Cloud Firestore — это облачная NoSQL база данных, которую Google позиционирует как замену Realtime Database. В этой статье я хочу рассказать как начать ей пользоваться.
Возможности
Cloud Firestore позволяет хранить данные на удаленном сервере, легко получать к ним доступ и следить за изменениями в режиме реального времени. В документации есть отличное сравнение Cloud Firestore и Realtime Database.
Создание и подключение к проекту
В консоли Firebase выбираем Database и нажимаем на Create database. Дальше выбираем настройки доступа. Для ознакомления нам будет достаточно тестового режима, но на проде лучше подойти к этому вопросу серьезнее. Подробнее про режимы доступа можно почитать здесь.
Для настройки проекта проделываем следующие шаги:
- Добавить Firebase к проекту по инструкции от сюда
- Добавить зависимость в app/build.gradle
implementation ‘com.google.firebase:firebase-firestore:18.1.0’
Теперь все готово.
Для ознакомления с базовыми приемами работы с Cloud Firestore я написал простенькое приложение. Для его работы необходимо создать проект в консоли Firebase и добавить файлик google-services.json в проект в Android Studio.
Структура хранения данных
В Firestore для хранения данных используются коллекции и документы. Документ — это запись, которая содержит какие-либо поля. Документы объединяются в коллекции. Также документ может содержать вложенные коллекции, но на андроиде это не поддерживается. Если проводить аналогию с SQL-базой, то коллекция — это таблица, а документ — это запись в этой таблице. Одна коллекция может содержать документы с разным набором полей.
Получение и запись данных
Для того чтобы получить все документы какой-либо коллекции достаточно следующего кода
Здесь мы запрашиваем все документы из коллекции Tasks.
Библиотека позволяет формировать запросы с параметрами. Следующий код показывает как получить документы из коллекции по условию
Здесь мы запрашиваем все документы из коллекции Tasks, у которых поле title соответсвует значению Task1.
При получении документов, их можно сразу конвертировать в наши data-классы
Для записи необходимо сформировать Hashmap с данными (где в качестве ключа выступает название поля, а в качестве значения — значение этого поля) и передать библиотеке. Следующий код это демонстрирует
В данном примере будет создан новый документ и Firestore сгенерирует ему id. Чтобы задать собственный id необходимо сделать следующее
В этом случае если нет документа с id равном New task, то он будет создан, а если есть, то указанные поля будут обновлены.
Еще один вариант создания/обновления документа
Подписываемся на изменения
Firestore позволяет подписаться на изменения данных. Подписаться можно как на изменения коллекции, так и на изменения конкретного документа
querySnapshot.documents — содержит обновленный список всех документов
querySnapshot.documentChanges — содержит список изменений. Каждый объект содержит измененный документ и тип изменения. Возможны 3 типа изменений
ADDED — документ добавлен,
MODIFIED — документ изменен,
REMOVED — документ удален
Загрузка большого количества данных
Realtime Database предоставляет более менее удобный механизм загрузки большого количества данных, который заключается в ручном редактировании json-файла и его загрузки. Firestore из коробки ничего такого не предоставляет. Было очень неудобно добавлять новые документы, пока я не нашел способ как можно легко загрузить большой объем информации. Чтобы у вас не было таких проблем как у меня, ниже приложу инструкцию как быстро и легко загрузить большой объем данных. Инструкция была найдена на просторах интернета.
- Установить Node.js и npm
- Установить пакет firebase-admin выполнив команду
npm install firebase-admin —save - Сформировать json-файл с данными коллекции. Пример можно посмотреть в файле Tasks.json
- Для загрузки нам понадобиться ключ доступа. Как его получить хорошо описано в этой статье
- В файле export.js проставить свои данные
require(‘./firestore_key.json’) — файл с ключом доступа. У меня лежал в папке со скриптом
— название вашей firestore-базы
«./json/Tasks.json» — путь до файла в котором лежат данные
[‘created’] — список имен полей с типом Timestamp - Выполнить скрипт
node export.js
В скрипте используются наработки dalenguyen
Заключение
Cloud Firestore я использовал в одном из своих проектов и не испытал никаких серьезных проблем. Одна из моих коллекций содержит около 15000 документов и запросы по ней проходят довольно быстро и это без использования индексов. Используя Cloud Firestore совместно с Room и Remote Config можно существенно сократить количество обращений к базе и не выходить за бесплатные лимиты. На бесплатном тарифе в день можно прочитать 50000 документов, записать 20000 и 20000 удалить.
Источник
10 best cloud storage services and apps for Android
We’re not in an era where having cloud storage is a good idea. It’s efficient, doesn’t take up your internal storage, and it’s far more convenient than carrying a hard drive around everywhere. it also makes it easier to share files with other people. You can get ahead of the curve with these awesome cloud storage services and apps for Android! There are also some great free cloud storage apps here that don’t cost you anything! Prices are accurate as of the publish date, but they could change before the next one.
The best cloud storage services and apps for Android
Amazon Drive
Price: Free app/ $1.99-$11.99 per month
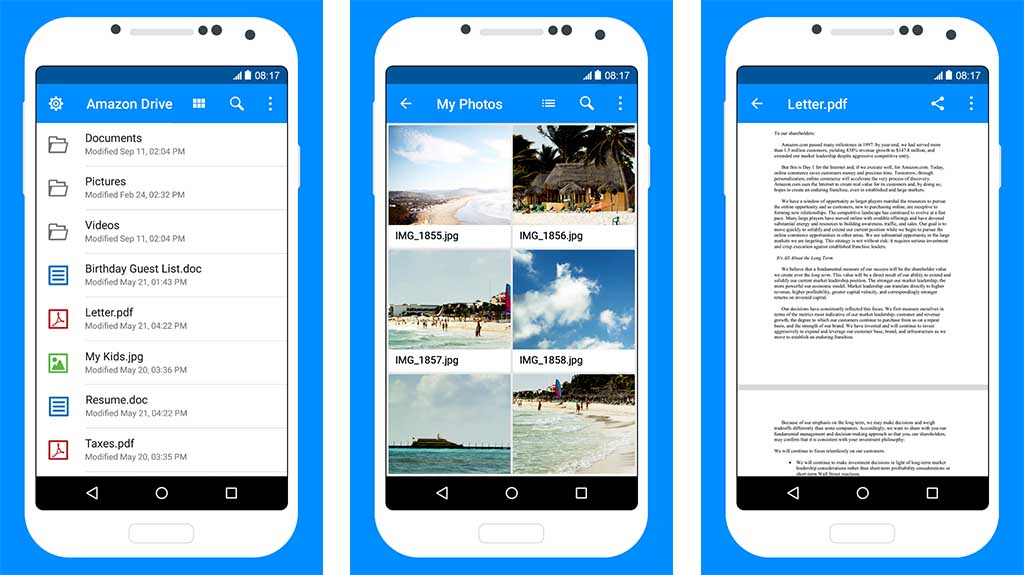
Amazon Drive is a good start for anyone who uses Amazon Prime. Those with Amazon Prime will already get 5GB of free storage along with unlimited backup for photos and videos. You can upgrade to unlimited storage for about $60 per year. Those without Amazon Prime get unlimited photo backup for $12 per year. The app itself works fine and isn’t anything special. There is a bit of lag from time to time, but otherwise, it’s a decent overall experience. Plus, if you have Amazon Prime, you can get unlimited photo uploads via the Amazon Photos app (Google Play link). It also recently changed its prices. The $1.99 per month price gives you 100GB, the $6.99 per month price gives you 1TB, and the $11.99 per month price gives you 2TB.
Autosync
Price: Free / Up to $9.99
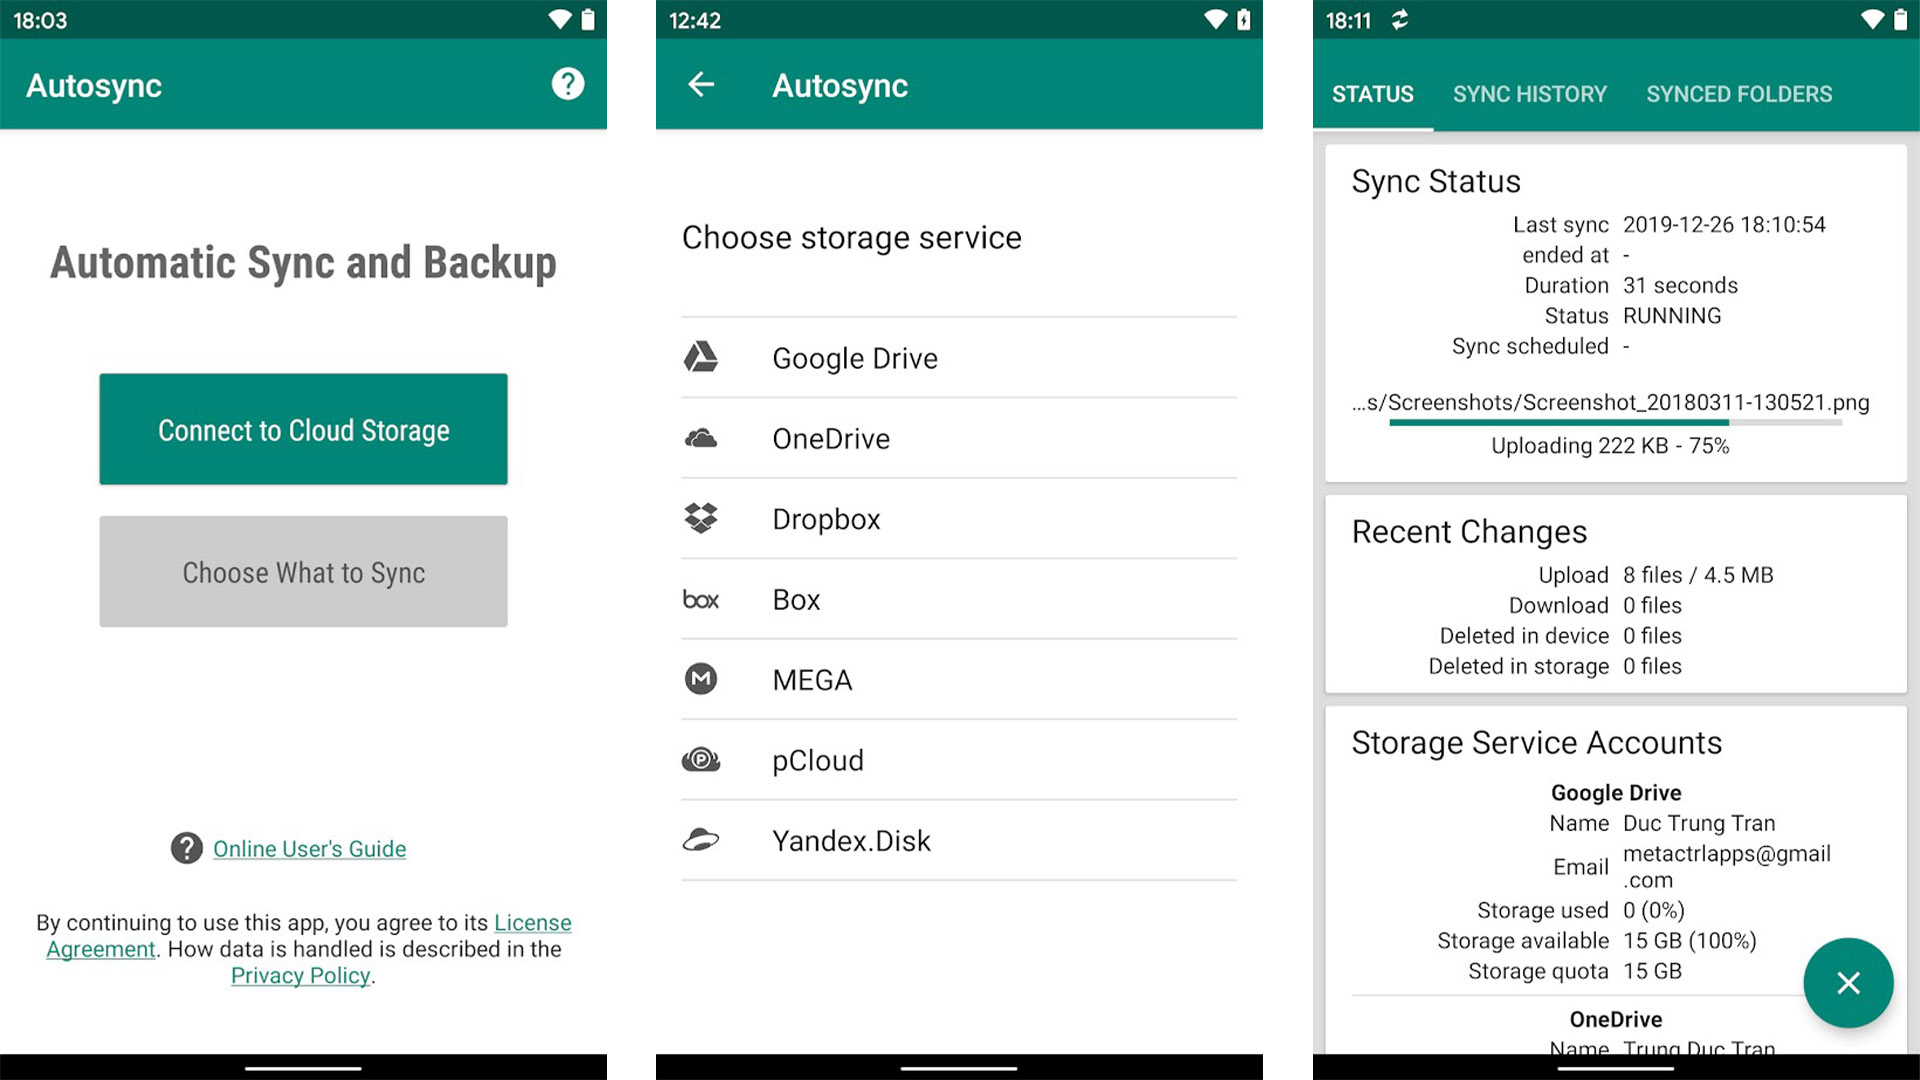
Autosync is a family of apps by MetaCtrl. Each one deals with a different cloud storage app and you can choose between Google Drive, OneDrive, Dropbox, Box, MEGA, and a new universal one (still in beta) that works with all of the previously mentioned services along with pCloud, Yandex Disk, and SharePoint Online. Autosync functions as a cloud storage manager. It forces full two-way syncing between your phone and cloud storage (or one way if you prefer) and you can set it to sync at customizable intervals. That’s really all it does, but it’s great if you want copies of your cloud storage on all of your devices.
Price: Free / $5-$15 per month / Enterprise options

Box.com is an up-and-comer in the cloud storage world. There are a variety of file management apps and others that have Box integration as well and that’s nice. New users can sign up for personal accounts for free and get 10GB of free storage while $10/month gets you 100GB. Business prices range from $5-$15/month per user and include far more features. The app works pretty well and it puts an emphasis on simplicity and organization. It is a bit more expensive than most for its base 100GB plan for individual use so keep that in mind.
Dropbox
Price: Free / $9.99-$16.99 per month
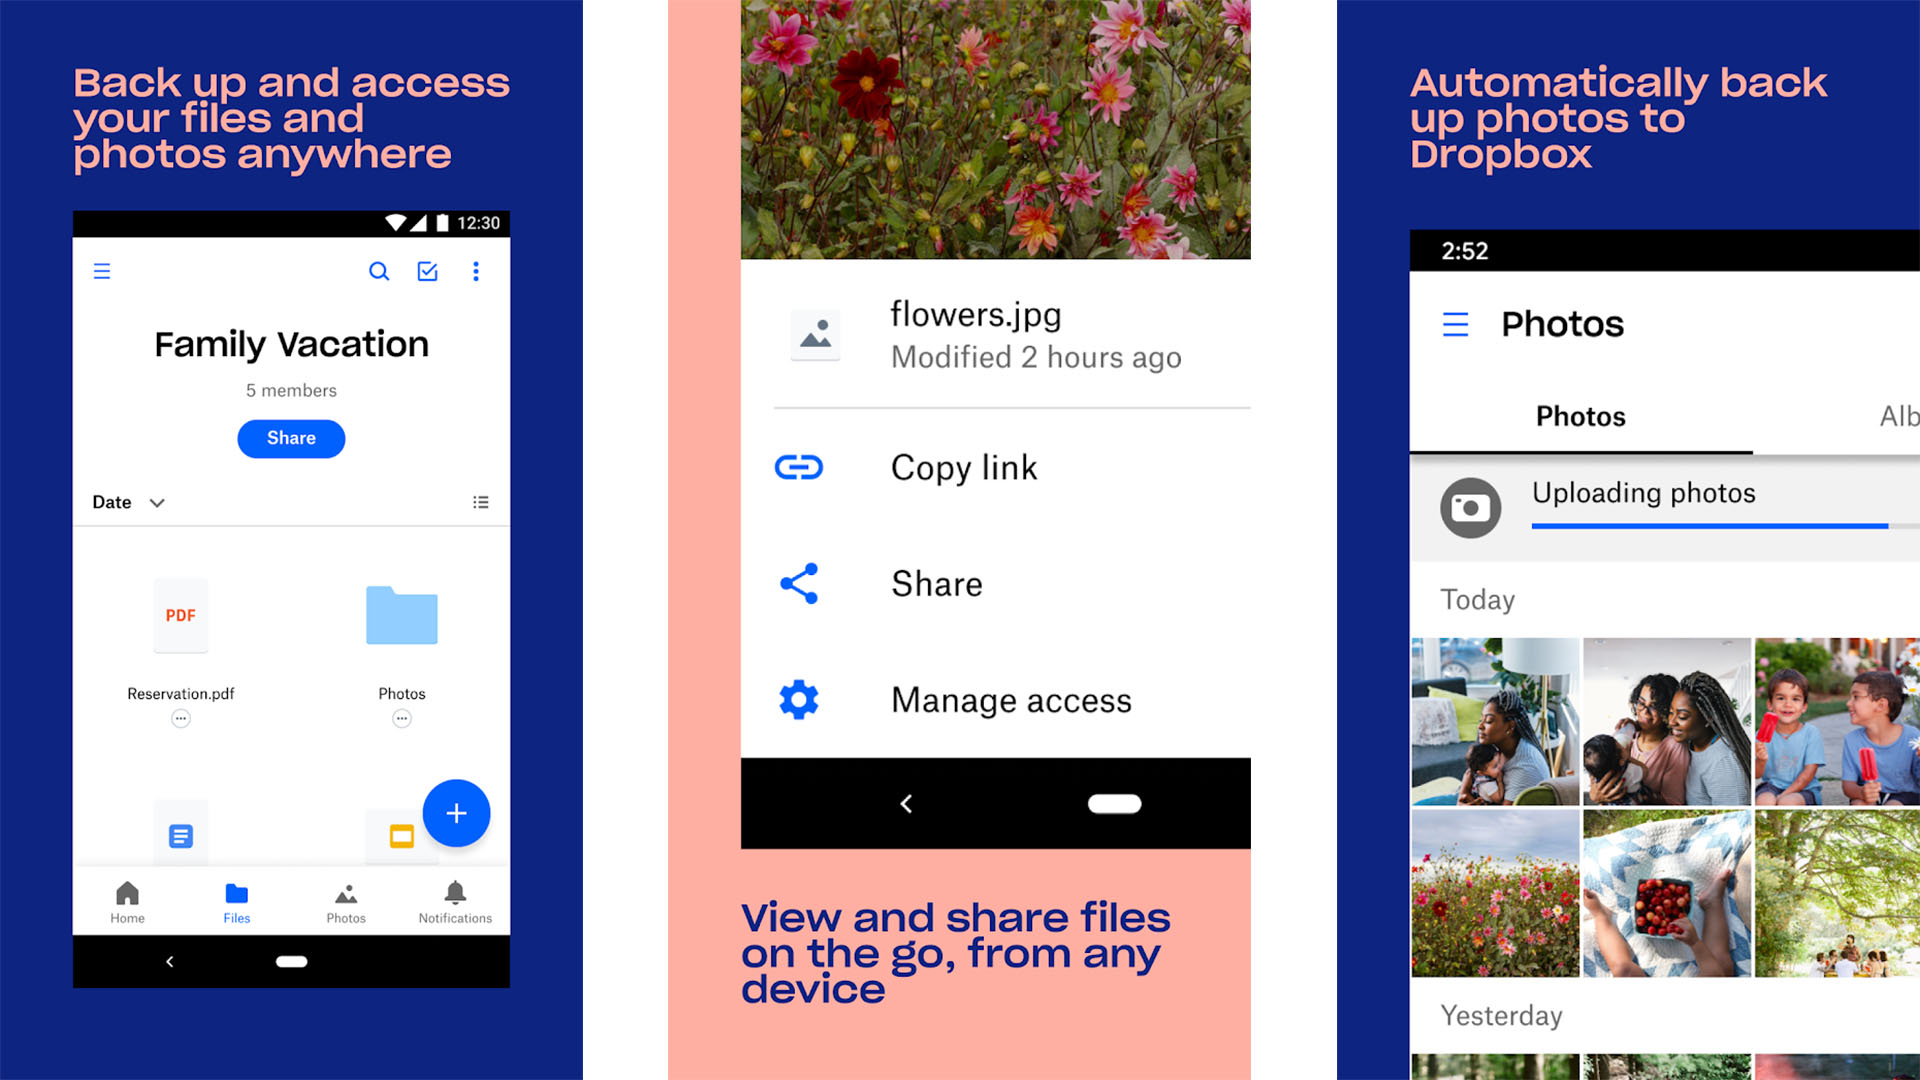
Everybody knows about Dropbox and there’s a good chance that some of you have this app pre-installed on your devices already. The app comes with auto-photo upload, easy sharing options, the latest Android design elements, Microsoft Office support, and the ability to send files to others. It’s a very solid option with more features than most. Individual accounts get 2GB for free. You now get 2TB for $10 per month which is on par with industry competitors. There is also a family plan for $16.99 per month that gives you the same 2TB but it’s usable by up to six people.
Google Drive
Price: Free / $1.99-$9.99 per month

Google Drive is one of the most respected and popular cloud storage apps available. Users get 15GB free out of the gate with Google Photos integration if they so choose. There is also an assortment of office apps available for documents, note taking, spreadsheets, and presentations. The plans are fairly versatile and include 100GB ($1.99 per month), 200GB ($2.99 per month), and 2TB ($9.99 per month). Between the photo storage, full-featured office apps, and collaborative features, Google Drive is a step above most in this game. However, if you just need cloud storage, they’re competitive, but not the only option.
Price: Free / €4.99-€29.99 per month / $6-$36 per month
MEGA is the spiritual sequel to the controversial site MegaUpload from years ago. It has the best free offering of any cloud storage app on the list with 50GB just for signing up. It has plans ranging from 400GB for $6 per month to a whopping 16TB for $36 per month. In terms of cloud storage, MEGA has a lot going for it. The app is easy to use and you can organize your files as needed. The only real caveat is the bonus storage you earn isn’t permanent. Otherwise, this is a solid option. The 50GB alone makes it great for a lot of folks.
Microsoft OneDrive
Price: Free / $1.99-$9.99 per month

Microsoft OneDrive is a popular cloud storage option because it integrates directly with a variety of Windows products. For starters, can get 5GB of free cloud storage and you can upgrade to 50GB for $1.99 per month. OneDrive storage is also included in every Office 365 subscription, be it for personal use or for businesses. You can get a bundled package of OneDrive space and Microsoft Office 365 for $6.99 per month (1TB, one device) or $9.99 per month (6TB, five devices). That gives you Microsoft Office and online cloud storage space for an exceptionally reasonable price. There is also an optional $1.99 per month OneDrive standalone package with 100GB.
Nextcloud
Price: Free
Nextcloud is a different type of cloud storage. It works a lot like Resilio Sync. You create your own Nextcloud server on your own computer. The app lets you sync files between your computer and your phone. It operates exactly like your typical cloud storage, but you control where the files go and what happens when they get there. It’s an excellent resource for people who like the idea of cloud storage, but don’t want their files in the servers of some other company. Plus, you get as much cloud storage as you have storage on your computer. The is free to use for personal use. There are enterprise options for businesses as well.
Resilio Sync
Price: Free / Up to $75

Resilio Sync (formerly BitTorrent Sync) is the best cloud storage solution for everyone that wants to do their own cloud storage. This app allows you to use your desktop, laptop, NAS, tablet, or even your own home-built server as a destination for your phone syncing. It operates exactly like Dropbox, Google Drive, etc, except you’ll be using your own machine to store everything. It’s an excellent option for those who are security conscious but still need cloud storage also. The only downside is that you’ll need to keep your receiving machine on all the time so that the syncing can be done. The app is free for basic home use with some rather expensive prices if you want to get full functionality. However, it is a single payment so it’s still cheaper in the long haul.
Tresorit
Price: Free / $12.50-$30 per month

Tresorit is one of the newer and more expensive cloud storage options. However, it takes security very seriously. It features end-to-end encryption of every file uploaded to its service. Basic accounts get 1GB of storage. $12.50 per month earns you 500GB while $30 per month nets you 2.5TB. Additionally, the pro plans include far more security features than the free account. There are also additional options for businesses and enterprise use. It’s a strong option for those who don’t mind paying for extra features and some extra privacy.
Who do you use for your cloud storage? If we missed any other great Android cloud storage options let us know about them in the comments below!
Thank you for reading! Try these out too:
Источник
Upload files with Cloud Storage on Android
Cloud Storage for Firebase allows you to quickly and easily upload files to a Cloud Storage bucket provided and managed by Firebase.
Note: By default, a Cloud Storage bucket requires Firebase Authentication to perform any action on the bucket’s data or files. You can change your Firebase Security Rules for Cloud Storage to allow unauthenticated access. Since Firebase and your project’s default App Engine app share this bucket, configuring public access may make newly uploaded App Engine files publicly accessible, as well. Be sure to restrict access to your Cloud Storage bucket again when you set up Authentication.
Upload Files
To upload a file to Cloud Storage, you first create a reference to the full path of the file, including the file name.
Kotlin+KTX
Once you’ve created an appropriate reference, you then call the putBytes() , putFile() , or putStream() method to upload the file to Cloud Storage.
You cannot upload data with a reference to the root of your Cloud Storage bucket. Your reference must point to a child URL.
Upload from data in memory
The putBytes() method is the simplest way to upload a file to Cloud Storage. putBytes() takes a byte[] and returns an UploadTask that you can use to manage and monitor the status of the upload.
Kotlin+KTX
Because putBytes() accepts a byte[] , it requires your app to hold the entire contents of a file in memory at once. Consider using putStream() or putFile() to use less memory.
Upload from a stream
The putStream() method is the most versatile way to upload a file to Cloud Storage. putStream() takes an InputStream and returns an UploadTask that you can use to manage and monitor the status of the upload.
Kotlin+KTX
Upload from a local file
You can upload local files on the device, such as photos and videos from the camera, with the putFile() method. putFile() takes a File and returns an UploadTask which you can use to manage and monitor the status of the upload.
Kotlin+KTX
Get a download URL
After uploading a file, you can get a URL to download the file by calling the getDownloadUrl() method on the StorageReference :
Kotlin+KTX
Add File Metadata
You can also include metadata when you upload files. This metadata contains typical file metadata properties such as name , size , and contentType (commonly referred to as MIME type). The putFile() method automatically infers the MIME type from the File extension, but you can override the auto-detected type by specifying contentType in the metadata. If you do not provide a contentType and Cloud Storage cannot infer a default from the file extension, Cloud Storage uses application/octet-stream . See the Use File Metadata section for more information about file metadata.
Kotlin+KTX
Manage Uploads
In addition to starting uploads, you can pause, resume, and cancel uploads using the pause() , resume() , and cancel() methods. Pause and resume events raise pause and progress state changes respectively. Canceling an upload causes the upload to fail with an error indicating that the upload was canceled.
Kotlin+KTX
Monitor Upload Progress
You can add listeners to handle success, failure, progress, or pauses in your upload task:
| Listener Type | Typical Usage |
|---|---|
| OnProgressListener | This listener is called periodically as data is transferred and can be used to populate an upload/download indicator. |
| OnPausedListener | This listener is called any time the task is paused. |
| OnSuccessListener | This listener is called when the task has successfully completed. |
| OnFailureListener | This listener is called any time the upload has failed. This can happen due to network timeouts, authorization failures, or if you cancel the task. |
OnFailureListener is called with an Exception instance. Other listeners are called with an UploadTask.TaskSnapshot object. This object is an immutable view of the task at the time the event occurred. An UploadTask.TaskSnapshot contains the following properties:
| Property | Type | Description |
|---|---|---|
| getDownloadUrl | String | A URL that can be used to download the object. This is a public unguessable URL that can be shared with other clients. This value is populated once an upload is complete. |
| getError | Exception | If the task failed, this will have the cause as an Exception. |
| getBytesTransferred | long | The total number of bytes that have been transferred when this snapshot was taken. |
| getTotalByteCount | long | The total number of bytes expected to be uploaded. |
| getUploadSessionUri | String | A URI that can be used to continue this task via another call to putFile. |
| getMetadata | StorageMetadata | Before an upload completes, this is the metadata being sent to the server. After the upload completes, this is the metadata returned by the server. |
| getTask | UploadTask | The task that created this snapshot. Use this task to cancel, pause, or resume the upload. |
| getStorage | StorageReference | The StorageReference used to create the UploadTask . |
The UploadTask event listeners provide a simple and powerful way to monitor upload events.
Kotlin+KTX
Handle Activity Lifecycle Changes
Uploads continue in the background even after activity lifecycle changes (such as presenting a dialog or rotating the screen). Any listeners you had attached will also remain attached. This could cause unexpected results if they get called after the activity is stopped.
You can solve this problem by subscribing your listeners with an activity scope to automatically unregister them when the activity stops. Then, use the getActiveUploadTasks method when the activity restarts to obtain upload tasks that are still running or recently completed.
The example below demonstrates this and also shows how to persist the storage reference path used.
Kotlin+KTX
getActiveUploadTasks retrieves all active upload tasks at and below the provided reference, so you may need to handle multiple tasks.
Continuing Uploads Across Process Restarts
If your process is shut down, any uploads in progress will be interrupted. However, you can continue uploading once the process restarts by resuming the upload session with the server. This can save time and bandwidth by not starting the upload from the start of the file.
To do this, begin uploading via putFile . On the resulting StorageTask , call getUploadSessionUri and save the resulting value in persistent storage (such as SharedPreferences).
Kotlin+KTX
After your process restarts with an interrupted upload, call putFile again. But this time also pass the Uri that was saved.
Kotlin+KTX
Sessions last one week. If you attempt to resume a session after it has expired or if it had experienced an error, you will receive a failure callback. It is your responsibility to ensure the file has not changed between uploads.
Error Handling
There are a number of reasons why errors may occur on upload, including the local file not existing, or the user not having permission to upload the desired file. You can find more information about errors in the Handle Errors section of the docs.
Full Example
A full example of an upload with progress monitoring and error handling is shown below:
Kotlin+KTX
Now that you’ve uploaded files, let’s learn how to download them from Cloud Storage.
Except as otherwise noted, the content of this page is licensed under the Creative Commons Attribution 4.0 License, and code samples are licensed under the Apache 2.0 License. For details, see the Google Developers Site Policies. Java is a registered trademark of Oracle and/or its affiliates.
Источник


