- AwesomeDevelop
- Самый быстрый эмулятор Android. Установка и настройка Genymotion.
- Установка Genymotion.
- Настройка Genymotion.
- Интеграция Genymotion в Eclipse.
- Интеграция Genymotion в AndroidStudio.
- How to Install Genymotion Emulator and Add it’s Plugin to Android Studio?
- Step by Step Implementation
- How to know the Android SDK path in your system?
- How to add Genymotion Plugin to Android Studio?
- # Genymotion Plugins
- # Genymotion plugin for Android Studio
- # Pre-requisite
- # Installing the plugin
- # Using the plugin
- # Running Android applications
AwesomeDevelop
Лёгкая техносферная обстановка в душевой Google 8)
Самый быстрый эмулятор Android. Установка и настройка Genymotion.

Если вы только начинаете или собираетесь начать разрабатывать приложения для OS Android, вам следует обратить внимание на этот скоростной эмулятор.
Не секрет, что устройства под этой операционной системой имеют огромную фрагментацию, существует огромнейшее количество устройств с различными размерами экрана, разрешениями экрана, различной комплектацией и производительности. Поэтому при разработке приложений возникает необходимость тестировать приложение на различных устройства. Естественно у вас не может оказаться под рукой такого количества различных устройств для теста и тогда на спасение приходят эмуляторы. Стандартный эмулятор, который включен в комплект SDK, мягко говоря далек от совершенства, работа с ним, даже в виде одного устройства, вызывает непередаваемо огромное количество эмоций и все они ,к сожалению, негативны. Ожидание запуска в несколько минут (в лучшем случае минут 3-5), ожидание отклика при нажатии любого элемента, заторможенность, все это делают его непригодным для работы.
Установка Genymotion.
Для начала установки данного эмулятора вам следует перейти на его официальный сайт и зарегистрироваться. Регистрация необходима не только для его загрузки, но и для использования, так как он включает в себя облачную технологию и будет сохранять ваши параметры.

После регистрации качаем сам Genymotion перейдя на страницу загрузки или выбрав соответствующий пункт меню на сайте. Далее вбираем репозиторий для вашей операционной системы. Если у вас ранее не был установлен VirtulBox – не переживайте, он будет загружен и установлен вместе с эмулятором.
После загрузки репозитория приступаем к его установке. В процессе установки проблем возникнуть не должно, все сведется к соглашению со всем и нажатием кнопки “далее”, единственным непривычным моментом может стать появление окна безопасности, в котором необходимо разрешить устанавливать продукты Oracle.
После полной установки, запускаем Genymotion и входим под логином и паролем, которые регистрировали на сайте.
Как только вход в систему будет выполнен, появится возможность добавлять новые устройства, этими виртуальными устройствами вы и будете пользоваться в дальнейшем. Для добавления выбираем нужное устройство и нажимаем кнопку “Add”.

Настройка Genymotion.
Для корректного взаимодействия эмулятора и вашей среды разработки (Eclipse или AndroidStudio) необходимо указать путь к Android SDK. Для этого открываем настройки указанные на следующем скриншоте.
В появившихся настройках указываем путь и нажимаем “OK”.
Интеграция Genymotion в Eclipse.
Открываем вашу среду разработки Eclipse. В нем необходимо добавить плагин для работы с эмулятором. Для этого нажимаем на пункт меню “Help” и выбираем подпункт “Install New Softawe”.

В открывшемся окне нажимаем “Add” , после чего откроется окно, в котором необходимо указать путь к плагину, вводим следующий адрес http://plugins.genymotion.com/eclipse .
После подготовки и загрузки плагина, выбираем его из списка, жмем “Next” и проходим стандартную процедуру установки, соглашаясь со всем и нажимая далее.
После установки плагина, на панели управления появится его иконка , нажав на которую будет предложено его настроить.

После выполненных действий, эмулятор будет интегрирован и готов к работе, для его использования компилируйте и запускайте свой проект, выбрав для запуска запущенное заранее виртуальное устройство.
Интеграция Genymotion в AndroidStudio.
Для интеграции с появившейся недавно AndroidStudio, необходимо загрузить Jar файл плагина. Его можно скачать на официальном сайте Genymotion. Для загрузки выбираем плагин отмеченный на следующем скриншоте.

Открываем AndroidStudio, выбираем пункт меню “File” и кликаем на подменю “Settings”.

В открывшемся окне выбираем из списка пункт “plugins”, нажимаем кнопку “install from disk” и указываем путь к скачанному ранее .jar файлу.

Плагин установлен и готов к использованию. Теперь как и обычно можно компилировать проект и запускать его в предварительно запущенном эмуляторе.
Данный эмулятор Android не без изъяна и изредка может закрыться, но его двухсекундный перезапуск раз в полчаса никак не сравнится с теми тормозами, с которыми приходится работать с стандартным эмулятором. Потому на сегодняшний день Genymotion можно считать лучшим и самым эффективным инструментом при разработке андроид приложений.
Источник
How to Install Genymotion Emulator and Add it’s Plugin to Android Studio?
Genymotion is an Android Emulator that is faster than the Android Studio Emulator. Genymotion emulator offers a wide range of virtual devices for development, test, and demonstration purpose. It has a very simple user interface and one can directly use it from Android Studio by installing its plugin only once. The Genymotion plugin for Android Studio allows testing the application developed with the Android Studio IDE. It uses ADB to connect to any active virtual device and push the application. So in this article let’s discuss how to install the Genymotion Emulator and also installing its plugin in the Android Studio to run the program.
Step by Step Implementation
Step 1: First we have to install Genymotion in our own system. So to download Genymotion please go to this site. Then click on the “Download Genymotion Personal Edition” button.
Note: Please sign in yourself to Genymotion if you have already not an account on Genymotion.
Step 2: In the next step click on the button as your requirement. If you have already installed VirtualBox on your system then go for the 2nd button and if not then go for the 1st button as shown in the below image. If you are using macOS or Linux then scroll below on that page and get your file.

Step 3: Once the download is completed install the Genymotion in your system and open Genymotion. After opening Genymotion sign in yourself with your ID and password.
Note: If a pop-up will arise on the screen then click on the Personal Use button.
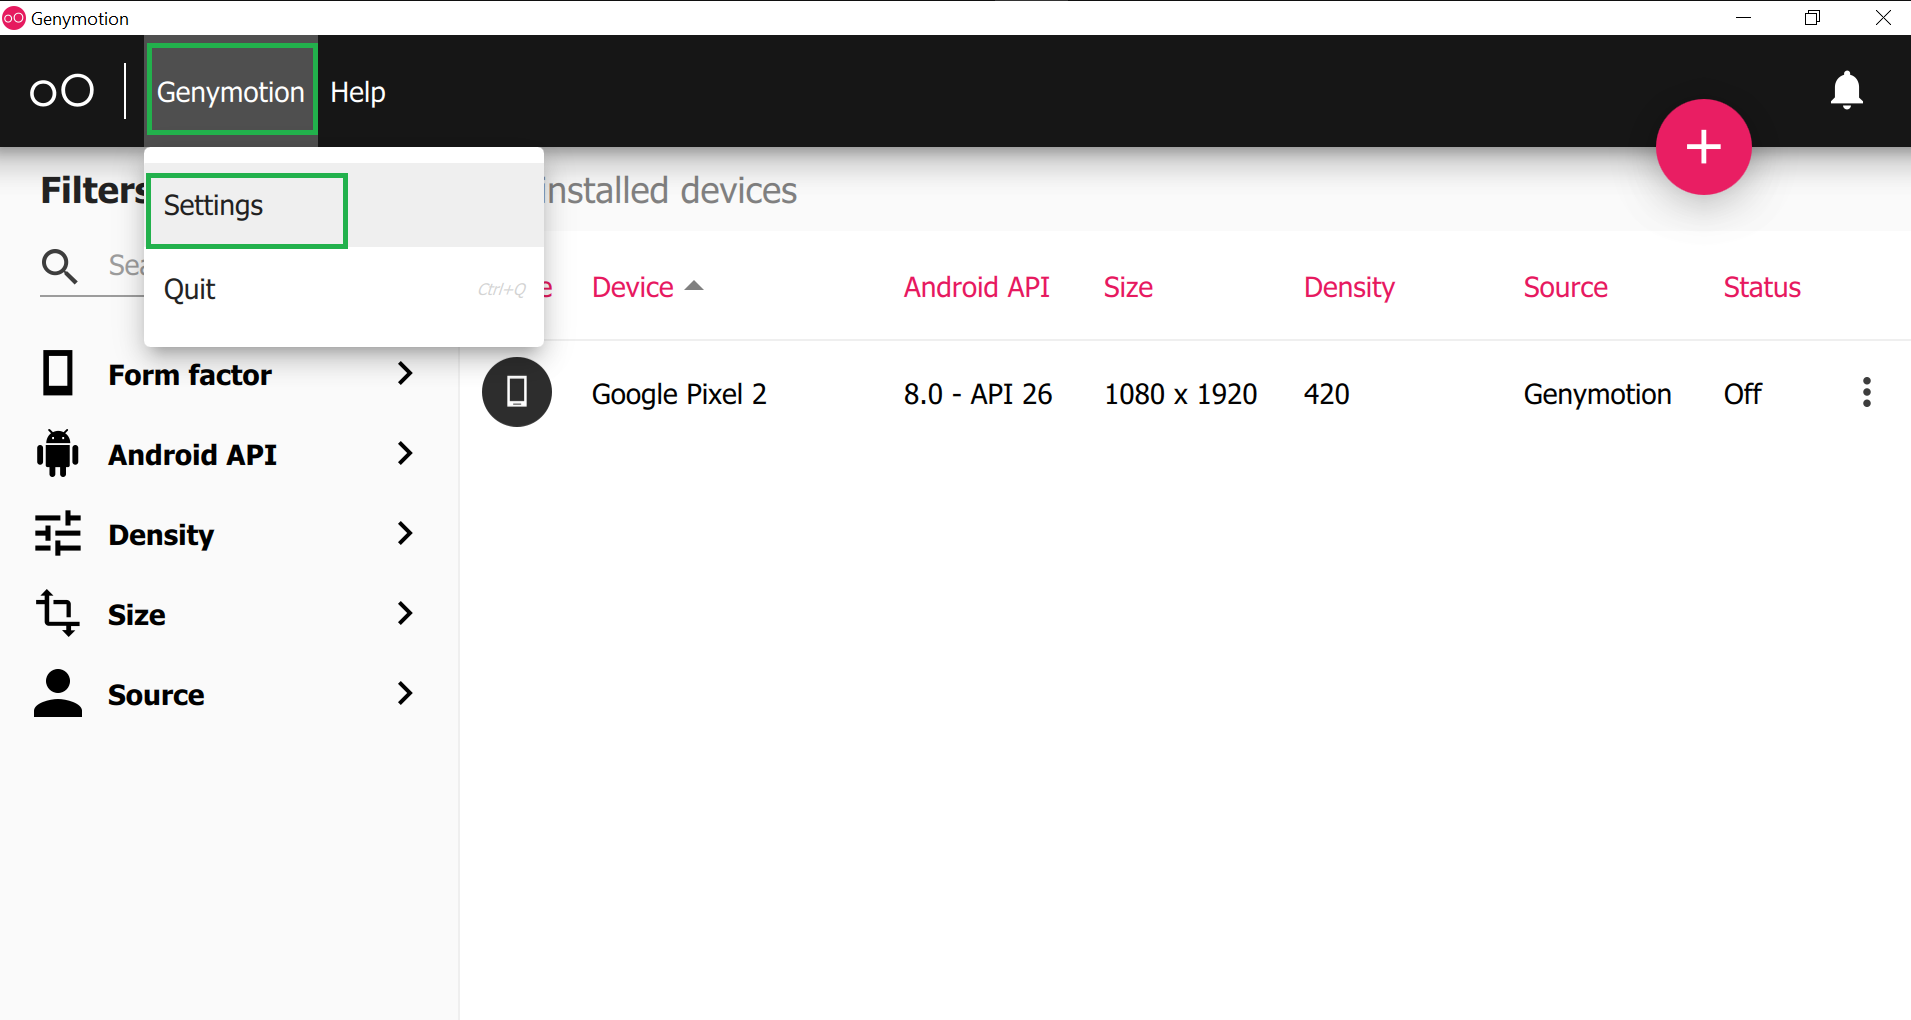
Step 4: Now click on the Genymotion and go to the Settings as shown in the below image.
Step 5: Then go to ADB and choose “Use custom Android SDK tools” and select your Android SDK path as shown in the below image. And there is nothing to do with other widgets. Now close this screen.

How to know the Android SDK path in your system?
To know the Android SDK path open your Android Studio and click on the Tools > SDK Manager as shown in the below image.

Then a screen will arise as in the below image and you can locate your Android SDK path.

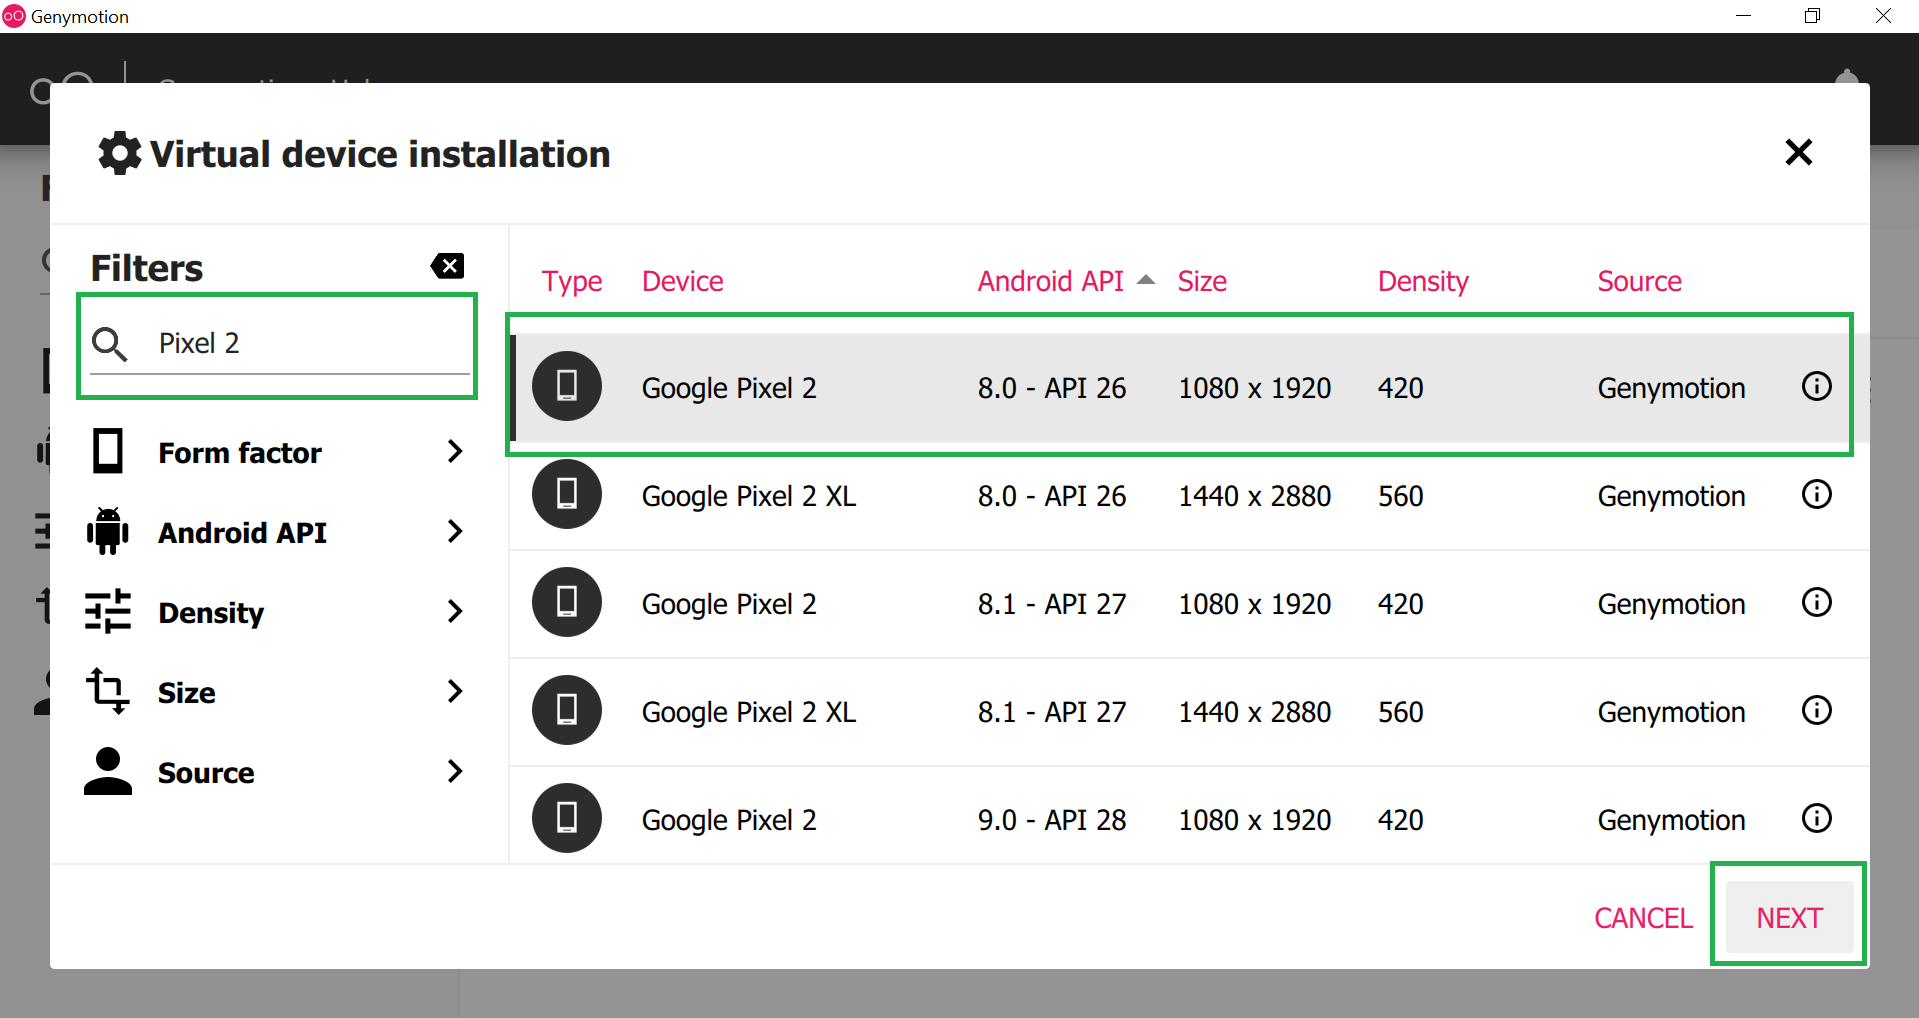
Step 6: Now click on the ‘pink +‘ screen as shown in the below image.

Step 7: Now search your favorite virtual device name and click on the device name and at last click on the NEXT button as shown in the below image.
Step 8: Choose an appropriate name for your emulator and then click on the INSTALL button. This will take a few times to download the required files.

Step 9: After successfully downloaded the required files you can find your emulator on the main screen. Now click on the Start button as shown below image and your Genymotion emulator is ready for use.

This is how Genymotion Emulator looks like.

How to add Genymotion Plugin to Android Studio?
In computing, a plug-in is a software component that adds a specific feature to an existing computer program. When a program supports plug-ins, it enables customization.
Similarly, we have to add the Genymotion plug-in to Android studio to use the Genymotion Emulator for developing and testing the project. To do so follow the following steps:
Step 1: Open the Android Studio and go to File > Settings and a pop-up will arise as seen in the below image. This will automatically select the Plugins section. Then search the Genymotion plugins and click on the Install button. This will download some files and it will ask to restart the Android studio and so click on the Restart Android Studio button.
Note: We have already installed the Genymotion plugin so it’s showing installed.

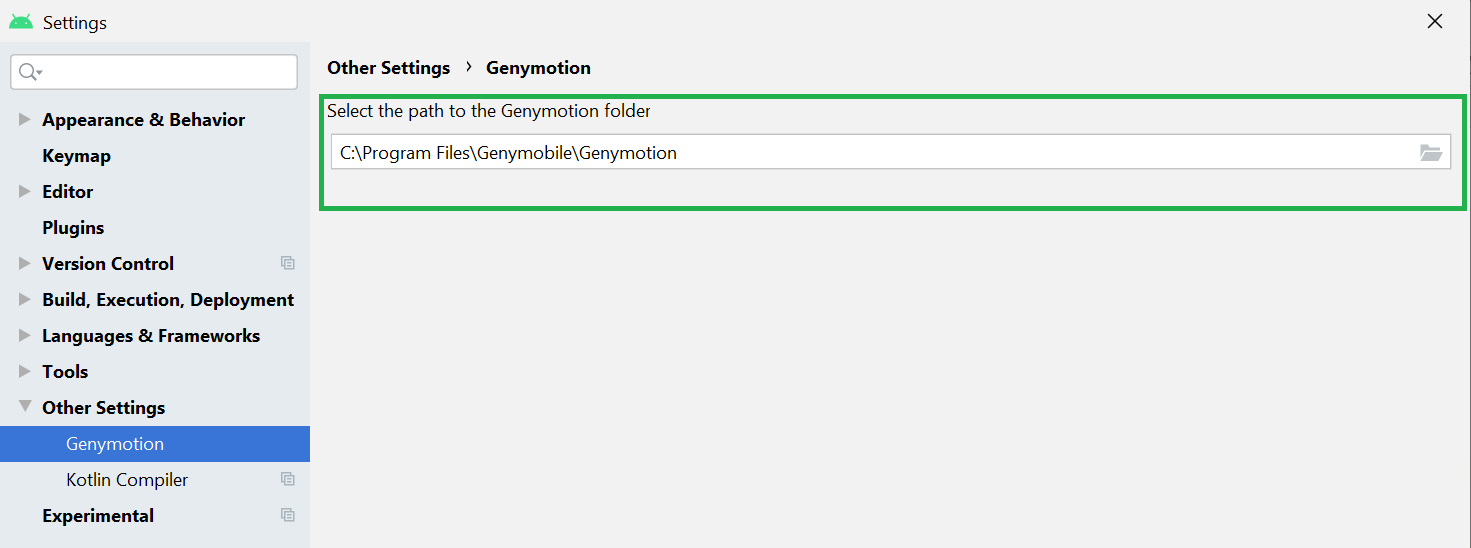
Step 2: After successfully restart the Android Studion again go to File > Settings > Other Settings > Genymotion as shown in the below image.

Step 3: Then select the path to the Genymotion folder. In most cases, you can find the path at C:\Program Files\Genymobile\Genymotion. Then just click on OK and you are done.
Make sure your Genymotion Emulator is started and you can see the Genymotin Emulator is active you can execute your program on that emulator as shown in the below image.
Источник
# Genymotion Plugins
This section gives you information about Genymotion plugins for Android Studio.
Genymotion plugin for Eclipse
The Genymotion plugin for Eclipse is no longer maintained and we no longer support nor distribute it.
# Genymotion plugin for Android Studio
The Genymotion plugin for Android Studio allows you to test your application developed with the Android Studio IDE. It uses ADB to connect to any active virtual device and push your application.
This section explains how to install, use the plugin and run Android applications.
# Pre-requisite
You need to set Genymotion Desktop to use the same Android SDK tool (adb) as Android Studio.
Please see ADB chapter for instructions.
# Installing the plugin
You can install Genymotion plugin for Android Studio from AS marketplace:
- Start Android Studio.
- Go to:
- Windows and Linux: File/Settings
- macOS: Android Studio/Preferences
- Select Plugins and go to Marketplace.
- Type Genymotion in the search box.
- Click Install, then Apply and OK.
# Using the plugin
The toolbar, where Genymotion plugin icon is displayed, is hidden by default. To display it, click View в†’ Appearance and select Toolbar (View в†’ Toolbar for older versions).
To start using the plugin:
- Click
 from the Android Studio toolbar. The following window opens:
 - Browse for the [Genymotion]В application installation directory:
- Windows: C:\Program Files\Genymobile\Genymotion
- macOS: /Applications/Genymotion.app
- Linux: /home/ /genymotion or /opt/genymotion
- Click OK.
- ClickВ to open the Genymotion Device Manager window:
From this window, you can perform the following actions:- Create a new virtual device using New This automatically starts the Genymotion creation wizard.
- Start a virtual device using Start
- Refresh the list of virtual devices using Refresh.
 from the Android Studio toolbar. The following window opens:

The virtual device activation status is displayed in the Status column. Values can be:
- Off: the virtual device is deactivated.
- Paused: the virtual device has been started and paused. The Restart action gets back to the exact same state.
- On: the virtual device is activated, but not connected to ADB. It means that you cannot select this virtual device in the Choose Device window of the ADB plugin.
# Running Android applications
- ClickВ from the Android Studio toolbar.
- Select the virtual device you want to use and click Start.
- Close the Genymotion window.
- In your application project, click . The Choose Device window opens.
- Click on the virtual device you started or created.
After a reboot or an unexpected halt of a virtual device, its name in the Choose Device window may become irrelevant. Close and reopen the plugin to solve this.
While GenymotionВ plugin window is open, errors are displayed in the Android Studio console.
Источник


