Utils package in android
Android-Utils 

![]()
![]()
![]()


![]()
![]()


Including in your project
Android-Utils is available in the Jcenter, so getting it as simple as adding it as a dependency
where 
Android-Utils-Ktx is available in the Jcenter, so getting it as simple as adding it as a dependency
where
I welcome and encourage all pull requests. It usually will take me within 24-48 hours to respond to any issue or request. Here are some basic rules to follow to ensure timely addition of your request:
- Match coding style (braces, spacing, etc.) This is best achieved using CMD+Option+L (Reformat code) on Mac (not sure for Windows) with Android Studio defaults. This project uses a modified version of Grandcentrix’s code style, so please use the same when editing this project.
- If its a feature, bugfix, or anything please only change code to what you specify.
- Please keep PR titles easy to read and descriptive of changes, this will make them easier to merge 🙂
- Pull requests must be made against develop branch. Any other branch (unless specified by the maintainers) will get rejected.
- Check for existing issues first, before filing an issue.
- Have fun!
Licensed under the Apache License, Version 2.0, click here for the full license.
This project was created by Nishant Srivastava but hopefully developed and maintained by many others. See the the list of contributors here.
If you appreciate my work, consider buying me a cup of ☕ to keep me recharged 🤘 [PayPal]

About
[Android Library] Facilitating some very common functionalities in the form of utility classes for Android
Источник
Package visibility in Android 11

On Android 10 and earlier, apps could query the full list of installed apps on the system using methods like queryIntentActivities() . In most cases, this is far broader access than is necessary for an app to implement its functionality. With our ongoing focus on privacy, we’re introducing changes on how apps can query and interact with other installed apps on the same device on Android 11. In particular, we’re bringing better scoped access to the list of apps installed on a given device.
To provide better accountability for access to installed apps on a device, apps targeting Android 11 (API level 30) will see a filtered list of installed apps by default. In order to access a broader list of installed apps, an app can specify information about apps they need to query and interact with directly. This can be done by adding a element in the Android manifest.
For most common scenarios, including any implicit intents started with startActivity() , you won’t have to change anything! For other scenarios, like opening a specific third party application directly from your UI, developers will have to explicitly list the application package names or intent filter signatures like this:
If you use Custom Tabs to open URLs, you might be calling resolveActivity() and queryIntentActivities() in order to launch a non-browser app if one is available for the URL. In Android 11 there’s a better way to do this, which avoids the need to query other apps: the FLAG_ACTIVITY_REQUIRE_NON_BROWSER intent flag. When you call startActivity() with this flag, an ActivityNotFoundException will be thrown if a browser would have been launched. When this happens, you can open the URL in a Custom Tab instead.
In rare cases, your app might need to query or interact with all installed apps on a device, independent of the components they contain. To allow your app to see all other installed apps, Android 11 introduces the QUERY_ALL_PACKAGES permission. In an upcoming Google Play policy update, look for guidelines for apps that need the QUERY_ALL_PACKAGES permission.
When targeting API level 30 and adding a element to your app, use the latest available release of the Android Gradle plugin. Soon we’ll be releasing updates to older Android Gradle plugin versions to add support for this element. You can find more information and use cases about Package Visibility in the developer documentation.
Источник
Полный список
— разбираемся, что такое Package для приложения
Package можно перевести как пакет. Этот вариант перевода я и буду использовать в уроке.
Пакет приложения мы прописываем в визарде создания приложения.
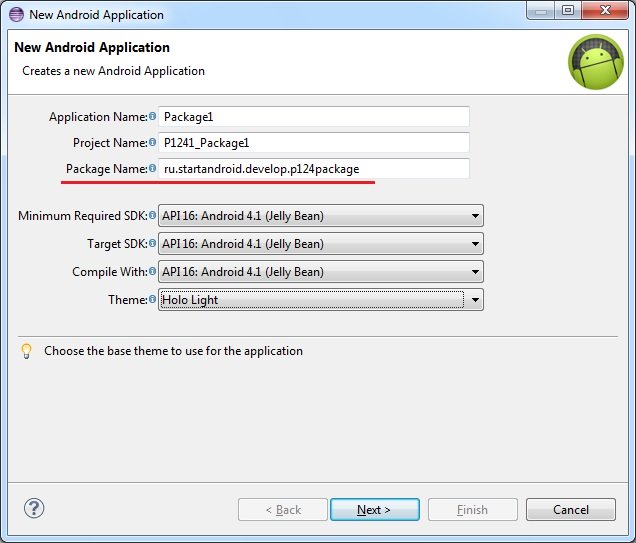
Потом его можно найти в манифесте.

Он же по дефолту становится пакетом для Java-классов

Как-то не особо значимая цель .
Может быть он используется как-то еще? Оказывается да. Более того, пакет — это крайне важная вещь при создании приложения. Пакет является идентификатором приложения в системе. Т.е. когда вы устанавливаете приложение, система смотрит его пакет и ищет уже установленное приложение с таким пакетом. Если не нашлось, то все ок и приложение устанавливается.
А вот если нашлось, то тут в дело вступает механизм подписи приложения ключом, который мы рассмотрели на прошлом уроке. Система проверяет, если установленное и устанавливаемое приложения подписаны одним и тем же ключом, то, вероятнее всего, это означает, что оба приложения создал один автор. И устанавливаемое приложение является обновлением установленного, т.к. их пакеты и ключи одинаковы. Система устанавливает новое приложение, заменяя старое — т.е. обновляет старое.
Если же система определила, что приложения были подписаны разными ключами, то это значит, что приложения были созданы разными авторами, пакеты совпали случайно, и новое вовсе не является обновлением старого. В этом случае при установке нового, старое было бы заменено, а значит потеряно (а не обновлено), т.к. приложения абсолютно разные. И система не дает поставить новое приложение, пока не будет вручную удалено старое.
Проведем пару тестов. Я создам два приложения Package1 и Package2 с одинаковым пакетом.
Установлю первое. Оно появилось в списке.

Теперь не удаляя первое, установлю второе.
Первое исчезло. Осталось только второе.

Система решила, что второе является обновлением первого (т.к. пакеты и ключи совпадают), поэтому первое благополучно снесла и заменила вторым. Собственно, это и происходит при обычном обновлении.
Теперь подпишу Package2 другим ключом, чем оно было подписано изначально и попробую обновить через adb.

Параметр r здесь означает, что приложение надо переустановить, если оно уже существует.
Видим ошибку Failure [INSTALL_PARSE_FAILED_INCONSISTENT_CERTIFICATES]. Система сверила ключи у установленного и устанавливаемого приложений, увидела, что они разные и решила, что это будет не обновление, а просто приложение от другого разработчика ломится с тем же пакетом. И вполне разумно решила не удалять имеющееся приложение, а предупредить пользователя, что не совпадают ключи.
Если закинуть это приложение на эмулятор и поставить через файловый менеджер, получим примерно то же сообщение.

Из вышесказанного можно сделать следующий вывод: ваш ключ, которым вы подписываете приложение ни в коем случае нельзя терять или давать кому-либо.
Если вы ключ потеряете, то ваше приложение навсегда потеряет возможность быть обновленным. Даже если вы создадите новый ключ с тем же алиасом, паролем и данными владельца, это все равно будет другой ключ. И подписанная им следующая версия приложения будет рассматриваться системой не как обновление, а как попытка приложения от другого разработчика заменить ваше приложение и не даст его установить, пока не удалите установленное.
Если же вы ключ кому-то предоставите, то этот человек сможет сделать обновление для вашего приложения без вашего участия. И если этот человек имеет доступ и к вашей учетке разработчика в маркете, то он сможет залить туда свою версию вашего приложения.
Также не забывайте пароли от хранилища и от ключа. Это будет равносильно тому, что вы потеряли ключ. В общем, относитесь к вашим ключам со всей серьезностью.
И в конце урока небольшой ликбез. Пакет имеет еще одно значение. Как вы уже наверно заметили по вкладке Devices в Eclipse, пакет используется в качестве имени процесса, в котором запускается приложение. При этом, под каждое приложение система создает пользователя. Это позволяет разграничить доступ к данным. Каждое приложение запускается и работает со своими данными в отдельном процессе под отдельным пользователем. Соответственно, другие приложения не имеют к этим данным доступа, т.к. запущены под другими пользователями.
На следующем уроке:
— разбираемся с ViewPager
Присоединяйтесь к нам в Telegram:
— в канале StartAndroid публикуются ссылки на новые статьи с сайта startandroid.ru и интересные материалы с хабра, medium.com и т.п.
— в чатах решаем возникающие вопросы и проблемы по различным темам: Android, Kotlin, RxJava, Dagger, Тестирование
— ну и если просто хочется поговорить с коллегами по разработке, то есть чат Флудильня
— новый чат Performance для обсуждения проблем производительности и для ваших пожеланий по содержанию курса по этой теме
Источник
Sample VoIP Calling App in Android

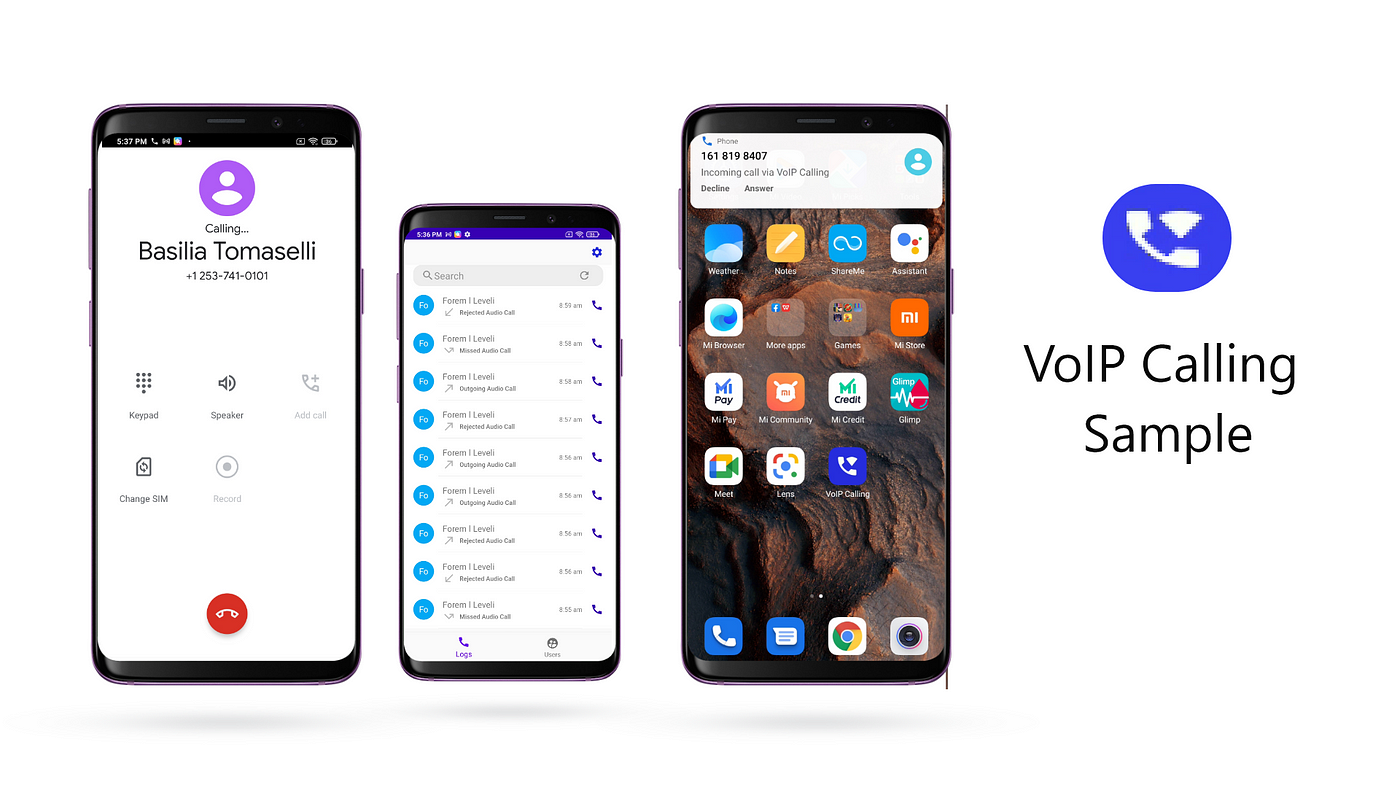
This article describes the designing & implementation of a sample VoIP calling app using CometChat Pro. CometChat Pro is Messaging & Call SDK that provides enormous features for developers to integrate chat. Using CometChat Pro UI Kit, developers can easily integrate real-time messaging & calling support in their app. By the end of this article, you will create a fully functioning Sample VoIP Calling App.
Key Components & Libraries Used
CometChat Android UI Kit — An ready to use UI Kit library which will help us to develop real-time messaging & call support in our sample app within a few minutes.
Firebase — To receive an event when the app is not in the foreground we will use Firebase Push Notification.
ConnectionService — An abstract class that will help you to build VoIP Calls in a sample app. It uses a built-in System UI to manage a call which is also called System Managed. If you wish to use your own UI to manage calls you can use Self-Managed Service.
Prerequisites
Before diving into more details please ensure that you have checked the below points.
— Android studio installed in your system.
— Android Device or Emulator to run your app.
- We will begin by fetching the code from GitHub.
You can clone the project from the Sample VoIP Calling repository.
- It’s necessary to have CometChat Account to run the app.
You can create your account in CometChat and replace the credentials with yours.

Also, please make sure to setup Push Notification Extension in CometChat.
Please click here to know How to setup Push Notification in CometChat.
- Next step is to setup Firebase Account and create a new project. Once the project is created, setup an Android App in the Firebase Project and add google-services.jsonfile in your “ app” folder
- Once the above mentioned configurations are done you can open the project in Android Studio. You will find the project contains two packages ‘ app’ which is our sample app and ‘ uiKit’ is a library provided by CometChat.
- In ‘ app’ you will find the ‘ utils’ package under which we have files to handle Push Notification and VoIP calls.
PushNotificationService
It extends FirebaseMessageService which is used to handle Push Notification received from Firebase. We are using it to notify the message sent to a user when they are not active. We are also handling incoming & outgoing calls through it.
onMessageReceived() : This method gets triggered whenever you receive a push notification from firebase.
CometChatHelper.processMessage() : This method is provided by CometChat SDK to get BaseMessage from “ data” received as JSON Object in Remote Message.
initiateCallService(call : Call) : This method is used to initiate a call through ConnectionService whenever a Call type message is received.
showMessageNotification(baseMessage: BaseMessage, title: String, alert: String) : This method is used to display and handle the notification for the message when is being received by the particular user.
CallConnectionService
CallConnectionService is custom connectionservice class which is binded with the app to handle incoming & outgoing calls. You will find onCreateIncomingConnection(), onCreateOutgoingConnection() methods in it.
onCreateIncomingConnection() : This method get triggered whenever telecomManager.addNewIncomingCall() get success on receiving a call.
onCreateIncomingConnectionFailed() : This method get triggered whenever telecomManager.addNewIncomingCall() fails to receive a call.
onCreateOutgoingConnection() : This method get triggered whenever telecomManager.placeCall() get successfully executed to place outgoing call.
onCreateOutgoingConnectionFailed() : This method get triggered whenever telecomManager.placeCall() get failed to place an outgoing call.
Currently, we are using CALL_PROVIDER as Capability of ConnectionService. So you can see your system’s native calling UI for incoming & outgoing calls.
You can change it SELF_MANAGED if you wan’t to show your own custom UI for incoming & outgoing calls.
CallConnection
It is a Connection class that is used to initiate a connection when a user receives an incoming or outgoing call. It usually helps the ConnectionService class to handle the connection requests and their callbacks. It includes certain methods like onAnswer(), onReject(), onHold(), onDestroy(),etc. Whenever the user receives an incoming call and if the user accepts the call then onAnswer() will be triggered. Similarly, if user rejects the call then onReject() is triggered.
onAnswer() : Whenever this method gets triggered, we use CometChat.acceptCall() which will start the CometChat Call Service and start the call session.
onReject() : Whenever this method gets triggered, we use CometChat.rejectCall() which will reject the CometChat Call Service and end the call session.
onDisconnect() : This method gets triggered whenever the initiator of a call ends the calls before the receiver accepts the call. This will ends the call session and make it a Missed Call.
CallHandler
It is a class that is used to handle and integrate ConnectionService in your app. Below are its methods that are used in your app.
Источник


