- Где можно задать свои расположения пакета SDK для Android?
- How To Install Android SDK Tools On Windows
- Step 1 — Download SDK Tools
- Step 2 — Install Command Line Tools
- Step 3 — Install Platform Tools
- Step 4 — Configure Environment Variable
- Step 5 — Configure Commands
- Step 6 — Using the SDK Manager
- Step 7 — Using the Emulator and AVD Manager
- Summary
- SDK Manager
- Contents
- What an SDK Does
- When You Must Add an SDK
- File Names and File Extension for SDKs
- SDK Panel
- macOS and iOS SDK Properties
- Android SDK, NDK and Java Properties
- SDK Tab
- NDK Tab
- Java Tab
- Troubleshooting (macOS and iOS)
- Handling Multiple Xcode Installations
- Missing SDK Versions Because the Xcode Directory Is Wrong
- «UnKnown Compiler» Error After Updating XCode
Где можно задать свои расположения пакета SDK для Android?
в Visual Studio перейдите в меню сервис параметры > Xamarin > Android Параметры , чтобы просмотреть и задать расположение пакет SDK для Android:

Расположение по умолчанию для каждого пути выглядит следующим образом:
Расположение пакета средств разработки Java:
C:\Program Филес\жава\ jdk1.8.0_131
Расположение пакета SDK для Android
C:\Program Files (x86) \Андроид\андроид-СДК
Расположение пакета Android NDK:
C:\ProgramData\Microsoft\AndroidNDK64\android-ndk-r13b
Обратите внимание, что номер версии NDK может отличаться. Например, вместо android-ndk-r13b может быть более ранняя версия, например android-ndk-r10e.
Чтобы задать расположение пакета SDK для Android, введите полный путь к каталогу пакета SDK для Android в поле Расположение пакета SDK для Android. Вы можете перейти к расположению пакета SDK для Android в проводнике, скопировать путь из адресной строки и вставить этот путь в поле Расположение пакета SDK для Android. Например, если расположение пакет SDK для Android находится на к:\усерс\усернаме\аппдата\локал\андроид\сдк, очистите старый путь в поле Расположение пакет SDK для Android , вставьте этот путь и нажмите кнопку ОК.
в Visual Studio для Mac перейдите к параметрам проекты > расположение пакета SDK для > Android. На странице Android перейдите на вкладку Расположения, чтобы просмотреть и задать расположение пакета SDK:

Расположение по умолчанию для каждого пути выглядит следующим образом:
Расположение пакета SDK для Android
Расположение пакета Android NDK:
Расположение пакета SDK для Java (JDK):
/usr
Обратите внимание, что номер версии NDK может отличаться. Например, вместо android-ndk-r14b может быть более ранняя версия, например android-ndk-r10e.
Чтобы задать расположение пакета SDK для Android, введите полный путь к каталогу пакета SDK для Android в поле Расположение пакета SDK для Android. Можно выбрать папку пакет SDK для Android в Finder, нажать клавиши CTRL + ⌘ + I , чтобы просмотреть сведения о папке, щелкнуть и перетащить путь справа от раздела :, скопировать, а затем вставить его в поле Расположение пакет SDK для Android на вкладке расположения . Например, если расположение пакет SDK для Android находится в папке
/либрари/девелопер/андроид/СДК, очистите старый путь в поле Расположение пакет SDK для Android , вставьте этот путь и нажмите кнопку ОК.
Источник
How To Install Android SDK Tools On Windows
It provides all the steps required to install Android Platform Tools and SDK Manager on Windows 10 without using Android Studio.
In this tutorial, we will discuss all the steps required to install Android Platform Tools and SDK Manager on Windows 10. This tutorial provides the steps for Windows 10, though the steps should be the same on other versions of Windows.
This post is useful for the developers using Android Platform Tools and SDK manager without installing Android Studio for the use cases including hybrid app development using Ionic. It also assumes that a valid JAVA_HOME environment variable exists pointing to the installation directory of Java.
You can follow How To Install Java 8 On Windows 10, How To Install Java 11 On Windows, How To Install Java 15 On Windows, or How To Install OpenJDK 15 On Windows to install Java on Windows. In case you are interested in developing Android applications using Android Studio, you can also follow How To Install Android Studio On Windows.
Step 1 — Download SDK Tools
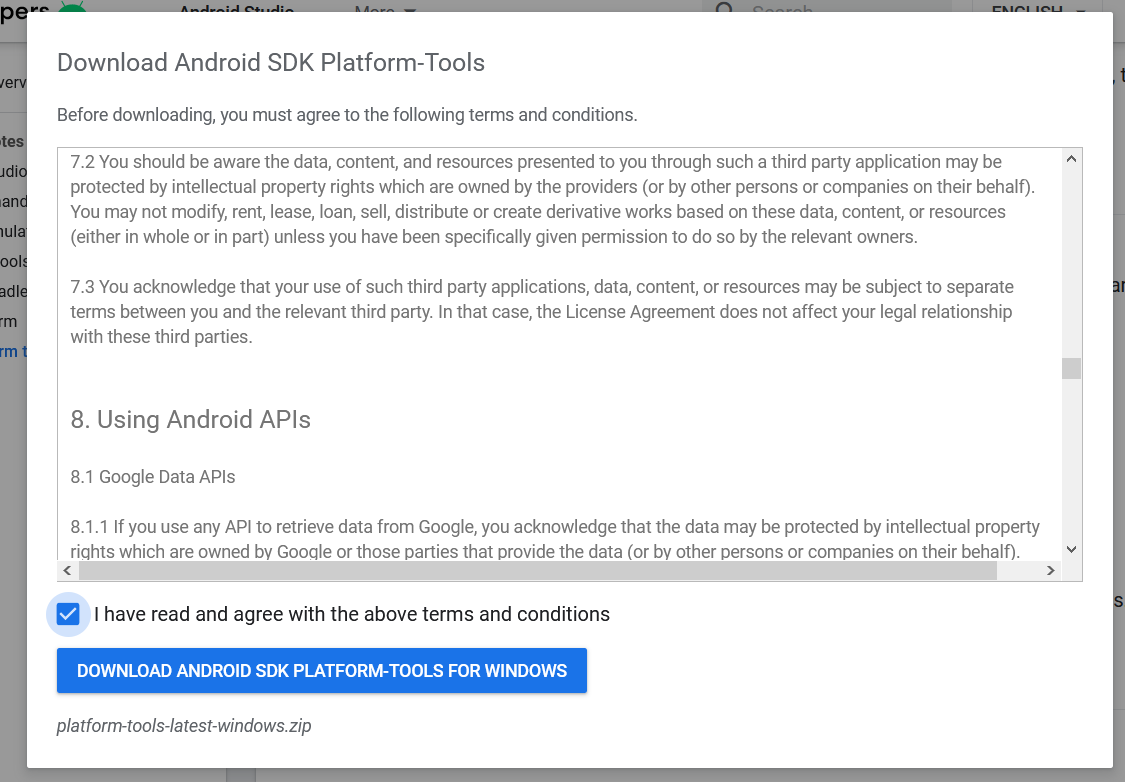
Open the download tab of Android Studio and scroll down to the Command line tools only section. This section shows various options to download the SDK tools as shown in Fig 1.
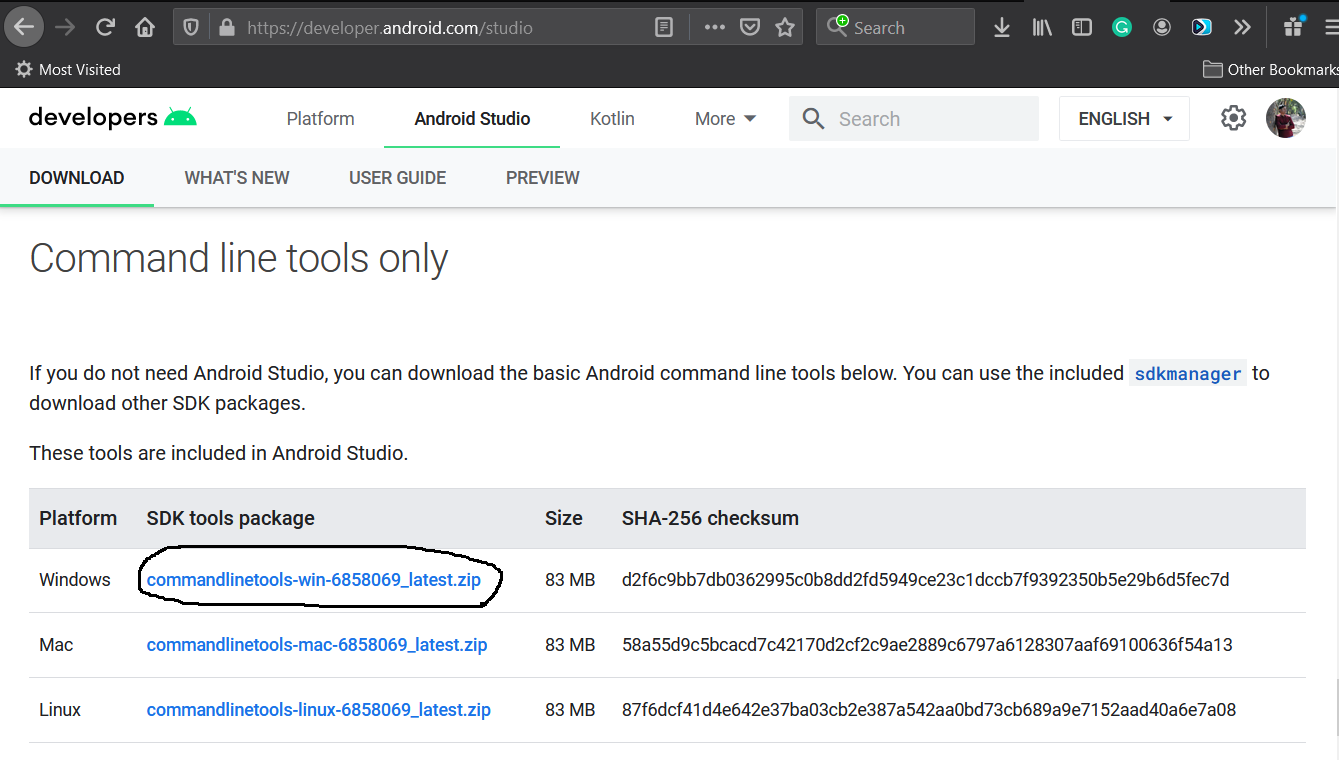
Click the first link having the download option for Windows as highlighted in Fig 1. It will ask to accept to terms and conditions as shown in Fig 2.
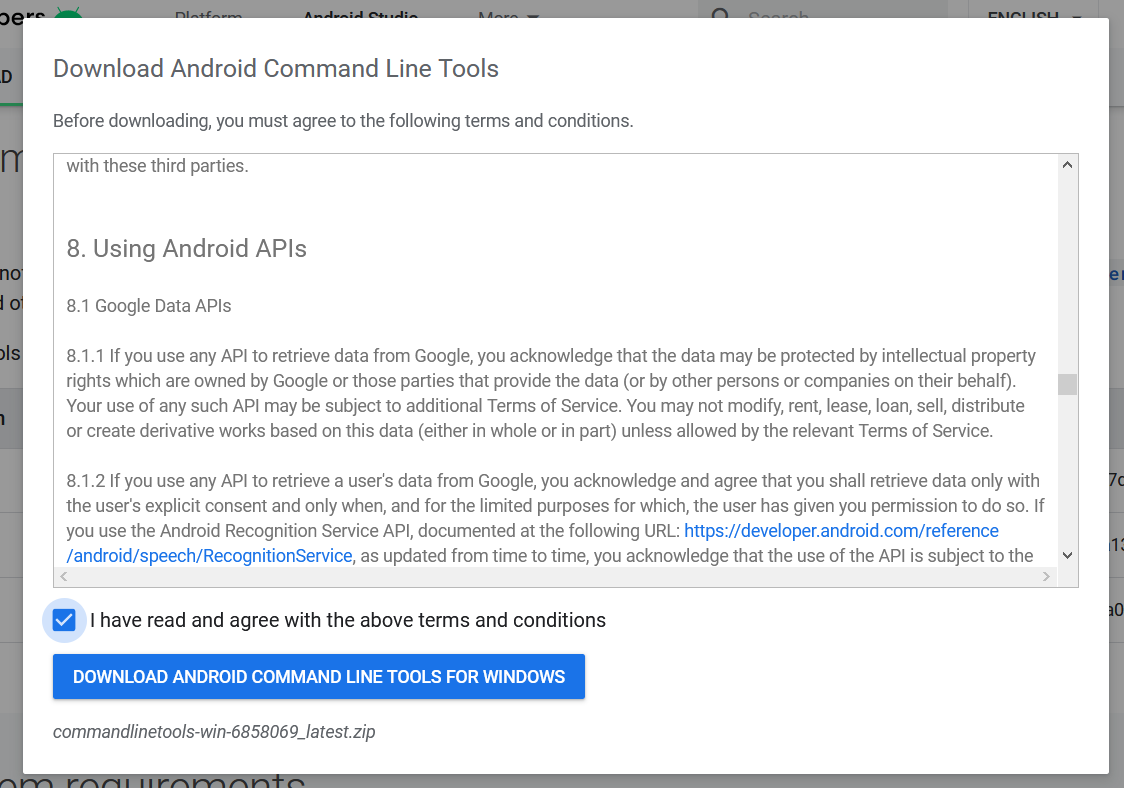
Go through the details, agree on the terms and conditions and click the Download Button to start the download.
Step 2 — Install Command Line Tools
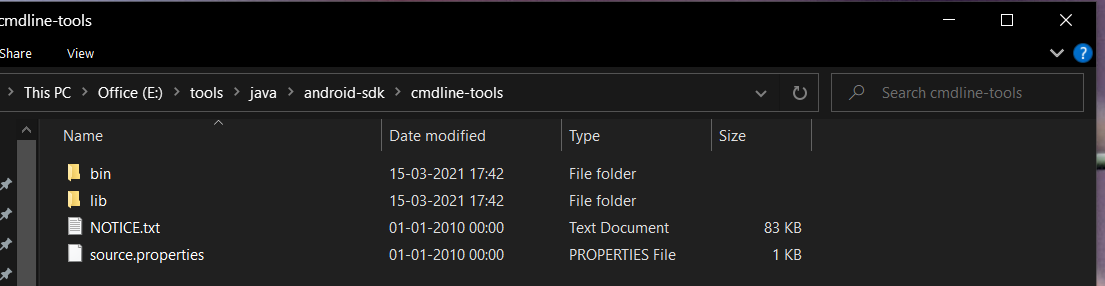
In this step, we will install the Android Command Line Tools on Windows 10. Create the directory android-sdk at your preferred location and extract the content of the downloaded SDK Tools zip to this directory. Make sure that the extracted content is available within the android-sdk directory created by us as shown in Fig 3.
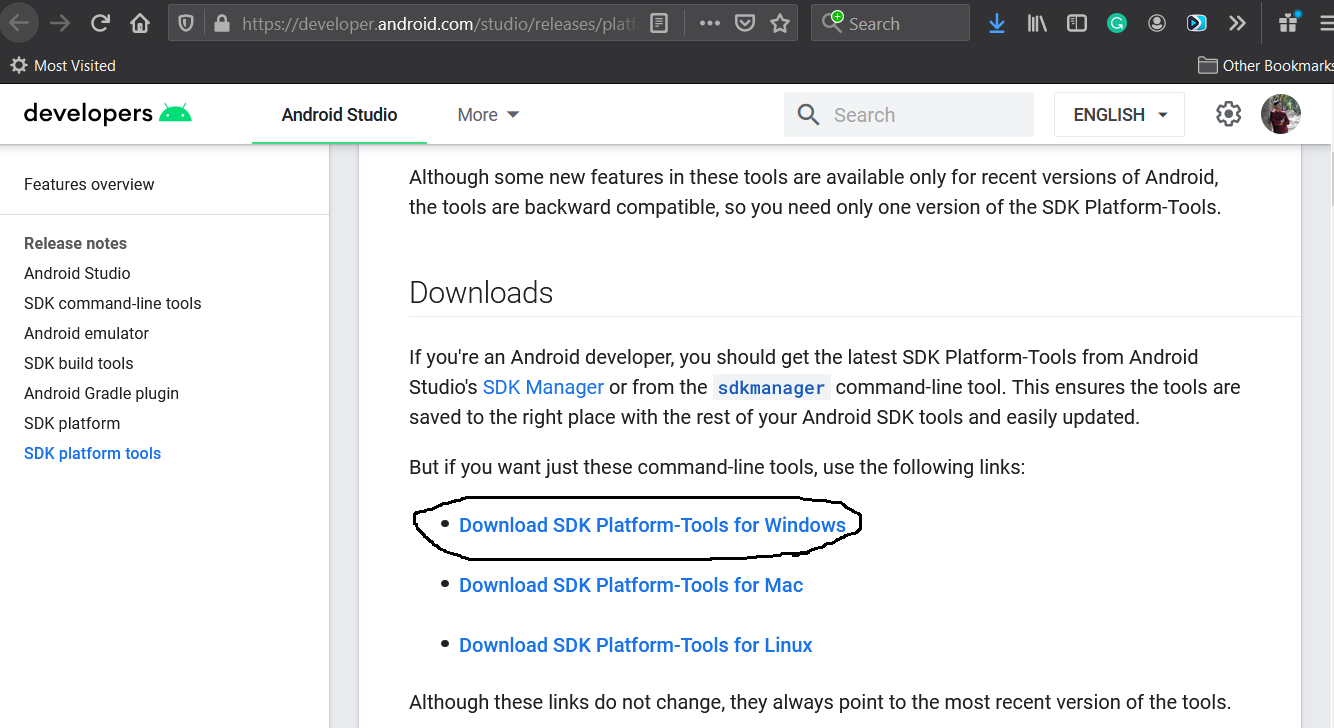
Step 3 — Install Platform Tools
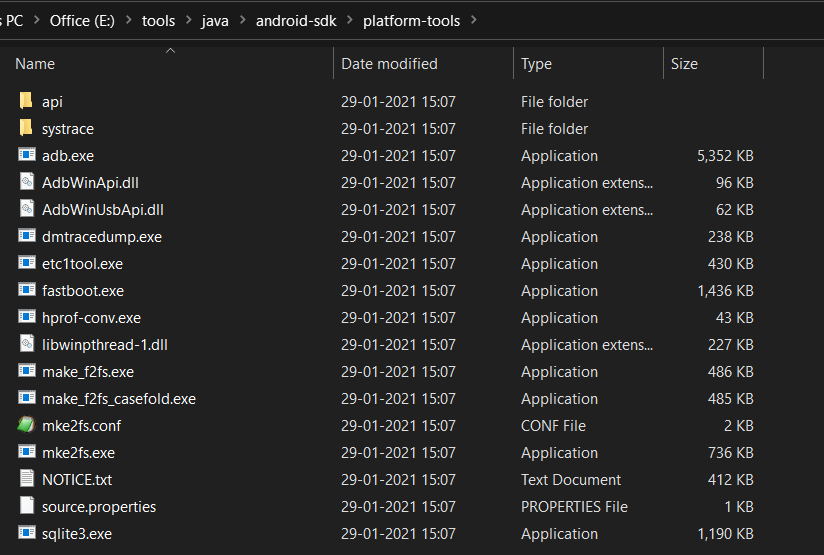
In this step, we will install the Android Platform Tools on Windows 10. Follow the same steps similar to Android SDK Tools to install Android Platform Tools using the download link as shown in Fig 4, Fig 5, and Fig 6.
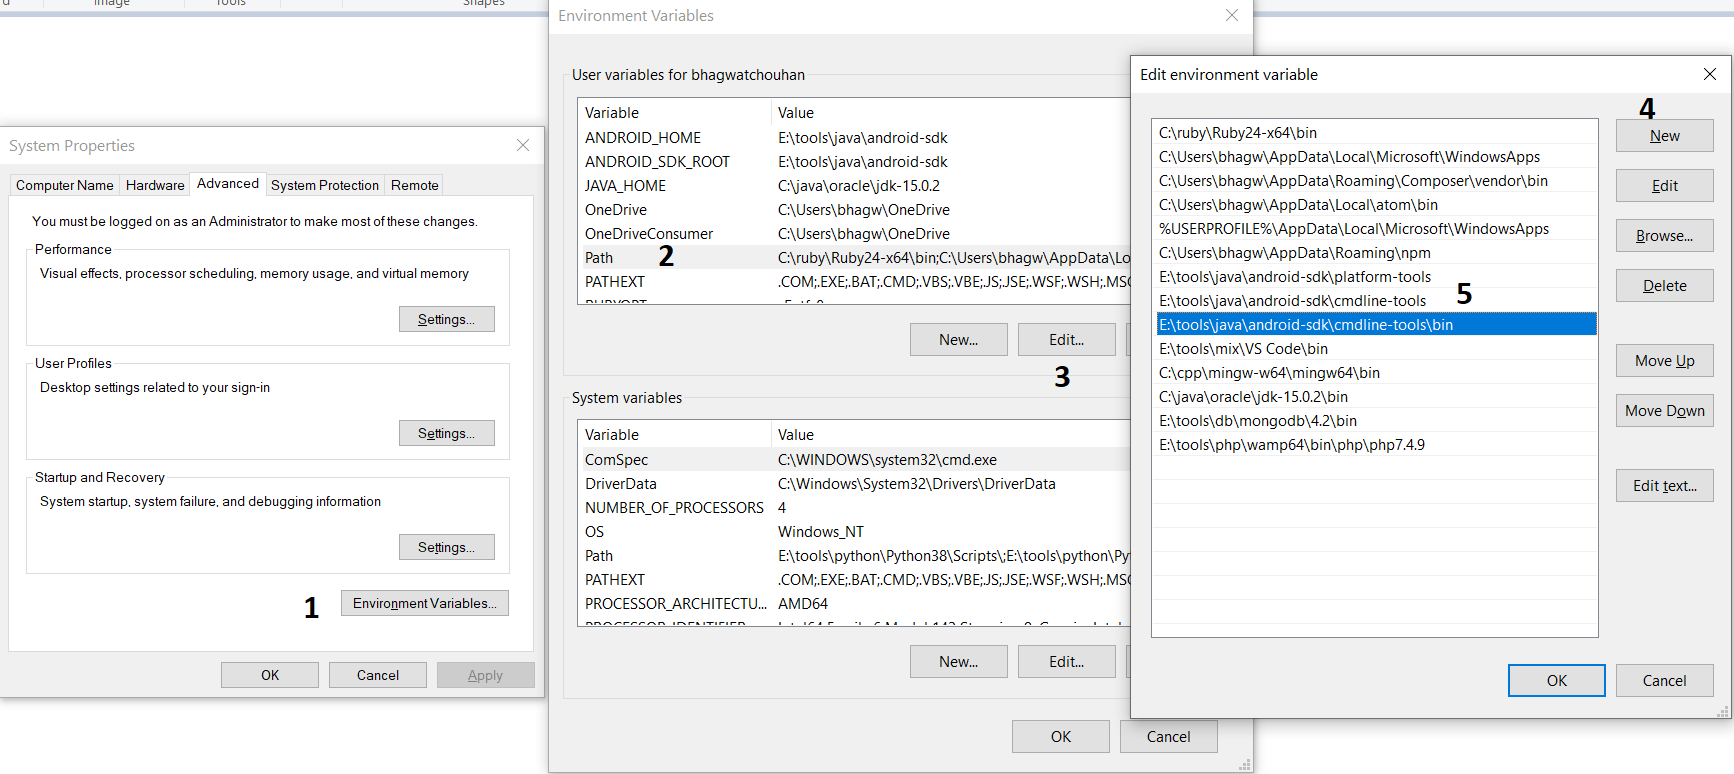
Step 4 — Configure Environment Variable
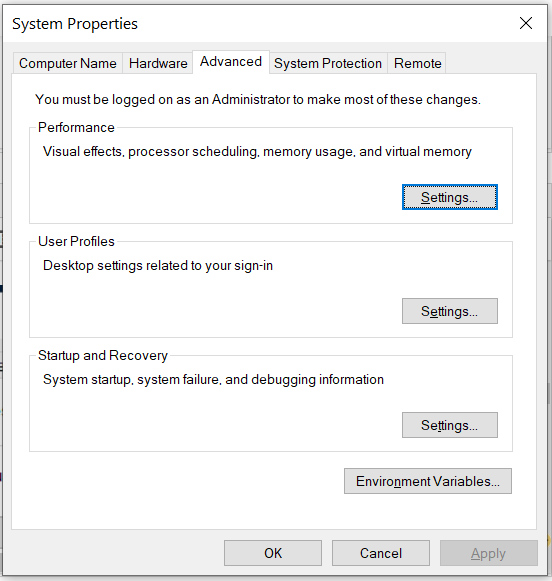
Right-click the My Computer or This PC on the desktop and click the Properties Option. Now click the Advanced system settings. It will show the System Properties dialog having Advanced Tab options as shown in Fig 7.
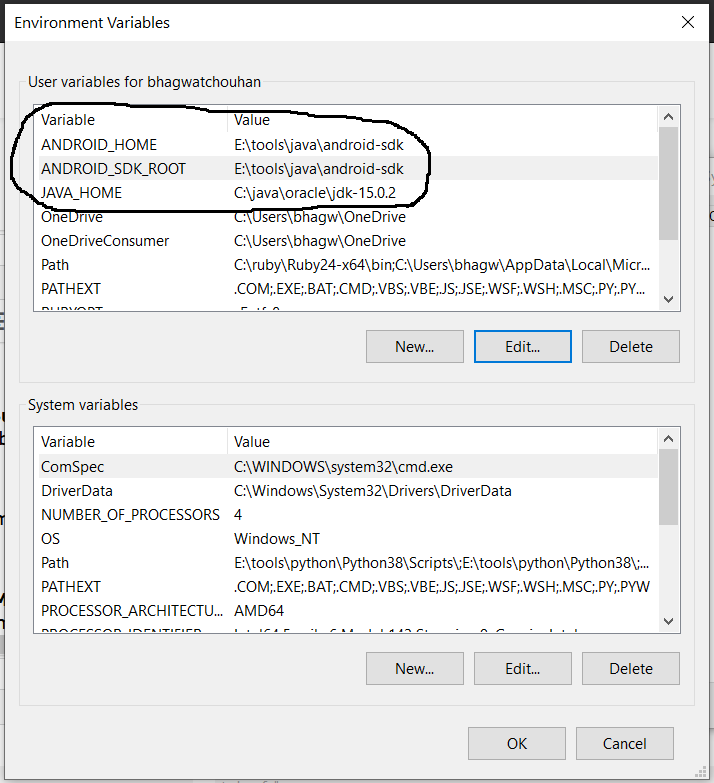
Click the Environment Variables Button and click the New Button in the first section. Set the Variable Name field to ANDROID_HOME and Variable Value to the android-sdk directory created by us in the previous step.
Similarly, also configure the environment variable ANDROID_SDK_ROOT to the android-sdk directory.
Also , make sure that the JAVA_HOME environment variable is set to the JDK installation directory. It must not end with the bin as we do with the system path variable.
Step 5 — Configure Commands
In previous steps, we have downloaded and extracted the Command Line Tools and Platform Tools to the android-sdk directory. Both the tools provide several command-line utilities which we need to run by going to the appropriate directory having the executable files.
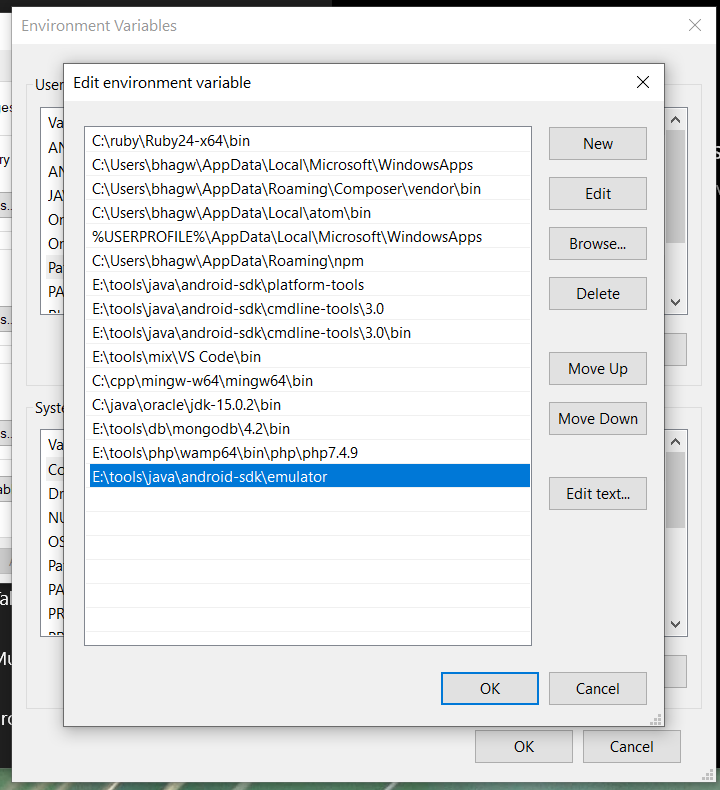
We can make these commands available at the system level without going to these directories by adding the path to tools, tools\bin, and platform-tools to the system path as shown in Fig 9. Make sure that these executables do not break other commands having the same name before adding these paths to the PATH environment variable.
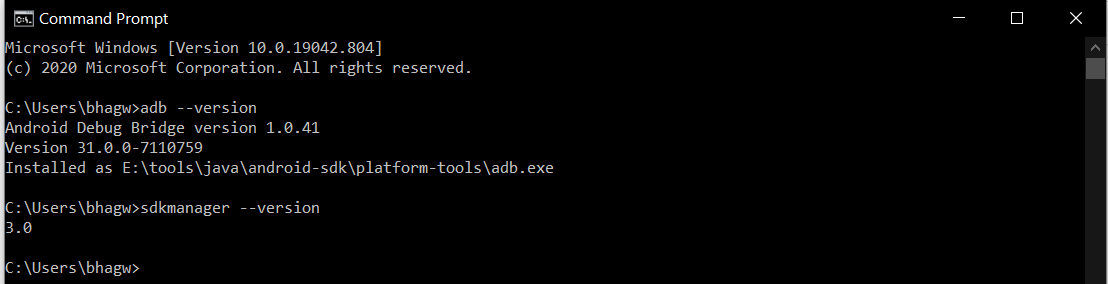
Now open the Command Prompt and check the ADB and SDK Manager versions as shown in Fig 10. You might be required to restart the system to apply the environment variables set by us.
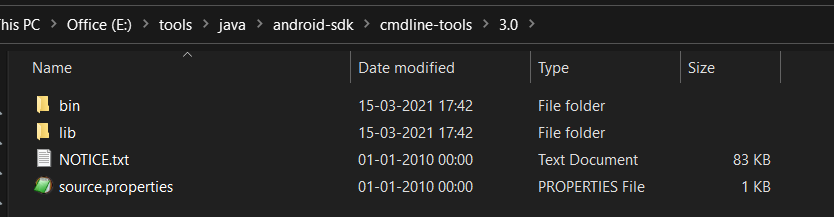
We can see that the ADB command works well and shows the version details, but the sdkmanager shows an error — «error: could not determine sdk root. error: either specify it explicitly with —sdk_root= or move this package into its expected location: \cmdline-tools\latest\» since it expects the Command Line Tools in a version-specific directory. Now open the source.properties file from the cmdline-tools directory to check the version. It will show the version details as shown below.
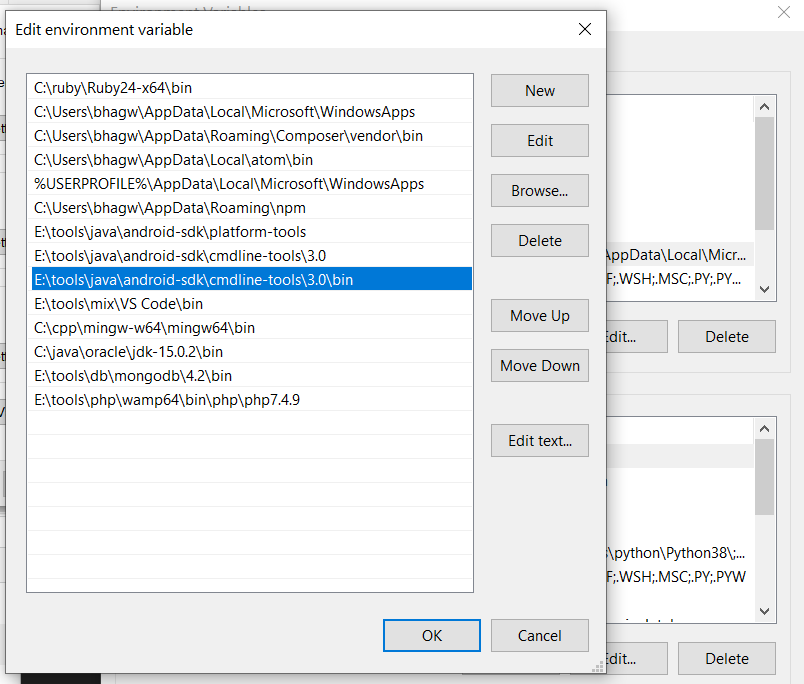
Now move all the files to the directory cmdline-tools/3.0 as shown in Fig 10.
Also, update the system path as shown in Fig 11.
Now close and open the Command Prompt. Also, check the ADB and SDK Manager versions as shown in Fig 12.
Step 6 — Using the SDK Manager
List — We can list the installed and available packages and images using the list command as shown below.
Install Platform — Use the below-mentioned command to install the Android 10 (API level 30) using the SDK manager.
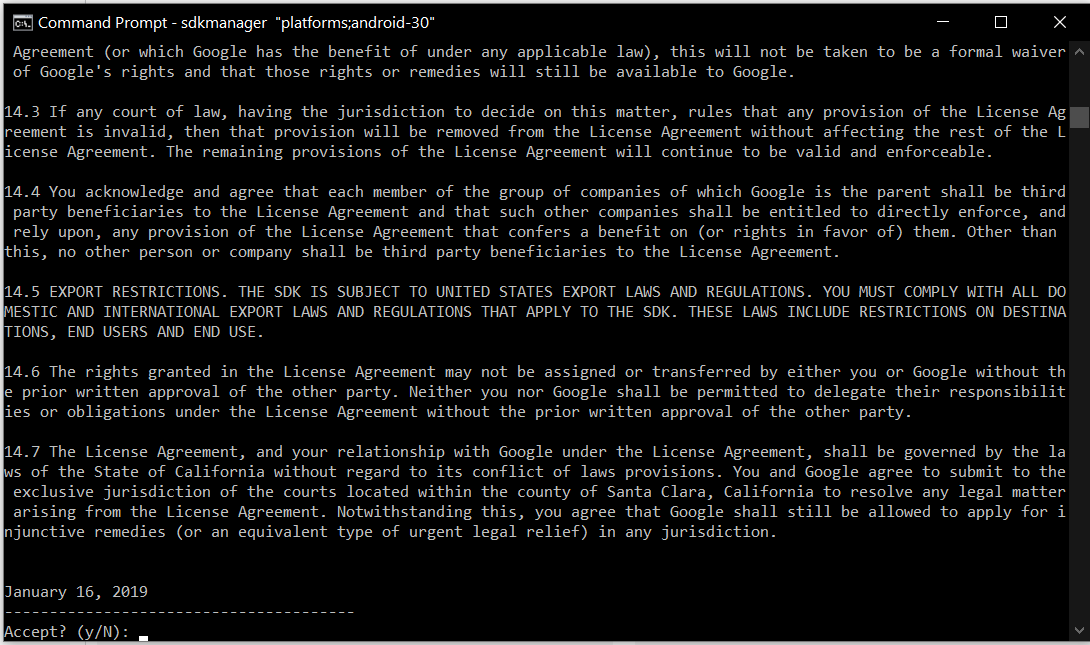
It will ask to accept the terms and conditions as shown in Fig 13. Enter y and hit Enter Key to accept the terms and conditions. This command creates the directory platforms within android-sdk and installs the package android-30 having all the required files to run the emulator for Android 10.
If we again check the installed packages, the list command shows the installed options as shown below.
Update SDK Manager — Update the SDK manager using the below-mentioned command.
Add System Image — We can add system images from available images shown by the list command using the SDK manager as shown below. We are adding the most recent default 64-bit system image.
Accept the License Agreement to complete the download.
There are several projects which need Google Play Services. We need system images specific to Google Play Services as shown below.
Accept the License Agreement to complete the download.
Install Emulator — We need to install the emulator before creating the AVD using SDK Manager.
Accept the License Agreement to complete the download.
Install Build Tools — Install the most recent build tool listed by the list command.
Step 7 — Using the Emulator and AVD Manager
Create Android Emulator — Create the emulator using the system image downloaded in the previous step as shown below. Replace with the actual name preferred by you.
The above commands ask a bunch of questions to configure the AVD if we choose the custom hardware profile option. We have excluded the details of these options from this tutorial since these configuration details depend on the actual needs. After completing all the configurations, it creates the AVD using the name provided by us while configuring it.
Similarly, we can also install the AVD of older versions as shown below.
List Android Emulators — Now go to the tools directory on the command line and check the installed platform as shown below.
Notes: Add Emulator to the system path as shown in Fig 14.
Close and re-open the Command Prompt to check the AVDs created by us in the previous steps.
It will list all the AVDs installed by us.
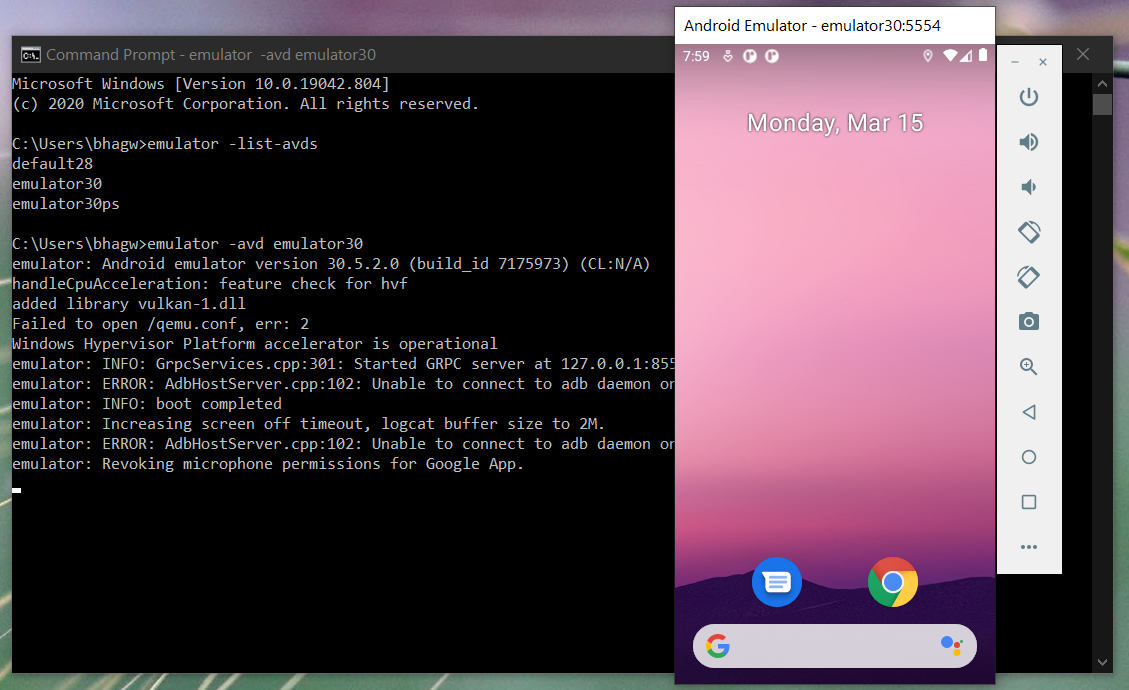
Run Emulator — We can run the emulator created by us as shown below.
The emulator will take some time to completely launch the AVD. The final results should look similar to Fig 15.
Delete Emulator — We can also delete an existing emulator as shown below.
Summary
This tutorial provided all the steps required to install Android Platform Tools and Android SDK Manager on Windows 10. It also provided the steps required to create and launch the AVDs using the Emulator.
Источник
SDK Manager
Tools > Options > Deployment > SDK Manager
In the Projects Window, right-click a platform in Target Platforms and click Edit SDK
Displays the existing SDKs, and enables you to add and manage SDKs for macOS, iOS, and Android.
Contents
What an SDK Does
A software development kit (SDK) provides the software required to build your applications for a target platform. In the SDK Manager page, an SDK provides the information that RAD Studio needs to locate the required software in your system.
macOS and iOS SDKs provide:
- A list of absolute paths to files and folders on the Mac that are required to build applications for the SDK target platform.
- A copy of those files, which can be pulled from the Mac using a connection profile.
Android SDKs contain the paths to the required software in your system.
On the SDK Manager page, for each target platform that has an associated SDK, one SDK is the default SDK, which appears in bold type. Windows platforms do not have a default SDK.
When You Must Add an SDK
SDKs are required for the following platforms and application types:
- C++ multi-device applications for the macOS platform.
- Multi-device applications for the iOS Device — 32 bit platform.
- Multi-device applications for the iOS Device — 64 bit platform.
- Multi-device applications for the Android platform.
File Names and File Extension for SDKs
SDK names have few restrictions other than that they must be valid filenames, as determined by System.IOUtils.TPath.HasValidFileNameChars. Duplicated SDK names result in an error (from the attempted Add or Import).
The SDK file extension is .sdk , which is added automatically when the SDK is saved as a file.
Examples of names for an SDK:
Each SDK you have defined is saved as an .sdk file in your Application Data folder (as returned by DesignIntf.IDesigner170.GetAppDataDirectory), such as the following folder on Windows 7:
The file contains the information about the SDK, such as the paths to the software required to build applications for the SDK target platform.
The actual SDK files (the SDK local file cache) are stored by default in C:\Users\ \Documents\Embarcadero\Studio\SDKs .
To change the SDK local file cache location of an SDK:
- For Android, adjust the paths in the SDK Manager to point to the new location.
- For macOS or iOS, see Changing the Local Root Directory of a macOS, iOS Device or iOS Simulator SDK.
SDK Panel
Lists the SDKs that have been defined, along with their associated platform. Boldface indicates the default SDK for a platform.
- To set a default SDK for a platform, do either of the following:
- Right-click the SDK entry and select Set as Default.
- Double-click the SDK entry.
- To edit an SDK, select it in the SDK versions list, make changes to the SDK Properties, and then click Save (without the Save, your changes are not saved).
Clicking one of the SDKs enables the buttons for managing an SDK (Delete and Export).
Displays the current settings in the selected SDK.
The content of this frame depends on the SDK platform: macOS, iOS or Android.
macOS and iOS SDK Properties
These are the fields that you can see in the SDK Properties frame when you select a macOS or iOS SDK.
Local root directory
Displays the directory on the local machine where files from the remote machine are cached. The default value is:
The value for the variable $(BDSPLATFORMSDKSDIR) is set on Tools > Options > IDE > Environment Variables
For C++, this directory is specified to the compiler with the —sysroot option. The remote paths are implicitly prefixed with the local root directory.
You can set the current values as the new default values by clicking  Save paths as the default for selected platform in the Remote paths pane.
Displays the list of paths on the remote machine that are pulled to the local machine.
A remote path is made up of:
- Directory. Represents the directory on the target or intermediate platform.
- File mask. Represents either the file name (for a single file) or the * (asterisk) wildcard, which matches all files in the specified directory. Example: OpenGL.
- Subdirectories. Indicates whether to include subdirectories.
There are four categories of remote paths, and the category determines how the paths/items are passed to the C++ compiler and linker, as follows:
- Include paths are passed to the compiler as part of the —sysinc path (the system include file search path with root directory prepended).
- Library paths are passed to the linker as part of the —syslib path (the system library search path with root directory prepended).
- Frameworks are passed to the compiler (with the —framework option) and to the linker (with the —Ff option).
- Other paths are not passed to the compiler/linker by default, but are pulled to the local machine.
All items specified are pulled to the local machine. See PAClient.
All paths should use the style appropriate for the target host machine. For example, use forward slashes (/) as separators for paths on Mac hosts. Certain punctuation marks such as the tilde (
) should be recognized for Mac.
The buttons on the Remote Paths field are described below:
| Button | Description |
|---|---|
 Add a new path item
 Edit the selected path item
 Delete the selected path item
 Reset paths to defaults for the selected platform
 Up Button
 Down Button
 ) to open Directories if you want to add, replace or delete new library paths.


