- Android Widgets
- Camera
- Entity State
- Media Player
- Service Call
- Template
- Home Assistant Companion Android App Release 3.0.0
- Breaking Changes
- Onboarding Improvements
- New Sensors
- Sensor Settings
- Android 11 Power Menu
- Notification Improvements
- Other Enhancements
- Первое знакомство с Home Assistant
- Умная рисоварка
- Home Assistant
- Automation
- Templating
- Python Scripts
- Creating integration
- Lovelace UI
- Custom Cards
- Notifications
- Послесловие
Android Widgets
The Android app allows the user to create widgets on the home screen so the user can call any Home Assistant service call or display an entities state (updates every 30 minutes or when tapped). You can add the widget like you normally would for any app depending on your devices launcher. The widget will not work when Data Saver is enabled, you will also need to ensure that background data for the app is enabled. If you notice that a widget is no longer working try to recreate it.
Camera
This widget will update every hour or when it is tapped. The widget will just contain the latest snapshot from the selected camera.
- Long press on any open space in the home screen
- Scroll down to Home Assistant in the widget list
- Drag the Camera Widget to an open space on the home screen
- Enter the Entity ID of the camera you wish to use
- Save the widget
Entity State
This widget will update every 30 minutes or when it is tapped. This widget will allow the user to select any entity they wish to get the state and an attribute from as well as setting the text size and adding a custom separator between the state and attributes.
- Long press on any open space in the home screen
- Scroll down to Home Assistant in the widget list
- Drag the Entity State widget to an open space on the home screen
- Enter the Entity ID you wish to view the state of
- If needed select the attribute checkbox and select the attribute you wish to add to the state
- If needed adjust the widget text size
- If needed add a custom separator to sit between the state and attribute
- Supply a name for the widget
- Save the widget
Media Player
This widget will let the user control any media player on their home screen. There are a couple of options available to hide or show the seek and skip buttons.
- Long press on any open space in the home screen
- Scroll down to Home Assistant in the widget list
- Drag the Media Player widget to an open space on the home screen
- Enter the Entity ID you wish to control
- If needed hide the Seek/Skip buttons
- Supply a label for the widget
- Save the widget
Service Call
This widget will make the service call when it is tapped. The user will see a green check mark if the call was successful and red if not. Red would indicate either the widget was not setup properly, the Home Assistant server is unavailable or some other error that would be indicated in the Home Assistant log.
- Long press on any open space in the home screen
- Scroll down to Home Assistant in the widget list
- Drag the Service Call widget to an open space on the home screen
- Select the service call you wish to perform
- Fill in the required service data for the selected service call
- Supply a name and icon for the widget
- Save the widget
Template
This widget will display any text that you wish to show in a widget using Home Assistants templating feature. This is an advanced feature but allows the user to display a wide variety of data. The widget will render the templates live below the text field so you can preview what it would look like.
You may also use HTML to format the text displayed such as adding a new line, making something bold or changing the color.
- Long press on any open space in the home screen
- Scroll down to Home Assistant in the widget list
- Drag the Template widget to an open space on the home screen
- Fill in the template data and observe the rendering below
- Save the widget
Источник
Home Assistant Companion Android App Release 3.0.0
Hey everyone it’s been a little while since we last spoke. We have a brand new Home Assistant Companion for Android release that we are excited to get into your hands and will roll out over the next day or so in the Google Play store.
Before we get into the release details I’d like to mention that this month marks the 1 year anniversary of the Home Assistant Companion app being offered in the Google Play Store! Just to think how far along the entire app has come from its initial alpha state to what is currently being offered in today’s release. Can you believe it’s already been a year?
It has been pretty busy over on the Android side of things during Hacktoberfest! We have seen a total of 84 pull requests from a wide range of contributors that we are thankful for, so thank you for all of your efforts! In case you missed it we actually had a release shortly after version 2.4.0 but as we did not have an accompanying blog post, we’ll cover whats new since we last spoke in this post. All of the features listed below are already documented on the Companion site, please be sure to check in there for greater details. Before we continue with what’s new lets go over the breaking changes for this release.
Breaking Changes
In our last blog post we mentioned that we were going to be breaking up some sensors and their attributes. As of 3.0.0 we have completed this task and no longer have non-static attributes as part of any sensor. If you are missing any data please check the Manage Sensors screen under App Configuration and enable the sensor you were previously using as an attribute.
Another major breaking change in this release is that the widgets were refactored to align with the application architecture. Unfortunately this means that some existing widgets may disappear from your home screen and will need to be recreated. We apologize for this and are unable to bring back the existing widgets that were lost. If you forgot what data was there we do have that saved, more on that down below.
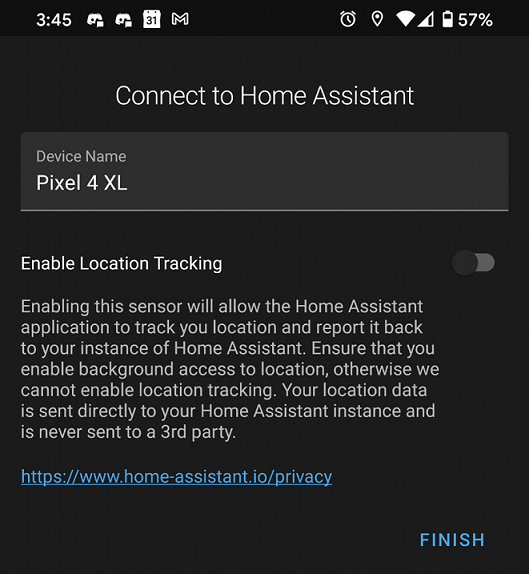
Onboarding Improvements
The first big change is that our onboarding screen has changed, we now ask the user to enter their preferred device name that gets attached to all entities that are created by the app. This was a source of frustration for some users as this meant that anytime they logged into the app they would then need to rename their entities to the name that they actually want. By default the device name is the device model but that is not meaningful to some users, especially if they have more than one device of the same model.
 Screenshot of the new onboarding flow.
New Sensors
We have several new sensors to welcome to the app, all of which are disabled by default. The first set of sensors were actually introduced in 2.5.0:
- Traffic Stat sensors — Sensors whose state represent the amount of data sent and received by the device. Mobile data may not be accurate, it depends on the data that we get from the API.
The following sensors are new in 3.0.0:
- Keyguard sensors — Sensors that represent various states from the Keyguard API, such as if a device is currently locked or has a password setup. These sensors will update during the periodic 15 minute interval.
- Last Notification sensor — A very powerful sensor that requires a special permission you must grant to read all notifications posted on the device. All attributes of the notification are provided as attributes for the sensor. You can think of this sensor as a great way to integrate any app that posts a notification to your device allowing you to automate around it. Personally I have been using it to integrate a food delivery app, to detect when my order will be delivered and automate around it. This sensor will update as soon as a notification is posted.
- Last Update Trigger — A sensor whose state will represent the reason for the last update that was sent to your Home Assistant instance. This sensor will update anytime an update is sent to your Home Assistant instance.
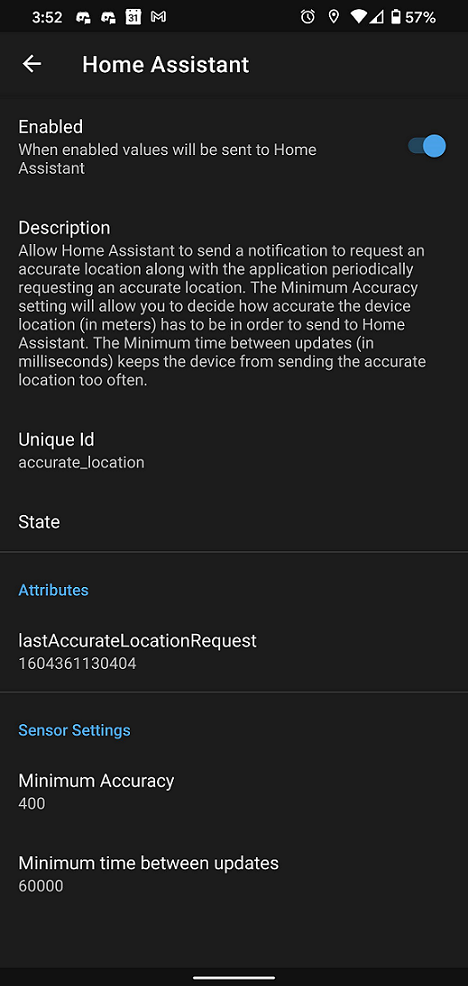
Sensor Settings
We didn’t stop at just adding new sensors, we also made enhancements to the overall sensor experience. Starting from version 2.5.0 certain sensors have custom settings that can help with what updates actually get sent to your Home Assistant instance.
 Screenshot of location settings.
- Next Alarm — This sensor has a setting for an allow list. This means that if you have an app that reports really odd timestamps as an actual alarm, you can now ignore them by telling the app which packages to send reports from. By default the list is blank. Tasker users are recommended to make use of this setting.
- Last Notification — This sensor also has an allow list to let the user create a list of apps from which they want notification data from. By default all notifications are sent to your Home Assistant instance. We highly recommend that you set up an allow list as soon as you can think of one to prevent a high amount of updates. You will be surprised by the amount of data that will show up in a short time period.
- Last Reboot — A bug was discovered where sometimes the timing in the calculation of the device’s last reboot could be off causing an unnecessary update. There is now a deadband setting to allow you to adjust the timing to ignore updates. By default this is set to 1 minute, you most likely won’t need to change this.
- Location Sensors — All 3 location sensors now have settings to allow you to adjust the minimum accuracy required to send a update to your Home Assistant instance. There is also a setting to adjust the minimum amount of time between updates. This should help a lot of users out who don’t get the location results they expect. We recommend changing this setting after you evaluate all of the location fixes in 3.0.0 as location tracking may already be improved without needing to adjust these.
- WiFi BSSID — This sensor has a setting that will allow the user to provide an alias for the currently connected BSSID. Not everyone can remember a MAC address let alone dozens of them. This setting is designed to help out those who use this sensor to make better sense of things without the need for secrets or templates. If you live in a household with multiple access points you may find it useful to set up an alias to help with things like room presence. By default this sensor reports the connected MAC address.
Android 11 Power Menu
We now integrate with Android 11’s power menu device control feature. The following domains are currently supported:
- automation On/Off
- climate Temperature slider
- cover Open/Close
- fan On/Off, speed slider
- input_boolean On/Off
- input_number Number control slider
- light On/Off, Brightness control slider
- lock Lock/Unlock
- scene Turn on scene
- script Turn on script
- switch On/Off
 Screenshot of power menu.
Notification Improvements
There have been several improvements to notifications as well.
- An event gets sent upon a notification being cleared along with all notification data.
- Notifications can make use of the alarm stream to bypass a device’s ringer mode setting. This can be useful if there is an important event such as an alarm being triggered. Make sure to check the updated Android examples on the companion site.
- Text To Speech notifications, with the ability to use the alarm stream if desired. By default it will use the device’s music stream. There is also an additional option to temporarily change the volume level to the maximum level while speaking, the level would then restored to what it was previously.
- New device commands to control your phone: broadcasting an intent to another app, controlling Do Not Disturb and ringer mode.
- Opening another app with an actionable notification, make sure to follow the Android examples.
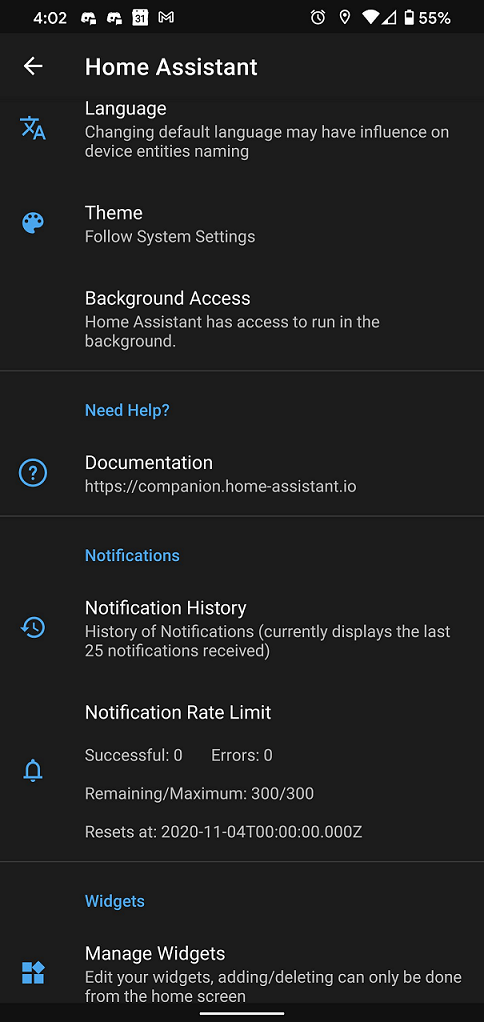
Other Enhancements
We have also spent time making improvements to all other areas most notably inside App Configuration:
 Screenshot of settings.
- App language can now be overridden to match a user’s profile, this will impact the name of entities that get added as well as the App Configuration appearance. By default your device will use your phones language however, we noticed some users actually prefer Home Assistant to always be in a different language on their device. With this feature you can now set the language to be one of any that are supported by the app. You can also help us translate the app on Lokalise.
- History of recently received notifications, along with all data that was sent
- Notification rate limit information to help you understand if you are about to go over the daily limit.
- Editable widgets, with the ability to delete missing widgets as mentioned in the breaking changes. This is really helpful if you ever created a widget and realized you needed to make one more adjustment.
- Widgets now update when the screen turns on to provide faster updates
- A new widget to control any media player
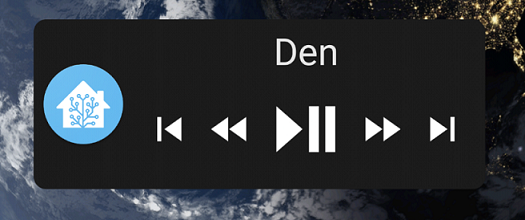 Screenshot of media player widget.
- Enable/Disable all sensors
- Events for entering or exiting a zone along with all location data
- Link to the current release changelog on GitHub
- File upload support for add-ons or person image upload
- The ability to opt out of sending crash reports to help the team investigate crashes. If you decide to opt out please make sure to report issues on GitHub otherwise we may not know the issue exists.
- Lots of location fixes for more accurate reporting
- Lots of bug fixes and other miscellaneous enhancements
Big thank you to everyone involved. Hope you take the time to digest all the new features. Looking forward to all the new use cases and feature requests everyone has been having.
Источник
Первое знакомство с Home Assistant

Home Assistant – популярное приложение с открытым исходным кодом для организации умного дома. Первый опыт автора в работе с Home Assistant основывается на попытке интеграции в него ‘умной рисоварки‘. Автор постарается описать основные компоненты и возможности данного приложения, с которыми ему привелось пошагово познакомиться. Статья является в чем-то обзором, в чем-то руководством для желающих начать свое знакомство с Home Assistant.
Тем, у кого мало свободного времени, советую пропустить присказку – первую главу – и перейти сразу ко второй. Вам нужно знать только, что работать мы будем с умной китайской рисоваркой от Xiaomi.
Умная рисоварка
Рисоварка, очевидно, — это устройство для приготовления риса. Вики демонстрирует нам керамические рисовые пароварки из Британского музея, датирующиеся 1250 г. до н.э. В 1945 году корпорация Mitsubishi стала первой в Японии компанией, производящей домашнюю электрическую рисоварку. Наша модель — Rice Cooker от Xiaomi – может готовить не только рис. “Это великолепное устройство для приготовления не только риса, но других типов блюд. Оно может готовить и супы, и пирожные, и многое другое” — говорится в рекламе. Но самое главное — это наличие wi-fi модуля, ПО с возможностями автоматизации и 200+ программно установленных рецептов. “Путь к умному дому через желудок – это правильно”, подумал автор, и решился.
Xiaomi Rice Cooker, как и подобает цифровому устройству, внешне очень привлекательна, радует округлостью форм и общим минимализмом. Для её настройки и использования производитель предлагает приложение Mi Home. После регистрации Mi account, программа легко отыскивает новое устройство, и вы регистрируете его в вашей локальной сети. Интерфейс приложения не самый плохой, предоставляет базовые средства для автоматизации, может принимать уведомления от устройств. Однако, есть существенные недостатки. Не всех может порадовать отправление информации разработчику о каждом клике пользователя. И неприятное выражение находит часто упоминаемый нынче национальный калорит. Вместо 200+ рецептов на иностранные языки переведено и доступно всего лишь четыре. Остальное – исключительно для китайского народа. Когда ваша ‘умная’ рисоварка не способна выполнять все обещаные кулинарные обязанности, тут, согласитесь, становится грустно. Побродя некоторое время по интернетам, погрустневший автор наткнулся на следующий интересный проект (вечных благ автору). Который оказался посвящен разработке модуля для некоего Home Assistant.
Home Assistant
Сперва, немного общей информации. Как нам говорят на домашней странице HA, ”Это ПО с открытым кодом для автоматизации умного дома, ориентирующееся на локальное управление и конфиденциальность. Развиваемый трудом открытого сообщества энтузиастов, он отлично подходит для работы на Raspberry Pi или локальном сервере.” Проекту более пяти лет, он использует python и лицензию Apache 2.0. Версия релиза на момент написания этих строк – 0.99.3.
Для управления устройствами HA использует отдельные модули (integrations, или components). Создать такой довольно просто. На сайте можно найти каталог основных (одобренных и поддерживаемых сообществом) модулей. Среди общего их количества (1485 штук) попадаются совершенно разнообразные, в каталоге значятся имена amazon, google, xiaomi, и даже один раз yandex.
Попробуем установить HA в виртуальное окружение на линукс десктопе. Нам понадобится python3 и менеджер пакетов pip.
После этого на http://localhost:8123 станет доступнен графичекий интерфейс HA. При первом входе потребуется создать аккаунт пользователя. Веб-интерфейс HA довольно объемен. Пара важных элементов, о которых стоит упомянуть в самом начале, это закладка Configuration → General, где вы легко можете перезагрузить файлы конфигурации или сам сервер. А также страница Info в списке Developers tools, где можно посмотреть логи ошибок.
Все необходимые пользователю данные HA хранит, в случае линукс, в папке настроек “
/.homeassistant”. Файлы настройки записаны в формате YAML, и основной из них – это “configuration.yaml”. Он объединяет данные модулей, автоматизаций, etc. Возможность импорта позволяет разбить настройки на отдельные логически организованные файлы. Модули же хранятся в подпапках “components” (встроенные) и “custom_components”.
Этих знаний для установки нового модуля нам должно быть достаточно. Копируем с репозитория папку “xiaomi_cooker” в нашу “
/.homeassistant/custom_components”. Согласно описанию, добавляем настройки модуля в файл “configuration.yaml”:
Готово. После перезагрузки HA в разделе General → Integrations веб-интерфейса появится запись о новом модуле.
Любой модуль представляет собой некоторый набор объектов (entities) и сервисов (services, по сути — функции). Объекты хранят различные принимаемые от устройств данные. Например, sensor.xiaomi_cooker_temperature – температуру рисоварки, sun.sun – положение солнца. Данные объекта выражаются одним основным значением — статусом (state), и произвольным набором дополнительных аттрибутов (attributes). Сервисы используются для передачи команд и значений устройствам. Например, xiaomi_cooker.start – команда начала работы рисоварки, или homeassistant.check_config – инициализация поиска ошибок в файлах настроек HA. В списке Developer Tools веб-интерфейса находится раздел Services, где можно просмотреть доступный вам список сервисов и поиграться с их вызовами. Рядом есть раздел States, где, соответственно, можно просмотреть и поизменять значения объектов. Нужно заметить, что изменения значений объектов в разделе States имеют односторонний характер. Т.е. если, например, поменять здесь состояние объекта lights.state с off на on, на истинном состоянии устройства это не отразится, и при следующем же обновлении данных от устройства значение объекта будет перезаписано в реальное.
Automation
Нужно заметить, что пока еще не все доступные автоматизации (например, приведенную выше) можно сконфигурировать без редактирования yaml-кода, через графический интерфейс, но разработчики говорят об активной работе над устранением этого недостатка.
Templating
entity_id мы оставили пустым, поскольку уже добавили автоматизацию, которая будет самостоятельно вызывать обновление данных объекта.
Python Scripts
/.homeassistant/python_scripts”, станут доступны в качестве сервисов с именами “python_scripts. ”. Их код выполняется в заранее заданном окружении, где переменные data и hass дают нам доступ к аргументам вызова сервиса, а также объектам и сервисам HA. В качестве примера приведем код файла “charge_set.py” для сервиса “python_scripts.charge_set”. Его функцией будет установка заряда нашей батарейки:
Creating integration
После этого сообщим о новом модуле файлу настроек “configuration.yaml”, добавив в него строчку с названием модуля: “overmind:”. Задача решена.
Lovelace UI
Так называется используемый HA фронтенд. Этот графический интерфейс, через который обычному пользователю предлагается управлять умным домом, является заглавной страницей веб-интерфейса HA. Интерфейс LUI формируется из карточек (сards) разнообразых типов, которые могут отражать значения объектов, служить для вызова функций и прочих задач. Карточки можно распределять по страницам (view), по аналогии с браузерными закладками. Настройка удобно организована через тот же графический интерфейс, но доступна и посредством yaml-кода, для чего там же присутствует встроенный текстовый редактор. Рекомендую заглянуть на страницу https://demo.home-assistant.io/, где приведено несколько различных примеров настройки LUI, и где их легко можно посмотреть, пощелкать и поизменять.
Пример настройки графического интерфейса
Говоря о недостатках интерфейса, к сожалению, разработчики сами признаются, что проект пытается усидеть одновременно на стульях десктопа и смартфона. LUI, по умолчанию, любит самостоятельно определять расположение и размеры карточек, что иногда может превращать нормально выглядящую на мониторе страницу в полную кашу на экране смартфона, и наоборот. Присутствуют некоторые простые инструменты для упорядочения интерфейса, но и они, по моему опыту, не всегда эффективны.
Думаю, не имеет большого смысла описывать создание интерфейса посредством графических инструментов, поэтому я приведу несколько примеров в виде использованного мной yaml-кода. Создав для нашей рисоварки отдельную страницу (view), мы постараемся заполнить её самыми необходимыми элементами так, чтобы это не вызывало отторжения при пользовании с экрана смартфона.
Тут же опробуем те самые простые инструменты упорядочения интерфеса, это – horizontal-stack и vertical-stack. Сперва, создадим vertical-stack из карточек типов entity-button и sensor. Первая будет служить для запуска нашей рисоварки, вторая – для отображения значения температуры:
Home Assistant включает в себя архив иконок Material Design Icons, которые, через соответствующие имена (например, mdi:selection), можно использовать в элементах настроек. Скрипт (в данном случае, не python-, а yaml-), который мы использовали для вызова сервиса, это еще один удобный инструмент HA.
Теперь объединим приведенный выше vertical-stack с карточкой портрета нашей в теперь уже horizontal-stack. Все будет так же просто:
/.homeassistant/www’ становятся доступными по ссылке http://localhost/local/filename.
Следующим шагом мы немного поработаем над созданной нами кнопкой вызова сервиса. Для нас было бы удобно, если бы она работала как тумблер, т.е. на включение/выключение, а не так, как это сделано сейчас. Этого можно добиться через использование карточки типа conditional, отображение которой на экране можно регулировать через задание определенных условий. Ниже приведен код для карточки, которая является кнопкой выключения рисоварки и видна только при условии, если рисоварка находится в процессе приготовления блюда:
Переписав подобным образом ранее созданный код кнопки влючения, и объединив его с этим, мы получим одну кнопку, работающую одновременно на включение и выключение.
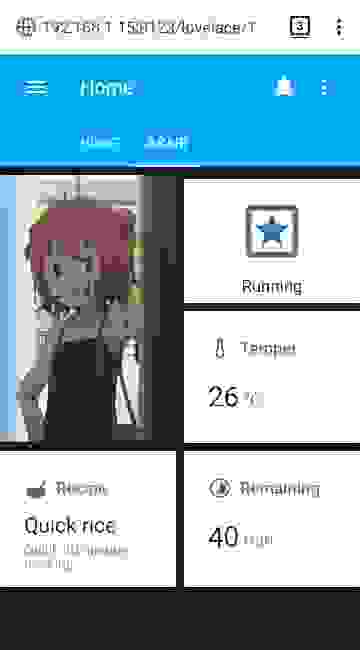
Дополним наш интерефейс еще одной карточкой — с отображением времени до окончания приготовления (аналогично карточке температуры), и еще одной – с деталями приготовляемого рецепта (custom:recipe-card). В итоге получим что-то такое:
Custom Cards
Для использования новой карточки нужно будет добавить в начале файла настроек LUI следующий код:
и среди списка карточек:
Notifications
Необходимой частью умного дома является отправка сообщений пользователю. В HA такие сообщения называются notifications (уведомления) и существует два базовых типа уведомлений. Первый – это внутренние уведомления (persistent notifications). Для их отправки используется встроенный сервис «persistent_notification.create». Список таких сообщений доступен через иконку колокольчика в графическом интерфейсе, они используют markdown разметку и по сути довольно просты.
Другим, более интересным, инструментом является встроенный модуль notify, который через установку дополнительных модулей позволяет передавать сообщения, используя сторонние платформы. В качестве примера рассмотрим модуль для telegram.
Для использования модуля нам, прежде всего, будет необходимо создать бота в самом telegram. При настройке нам понадобится chat_id нашего пользователя и API token бота. Как получить эти данные – детально рассказано по ссылке выше, будем считать, что они у нас готовы. Переходя непосредственно к установке модуля, сперва, как мы уже делали, скопируем его исходники в папку components, а затем добавим его настройки в файл “configuration.yaml”:
плюс настройки модуля notify:
Модуль telegram позволяет нам отправлять сообщения, картинки, или видео. В качестве примера, создадим автоматизацию для отправки сообщения с картинкой, уведомляющее нас об окончании приготовления блюда.
Послесловие
Welcome to the release notes of yet another wonderful release! No, we’re not going for 1.0, we’re doing 0.100! We feel like we’re not ready yet with our goals for 1.0, but we’re making progress every day. For a sneak peak of what we’re thinking about, check our blog Simple mode in Home Assistant 1.0.
Источник


