- Hello World widget для Android
- Android (Home screen) Widgets — Tutorial
- 1. Prerequisites
- 2. Android Widgets
- 2.1. Overview about AppWidgets
- 2.2. Home screen widgets
- 2.3. Steps to create a Widget
- 2.4. Widget size
- 3. Creating the Broadcast receiver for the widget
- 3.1. Create and configure widget
- 3.2. Available views and layouts
- 3.3. AppWidgetProvider
- 3.4. Receiver and asynchronous processing
- 4. Widget updates
- 5. Exercise: widget with fixed update interval
- 5.1. Target
- 5.2. Create project and widget implementation
- 5.3. Validate
- 6. Collection View Widgets
- 7. Enabling a app widget for the lock Screen
- 8. Exercise: Update widget via a service
Hello World widget для Android
Размер виджета можем указывать любой, но гугл рекомендует придерживаться формуле расчёта размера виджета (number of cells * 74) – 2. updatePeriodMillis — это частота обновления виджета, но не чаще чем раз в 30 минут, в целях экономии батарейки. initialLayout – это файл шаблона виджета.
Widget provider — Это java файл, он должен наследоваться от класса AppWidgetProvider. В нашем случае он пока останется пустым (src/ru/example/android/widget/ HelloWidget.java).
- package ru.example.android.widget ;
- import android.appwidget.AppWidgetProvider ;
- public class HelloWidget extends AppWidgetProvider <
- >
Layout – Это шаблон виджета или слой View, кому как нравится. Выглядеть он будет так: (res/layout /main.xml).
- version = «1.0» encoding = «utf-8» ?>
- xmlns:android = «schemas.android.com/apk/res/android»
- android:layout_width = «fill_parent»
- android:orientation = «vertical»
- android:background = «@android:color/white»
- android:layout_gravity = «center»
- android:layout_height = «wrap_content» >
android:id = «@+id/widget_textview»
android:text = «Hello Widget» android:layout_height = «wrap_content» android:layout_width = «wrap_content» android:layout_gravity = «center_horizontal|center» android:textColor = «@android:color/black»/> >
Всё основное мы сделали, осталось зарегистрировать виджет в AndroidManifest.xml. Для этого добавим в него следующий код в раздел . :
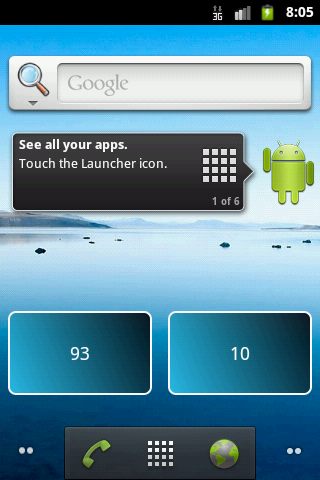
Теперь можем компилировать проект и смотреть результат в эмуляторе! 
Наш виджет хоть и работает, но абсолютно бесполезен. Давайте сделаем так, чтобы он реагировал на нажатие кнопки.
В виджете невозможно повесить полноценное событие на нажатие кнопки или еще на какое-либо событие, как это Вы привыкли делать в Activity. На этом примере Вы увидите, как можно обработать событие от нажатия кнопки. Давайте для начала добавим в наш шаблон кнопку (res/layout /main.xml).
- version = «1.0» encoding = «utf-8» ?>
- xmlns:android = «schemas.android.com/apk/res/android»
- android:layout_width = «fill_parent»
- android:orientation = «vertical»
- android:background = «@android:color/white»
- android:layout_gravity = «center»
- android:layout_height = «wrap_content» >
android:id = «@+id/widget_textview»
android:text = «Hello Widget» android:layout_height = «wrap_content» android:layout_width = «wrap_content» android:layout_gravity = «center_horizontal|center» android:textColor = «@android:color/black»/> android:id = «@+id/widget_button» android:text = «click me» android:layout_height = «wrap_content» android:layout_width = «wrap_content»/> >
Все взаимодействия с виджетом будем делать в классе provider (src/ru/example/android/widget/ HelloWidget.java). Вот как будет выглядеть простейшая обработка события:
- public class HelloWidget extends AppWidgetProvider <
- public static String ACTION_WIDGET_RECEIVER = «ActionReceiverWidget» ;
- @ Override
- public void onUpdate ( Context context, AppWidgetManager appWidgetManager, int [ ] appWidgetIds ) <
- //Создаем новый RemoteViews
- RemoteViews remoteViews = new RemoteViews ( context. getPackageName ( ) , R. layout . main ) ;
- //Подготавливаем Intent для Broadcast
- Intent active = new Intent ( context, HelloWidget. class ) ;
- active. setAction ( ACTION_WIDGET_RECEIVER ) ;
- active. putExtra ( «msg» , «Hello Habrahabr» ) ;
- //создаем наше событие
- PendingIntent actionPendingIntent = PendingIntent. getBroadcast ( context, 0 , active, 0 ) ;
- //регистрируем наше событие
- remoteViews. setOnClickPendingIntent ( R. id . widget_button , actionPendingIntent ) ;
- //обновляем виджет
- appWidgetManager. updateAppWidget ( appWidgetIds, remoteViews ) ;
- >
- @ Override
- public void onReceive ( Context context, Intent intent ) <
- //Ловим наш Broadcast, проверяем и выводим сообщение
- final String action = intent. getAction ( ) ;
- if ( ACTION_WIDGET_RECEIVER. equals ( action ) ) <
- String msg = «null» ;
- try <
- msg = intent. getStringExtra ( «msg» ) ;
- > catch ( NullPointerException e ) <
- Log. e ( «Error» , «msg = null» ) ;
- >
- Toast. makeText ( context, msg, Toast. LENGTH_SHORT ) . show ( ) ;
- >
- super . onReceive ( context, intent ) ;
- >
- >
В классе есть 2 метода — onUpdate и onReceive. Метод onUpdate вызывается при обновлении виджета. Частоту обновления мы настроили в файле res/xml/hello_widget_provider.xml атрибутом android updatePeriodMillis=«86400000». Метод onReceive унаследован от класса BroadcastReceiver.
В виджете нельзя обновить отдельный элемент, например текст, как в Activity. Всегда обновляется иерархия Views целиком. Для обновления виджета нам потребуется класс RemoteViews, с помощью которого мы и будем менять иерархию Views целиком. К сожалению, возможности этого класса скудные. Он позволяет нам изменять текст, картинки и вешать событие на клик. Событие в виджете событием можно назвать с натяжкой, api позволяет выполнять всего 3 дейстия:
- Бросить Broadcast
- Запустить Activity
- Запустить Service
В нашем случае мы будем рассылать Broadcast (Широковещательное сообщение). В результате получится что-то вроде обычной обработки события. С помощью класса PendingIntent создаём наше событие и регистрируем его в RemoteViews. Затем обновляем виджет. А в методе onReceive ловим наше «событие» и обрабатываем, выводя сообщение с помощью класса Toast.
Добовляем изменения в файл AndroidManifest.xml:
Компилируем, и наслаждаемся резульатом.
Источник
Android (Home screen) Widgets — Tutorial
Developing Android Widgets. This article describes how to create home screen widgets in Android.
1. Prerequisites
The following description assume that you already have experience in building standard Android application. Please see https://www.vogella.com/tutorials/Android/article.html — Android Tutorial. It also partly uses Android services. You find an introduction into Android Services in https://www.vogella.com/tutorials/AndroidServices/article.html — Android Service Tutorial.
2. Android Widgets
2.1. Overview about AppWidgets
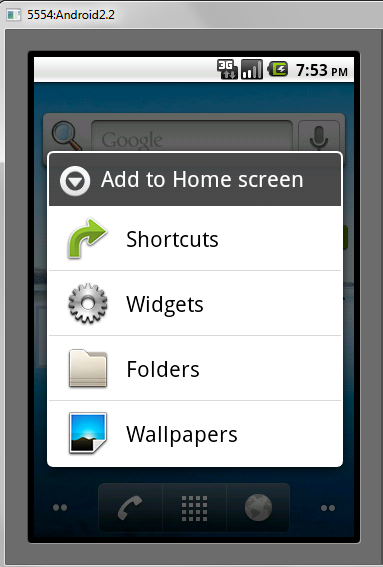
2.2. Home screen widgets
Home screen widgets are broadcast receivers which provide interactive components. They are primarily used on the Android home screen. They typically display some kind of data and allow the user to perform actions with them. For example, a widget can display a short summary of new emails and if the user selects an email, it could start the email application with the selected email.
To avoid confusion with views (which are also called widgets), this text uses the term home screen widgets, if it speaks about widgets.
A widget runs as part of the process of its host. This requires that the widget preserves the permissions of their application.
Widget use RemoteViews to create their user interface. A RemoteView can be executed by another process with the same permissions as the original application. This way the widget runs with the permissions of its defining application.
The user interface for a Widget is defined by a broadcast receiver. This receiver inflates its layout into an object of type RemoteViews . This object is delivered to Android, which hands it over the home screen application.
2.3. Steps to create a Widget
To create a widget, you:
Define a layout file
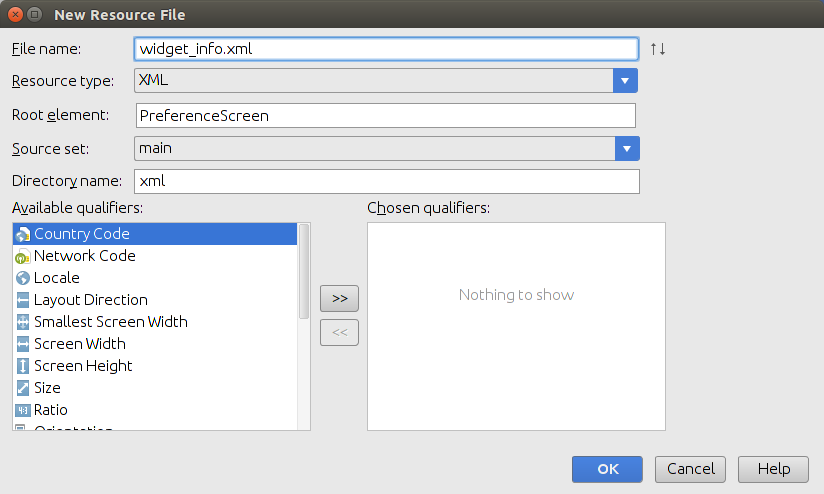
Create an XML file ( AppWidgetProviderInfo ) which describes the properties of the widget, e.g. size or the fixed update frequency.
Create a BroadcastReceiver which is used to build the user interface of the widget.
Enter the Widget configuration in the AndroidManifest.xml file.
Optional you can specify a configuration activity which is called once a new instance of the widget is added to the widget host.
2.4. Widget size
Before Android 3.1 a widget always took a fixed amount of cells on the home screen. A cell is usually used to display the icon of one application. As a calculation rule you should define the size of the widget with the formula: ((Number of columns / rows) * 74) — 2 . These are device independent pixels and the -2 is used to avoid rounding errors.
As of Android 3.1 a widget can be flexible in size, e.g., the user can make it larger or smaller. To enable this for widget, you can use the android:resizeMode=»horizontal|vertical» attribute in the XML configuration file for the widget.
3. Creating the Broadcast receiver for the widget
3.1. Create and configure widget
To register a widget, you create a broadcast receiver with an intent filter for the android.appwidget.action.APPWIDGET_UPDATE action.
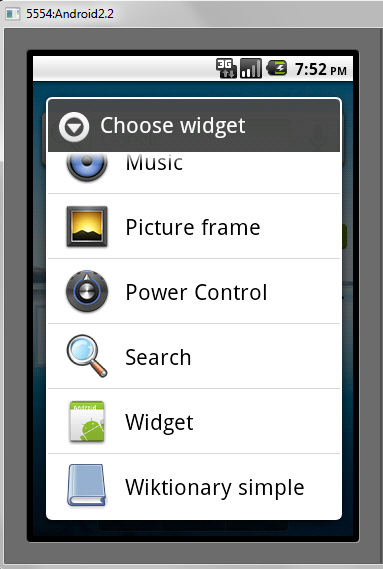
The receiver can get a label and icon assigned. These are used in the list of available widgets in the Android launcher.
You also specify the meta-data for the widget via the android:name=»android.appwidget.provider attribute. The configuration file referred by this metadata contains the configuration settings for the widget. It contains, for example, the update interface, the size and the initial layout of the widget.
3.2. Available views and layouts
A widget is restricted in the View classes it can use. As layouts you can use the FrameLayout , LinearLayout and RelativeLayout classes. As views you can use AnalogClock , Button , Chromometer , ImageButton , ImageView , ProgressBar and TextView .
As of Android 3.0 more views are available: GridView , ListView , StackView , ViewFlipper and AdapterViewFlipper . These adapter views require that you define a collection view widget which is described later in this tutorial.
The only interaction that is possible with the views of a widget is via an OnClickListener event. This OnClickListener can be registered on a widget and is triggered by the user.
3.3. AppWidgetProvider
Your BroadcastReceiver implementation typically extends the AppWidgetProvider class.
The AppWidgetProvider class implements the onReceive() method, extracts the required information and calls the following widget life cycle methods.
As you can add several instances of a widget to the home screen, you have life cycle methods which are called only for the first instance added / removed to the home screen and others which are called for every instance of your widget.
| Method | Description |
|---|---|