- Take control of view’s shadow — Android
- You can find updated code that is written in Kotlin here
- Use drawable with multi different color solid (worse thing that you can do)
- Android elevation (supported from API 21)
- CardView
- Using Shape Drawable (New way to implement shadow)
- Урок 4. Android Material Design. Установка теней и обрезка View
- Настройте тени и контуры
- Обрежьте view
- Playing with elevation in Android
- What is that shadow all about
- Elevation tweaks in action
- One last thing before you go
Take control of view’s shadow — Android
You can find updated code that is written in Kotlin here

Apr 23, 2017 · 4 min read
Let’s say you’re looking for how to implement shadow on your View in Android and you are going to Google something. You will probably find these 3 answers.
We are going to check these answers, and after we check them all I will suggest new way that you can implement shadow in any View you want.
Use drawable with multi different color solid (worse thing that you can do)
Just use 5–6 shapes that have padding, and at the end the shape that will be your view’s main background, those shapes will be overlapping on each other and Baam! you have drop shadow
Let’s see t he result. Yes for some people this one is acceptable (not for me), but let’s enable Debug GPU Overdraw and check result too

4x+ Overdraw it’s not good, so never ever ever ever use this solution, not worth it.
Android elevation (supported from API 21)
It’s easy to use, just add one attribute to your view’s XML or even enable it with Java code in your View class check Android documentation
The result is perfect, overdraw is acceptable but you older APIs will not support this shadow
Let’s check overdraw and the result.

Do you see that green border on left|top|right of overdraw result that means some part of view overdraw 2x time I have no idea why this is happening.
CardView
When you are using CardView you will see shadow in all APIs, but the result in older APIs are not same as 21+ APIs
Cardview overdraw is exactly same as elevation
But there is one thing you should know; if you go to CardView source code you will notice that CardView extends from FrameLayout (link), That means if you want to use LinearLayout as Parent View it will add inside of Framelayout, so you will always have one more extra overdraw in your views. And when you are using CardView (Elevation) you can not change the shadow’s color, you can not change the shadow’s direction (top|left, bottom|right) you need to follow material design in your application.
Using Shape Drawable (New way to implement shadow)
Why not create the shadow ourself? You need to create a custom view and initial in background.

First, let’s see the result.

The result is same as CardView, we don’t have that green 2x overdraw and you can use it in any view you want and you can control your shadow’s direction and color.
Here is just a simple example how it works.
You can add this view in your XML and you have LinearLayout that support rounded box with drop shadow.
You can create your own attribute and pass background color, corner radius, shadow color through XML too.
And the good part is you are not forced to use FrameLayout as your parent view, you can easily create any view you want.
Let’s go to ViewUtils class and see magical things.
This function generate shadow with 3 different direction with custom radius and color.
First, we create background paint to draw our background color and we will add shadow layer with only corner radius that we want.
Next, we add padding to shape drawable to prevent overlapping view’s content on the shadow layer.
With ‘setShadowLayer’ you can change the color of shadow and also the direction of shadow and after that, you need to add a corner to your shadow layer too.
And at the end we merge it to LayerDrawable and set Inset to drawable for not seeing cutting shadow, that’s all.

It’s just simple example,you can use more that one ShapeDrawable to create customizable shadow.
In the next post, I will show how you can clip shape in view with shadow background.
Источник
Урок 4. Android Material Design. Установка теней и обрезка View
Перевод документации официального сайта developer.android.com
 Рисунок 1. Тени для различных высот view.
Чтобы установить высоту view в макете используйте атрибут android:elevation. Чтобы установить высоту в коде activity, используйте метод View.setElevation().
Чтобы установить смещение, используйте метод View.setTranslationZ().
Новые методы ViewPropertyAnimator.z() и ViewPropertyAnimator.translationZ() позволяют легко анимировать высоту view. Для получения дополнительной информации, смотрите справку по ViewPropertyAnimator и руководство разработчика о свойствах анимации.
Вы так же можете использовать StateListAnimator чтобы установить анимации декларативно. Это особенно полезно в тех случаях, когда изменяется состояние триггера анимации, например, когда пользователь нажимает на кнопку. Для получения дополнительной информации, смотрите Изменение состояния анимации view.
Значение Z измеряется в dp (density-independent pixels).
Настройте тени и контуры
Границы фона drawable view определяют форму его тени. Контуры представляют собой внешнюю форму графического объекта и определяют область для сенсорного отклика.
Рассмотрим view, определенное с помощью фона dravable:
Фон drawable определен как прямоугольник с закругленными углами:
View отбрасывает тень с закругленными углами, после того как фон drawable установил границы view. Создание пользовательского контура переопределяет форму тени view по умолчанию.
Чтобы установить пользовательский контур для view в коде:
1. Унаследуйтесь от класса ViewOutlineProvider.
2. Переопределите метод getOutline().
3. Назначьте нового поставщика контура для вашего view с помощью метода View.setOutlineProvider() .
Вы можете создать овальные и прямоугольные очертания с закругленными углами используя методы класса Outlines. Поставщик контура для view по умолчанию получает контур из фона view. Чтобы view не отбрасывала тень, установите значение поставщика контура в null.
Обрежьте view
Обрезание позволяет вам легко изменить форму view. Вы можете обрезать view для совместимости с другими элементами дизайна или изменить форму view в ответ на действия пользователя. Вы можете обрезать view к его области контура с помощью метода View.setClipToOutline() или используя атрибут android:clipToOutline. Только прямоугольник, круг и скругленный прямоугольник поддерживают обрезание, как определено в методе Outline.canClip().
Чтобы обрезать view в форме drawable, установите drawable в качестве фона view (как показано выше), и вызовите метод View.setClipToOutline().
Обрезание view это дорогостоящая операция, поэтому не анимируйте форму, которую вы используете чтобы обрезать view. Для достижения этого эффекта используйте Reveal эффект анимации.
Источник
Playing with elevation in Android
Everyone knows that Material Design has shadows. Most know that you can control the virtual Z coordinate of Material elements in Android by using the elevation property, to control the shadow. Very few know that there’s so much more you can do to tweak the shadows your UI elements cast!
Update 6th Nov 2018: I just published a follow-up to this article with new APIs added in P, and a bunch of other goodies. Do check it out!

What is that shadow all about
In Material Design, the elevation is a manifestation of the virtual Z coordinate of a material plane relative to the screen’s “base” plane. For example:
 Image shamelessly ripped from the Material Design guidelines.
In the Material Design system, there are two light sources. One is a key light that sits above the top of the screen, and an ambient light that sits directly above the centre of the screen:
 Image shamelessly ripped from the Touchlab blog.
These two lights cast each their own shadow, one which is mostly affecting the bottom edge of a material sheet (key light), and the other which is affecting all edges (ambient light):
 Image derived from the Material Design guidelines.
The elevation property directly controls the shape of the resulting shadow; you can see this clearly with buttons, which change their elevation based on their state:
 Image from Vadim Gromov’s Dribbble.
You may think that the elevation property is the only way to control how shadows look, but that’s not true.
In Android, there is a very little known API called Outline that is providing the required information for a Material sheet to project a shadow. The default behaviour for View s is to delegate the outline definition to their background drawable. ShapeDrawable s for example provide outlines that match their shapes, while ColorDrawable s, BitmapDrawable s, etc. provide a rectangle matching their bounds. But nothing says we cannot change that, and tell a view to use a different ViewOutlineProvider , using the setOutlineProvider() method:
If we control the ViewOutlineProvider , we can tweak the resulting Outline , tricking the OS into drawing whatever shadow we want:
You can use elevation and Outline to do all sorts of tweaks to the shape and position of an elevation shadow:
 Believe it or not, I have actually captured this one myself on my phone.
You will notice how the shadow here does not just adapt to different elevation values, but is also translated around and gets a larger or smaller size than the view itself.
Another thing you can do is to assign a shape that is different from the actual outline of the view itself — I cannot think of any situation in which this would make sense, but you could. The only limitation is that the shape must be convex. There are convenience methods on Outline to have ellipses, rectangles and rounded rectangles, but you could also use any arbitrary Path , as long as it’s convex.
Unfortunately it’s not possible to exaggerate some effects too much, since as you can see there are some shortcuts the system takes when rendering the shadows which will create some rather annoying artefacts when you hit them.
In case you are curious how shadows are rendered in Android, the relevant code is in the hwui package in AOSP — you can start looking at AmbientShadow.cpp (note: starting with Android 10, hwui is not really used anymore, and everything is rendered by Skia instead).
Another limitation is that we cannot tint the elevation shadow, we’re stuck with the default grey, but to be honest I don’t believe that’s a bad thing 😉
Elevation tweaks in action
I’ve used this technique to come up with a peculiar elevation appearance for the cards in Squanchy, an open source conference app I’ve been working on in the last year:
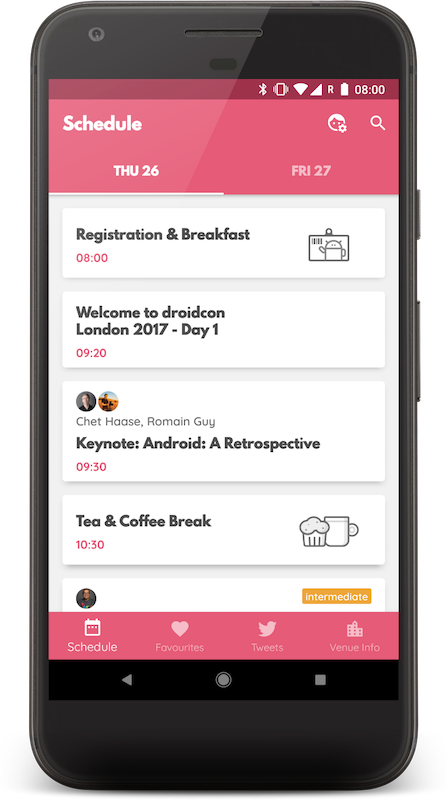
As you can see, the cards have a shadow that looks way more diffuse than the regular elevation shadows. This is obtained by having an Outline that is 4dp smaller than the card, and an elevation of 4dp :
The cards have an android:stateListAnimator that also tweaks their elevation and translationZ based on their pressed state, like Material buttons do. You can see how the cardInset* attributes are then used in the CardLayout code to shrink the Outline that we provide to the system.
When you scroll the schedule in Squanchy, you might notice that the shadow tends to change size as a card scrolls along the Y axis:
If the effect is too subtle in a gif for you to see, this image makes it crystal clear:
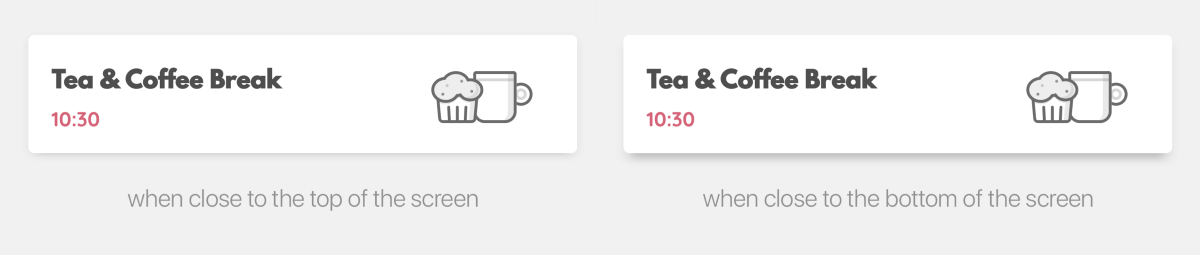
How is that possible? We definitely don’t change the elevation and outline based on the y-position of an item (we could, but it’s really not a good idea as it requires recalculating outlines on each scroll event).
You’ll remember I mentioned earlier how there are two shadows in the Material Design environment, one which sits above the top of the screen, and one that sits directly above the centre. Well, the top light — that is the key light — is casting a longer shadow when an item gets farther away from it. This is actually something that is always true in Android, you just don’t notice it as much in normal circumstances. The Squanchy style makes it more obvious though, and you can even exaggerate it further by using a higher elevation value:

One last thing before you go
Lastly, remember that Outlines aren’t just used for shadows, but by default they define the clipping of the view too! If you have a weird outline and don’t want it to influence the drawing of your actual view, you’ll want to call setClipToOutline(false) on it to avoid nasty surprises.
This is only important when the Outline you provide has canClip() returning true , which is the case when the outline is a rectangle, a rounded rectangle, or a circle. Non-round ovals, and arbitrary paths, are not able to provide clipping, so setClipToOutline() has no effect in those cases.
Fun fact: rectangles and circles are all internally represented as special cases of rounded rectangles. A rectangle is a rounded rectangle with a corner radius of zero, and a circle is a rounded rectangle whose corner radius is equal to half the circle height/width.
If you want to read some more on the topic, the Android Developers website has a page on Defining shadows and clipping views, that goes through the same topics with code examples, and links to some more javadocs.
To play around with elevations on your own Android device, I have cooked up a simple playground app:
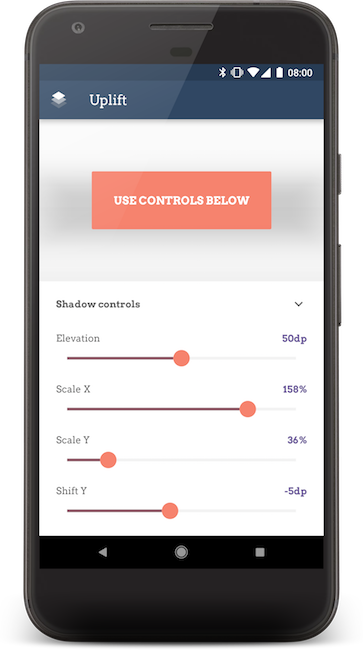

The code for the playground app is open source on GitHub.
Источник


