- Как установить ViPER4Android в Android 10
- Установка ViPER4Android в операционной системе Android 10
- Установка ViPER4Android FX на Android Q
- Причина проблемы
- Правильная установка ViPER4Android FX на Android 10
- ViperFX установка на Android 10
- How to Install ViPER4Android on Android 11/Android 10 Q (Alternate Method)
- Before You Begin
- Instructions to Install ViPER4Android on Android 11 and Android 10
- Alternative Method
Как установить ViPER4Android в Android 10

Многие из владельцев Android устройств замечают, что после обновления их операционной системы до самой свежей на сегодняшний день версии операционной системы Google: Android 10 установить ViPER4Android становится невозможным.
Обычный метод установки модуля через Magisk оказывается неработоспособным, но отчаиваться вам не стоит: проблема решается просто, для этого нужно всего лишь немного изменить процедуру установки.
Установка ViPER4Android в операционной системе Android 10
1. Установите ViPER4Android FX из репозитория Magisk
2. Не перезагружайте свой смартфон после установки несмотря на запрос
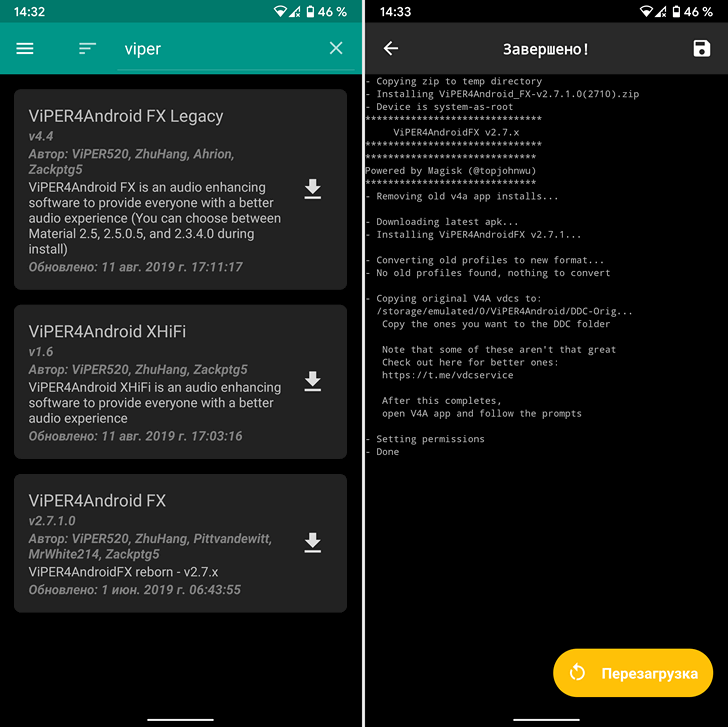
3. Запустите приложение VIPER4Android
4. Установите драйвер, после чего ваше устройство перезгрузится автоматически
Новая часть инструкции
5. Если ваш смартфон при перезагрузке зависает или переходит в режим fastboot, перезагрузите его в рекавери
6. В рекавери откройте менеджер файлов (File Manager)
7. Перейдите в папку data/adb/modules/ViPER4AndroidFX
8. Удалите или переименуйте имеющийся здесь файл post-fs-data.sh
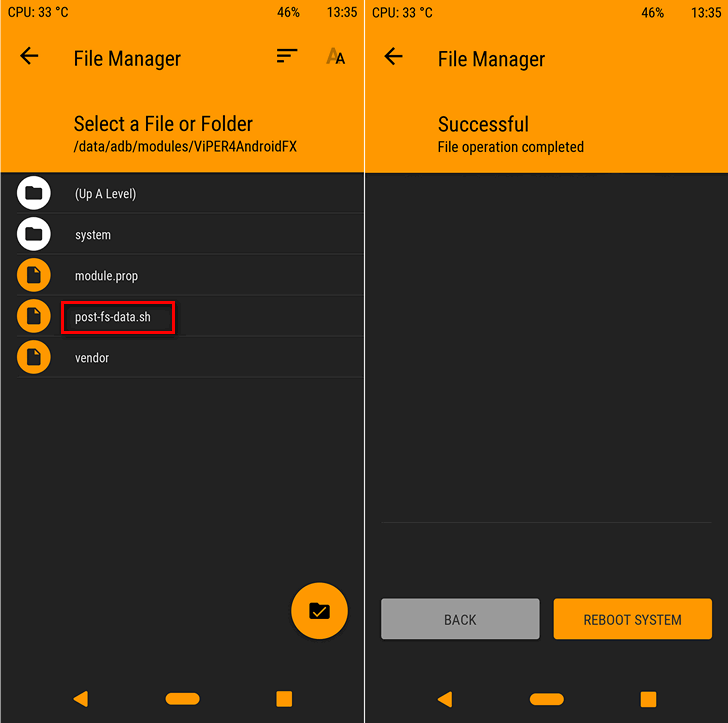
9. Перезагрузите систему (Reboot System)
Поздравляем, теперь вы можете пользоваться своим любимым VIPER4Android как раньше
Источник
Установка ViPER4Android FX на Android Q
Сегодня обновившись до Android 10 и попытавшись привычным способом установить ViPER4Android, после перезагрузки устройства я испытал крайнее удивление: телефон словил бутлуп 😳 Ничего страшного, конечно, не случилось, бекапы всего нужного у меня были под рукой (ставил на чистую систему), но неприятная взволнованность появилась: а вдруг V4A на десятом Андроиде не работает? Полез гуглить и нашел как причину, так и решение проблемы как заставить работать ViPER4Android FX на Android 10 (Q), чем спешу поделиться со всеми интересующимися. Проверено на крайнем на момент написания материала crDroid 6.3.
Причина проблемы
Всё оказвлось просто. Во-первых, как известно, ViPER4Android самостоятельно ставит свой драйвер в ядро, тем самым избавляя пользователя от лишнего гемора. Только вот умеет он это делать с Android 9 и ниже, но не с «десяткой». При попытке это сделать с Android Q, V4A просто-напросто ломает процесс загрузки системы, и мы тем самым получаем бутлуп, чему и «радуемся» пока ищем как систему восстановить. Поэтому обычным способом ViPER4Android на Android 10 устанавливать нельзя. Во-вторых, даже установив V4A корректно, он всё равно отказался работать на моем устройстве. После долгих поисков я нашел этому причину: встроенная по умолчанию в прошивку crDroid улучшалка звука AudioFX. Мало того,что она присутствует во всех прошивках, основанных на Lineage OS, к коим относится и crDroid, так она еще и оказывается включена по умолчанию 🤬 Думаю, понятно что с этой софтиной нужно было сделать чтобы V4A заработал. Ну и в-третьих, корректной работе «Вайпера» может помешать Selinux, работающий в режиме «enforce». В этом случае его нужно переключить в режим «permissive», что вроде должно произойти автоматически, если следовать инструкции ниже. Ну что, хватит теории, пора заняться практикой!
Правильная установка ViPER4Android FX на Android 10
Инструкцию по корректной установке ViPER4Android на Android Q можно найти в этом посте на форуме 4pda. Делаем всё, как там описано и получаем установленный V4A. Чтобы качать файлы с 4pda нужна учётная запись! Если её нет — регистрируемся/входим. Далее, если прошивка основана на AOSP, то по идее Вайпер должен заработать сразу (а может и нет, нужно проверять в каждом конкретном случае).
ОБН 8.03.2020. По этой ссылке на 4pda.ru можно скачать модуль для Magisk c ViPER4Android FX 2.7.1.0 и 2.5.0.5, рабочий на Android 10. Качается и ставится вручную через Magisk Manager. Напоминаю, для скачивания файлов c 4pda.ru нужна тамошняя учётная запись, иначе получите 404 not found. Так же рекомендую проверить статус Selinux, который должен быть «permissive» и отключен ли системный эквалайзер (об этом ниже).
Если не заработал, и прошивка основана на Lineage OS — делаем следующие действия:
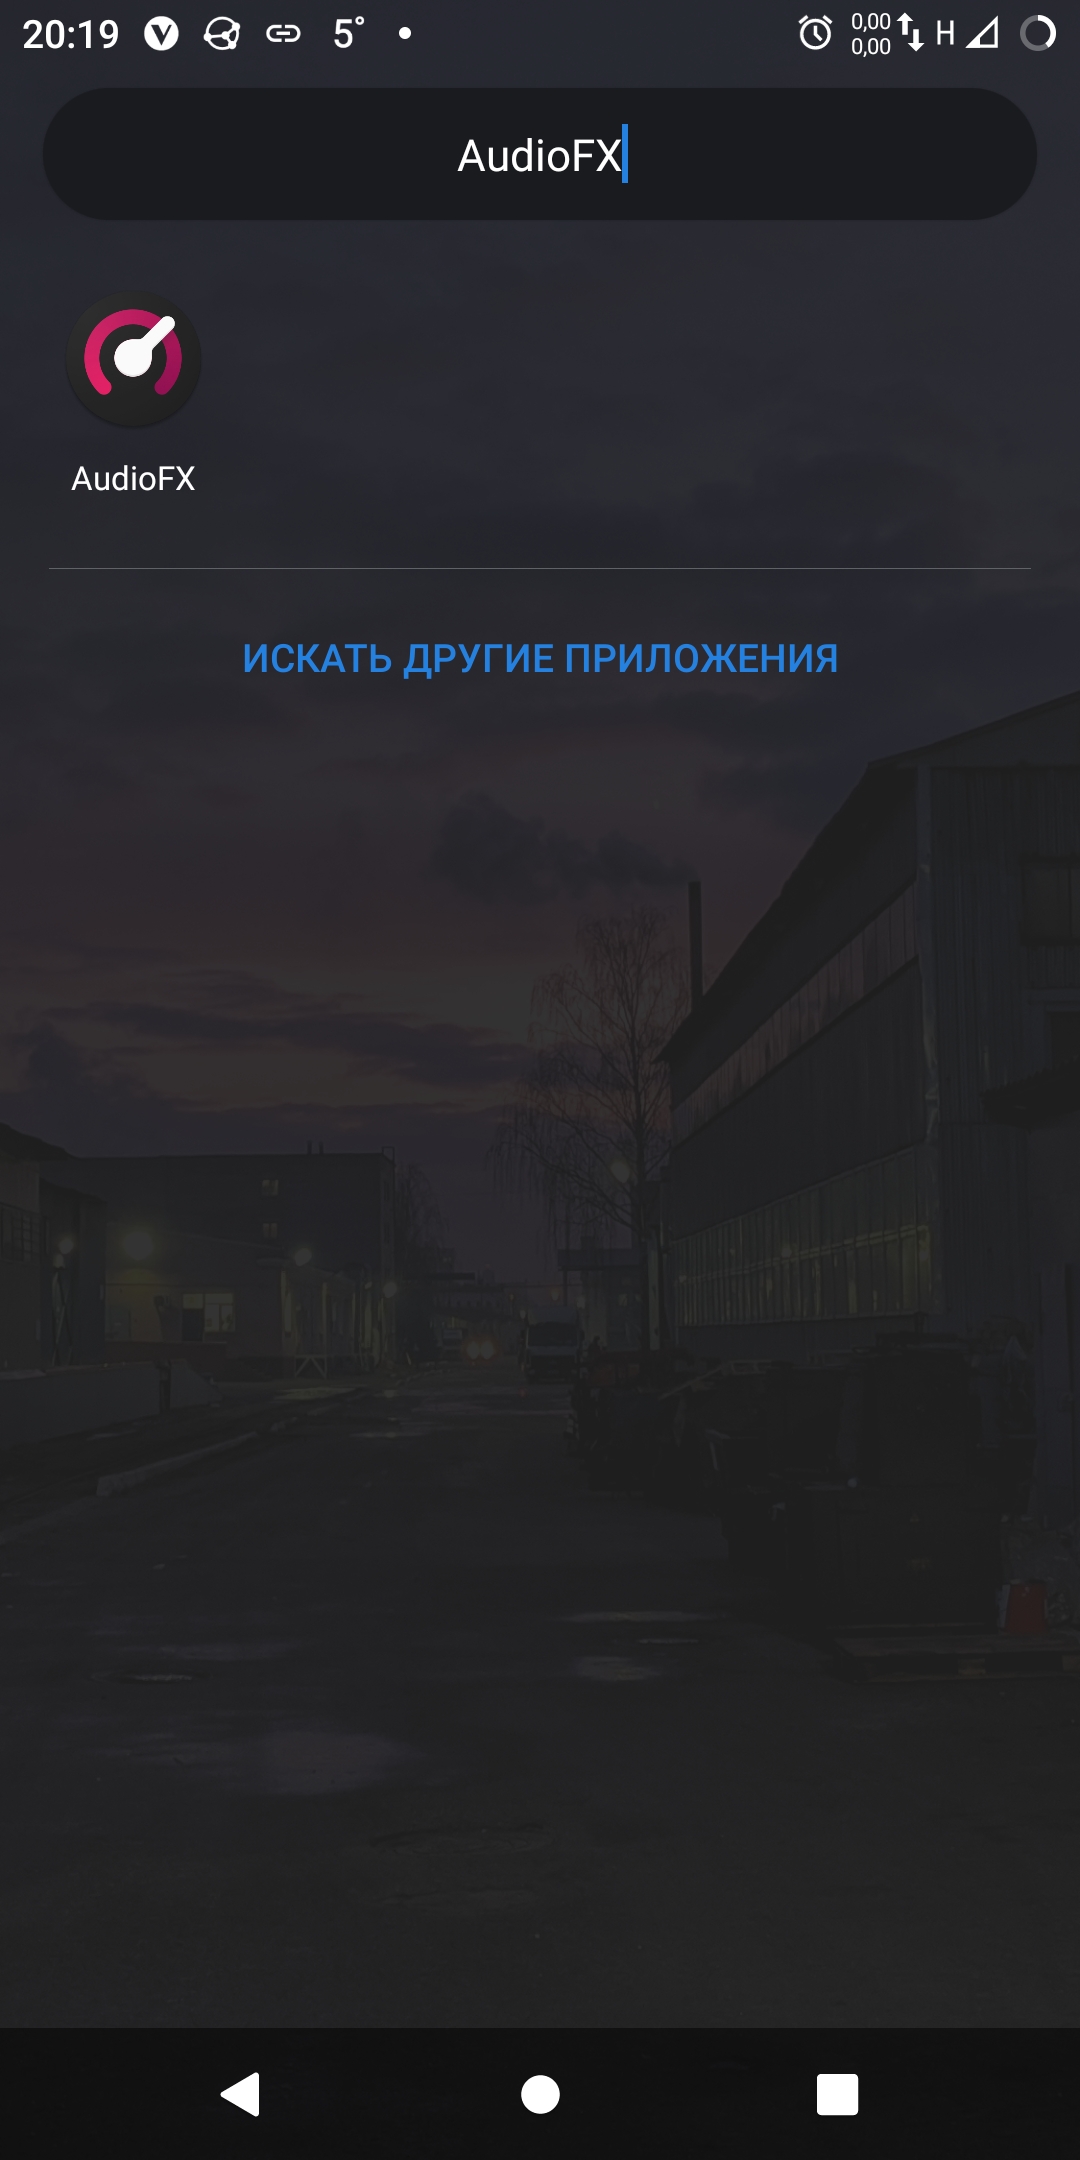
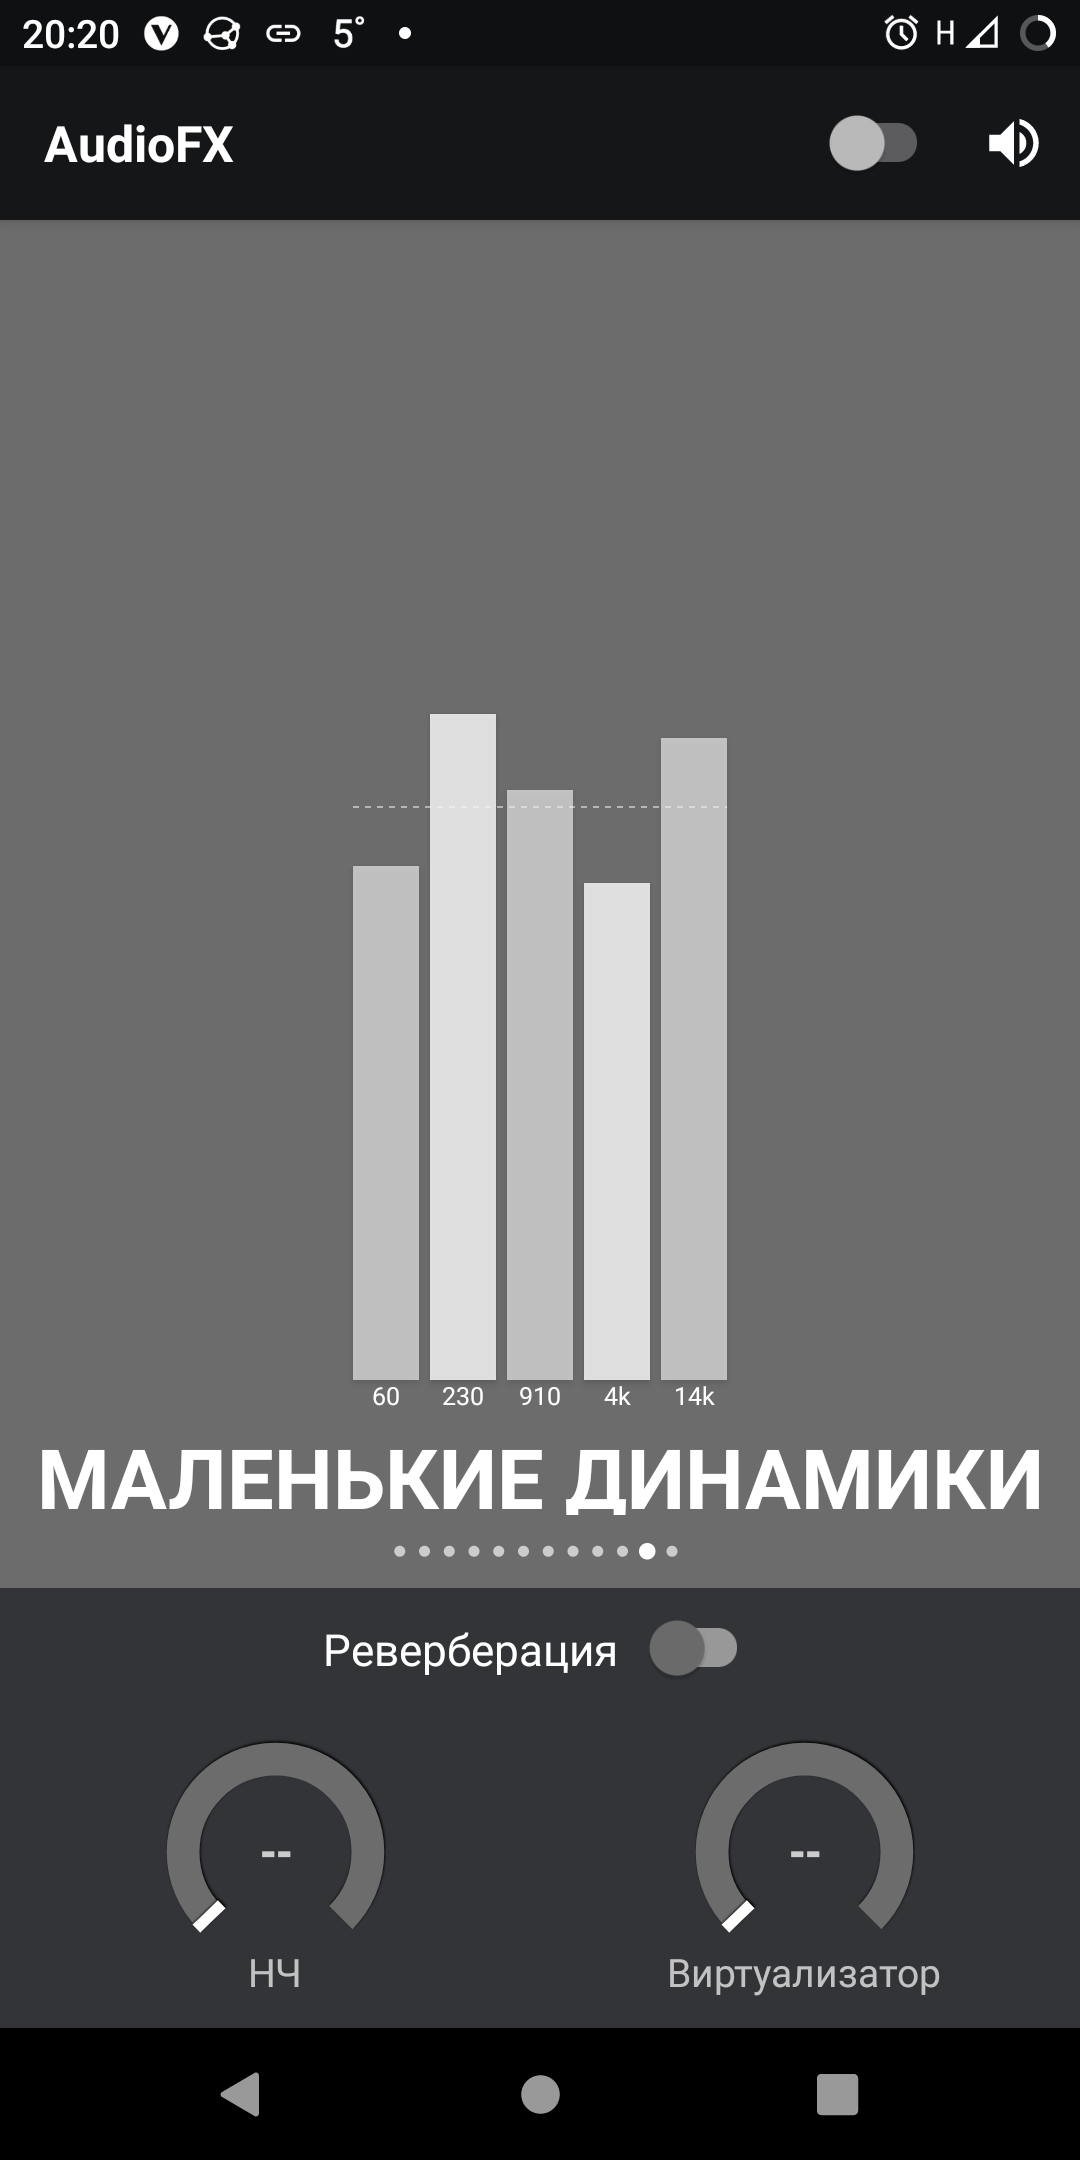
- Находим приложение с названием «AudioFX»;
- Запускаем;
- Если интерфейс цветной и справа вверху переключатель включен вправо — то приложение работает. Отключаем приложение этим выключелем!
- Удостоверяемся, что интерфейс стал чёрно-белым, а переключатель принял левое положение;
- Перезагружаем устройство.
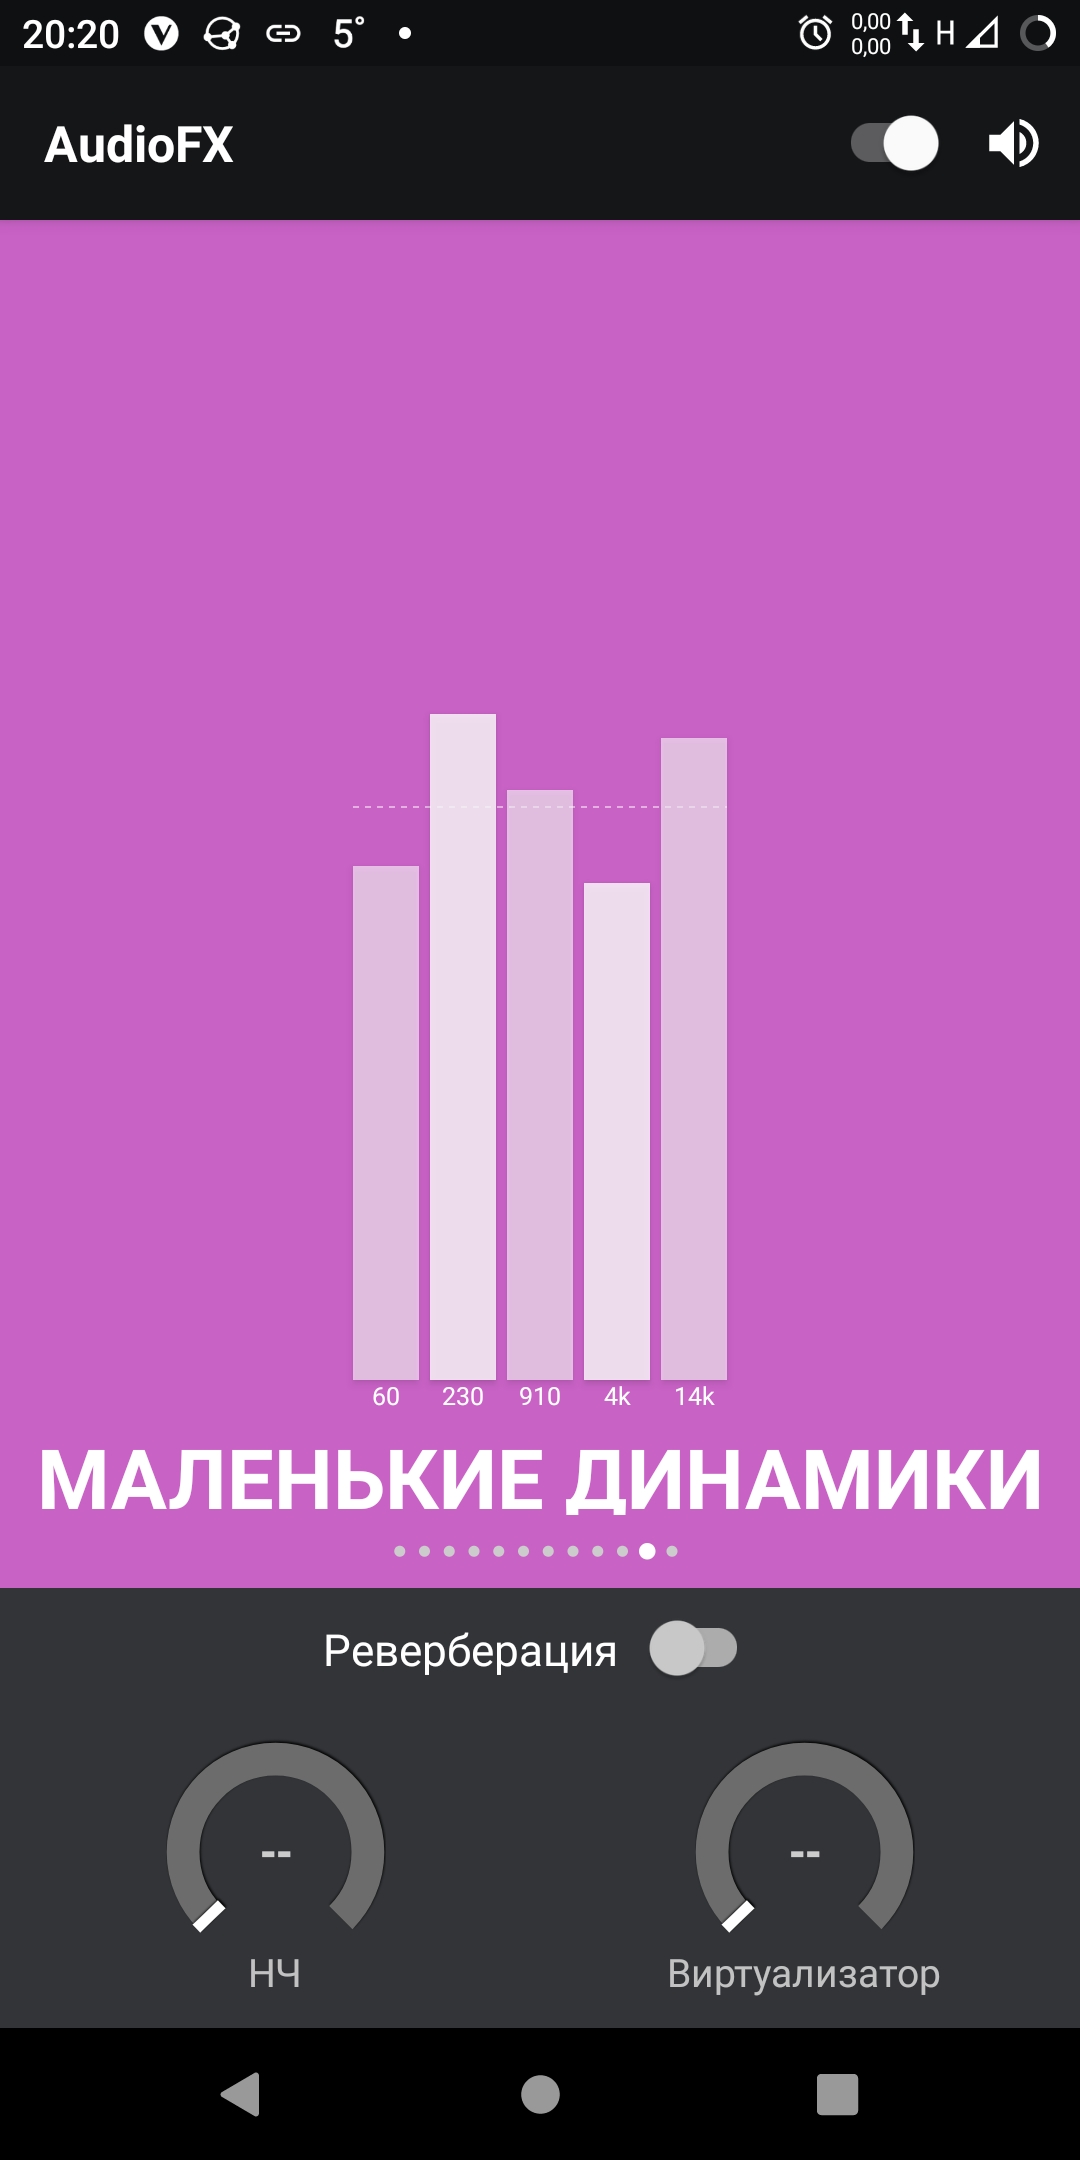
Теперь ViPER4Android будет работать без проблем! Смысл был в том, чтобы отключить все остальные DSP обработчики звука в системе, которые могут мешать работе V4A. В моём случае мешал как раз этот вредный AudioFX.
На этом у меня пока что всё, приятного прослушивания любимой музыки и до новых встреч!
Источник
ViperFX установка на Android 10


ВНИМАНИЕ! ДЕЛАЙТЕ БЭКАПЫ НА ВСЯКИЙ СЛУЧАЙ!
При возникновении проблем заходим в рекавери и удаляем папку Viper по пути:
data/adb/modules/VIPER4AndroidFx
magisk-permissive-script_v1.2.zip
ViPER4Android_FX-v2.7.1.0(2710).zip
BusyBox Pro_v70_Rus_crc.apk
Init.d+Toggler(com.broodplank.initdtoggler)-1.3(4).apk
Можете скачать эти файлы по ссылке выше, либо с форума 4PDA . Скачивая по первой ссылке вы поддерживаете автора материала (меня).
Инструкция по установке:
1. Устанавливаем в Magisk модуль с названием из архива: “magisk-permissive-script_v1.2.zip
2. Перезагружаемся, устанавливаем BusyBox
3. В BusyBox выбираем место установки /system/xbin
4. Устанавливаем: “init.d toggler” (если у вас чистый андроид, то скорее всего он не понадобится)
5. Устанавливаем в Magisk модуль ViperFX 2.7.1.0
6. Перезагружаемся
7. Заходим в Init.d Toggler и нажимаем активировать (пропускаем если не работает)
8. Заходим в Viper разрешаем Root доступ и нажимаем установить драйвер
9. После перезагрузки заходим в Viper, переходим в настройки

10. Включаем Legacy Mode (ЕСЛИ у вас работает и без него, то ничего не трогаем)
11. Получаем рабочий Viper!

Источник
How to Install ViPER4Android on Android 11/Android 10 Q (Alternate Method)
Can’t install ViPER4Android on your device running Android 11/Android 10? Don’t worry, it’s a known issue. In this guide, we will show you how to install ViPER4Android on Android 11 and Android 10 Q using an alternative approach. The method used here is fully working and has been personally tested by us on two different OEM devices including the Pixel 3 XL on Android 10.
ViPER4Android (Abbreviated as “V4A“) is one of the best Audio enhancing mods available for Android devices. And we already have a detailed tutorial on how to install it on any Android version, from 6.0 Marshmallow up to Android 11.
However, we have received reports that the original method sometimes fails to work on certain OEM devices. The problem? Basically the V4A drivers will fail to configure and prompt you to re-install them, again and again. This could probably be caused by the new changes implemented by device manufacturers in Android 11 and Android 10.
So, how can you install ViPER4Android on Android 11 or Android 10? Well, to be honest, the process is not the simplest one out there. It’s pretty much a hit and miss process, but it has a very high success rate as per the reports we have received. It has been tested and confirmed to be working on Pixel 3/2 XL, OnePlus 6/6T (Thanks priba77 for confirming!), OnePlus 7/7 Pro, Xiaomi Mi 9T Pro (Redmi K20 Pro), Samsung Galaxy Note 10+ 5G, along with several other devices running Android 10 (Q).
First off, we would like to thank XDA member 1dopewrx05, who shared this method on the Pixel 2 XL XDA thread.
Before You Begin
Before you head over to the instructions, make sure to fulfill all the requirements as stated below.
- Your Android 10 device must be rooted with Magisk. If it’s not rooted, then you can follow the instructions here on how to install Magisk or search our site’s database for your device-specific rooting guide.
- Ensure that you uninstall any audio modification library and any previous version of ViPER4Android that you might have installed earlier. Once uninstalled, reboot your phone and then only proceed ahead.
Instructions to Install ViPER4Android on Android 11 and Android 10
- Download the latest ViPER4Android v2.7.1.0 APK from here.
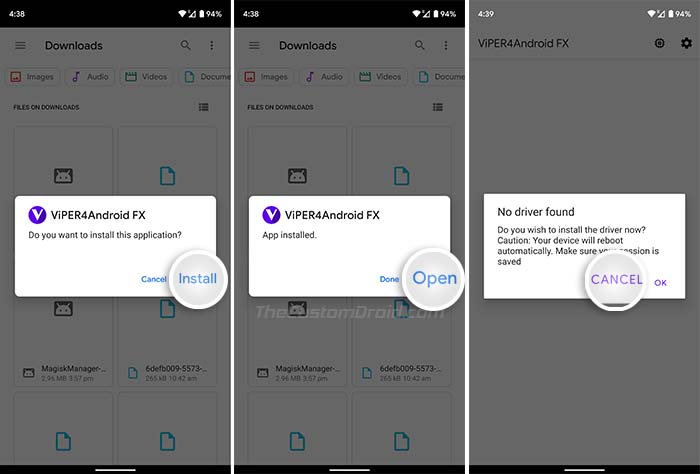
- Install the downloaded APK on your Android 11/Android 10 device using a file manager app.

- Launch the ‘ViPER4Android’ app but do not install the drivers right now.
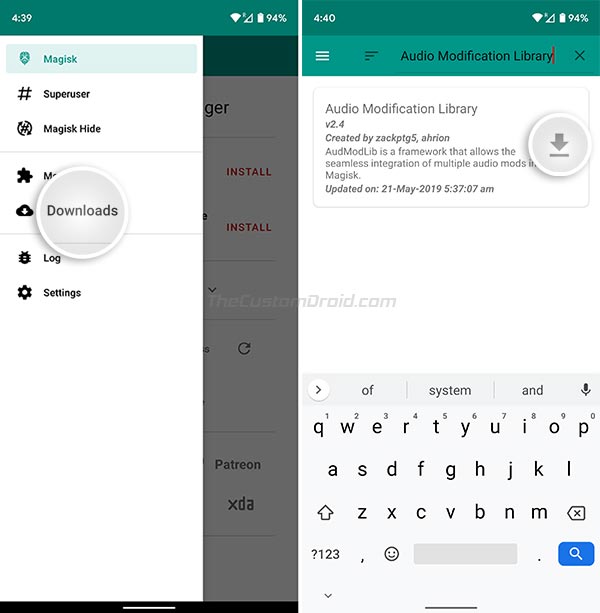
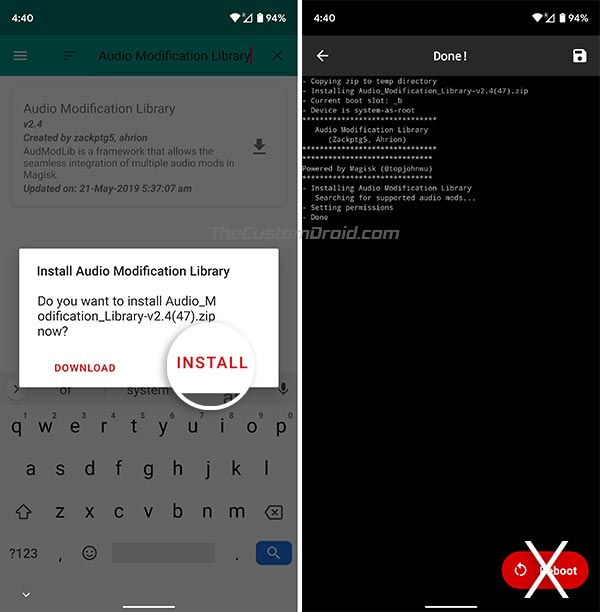
- Open ‘Magisk Manager’ and go to the ‘Downloads’ section of the app.
- Search and find the “Audio Modification Library” module and press the download icon next to it.
- Tap on the ‘INSTALL’ button to install the module on your device.
- Magisk module installer will prompt you to reboot but do not reboot your phone yet.
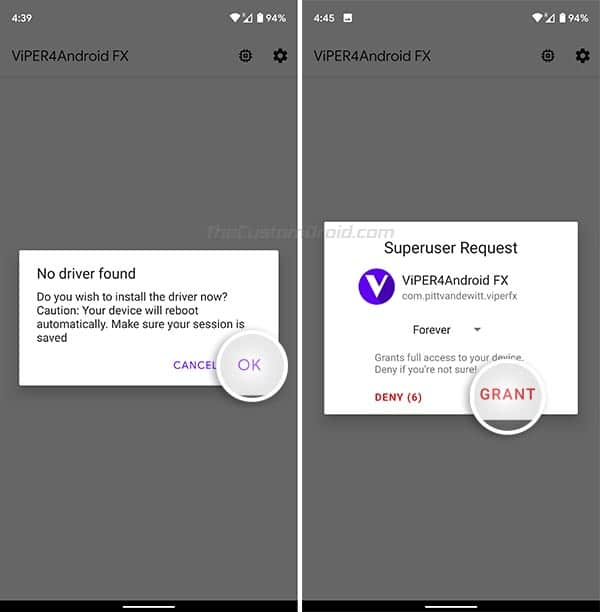
- Now go back to the ViPER4Android app, tap on “OK” to install the required V4A drivers.
- Grant the Superuser permissions to the app when prompted.
- After the drivers are installed, the device will automatically reboot.
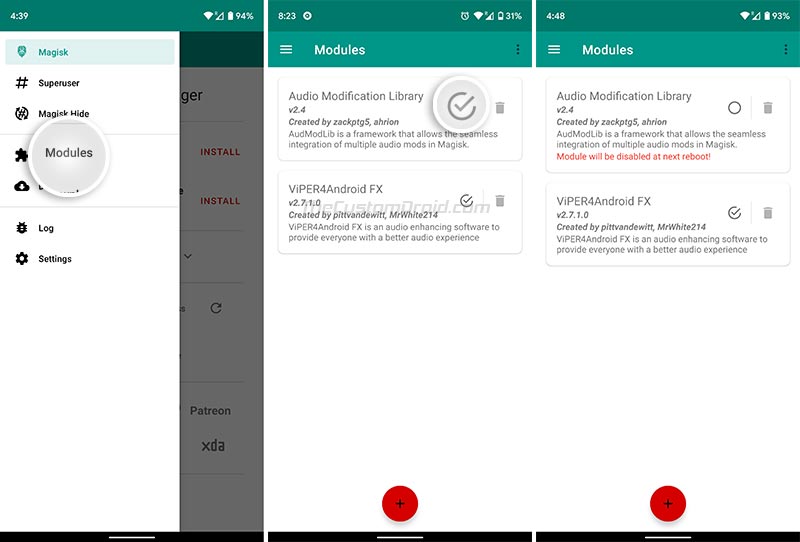
- Once the device reboots, go to ‘Magisk Manager’ → ‘Modules’ and uncheck the ‘Audio Modification Library’ to disable it.
- Now head back to ViPER4Android, repeat the driver installation process, and let the device reboot.
- Once the device boots, launch the ViPER4Android app. Now, if the drivers are installed properly, you’re done! If not, only then follow the steps further.
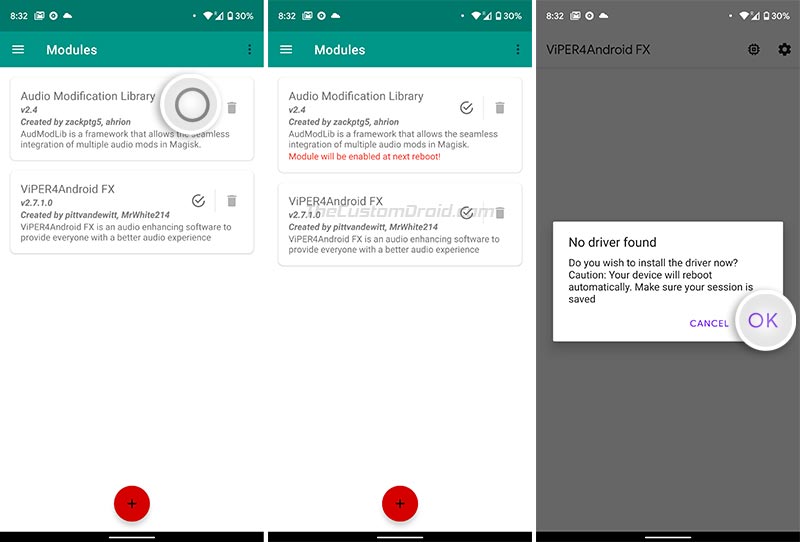
- Go to ‘Magisk Manager’ → ‘Modules’ and re-enable the ‘Audio Modification Library’ module.
- Open ViPER4Android, install the drivers when prompted, and let the device reboot.
Note: For some users, rebooting the phone after disabling the AML module in step #11 can help in the proper installation of V4A drivers (Step #12). Thanks to our fellow reader skythian for the tip!
Important Note: If your device ends up in a bootloop due to the incompatibility of drivers, you can simply follow this guide and use TWRP to remove the ViPER4Android module. This should certainly fix the bootloop issue. And so, you wouldn’t have to go through all the trouble of re-installing the ROM and re-rooting the device.
This time, the drivers should be properly installed and ViPER4Android should be running on your Android 11/Android 10 device. You can now go ahead, enhance your phone’s audio using the available controls, and unleash the audiophile in you.
The method might seem a bit lengthy at first but isn’t complicated at all. It seems like the installation of ViPER4Android and Audio Modification Library should be done in a specific order in order to make it work.
Alternative Method
If your device entered a bootloop following the above method, then we do have an alternative method to install ViPER4Android on Android 11/Android 10. This substitute method has been confirmed to work on Samsung Galaxy devices running Android 10 (One UI 2.0) and may work on other OEM devices as well, especially with custom ROMs installed.
- Download the required files on your device:
- ViPER4Android v2.7.1.0 APK: XDA Labs
- Zackptg5’s Rootless Driver Installer: v4afx-rootless_10.21.2020.zip
- Go to the app drawer and launch the Magisk Manager application.
- Press the menu icon and select ‘Downloads’.
- Search the module repository for the ‘Audio Modification Library’ module and install it. Do not reboot yet!
- Now install the V4A APK file on your device using a file manager.
- Once the application is installed, reboot your device into TWRP recovery mode.
- Tap on the ‘Install’ button in TWRP and select the Rootless Driver Installer zip file (e.g. v4afx-rootless_03.17.2020.zip)
- Swipe the button on the bottom of the screen to flash the file.
When the flashing process finishes, press the ‘Reboot System’ to reboot your device into the OS (system). You should now have V4A installed on your Android 11/Android 10 device.
Once the original developers of the mod pittvandewitt and MrWhite214 (Team_DeWitt) update it to support Android 10, we are certain that the installation will again be much easier and direct.
So, you have just been able to install ViPER4Android on Android 11 and Android 10 Q. If you have any questions regarding the process, make sure to ask us by commenting below. Make sure to include your device name (with the model number, if applicable) and the ROM you’re using. We will try to the best of our knowledge to help you. Also, don’t forget to let us know which ones of the above method worked for your particular device and ROM.
A huge thanks to all the readers who confirmed that this method works, and also to those who stuck around to help others!
Источник


