- Virtual Cameras
- Unreal’s Virtual Camera system is used to drive a Cine Camera inside Unreal by using a modular component system to manipulate camera data and output the results to a variety of external output providers.
- getId() — блог о программировании
- 15 ноября 2015 г.
- Получение данных с камеры телефона на Unreal Engine 4 + Android
- Исследование готовых вариантов
- Общая схема работы
- Сборка проекта на Unreal Engine 4 для Android
- Android.mk
- GameActivity
- Сборка
- Virtual Camera Component Quick Start
- The Virtual Camera Component is the base architecture that provides the foundation for building custom virtual cameras in Unreal Engine.
- Overview
- Goals
- Objectives
- 1 — Required Setup
- Section Results
- 2- Creating a Virtual Camera
- Section Results
- 3 — Adding Modifiers
- Creating your First Modifier
- Adding the Modifier to the Stack
- Section Results
- 4 — Using the Virtual Camera Input System
- Goals
- Creating an Input Event
- Section Results
- 5 — Adding Output Providers
- Viewport Output Provider
- Unreal Remote Output Provider
- iOS Device Setup
- Connecting your device
- Media Output Provider
- Composure Output Provider
- Section Results
- Next Steps
Virtual Cameras
Unreal’s Virtual Camera system is used to drive a Cine Camera inside Unreal by using a modular component system to manipulate camera data and output the results to a variety of external output providers.
A Virtual Camera drives a Cine Camera in Unreal Engine by using a modular component system to manipulate camera data and output the final results to a variety of external output providers.
The Virtual Camera Component (VCamComponent) is the base component that enables building custom virtual cameras in Unreal Engine.
With the VCamComponent, a user can drive a Cine Camera inside Unreal Engine by adding custom Modifiers and Output Providers.
The Modifiers manipulate the camera data with custom effects such as filtering, tracking, and auto focus. The Output Providers route the output of the virtual camera to Composure, Media Framework, editor viewports, or any devices running the Unreal Remote app.
In addition, this new architecture includes the following:
Multi-User editor support for all features.
The ability to overlay custom UMG controls over the output and interact with them in the Editor or on a device.
Built-in support for controllers and other hardware input in addition to touchscreens.
The ability to switch to any custom tracking system with Live Link.
An updated Unreal Remote app with a new UI and improved streaming performance.
This page links to documents regarding the virtual camera system, including a Quick Start on how to use the Virtual Camera Component to build a custom camera, and an overview of a built-in virtual camera that comes with the engine.

The Virtual Camera Actor is a sample Virtual Camera that can be used as a starting point for your project.

The Virtual Camera Component is the base architecture that provides the foundation for building custom virtual cameras in Unreal Engine.

The Virtual Camera Actor is a sample Virtual Camera that can be used as a starting point for your project.

The Virtual Camera Component is the base architecture that provides the foundation for building custom virtual cameras in Unreal Engine.
Источник
getId() — блог о программировании
15 ноября 2015 г.
Получение данных с камеры телефона на Unreal Engine 4 + Android
Задача: получить и обработать данные с камеры телефона на Android в рамках проекта на Unreal Engine 4.
Необходимость в этом возникла при попытке использовать камеру на телефоне для определения местоположение телефона относительно помещения, в котором его используют. Это касается и AR- и VR-игр.
Как обычно, я запишу, что я делал для этого, чтобы потом вспомнить. Будет небольшая каша из-за того, что у меня используется моя библиотека markers detector, которая вам, скорее всего, не нужна. Но, надеюсь, вы поймёте ход моих мыслей и сможете увидеть всю картину целиком. Учитывая необходимость править файлы из директории игрового движка, использовать Java, NDK и C++, я бы не назвал весь этот подход очевидным.
Исследование готовых вариантов
The other, a bit sad but inevitable news — we had to drop support for nativecamera on Android. It used some undocumented API and never worked stable.
Ничего другого готового найти не удалось, поэтому я пошёл своим путём, собранным по кусочкам.
Общая схема работы
Было решено использовать связку обычного java-кода и C++ кода из NDK. Получить данные с камеры можно без особых проблем фрагментации устройств через android.hardware.Camera, в котором есть метод setPreviewCallback. Его использование требует немного дополнительного кода, но в целом, свою задачу выполняет. Получаемые данные нам нужно передать в нативный код через JNI-вызовы. В java-части описываем JNI функцию:
Затем, при получении данных из
делаем вызов
В java-части я оформил это отдельным классом AndroidCamera, запуск и остановку работы с камерой вынес в публичные методы. Эти методы вызываются из Activity на onPause и оnResume.
Был один неприятный момент. На Android API новее 10 массив FrameData был постоянно пустым. Избежать этого удалось, указав фиктивную текстуру предпросмотра кодом:
Далее привожу код, который написан в собираемом NDK cpp-файле:
Здесь уже используется OpenCV, но это лишь для удобства, так как OpenCV предоставляет контейнер для данных изображения cv::Mat, с помощью которого можно легко преобразовывать форматы изображений.
Кроме того, здесь используется MarkersDetector — это моя библиотека, которая ищет маркеры по контурам, используя полученное изображение. Как видно, передача данных в статическое поле класса обёрнута в mutex. Это нужно потому что данные из этого поля читаются в другом потоке (так же с использованием mutex). Если этого не сделать, то возможны случайные вылеты приложения.
Схематично уровни передачи данных выглядят так:
Сборка проекта на Unreal Engine 4 для Android
У вас должны быть установлены SDK и NDK Android. UE4 рекомендует использовать NVIDIA WORKS — пакет, установщик которого поставляется вместе с UE4 и содержит всё необходимое. Даже OpenCV.
Так как у меня была моя библиотека на OpenCV для обработки изображений, то через нее я и получал данные с камеры. Всё как на схеме выше. Вариант без такой библиотеки я не пробовал, поэтому расскажу с ней. Ещё раз ссылка на Github-репозиторий.
Первым делом отдельно собирается с помощью NDK библиотека, в которой описана сама нативная функция FrameProcessing и которая имеет методы для получения данных видео-фрейма. Сборка очень проста. Нужно соблюсти минимальную структуру проекта, описать Android.mk и вызвать ndk-build из пакета NDK.
Собранная so-библиотека подключается как зависимость проекта через build.cs файл вашего проекта на UE4.
Ранее я описывал такую сборку. В примере я собирал под Windows, здесь дополнительно нужно подключить so-файл.
Android.mk
GameActivity
Сборка
После всех этих действий можно собирать проект через редактор Unreal Engine. На выходе будет apk-файл. Для дебага можно узнать, что вошло в apk, исследовав папку Intermediate в директории вашего проекта.
Источник
Virtual Camera Component Quick Start
The Virtual Camera Component is the base architecture that provides the foundation for building custom virtual cameras in Unreal Engine.
Overview
The Virtual Camera Component (VCamComponent) is the base component that enables building custom virtual cameras in Unreal Engine.
With the VCamComponent, a user can drive a Cine Camera inside Unreal Engine by adding custom Modifiers and Output Providers.
Goals
This Quick Start guide is designed to take you through the basic steps of creating a virtual camera using the Virtual Camera Component.
Objectives
After going through this guide, you will learn the following:
How to place a camera in the scene and add the VCamComponent.
How to add Modifiers to the camera to customize its behaviors.
How to add basic key inputs to enable and disable Modifiers.
How to use different Output Providers.
1 — Required Setup
Before you start, you need to enable the appropriate plugins inside your project.
Click on Settings > Plugins to open the Plugins menu.

Search for the Virtual Camera plugin and enable it.

Restart the editor.
Section Results
You are now ready to start creating your virtual camera.
2- Creating a Virtual Camera
The Virtual Camera Component works with any Actor that contains a Cine Camera Component. In this example we will be using the Cine Camera Actor for convenience.
On the Place Actors panel, select the Cinematic category and click and drag the Cine Camera Actor to your scene.
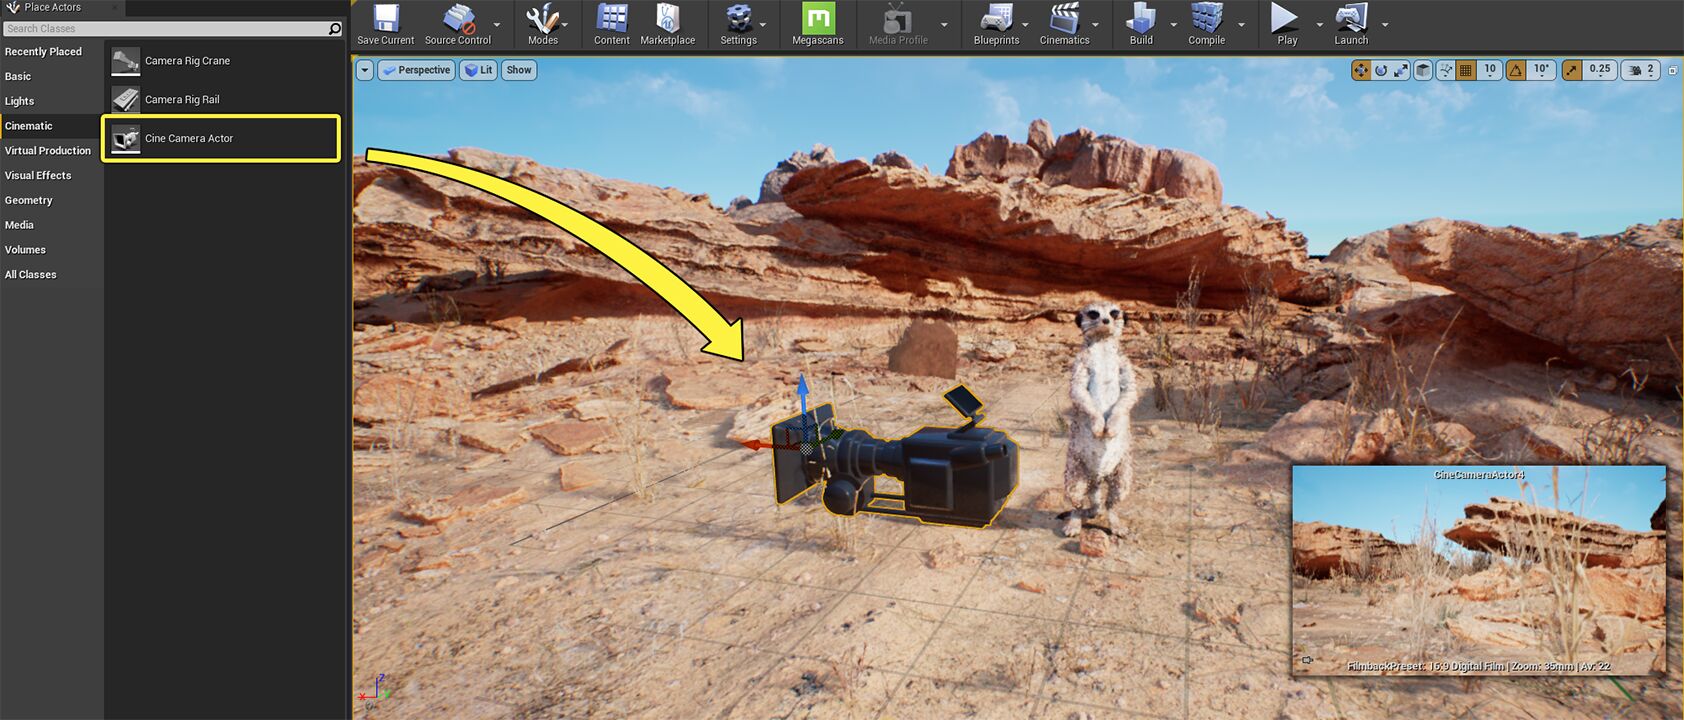
With the Cine Camera Actor selected, go to the Details panel and select the CameraComponent.

Click the Add Component button and search for and add the VCam component.

Make sure the VCam component is a child of the CameraComponent.
Select and click VCam to add the component.
Feel free to move the Cine Camera Actor in your scene and adjust the Current Camera Settings to your liking. In the example below, we moved the camera to frame the meerkat in the scene and adjusted the camera to always keep the subject in focus.

You can learn more about adjusting the camera settings by going to the Cine Camera Actor documentation page.
Select the Camera Actor, then select the VCam component in the component hierarchy.

You can now see the properties available under the Virtual Camera section.

The properties are as follows:
Enabled
This toggle enables and disables the entire Virtual Camera Component.
Live Link Subject
This is the subject used via the Live Link plugin. The component uses the subject’s camera information to drive the camera in the scene.
Lock Viewport to Camera
The viewport will be rendered from the point of view of the virtual camera.
Disable Component when Spawned by Sequencer
Disables the Virtual Camera Component when spawned by a Sequence. This prevents a situation where two VCam components might become active at the same time when you play a Sequence that contains a VCam component set as spawnable.
Target Viewport
This is the editor viewport that will be used by the component to render its view.
Output Providers
Contains a list of all output device destinations.
Modifier Context
An optional object that contains arbitrary data that is shared between all Modifiers.
Modifier Stack
Contains a list of all Modifiers added to the component.
Section Results
You placed a Cine Camera Actor in your scene and added the Virtual Camera Component. You are now ready to customize your camera by adding Modifiers.
3 — Adding Modifiers
Modifiers can manipulate the camera by adding custom effects and behaviors to simulate real life camera behaviors. You can create custom modifiers with Blueprints or C++ and add them to the stack to layer different effects.
The Modifiers in the stack will be executed from top to bottom and the effects will be applied in that order.
Creating your First Modifier
Right-click inside the Content Browser and select the VCam Modifier under the Virtual Camera category.

Name your Blueprint VCM_LookAt, then double-click it to open it.

Go to the My Blueprint tab and click on the plus sign next to Variables to add a new variable. Name the new variable TargetActor.

With TargetActor selected, go to the Details panel and click on the Variable Type dropdown. Search for Actor and select the Object Reference.

Select the Instance Editable checkbox and Compile and Save the Blueprint.

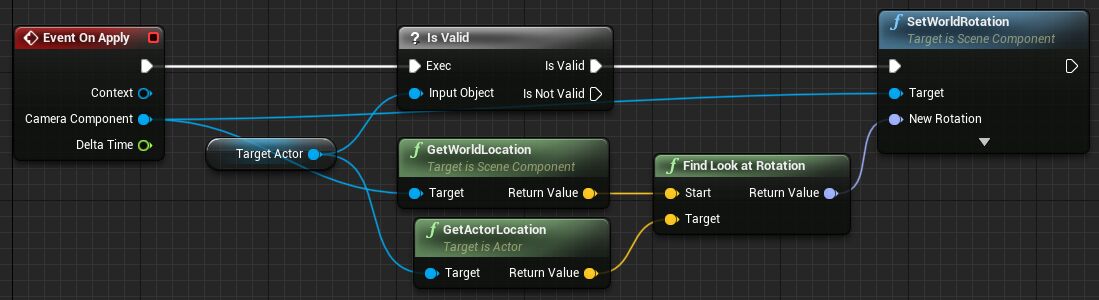
Drag TargetActor into the Event Graph and select Get TargetActor. Then drag from the node and search for and select Is Valid, as shown below.

Connect the Event on Apply node to the Is Valid node.

Drag from the Camera Component pin of the Event On Apply node and search for and select Get World Location.

Drag from TargetActor and search for and select Get Actor Location.

Drag from the Return Value of the GetWorldLocation node and search for and select Find Look At Rotation.

Connect the Return Value pin of the Get Actor Location node to the Target pin of the Find Look at Rotation node.

Drag from the Camera Component pin of the Event On Apply node and search for and select Set World Rotation.

Connect the Is Valid pin from the Is Valid node to the Set World Rotation node. Connect the Return Value pin of the Find Look at Rotation node to the New Rotation pin of the Set World Rotation node.
Compile and Save the Blueprint.
Adding the Modifier to the Stack
Now you are ready to add your custom Modifier to the Modifier Stack.
Go to the Place Actors tab and under the Basic category, click and drag a Sphere into the level.

Select your Camera Actor and inside the component hierarchy, select the VCam component.
Click the plus sign on the Modifier Stack to add an entry to the list.

Enter a name for your Modifier, such as Look At. Adding a name allows you to reference this Modifier in your Blueprints later on.

Click on the dropdown arrow for Generated Modifier and select VCM_LookAt from the list.

Expand the Default section of the Modifier and click on the Target Actor dropdown. Select the Sphere Actor you added to the level.

Select the Sphere Actor in your level and move it. You will see the camera rotate towards the Sphere.

Section Results
In this section you learned how to create a custom camera modifier by using Blueprints.
You also learned how to add your custom modifier to the Modifier Stack to manipulate your virtual camera inside the editor.
4 — Using the Virtual Camera Input System
The current Virtual Camera input system is a placeholder and will be replaced by a more advanced version in the future.
The Virtual Camera Component can use Editor Input Events directly inside Modifiers to provide additional control to the user.
Here is how you can use this system to add additional functionality to your Modifier.
Goals
Our goal for this section will be to add a key input to our Modifier that will allow us to enable and disable the effect by pressing a single key.
Creating an Input Event
Open the VCM_LookAt Blueprint by double clicking it in the Content Browser.
Right click on the Event Graph then search for and select the function Get VCamInputSubsystem.

Drag from the VCam Input Subsystem node then search for and select the Bind Key Up Event. Connect the Event On Initialize node with the Bind Key Up Event node.

Drag from the red Delegate pin and search for and select Add Custom Event. Name the new custom event ToggleActivation.


On the Bind Key Up Event node, click on the keyboard icon and press the S key to bind it to the event. Alternatively, you can press the dropdown arrow and select the desired key from the list.

Right click on the Event Graph and search for and select Set Enabled under the Virtual Camera category. Connect the ToggleActivation node to the Set Enabled node.

Right click on the Event Graph and search for and select Is Enabled under the Virtual Camera category.

Drag from the Is Enabled node and search for and select Not.

Connect the Not node to the New Enabled pin of the Set Enabled node.

Return to your scene and while moving the Sphere Actor in the level, press S to toggle the effect on and off.
The virtual camera input system executes every time the user presses a key, even when the viewport is not in focus. This can cause conflicts when the user presses the key for other purposes. For example, if the user renames an asset in the Content Browser and uses the letter S, it will execute your event.
To prevent accidental activation of the Modifier, you can add an additional safeguard to your code such as adding the Shift key as part of the input.
Go back to VCM_LookAt and add a Branch node between the ToggleActivation event and the Set Enabled node, as shown below.

Drag from the Key Event pin of the Toggle Activation node, then search for and select the Get Input from Key Event function.

Drag from the node, then search for and select the Is Shift Down function.

Finally, connect the Is Shift Down node to the Condition pin of the Branch node, as seen below.

Your Modifier will now execute only when the Shift key is down and you press the S key.
Section Results
In this section you added an input event that executes when the S key is pressed. This event enables and disables the effect of your Modifier. In addition, you added the Shift key as a safeguard to prevent conflicts when the user presses the S key for another purpose.
5 — Adding Output Providers
The Output Provider system is used to route the output of the virtual camera onto various providers including viewports, devices using the remote session protocol, the Composure plugin, and various supported video capture cards.
The Output Providers list is always executed in order, starting from the top.
Let’s take a look at the available Output Providers that come with the Virtual Camera Component.
Viewport Output Provider
This Provider will output the virtual camera’s view directly to the main viewport in the editor.
Select the VCam component and click on the + sign next to the Output Providers to add a new Provider to the list.

Select the Viewport Output Provider option from the list.

You can now see the shared properties among the different Providers:
Is Active
Enables and disables the Provider.
UMG Overlay
UMG widget that is overlaid on top of the image output.
Use Override Resolution
Sets a custom resolution to the output image. This is especially useful when using external devices with fixed resolutions.
Override Resolution
This is the fixed resolution used for the output image.
As an example, click on the UMG Overlay dropdown and search for and select TestUMG to add a test widget to the viewport.

Finally, set the Output Provider as Active by clicking on the checkbox.

You should now see an overlay on the main viewport in your scene.This is an example of how you can customize your camera output to fit your specific needs.

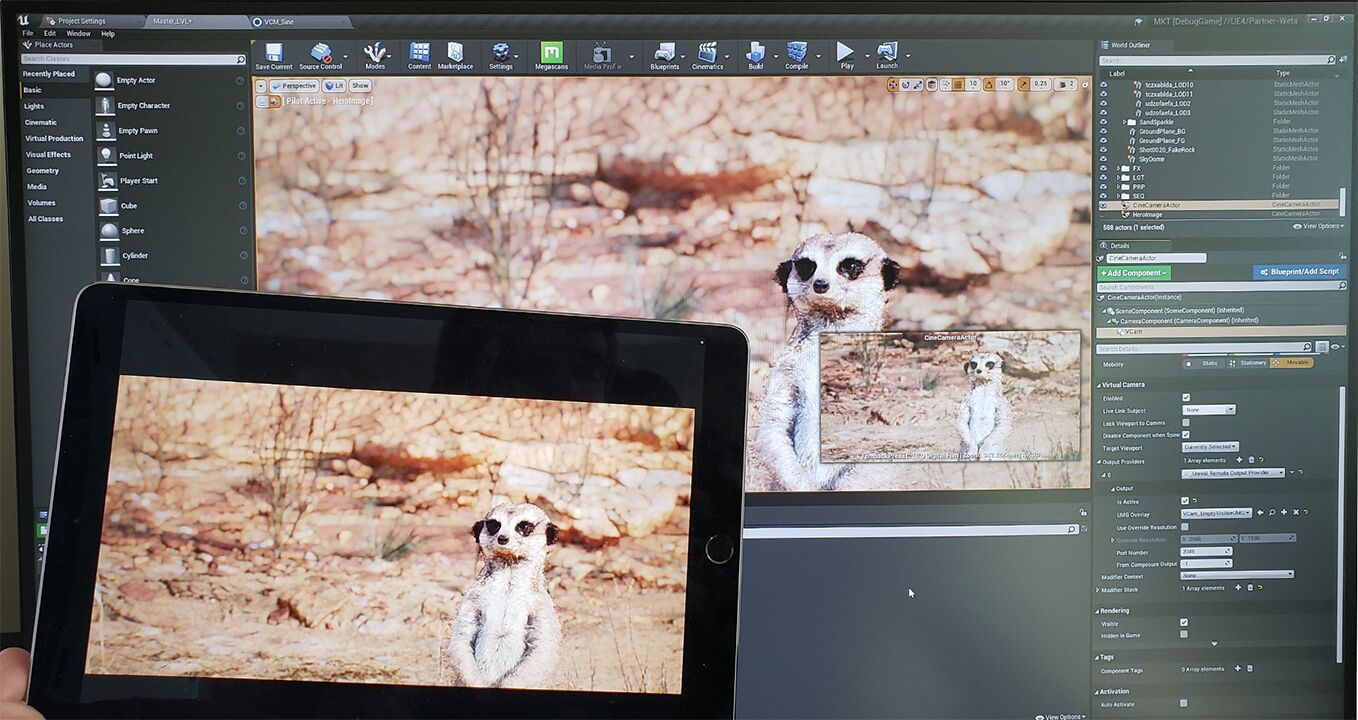
Unreal Remote Output Provider
This Provider outputs the main editor viewport to a remote device connected via the Remote Session protocol, such as the Unreal Remote 2 app. Any compatible device connected with this method can be used for this purpose.
Next you will configure your project to connect an external device using Remote Session.
Open Settings > Project Settings.

Go to the UDP Message section and set your Unicast Endpoint to your computer’s IP address with :0 at the end of the IP to indicate your port number.

Go to the Rendering section and under Default Settings click on the arrow to expand the advanced settings. Set your Frame Buffer Pixel Format to 8bit RGBA.

Restart the editor.
iOS Device Setup
Download the VCAM App from the App Store to your ARKit enabled iOS device and launch the app.

Connecting your device
Select the VCam component on your virtual camera actor, and select the Unreal Remote Output Provider from the Output Provider dropdown list.

Open the Unreal Remote 2 app on your device. Enter the IP address of your computer and tap the Connect button to try and establish a connection.
You should now see the main editor viewport mirrored on your device’s screen.
Media Output Provider
The Media Output Provider sends the virtual camera’s output to any device supported by the Unreal Media Framework , such as video capture cards from Black Magic and AJA.
Once chosen, you can select the Output Config, which is used to specify the output parameters.

For more information on how to use the Unreal Media Framework, visit the Media Framework documentation page.
Composure Output Provider
The Composure Output Provider sends the virtual camera’s output to a render target that can be used directly by the Composure Plugin . In addition, you can specify the Composure Layer Targets that the camera’s view will be rendered on.

For more information on how to use the Composure Plugin, please visit the Real-Time Compositing with Composure documentation page.
Section Results
In this section you learned how to add different Output Providers to your Virtual Camera component. You can now use your virtual camera to output directly to the editor viewport, or an external device via the Remote Session protocol.
You also learned how to send your output to be processed by the Unreal Media Framework and the Composure Plugin.
Next Steps
Now that you know how to build your own virtual camera, take a look at the pre-built Virtual Camera Actor that comes included in the Unreal Engine by going to the Virtual Camera Actor Quick Start .
Источник


