- Отладка приложений в Android Emulator
- Использование предварительно настроенного виртуального устройства
- Изменение виртуальных устройств
- Запуск эмулятора
- Быстрая загрузка
- Устранение неполадок
- Сводка
- The Hardest Work
- How to Debug a Unity APK on an Android device with Visual Studio
- Set Up Device for Development
- Enable Debugging on the Device
- Android 9.0+
- Android 8.0 and Android 8.1
- Android 7.1 and lower
- Verify that USB debugging is enabled
- Android 9.0+
- Android 8.0 and Android 8.1
- Android 7.1 and lower
- Connect the device to the computer
- Alternate connection via Wifi
- Connecting over WiFi
- Troubleshooting
- Install USB Drivers
- Download the USB Drivers
- Installing the USB Driver
- Summary
Отладка приложений в Android Emulator
Это руководство описывает, как запустить виртуальное устройство в Android Emulator для отладки и тестирования вашего приложения.
Для имитации разнообразных устройств с Android эмулятор Android Emulator (устанавливаемый с рабочей нагрузкой Разработка мобильных приложений на .NET) можно запускать в различных конфигурациях. Каждая из этих конфигураций создается в виде виртуального устройства. В этом руководстве вы узнаете, как открыть эмулятор из Visual Studio и запустить приложение на виртуальном устройстве. Информацию о настройке Android Emulator и создании виртуальных устройств см. в статье Настройка Android Emulator.
Использование предварительно настроенного виртуального устройства
В состав Visual Studio входят предварительно настроенные виртуальные устройства, которые отображаются в раскрывающемся меню устройства. Например, на следующем снимке экрана Visual Studio 2017 доступно несколько предварительно настроенных виртуальных устройств:
VisualStudio_android 23_arm_phone
VisualStudio_android 23_arm_tablet
VisualStudio_android 23_x86_phone
VisualStudio_android 23_x86_tablet

Как правило, для тестирования и отладки приложения для телефона следует выбрать виртуальное устройство VisualStudio_android-23_x86_phone . Если одно из этих предварительно настроенных виртуальных устройств соответствует вашим требованиям (т. е. соответствует целевому уровню API приложения), перейдите к разделу Запуск эмулятора, чтобы приступить к запуску приложения в эмуляторе. (Если вы еще не знакомы с уровнями API Android, см. сведения в статье Основные сведения об уровнях API Android.)
Если в проекте Xamarin.Android используется уровень целевой платформы, несовместимый с доступными виртуальными устройствами, непригодные для использования виртуальные устройства отображаются в разделе Неподдерживаемые устройства раскрывающегося меню. Например, для следующего проекта целевой платформой является Android Nougat 7.1 (API 25), которая несовместима с указанными в этом примере виртуальными устройствами Android 6.0:

Чтобы изменить минимальную версию Android в соответствии с уровнем API доступных виртуальных устройств, щелкните Изменить минимальную целевую версию Android. Кроме того, с помощью Android Device Manager можно создать виртуальные устройства, которые поддерживают целевой уровень API. Перед настройкой виртуальных устройств для нового уровня API сначала нужно установить соответствующие образы системы для этого уровня API (см. раздел Настройка пакета SDK для Android для Xamarin.Android).
В состав Visual Studio для Mac входят предварительно настроенные виртуальные устройства, которые отображаются в раскрывающемся меню устройства. Например, на следующем снимке экрана Visual Studio 2017 доступны два предварительно настроенных виртуальных устройства:
Android_Accelerated_x86
Android_ARMv7a

Как правило, для тестирования и отладки приложения для телефона следует выбрать Android_Accelerated_x86 виртуальное устройство. Если это предварительно настроенное виртуальное устройство соответствует вашим требованиям (т. е. соответствует целевому уровню API приложения), перейдите к разделу Запуск эмулятора, чтобы приступить к запуску приложения в эмуляторе. (Если вы еще не знакомы с уровнями API Android, см. сведения в статье Основные сведения об уровнях API Android.)
Изменение виртуальных устройств
Для изменения (или создания) виртуальных устройств нужно использовать Android Device Manager.
Запуск эмулятора
В верхней части Visual Studio находится раскрывающееся меню для выбора режима Отладка или Выпуск. При выборе режима Отладка отладчик подключается в процессу приложения, выполняемому в эмуляторе, после запуска приложения. При выборе режима Выпуск отладчик отключается (однако вы все равно можете запустить приложение и использовать операторы журнала для отладки). После выбора виртуального устройства в раскрывающемся меню устройств выберите режим Отладка или Выпуск, а затем нажмите кнопку «Воспроизведение», чтобы запустить приложение:


После запуска эмулятора Xamarin.Android развернет в нем приложение. Эмулятор выполняет приложение с настроенным образом виртуального устройства. Ниже приведен пример снимка экрана Android Emulator. В данном примере в эмуляторе выполняется пустое приложение MyApp:

Эмулятор можно оставить в рабочем режиме. Необязательно завершать его работу и ожидать его перезапуска при каждом запуске приложения. При первом запуске приложения Xamarin.Android в эмуляторе устанавливается общая среда выполнения Xamarin.Android для целевого уровня API, после чего устанавливается приложение. Установка среды выполнения может занять несколько минут. Установка среды выполнения происходит только при развертывании первого приложения Xamarin. Android в эмуляторе. последующие развертывания выполняются быстрее, поскольку в эмулятор копируется только приложение.
Быстрая загрузка
Более новые версии Android Emulator поддерживают быструю загрузку, которая запускает эмулятор за несколько секунд. При закрытии эмулятора она создает моментальный снимок состояния виртуального устройства, чтобы его можно было быстро восстановить при перезапуске. Чтобы воспользоваться этой функцией, необходимо следующее:
- Android Emulator версии 27.0.2 или более поздней
- Android SDK Tools версии 26.1.1 или более поздней
После установки указанных выше версий эмулятора и средств SDK функция быстрой загрузки включена по умолчанию.
Первый холодный запуск виртуального устройства выполняется без повышения производительности, так как моментальный снимок еще не создан:

При выходе из эмулятора функция быстрой загрузки сохраняет его состояние в моментальном снимке:

Впоследствии виртуальное устройство запускается гораздо быстрее, так как эмулятор просто восстанавливает состояние, актуальное на момент завершения работы.

Устранение неполадок
Советы и способы решения распространенных проблем в эмуляторе см. в разделе Устранение неполадок Android Emulator.
Сводка
Это руководство описывает процесс настройки Android Emulator для запуска и тестирования приложений Xamarin.Android. В нем рассмотрены шаги по запуску эмулятора с использованием предварительно настроенных виртуальных устройств и приведены действия по развертыванию приложения в эмуляторе из Visual Studio.
Дополнительные сведения об использовании Android Emulator см. в следующих разделах для разработчиков под Android.
Источник
The Hardest Work

How to Debug a Unity APK on an Android device with Visual Studio
Oh my goodness this was far too difficult… so I had to write it up! This guide assumes you have some experience with Unity, debugging in Visual Studio, and building APK’s (let me know if you don’t in the comments!).
If you’re using Unity, you’re coding in C#, and you’re using Visual Studio… Here’s how you can setup a remote debugger to debug your APK on an Android device.
I’m currently using the following tools but the steps are generally the same:
Unity v2020.1.7f1
Visual Studio Community 2019
Android Studio v3.5 & SDK
Samsung Galaxy S9
Step 1: When you build your APK you’ll want to tick 2 boxes on the build settings menu. ‘Development Build‘ & ‘Script Debugging‘

Step 2: Create your build as usual and copy the build to your Android device. Connect your Android Device to your PC via USB. Be sure your machine and Android device are connected to the same wifi network.
Step 3: If you haven’t previously, Enable USB Debugging on your Android Device.
- Open Settings
- Select System
- Scroll to the bottom and select About Phone
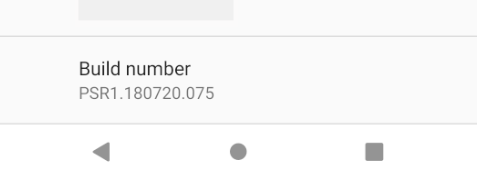
- Scroll to the bottom and tap ‘Build Number’ 7 times
- Return to the previous screen and find ‘Developer Options’ near the bottom
- Scroll down and select to enable ‘USB Debugging’
Step 4: Back on your computer, open up a cmd prompt (or terminal) as an administrator and change your directory to:

Step 5: Back on your Android Device, find the Android Device’s IP by going to:
- Go to Settings
- Go to ‘About Phone’
- Got to ‘Status’
- Find ‘IP Address’
- Write it down…
Step 6: Back in your command prompt enter the following command:
Step 7: Connect to your Device with this command using your IP from Step 5:
Step 8: Open Visual Studio from within Unity and go to the ‘Debug’ menu option. Select ‘Attach Unity Debugger’

Step 9: You should see a small menu popup and it should display both your computer and your connected Android device. Select your Android device, set some break points in your code, and have fun!
Hopefully this guide saves you some time and headache on trying to figure this out. If you need more information on connecting your device that this guide doesn’t provide let me know so I can update it!
Источник
Set Up Device for Development
This article explains how to setup an Android device and connect it to a computer so that the device may be used to run and debug Xamarin.Android applications.
After testing on an Android emulator, you will want to see and test your apps running on an Android device. You will need to enable debugging and connect the device to the computer.
Each of these steps will be covered in more detail in the sections below.
Enable Debugging on the Device
A device must be enabled for debugging in order to test an Android application. Developer options on Android have been hidden by default since version 4.2, and enabling them can vary based on the Android version.
Android 9.0+
For Android 9.0 and higher, debugging is enabled by following these steps:
- Go to the Settings screen.
- Select About Phone .
- Tap Build Number 7 times until You are now a developer! is visible.
Android 8.0 and Android 8.1
- Go to the Settings screen.
- Select System.
- Select About Phone
- Tap Build Number 7 times until You are now a developer! is visible.
Android 7.1 and lower
- Go to the Settings screen.
- Select About Phone.
- Tap Build Number 7 times until You are now a developer! is visible.
Verify that USB debugging is enabled
After enabling developer mode on your device, you must ensure that USB debugging is enabled on the device. This also varies based on the Android version.
Android 9.0+
Navigate to Settings > System > Advanced > Developer Options and enable USB Debugging.
Android 8.0 and Android 8.1
Navigate to Settings > System > Developer Options and enable USB Debugging.
Android 7.1 and lower
Navigate to Settings > Developer Options and enable USB Debugging.
Once the Developer Options tab is available under Settings > System, open it to reveal developer settings:
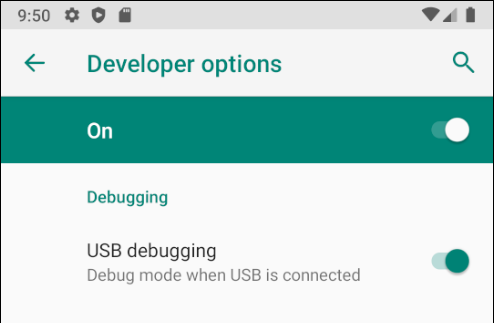
This is the place to enable developer options such as USB debugging and stay awake mode.
Connect the device to the computer
The final step is to connect the device to the computer. The easiest and most reliable way is to do so over USB.
You will receive a prompt to trust the computer on your device if you have not used it for debugging before. You can also check Always allow from this computer to prevent requiring this prompt each time you connect the device.

Alternate connection via Wifi
It is possible to connect an Android device to a computer without using a USB cable, over WiFi. This technique requires more effort but could be useful when the device is too far from the computer to remain constantly plugged-in via cable.
Connecting over WiFi
By default, the Android Debug Bridge (ADB) is configured to communicate with an Android device via USB. It is possible to reconfigure it to use TCP/IP instead of USB. To do this, both the device and the computer must be on the same WiFi network. To setup your environment to debug over WiFi complete the following steps from the command line:
Determine the IP address of your Android device. One way to find out the IP address is to look under Settings > Network & internet > Wi-Fi, then tap on the WiFi network that the device is connected to, and then tap on Advanced. This will open a dropdown showing information about the network connection, similar to what is seen in the screenshot below:
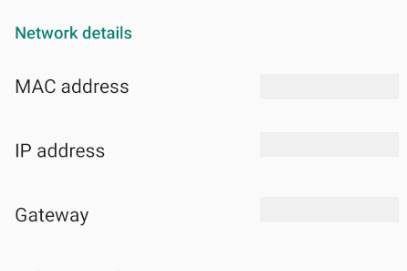
On some versions of Android the IP address won’t be listed there but can be found instead under Settings > About phone > Status.
Connect your Android device to your computer via USB.
Next, restart ADB so that it using TCP on port 5555. From a command prompt, type the following command:
After this command is issued, your computer will not be able to listen to devices that are connected via USB.
Disconnect the USB cable connecting your device to your computer.
Configure ADB so that it will connect to your Android device on the port that was specified in step 1 above:
Once this command finishes the Android device is connected to the computer via WiFi.
When you’re finished debugging via WiFi, it’s possible to reset ADB back to USB mode with the following command:
It’s possible to request ADB to list the devices that are connected to the computer. Regardless of how the devices are connected, you can issue the following command at the command prompt to see what is connected:
Troubleshooting
In some cases you might find that your device cannot connect to the computer. In this case you may want to verify that USB drivers are installed.
Install USB Drivers
This step is not necessary for macOS; just connect the device to the Mac with a USB cable.
It may be necessary to install some extra drivers before a Windows computer will recognize an Android device connected by USB.
These are the steps to set up a Google Nexus device and are provided as a reference. Steps for your specific device may vary, but will follow a similar pattern. Search the internet for your device if you have trouble.
Run the android.bat application in the [Android SDK install path]\tools directory. By default, the Xamarin.Android installer will put the Android SDK in following location on a Windows computer:
Download the USB Drivers
Google Nexus devices (with the exception of the Galaxy Nexus) require the Google USB Driver. The driver for the Galaxy Nexus is distributed by Samsung. All other Android devices should use the USB driver from their respective manufacturer.
Install the Google USB Driver package by starting the Android SDK Manager, and expanding the Extras folder, as can be seen in the follow screenshot:
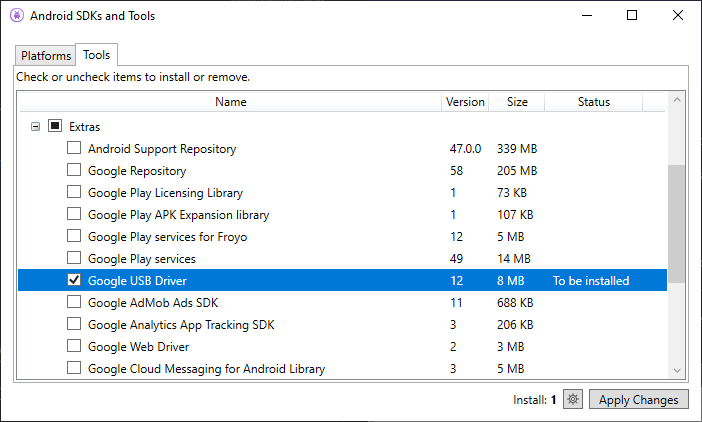
Check the Google USB Driver box, and click the Apply Changes button. The driver files are downloaded to the following location:
[Android SDK install path]\extras\google\usb\_driver
The default path for a Xamarin.Android installation is:
Installing the USB Driver
After the USB drivers are downloaded, it is necessary to install them. To install the drivers on Windows 7:
Connect your device to the computer with a USB cable.
Right-click on the Computer from your desktop or Windows Explorer, and select Manage .
Select Devices in the left pane.
Locate and expand Other Devices in the right pane.
Right-click the device name and select Update Driver Software . This will launch the Hardware Update Wizard.
Select Browse my computer for driver software and click Next .
Click Browse and locate the USB driver folder (the Google USB driver is located in [Android SDK install path]\extras\google\usb_driver).
Click Next to install the driver.
Summary
This article discussed how to configure an Android device for development by enabling debugging on the device. It also covered how to connect the device to a computer using either USB or WiFi.
Источник


