- Question: Q: How do I turn off annoying notifications about iCloud and backup?
- Require a password for App Store and iTunes purchases
- Require a password on your iPhone, iPad, or iPod touch
- Require a password on your Mac
- Require a password on your PC
- Require a password on your Apple TV 4K or Apple TV HD
- Require a password on your Apple TV (3rd generation)
- About turning off password protection
- Manage what kids buy or download
- Question: Q: I want to turn on touch ID for iTunes & App Store
- Helpful answers
- About emergency and government alerts on iPhone and Apple Watch
- Turn Government Alerts on or off
- Choose to receive Test Emergency Alerts in the United States
- Approve what kids buy with Ask to Buy
- How Ask to Buy works
- Who can use Ask to Buy
- How to turn on or turn off Ask to Buy
- On your iPhone, iPad, or iPod touch
- On your Mac
- On your Mac with macOS Mojave or earlier
- How to approve or decline a request
- What happens next
- Where to find your Ask to Buy requests
- How to choose another approver
- On your iPhone, iPad, or iPod touch
- On your Mac
- On your Mac with macOS Mojave or earlier
- How children or teens can make a request with Ask to Buy
- Ask to Buy doesn’t apply to apps or content from school
Question: Q: How do I turn off annoying notifications about iCloud and backup?
iPhone 6s, iOS 7.1.1, PC
Posted on Jul 21, 2017 3:00 PM
You really don’t want to turn off such notices if your backups mean anything to you, if they don’t mean anything you can get rid of the notices by turning backup off ( Settings ➔ Apple ID(Top) ➔ iCloud ➔ Apps Using iCloud ➔ iCloud BackUp ➔ On/Off ). However, really you need to sort out why your backup isn’t happening.
Please check that your device is correctly connected to the wifi/internet ( Settings ➔ Wifi ) and is plugged into a power source, also check that you have enough space in iCloud for your back up.
You can check the space available at Settings ➔ Apple ID(Top) ➔ iCloud ➔ Storage ➔ iCloud ➔ Available and the space needed for the next back up at Settings ➔ Apple ID(Top) ➔ iCloud ➔ Storage ➔ iCloud ➔ Manage Storage ➔ BackUps ➔ This Device ➔ Next Back Up Size (wait for the information to load).
Assuming you meet the requirements for iCloud back up, you should try a forced shutdown to begin with, hold down the side/top and home buttons together until the device shuts down, then restart it by pressing the side/top button.
Next, try connecting the device in a new location (different WiFi network)
If your back up continues to fail, you might try turning off BackUp on your mobile device ( Settings ➔ Apple ID(Top) ➔ iCloud ➔ Apps Using iCloud ➔ iCloud BackUp ➔ Off ), restarting the device and then turning BackUp back on again.
If this doesn’t help turn BackUp off again, delete your existing back up from Settings ➔ Apple ID(Top) ➔ iCloud ➔ Storage ➔ iCloud ➔ Manage Storage ➔ BackUps ➔ This Device(scroll down to the bottom) ➔ Delete BackUp , restart the device and then turn BackUp back on again.
If you are still unable to complete a back up, try signing out of iCloud ( Settings ➔ Apple ID(Top) (scroll down to the bottom) ➔ Sign Out ) (you will need to enter your password at this stage), restart the device and sign back into iCloud at Settings ➔ Apple ID(Top) ➔ Sign In .
The next thing to try would be to reset your network settings. ( Settings ➔ General ➔ Reset ➔ Reset Network Settings )
Resetting your network settings will clear your current cellular and wifi network settings, including saved networks, wifi passwords and any VPN settings you might use. It will affect internet connectivity but won’t impact on telephone services since these settings are auto configured by your carrier. It may take a few moments to re-enter all your network settings but it shouldn’t cause you any major problems. If you are comfortable re-entering your network settings, you may wish to try this step a little earlier in the troubleshooting procedure, say after the forced shutdown suggested above.
If this doesn’t help, try turning off some items for back up in a pattern to try to establish if your problem is being caused by specific data on your device. You can do this at Settings ➔ Apple ID(Top) ➔ iCloud ➔ Storage ➔ iCloud ➔ Manage Storage ➔ BackUps ➔ This Device ➔ Choose Data To Backup .
If you still aren’t able to complete a back up to iCloud, you may wish to try restoring your phone which you should do by making a back up to iTunes via your computer and restoring from that.
Being able to back up to the cloud can be very useful, especially if you don’t have access to a computer or have infrequent access to one, however unless you specifically need to use iCloud for back up, you will find backing up to iTunes significantly more convenient and possibly more reliable. However if you back up to iTunes be sure to encrypt the back up if you want to keep your health data and passwords etc.
Источник
Require a password for App Store and iTunes purchases
You can require a password for every purchase or require a password every 15 minutes.
You can choose how often you want to enter your password when you buy items (including in-app purchases) from the App Store and iTunes Store:
- Always Require—Every time you make a purchase, you’ll be asked to enter your password, even if you’re signed in with your Apple ID.
- Require After 15 Minutes—If you entered your password within the last 15 minutes, you won’t be asked to enter your password again.
If you don’t want to enter a password when you download free items, follow the steps below and turn off password protection for free items.

Require a password on your iPhone, iPad, or iPod touch
- Open the Settings app.
- Tap your name.
- Tap Media & Purchases.
- Tap Password Settings, then choose the setting that you want.
If you don’t see Password Settings, you have turned on Face ID or Touch ID for App Store and iTunes Purchases. To change this, go back to Settings, tap «Face ID & Passcode» or «Touch ID & Passcode», then turn off Face ID or Touch ID next to iTunes & App Store.
Require a password on your Mac
- On your Mac, choose the Apple menu () at the top of your screen, then choose System Preferences.
- Click Apple ID.
- Click Media & Purchases.
- Select the settings that you want for free downloads and purchases. If you have Touch ID turned on for purchases, you won’t see this menu.
If you’re using an older version of macOS, open iTunes, choose iTunes > Preferences, then click the Store tab.
Require a password on your PC
If you’re using a PC, open iTunes. From the top of the iTunes window, choose Edit, then choose Preferences. Click the Store tab. Then select the settings that you want for purchases and free downloads.
Require a password on your Apple TV 4K or Apple TV HD
- From the Home screen, select Settings.
- Select Users and Accounts.
- Select [your name]’s Account.
- Under Require Password, choose the settings that you want for purchases and free downloads.
Require a password on your Apple TV (3rd generation)
- From the Home screen, select Settings > iTunes Store > Sign In.
- Sign in with your Apple ID and password.
- After you click Submit, you’ll see a screen that says «Remember Password?» Select your preferred level of protection:
- Choose Yes if you want the Apple TV to remember your password for purchases as long as you’re signed in with your Apple ID.
- Choose No if you want to enter your password each time that you make a purchase in the iTunes Store.
To change your password settings, sign out, then follow the steps above to sign in again.
About turning off password protection
You can’t completely turn off password protection for paid items on your iPhone, iPad, iPod touch, or computer. On Apple TV, you can turn off password protection for both free and paid items.
If you enabled Touch ID or Face ID for App Store and iTunes Store purchases, you’ll be asked to use Touch ID or Face ID for every download, even if the item is free.
Manage what kids buy or download
If you use Family Sharing, you can use Ask to Buy to control what kids buy. When a child asks to buy an item or download a free item, the family organizer can approve or decline the request.
Information about products not manufactured by Apple, or independent websites not controlled or tested by Apple, is provided without recommendation or endorsement. Apple assumes no responsibility with regard to the selection, performance, or use of third-party websites or products. Apple makes no representations regarding third-party website accuracy or reliability. Contact the vendor for additional information.
Источник
Question: Q: I want to turn on touch ID for iTunes & App Store
When I try, the feature is grayed out. I looked at my settings for iTunes & App store and my Apple ID is entered and when I click it i have the option to ‘sign out’ so I believe I am signed in. Any ideas on how to enable this feature?
iPhone 5s, iOS 7.0.3
Posted on Nov 6, 2013 3:58 PM
I have went in and enabled restrictions — it didn’t work. I then enabled restrictions and disabled iTunes Store, Installing Apps, Deleteing Apps, and In-App Purchases and I am still not having luck with getting the option to tun this on. The ‘requrie passwork’ is also set to 15 minutes. See pictures as maybe I am in the wrong place.
Posted on Nov 7, 2013 9:03 AM
Helpful answers
You need to enable Restrictions if you want to change any options in there. You can disable Restrictions after you’ve finished.
Note the Restrictions off is only to protect accidental changes in all the options. To really protect it, set the passcode.
Nov 6, 2013 5:31 PM
There’s more to the conversation
Loading page content
Page content loaded
Make sure you did not set Restrictions on iTunes
Settings > General > Restrictions > iTunes: ON
Note: Touch ID cannot be used for purchases if Require Password in Settings > General > Restrictions is set to Immediately.
Nov 6, 2013 4:20 PM
I have all restrictions disabled and set to ‘off’ and then the require password field in the restrictions area is grayed out because I have restrictions off. Any other idea on what could be going on?
Nov 6, 2013 5:23 PM
You need to enable Restrictions if you want to change any options in there. You can disable Restrictions after you’ve finished.
Note the Restrictions off is only to protect accidental changes in all the options. To really protect it, set the passcode.
Nov 6, 2013 5:31 PM
I have went in and enabled restrictions — it didn’t work. I then enabled restrictions and disabled iTunes Store, Installing Apps, Deleteing Apps, and In-App Purchases and I am still not having luck with getting the option to tun this on. The ‘requrie passwork’ is also set to 15 minutes. See pictures as maybe I am in the wrong place.
Nov 7, 2013 9:03 AM
That’s the opposite to what you should have done.
Options in Restrictions should be ON are
Try sign out in Settings > iTunes & App Store > Apple ID: > tap here to sign out.
Reset iPhone: Hold down the Sleep/Wake button and the Home button at the same time for at least ten seconds, until the Apple logo appears. Note: You will not lose any data.
Nov 7, 2013 1:02 PM
All you need to do is to make purchase of any app with your password first, and it will prompt you an option whether you wanna use touch id or not.
Nov 18, 2013 3:35 PM
been following along the Q and As on this as i had the same problem. thanks, a reset did it.
Jan 18, 2014 10:49 PM
Glad it’d helped you.
Jan 19, 2014 5:20 AM
Please do the following setting :-
Setting > General > Restrictions > turn on the restrctions Note: You have to allow installaing apps, In-app purchases etc ie, should be green.
Settings > Touch ID & Passcode > Touch ID> iTunes & App Store > trun to on
Settings > Touch ID & Passcode > Require Passcode > Change to immediately
Then if you purchase any app Touch ID window will prompt automatically , you cand enter password or use touch ID.
Источник
About emergency and government alerts on iPhone and Apple Watch
Learn how to turn on emergency, government, and public safety alerts on your iPhone and Apple Watch.
You can receive emergency, government, and public safety alerts on your iPhone and Apple Watch. In the event of an emergency, here’s what you might see:
- Alerts issued by your country or region’s government
- Alerts involving imminent threats to safety or life
- Alerts for extreme weather conditions
- AMBER alerts (America’s Missing: Broadcast Emergency Response)*
- Public Safety Alerts*
*AMBER alerts and Public Safety Alerts aren’t available in all countries or regions.
Turn Government Alerts on or off
By default, Government Alerts are turned on for your device. * When you receive a government alert, you hear a special sound that’s similar to an alarm. If you want to turn these alerts on or off, follow these steps:
- Go to Settings > Notifications.
- Scroll to the very bottom of the screen.
- Under Government Alerts, turn the type of alert on or off. *
*Government Alerts are supported when using a SIM card from a supported carrier. Your Apple Watch can receive these alerts if your iPhone can receive them and is nearby, or your Apple Watch is on a Wi-Fi network. With a cellular plan from a supported carrier, your Apple Watch Series 3 (GPS + cellular) can receive these alerts without your iPhone nearby. For more information, contact your carrier.
*In some countries, you may not be able to disable Government Alerts.
Choose to receive Test Emergency Alerts in the United States
When your iPhone is connected to a carrier in the United States — using a U.S. SIM or while roaming in the U.S. — you can enable Test Emergency Alerts. By default, this is turned off. When you receive this type of alert, you’ll hear a sound that’s similar to an alarm, and the alert will mention that it’s a test. To turn these alerts on or off, follow these steps:
- Open the Phone app and tap Keypad.
- To turn it on: Enter *5005*25371# and tap . You’ll get an alert that says «Test alerts enabled.»
- To turn it off: Enter *5005*25370# and tap . You’ll get an alert that says «Test alerts disabled.»
Источник
Approve what kids buy with Ask to Buy
With Ask to Buy, you can give kids the freedom to make their own choices while still controlling their spending.

How Ask to Buy works
With Ask to Buy, when kids want to buy or download a new item, they send a request to the family organizer. The family organizer can use their own device to approve or decline the request. For example, if a child wants to buy an app, the family approver can see the app and decide whether to allow it.
If the family organizer approves the request and completes the purchase, the item automatically downloads to the child’s device. If the family organizer declines the request, no purchase or download will take place. If a child redownloads a purchase, downloads a shared purchase, installs an update, or uses a redemption code, the family organizer won’t receive a request.
![]()
Who can use Ask to Buy
Familes can use Ask to Buy after they set up Family Sharing. The family organizer can turn on Ask to Buy for any family member who isn’t an adult. It’s on by default for any children under 13. You’ll be asked to set up Ask to Buy when you invite anyone under 18 to your family group. 1
If a family member turns 18 and the family organizer turns off Ask to Buy, the family organizer can’t turn it on again.
![]()
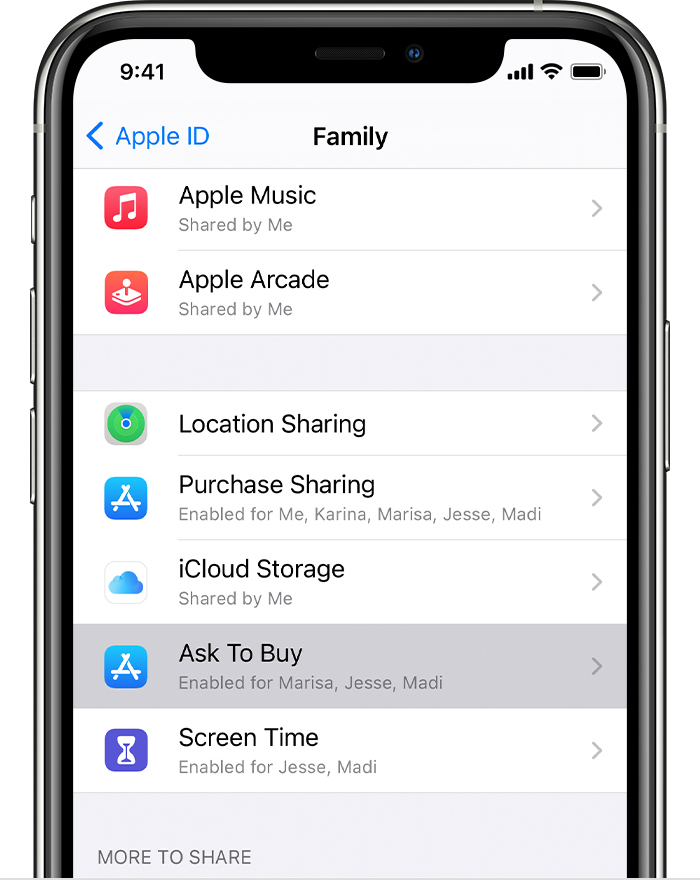
How to turn on or turn off Ask to Buy
If you’re the family organizer, use your own device to turn on or turn off Ask to Buy.
On your iPhone, iPad, or iPod touch
- Open the Settings app.
- Tap your name.
- Tap Family Sharing.
- Tap Ask to Buy.

- Tap your family member’s name.
- Use the toggle to turn on or turn off Ask to Buy.
On your Mac
- Choose Apple menu > System Preferences, then click Family Sharing.
- Click Family in the sidebar.
- Click Details next to the child’s name on the right.
- Select Ask to Buy.
On your Mac with macOS Mojave or earlier
- Choose Apple menu > System Preferences.
- Then click iCloud.
- Click Manage Family and select your family member’s name.
- Select Ask to Buy.
![]()
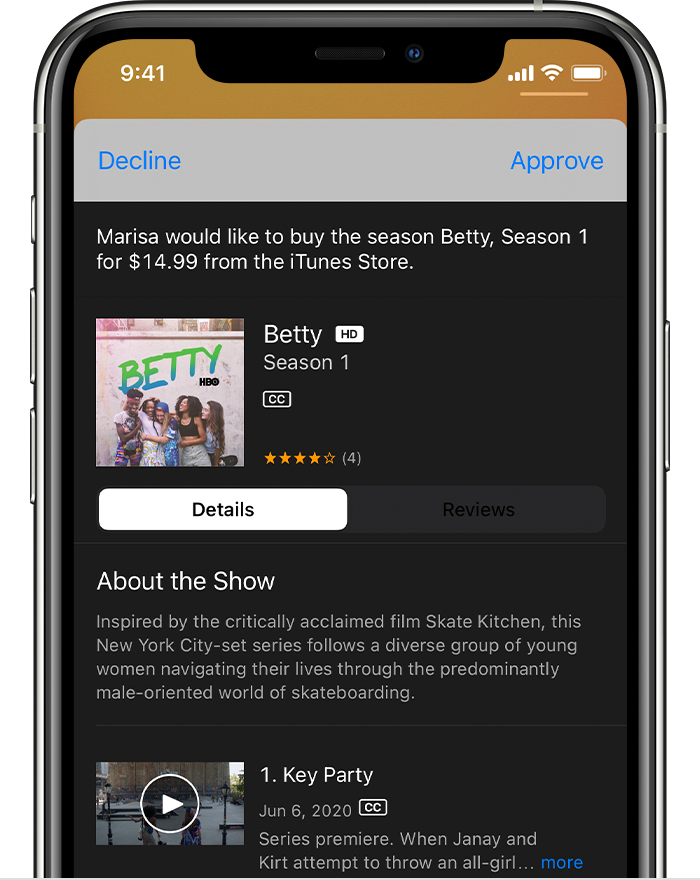
How to approve or decline a request
If you’re the family organizer, use your iPhone, iPad, iPod touch, Apple Watch, or Mac to approve or decline a request.
- Open the notification to see the item that your family member wants to get. Can’t find your Ask to Buy notifications?
- Approve or decline the purchase.
- If you approve, sign in with your Apple ID and password to make the purchase.
What happens next
After the item is purchased, it’s added to your child’s account. 2 If you turned on purchase sharing, the item is also shared with the rest of the family group.
If you decline a request, your child receives a notification that you declined the request. If you dismiss the request or don’t make the purchase, the child will need to make the request again. Requests that you decline or dismiss are deleted after 24 hours.
Where to find your Ask to Buy requests
If you miss an Ask to Buy notification, you can find the request in Notification Center on your iPhone, iPad, iPod touch, Apple Watch, or Mac.
![]()
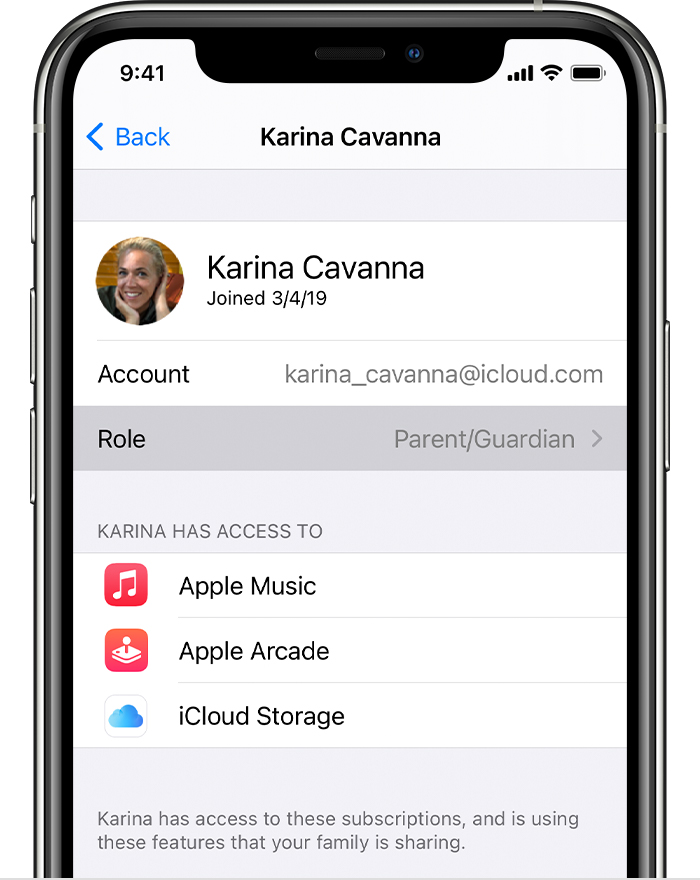
How to choose another approver
The family organizer can give another parent or guardian in the group over the age of 18 permission to manage Ask to Buy requests. Only one adult needs to manage each purchase, and after it’s done, the purchase is final.
On your iPhone, iPad, or iPod touch
- Go to Settings.
- Tap your name.
- Tap Family Sharing, then tap your family member’s name.
- Tap Role.
- Tap Parent/Guardian.
On your Mac
- Choose Apple menu > System Preferences, then click Family Sharing.
- Click Family in the sidebar.
- Click Details next to the family member’s name, then select Parent/Guardian.
On your Mac with macOS Mojave or earlier
- Choose Apple menu > System Preferences.
- Click iCloud, then select your family member.
- Select Parent/Guardian.
![]()
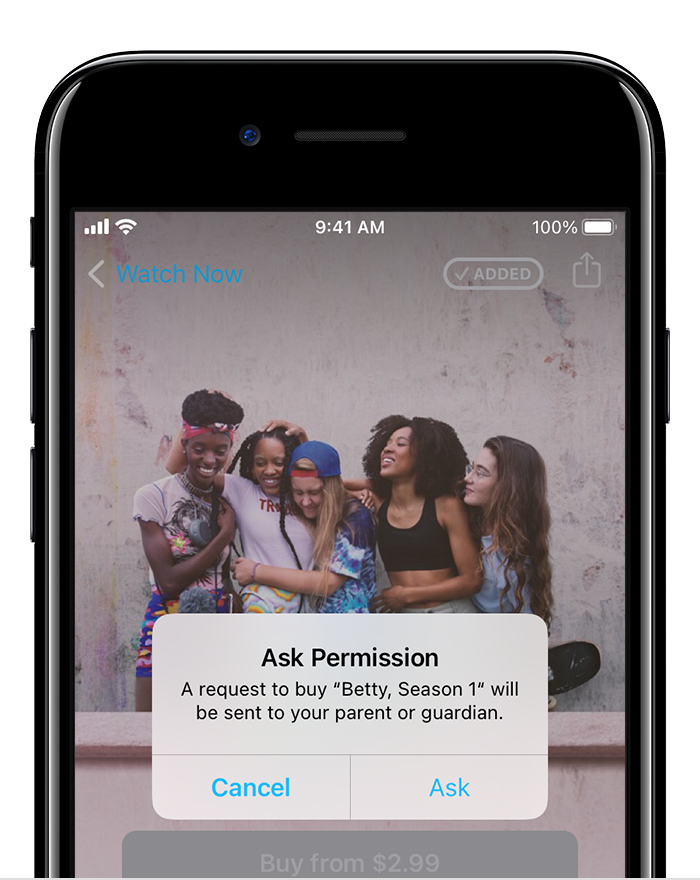
How children or teens can make a request with Ask to Buy
- To buy or download an item, tap the price or Get button. Or if you’re using an Apple Watch, double-click the side button, then enter your passcode.
- If asked, enter your Apple ID and password.
- Tap Ask. If your parent or guardian is nearby, you can tap «approve it in person» and they can approve the purchase directly from your device.
- After your parent or guardian buys the item, it downloads to your device automatically. 2
![]()
Ask to Buy doesn’t apply to apps or content from school
If a child’s account was created using Apple ID for Students, the child can use Ask to Buy for personal purchases outside of the educational institution. It won’t apply to any apps or other content distributed by the school.
1. Age varies by country or region.
2. In South Korea, a child might be asked to verify their age after an Ask to Buy request is approved. Learn about age verification in South Korea.
Источник


