- Инструкция: Как установить Siri на iPhone 4, iPad, iPod Touch
- Как установить Siri (Original) на iPhone 4, iPhone 3GS, iPod 4G/3G? [Инструкция]
- Question: Q: Why no Siri for iPhone 4 ?
- Helpful answers
- Wish to Use Siri Without an iPhone 4S? Here’s How to Use Siri On iPhone 4 or iPod
- Get Siri on iPhone 4 or iPod
- Materials Needed
- Moving Materials
- Installing Siri
- Final Touches
- «Привет, Siri!», или как включить Siri голосом на iPhone
- Полезное видео на тему:
- На каких iPhone и iPad работает включение Siri голосом
- Как активировать функцию «Привет, Siri!» на iPhone и iPad?
- Почему функция «Привет, Siri!» включена, но не работает
Инструкция: Как установить Siri на iPhone 4, iPad, iPod Touch
 Чуть больше месяца назад мы писали, что не малоизвестный Райан Петрич выпустил порт Siri для iPhone 4, iPhone 3GS, iPod touch и iPad, который получил название Spire.
Но решение было не слишком удобное из-за того, что необходимо было вручную прописывать прокси-сервера, так же нужен был iPhone 4S, чтобы заполучить сертификат.
Благодаря трудам отечественных программистов все стало намного проще. Загрузив твик Siriport Вам придётся вручную сделать минимум действий и Siri будет на iPhone 4 или на другом девайсе.
А теперь, пошаговая инструкция, с описанием установки Siri на iPhone 4, 3GS или iPod touch, iPad:
- 1. Для начала, вам необходимо добавить в Cydia новый репозиторий repo.siriport.ru.
- 2. Загружаем твик Siriport (200 мб)
- 3. Перезагружаем гаджет
- 4. После перезагрузки, открываем в Safari ссылку siriport.ru/1.crt. и устанавливаем сертификаты*
- 5. Опять перезагружаем устройство
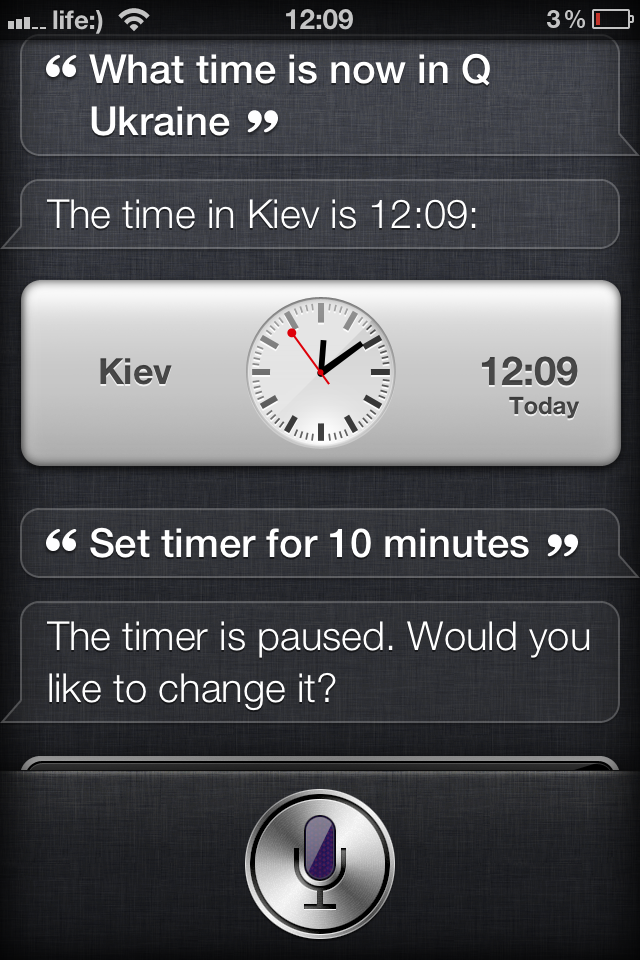
- 6. Запускаем Siri, и приветствуем её «Hi Siri». Программа должна вам ответить**
*Если ссылка в Safari упорно не открывается, открываем её на компьютере и пересылаем скаченный сертификат на iPhone.
**Если Siri не отзывается, закрываем её и ждем около 4 минут. Далее повторяем запуск. Если опять Siri не реагирует, повторяем перезапуск, не забывая приветствовать.
Не забывайте, что все действия Вы делаете на свой страх и риск, некоторые пользователи столкнулись проблемами, решения которых требовало восстановления, но таких не много. Может, кому поможет видео ниже, там демонстрация установки Siri на iPhone 4. Так же некоторые пользователи замечают тормоза iOS, после установки:
Источник
Как установить Siri (Original) на iPhone 4, iPhone 3GS, iPod 4G/3G? [Инструкция]
Итак, этот прекрасный момент настал, теперь не только владельцы iPhone 4S имеют возможность пользоваться персональным помощником Siri. Джейлбрейк-твик Siriport уже достаточно доведен до ума и проблем с ним возникать не должно. Вообще, данный порт является самым качественным и самым надежным из всех существующих, и к тому же он ни капли не отличается от оригинальной Siri на iPhone 4S.
Внимание! Для установки SiriPort (Original) используйте ТОЛЬКО чистое, только что восстановленное устройство на прошивке iOS 5.1.1 с джейлбрейком!
В этой статье будет описана установка Siri (Original) на следующие устройства:
- iPhone 4 (GSM/CDMA)
- iPhone 3GS
- iPod 4G/3G
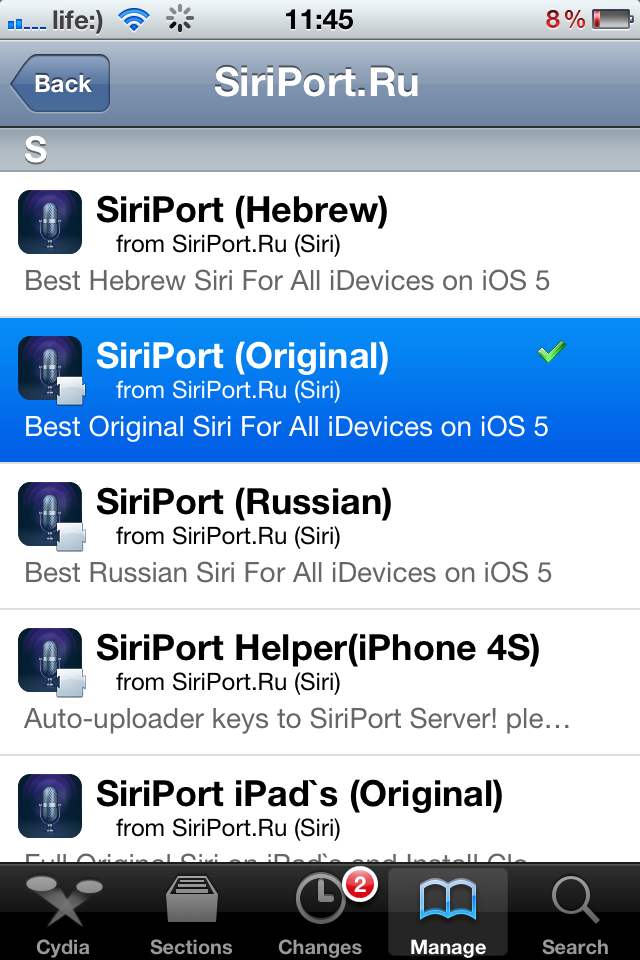
- Установите SiriPort (Original) из репозитория repo.siriport.ru в Cydia.
- Откройте «Настройки» на iOS-устройстве и перейдите в меню SiriPort.Ru Original.
- Нажмите «Install Certificate», после чего откроется страница установки сертификата.
- Выберите «Install Certificate» для установки сертификата.
- Перезагрузите устройство.
- Запустите Siri, и произнесите «Hello Siri». Если Вы получили ответ, то поздравляем, если нет, то придется повторить этот пункт. Это зависит от наличия свободных ключей (сертификатов Siri) на сервере. Тут уж как повезет, можно поймать ключик и с первого раза, а можно и сутки «здороваться» безрезультатно.
Также обязательно посмотрите видеоинструкцию:
Для тех пользователей, у которых нет доступа к Wi-Fi, предлагаем воспользоваться ручной установкой SiriPort:
- Скачать Deb установщик
- В Cydia устанавите системные пакеты Mobile Substrate, PreferencesLoader.
- Установите, скачанный в п. 1 Deb файл с помощью iFile или iFunbox.
- Установите сертификат в настройках устройства (Настройки -> SiriPort.Ru Original)
- Перезагрузите устройство.
- Запустите Siri для активации ключа (произносите «Hello Siri», до тех пор пока не получите ответа)
Кстати, если Вы являетесь владельцем iPhone 4S и не против помочь пользователям других iOS-утройств, то прочитайте следующий FAQ и поделитесь ключом для Siri.
Источник
Question: Q: Why no Siri for iPhone 4 ?
Why isn’t Siri on iOS 6 update for iPhone 4 ?
I have Multiple Sclerosis & my hands tire easily.
I have been looking forward to the iOS 6 update
ever since Siri came out. I purchased my iPhone 4 32G
through Verizon not knowing the iPhone 4S was
to be released within DAYS of my purchase. I can’t
upgrade for another year.
I love my iPhone 4
it’s my first Apple product, and as a «PC» user,
there is no comparison, Apple products are
exceptional. Is there a way to get Siri on my iPhone 4 ??
iPhone 4, iOS 6, Why isn’t Siri on iOS 6 iPhone 4 ?
Posted on Sep 22, 2012 11:42 AM
its the limitations of the 4, the chip and the Internet speed for the 4 cant handle siri
Posted on Sep 22, 2012 11:45 AM
Helpful answers
Thank You Robert,
I have one more question, what is the difference btwn
the iPhone 3S or is it 3GS ? More Less
Sep 22, 2012 11:55 AM
There’s more to the conversation
Loading page content
Page content loaded
its the limitations of the 4, the chip and the Internet speed for the 4 cant handle siri
Sep 22, 2012 11:45 AM
Thank You Robert,
I have one more question, what is the difference btwn
the iPhone 3S or is it 3GS ? More Less
Sep 22, 2012 11:55 AM
Only the Iphone 4S, the Iphone 5, iPad 3, and the 5th Generation iPod touch are compatible with SIRI due to hardware requirements. The Iphone 3G and the Iphone 3GS don’t suppport SIRI, and even the 3GS doesn’t suppport all the feartures of IOS 5 and IOS 6. Hope this helps.
Sep 22, 2012 12:49 PM
what about a wifi connection?
Like so many others, I’ve too have upgraded to 6.0 and using a iPhone 4.
While I can’t say for sure, I thought i had siri working on the phone, but today when I started using it, there’s not siri.
As a matter of fact, there’s not siri under settings-general
it’s simply not there.
so, why would it not work under wifi if the internet connection via 3g is too slow?
Sep 23, 2012 11:40 AM
Why isn’t Siri on iOS 6 update for iPhone 4 ?
Apple has not stated why it is not on the iPhone 4 (or other devices). Whatever anyone tells you is simply speculation on their part.
Sep 23, 2012 11:44 AM
Like so many others, I’ve too have upgraded to 6.0 and using a iPhone 4.
While I can’t say for sure, I thought i had siri working on the phone, but today when I started using it, there’s not siri.
You do have Voice Control.
Sep 23, 2012 11:47 AM
yes, the voice control still works, well at works as good as it use to, but god save the queen, I thought after i updated my iPhone 4 the other day that I had siri, at least until this morning and it went away.
I have it on my iPad III and it works okay
Sep 23, 2012 1:58 PM
You are mistaken. You never had Siri on your iPhone 4, only Voice Control. See Appleiosfan’s post above for which devices run Siri.
Sep 23, 2012 2:15 PM
That is like 60% bull. Wanna know how I know? Because essentially the iPhone 4-4S-5 is all the same processor. They label it the A4 A5 A6, well A6 is the only one that has a dual-core, same speed the only thing different is how much RAM is in it. And Internet connection not supported? Please 99.9999999999999999999% of the time you are in 3G coverage. 3G has always been slow because of the type of frequency that is being used and its very limited. That’s why you can’t talk and surf. Doesn’t work that way. 4G is brand new and there ISN’T a lot of coverage dispite what the service providers say. Tell you what, why don’t you you get a 4G phone and travel to every town, city, and state and check the 4G coverage.
Apple doesn’t want to do it because why buy the 5, or the 4S if I could get the 4 for like $400 less and still have all the features? Talk about severe drop in 5/4S sales.
Oct 4, 2012 5:18 PM
simple answer. spend more on «our» products to get siri which cannot do even local toggles and local actions without an internet connection.
complicated answer. none exists 🙂
Oct 4, 2012 5:27 PM
Pretty sure I didn’t ask a question.
Oct 4, 2012 5:44 PM
Talk & surf have nothing at all to do with 3G bandwidth, it’s the difference in gsm or CDMA networks.. AT&T gsm= talk & surf, Verizon CDMA = no talk and surf. Not arguing who’s better just stating facts. Here is a link that gives pretty good break down
Источник
Wish to Use Siri Without an iPhone 4S? Here’s How to Use Siri On iPhone 4 or iPod
One of the biggest selling points of that shiny new iPhone 4S is the inclusion of Siri, everybody’s favorite voice assistant. Just give Siri command or ask it a question and it will help you out. It’s like the voice command you know and loves from forever, but refined to that high degree personified by Apple products.
However, there is some good news for those of us who are waiting for an iPhone 5 (and not just a 4.5). Siri is not really exclusive to the 4S. Apple’s excuse is “technical issues” prevent porting Siri to other devices, but that’s total crap. Apple’s actually ported Siri to the iPhone 4 themselves. True story. And lest we forget, Siri was originally compatible with all devices.
Thankfully, the hackers have got your back. If you’re willing to put in some effort and get elbow-deep in iPhone hacking, there is a way to get Siri on an iDevice that is not an iPhone 4S. The catch is that the process is totally illegal and your version of Siri can’t talk to Apple’s servers. So, consider this guide for… educational purposes. We do not endorse infringing on Apple’s copyrights. This guide is merely informational.
With that out of the way, here’s how you hack Siri.
Get Siri on iPhone 4 or iPod
Materials Needed
- A downloaded copy of Siri from here . (This file is no longer available)
- A working, jailbroken version of iOS 5 running on an iPhone or iPod Touch. If you haven’t jailbroken, check out some of our guides.
- iFile, which can be downloaded from Cydia. It’s $4 or free from the Sinful iPhone repo. I recommend buying it, iFile is an essential app for jailbreaking.
Moving Materials
Start iFile on your iPhone. At the bottom is a small wifi logo. Tap that and the iFile server will start. Your iPhone just became a server which you can access on your desktop computer.
If the server is working, you should see a bunch of tiny white text on a black background. The last line should include a web address that is composed of entire numbers. That’s your iPhone. Go to that address in your computer’s browser.
The iPhone file system is labyrinthine at best, so don’t worry if the mess of folders is confusing. Scroll to the bottom of the page and click “Upload File.” Select the file you downloaded earlier, Siri.zip.
Your iPhone should show a progress bar at the bottom. Once that bar hits one hundred percent and your computer browser says “File successfully uploaded,” it’s finished.
Installing Siri
Tap the blue “Done” button in the upper right corner of the iFile web server page. This will shut down the server, you don’t need it anymore.
Depending on whether you’ve used iFile before, you may find yourself at a different point in the iPhone file system. Just keep tapping the back arrow in the upper left until you can’t go back anymore. This should be the root, where you uploaded Siri.zip.
Tap Siri.zip. Choose to open it with Unarchiver. Your iPhone will now display some awesome scrolling text that should make you feel like a super hacker. It’s extracting the zip file. Tap “Done” once it’s finished.
At the top is a folder labeled “_MACOSX.” Delete that, it’s useless. Go to the folder labeled “Siri” and open it. Inside is another folder named “AssistantServices.framework.” Tap “Edit” in the upper right and then tap AssistantServices.framework. Now tap the clipboard in the bottom right and choose “Copy/Link.” Tap “Done.”
Tap the “/” arrow in the upper right. Now go to /System/Library/PrivateFrameworks. Tap “Edit” and touch the clipboard again and hit “Paste.”
Go back to the root directory (keep touching the upper left arrow until it disappears). Go to /Siri/SpringBoard_Assistant_pics. Copy every file inside there and paste them inside /System/library/CoreServices/SpringBoard.app.
Stay inside that folder. Find N90AP.plist or N81AP.plist (this takes a lot of scrolling). Touch it and open it as a text file. Find the line that reads “ 720p
Just use the space bar to indent those two lines.
Finally, restart SpringBoard while holding down the Home button. If you don’t know how to respring, download SBSettings from Cydia. It’s a super-easy way to respring.
Final Touches
If everything goes according to plan, your iPod Touch or iPhone should take quite a while to respring but will now boot with a little extra: Siri.
The downside to hacking Siri is that it can’t communicate with Apple servers. This sort of takes the fun out of asking Siri any question imaginable and having it lookup an answer. Still, if you liked the idea of dictating texts or using voice commands to control your phone, hacked Siri will do nicely.
Источник
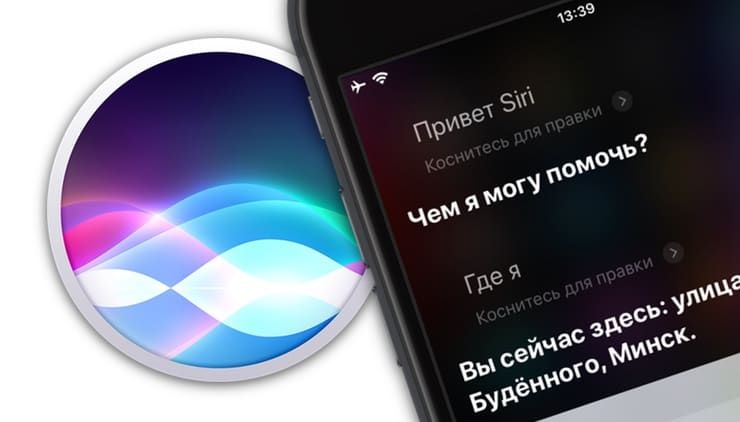
«Привет, Siri!», или как включить Siri голосом на iPhone
Функция «Привет, Siri!», вызывающая голосовой ассистент, – одна из относительно немногих фич, которая была нагло подсмотрена у ребят из конкурирующей платформы («О’кей, Google»). В этом материале мы расскажем на каких устройствах Apple она работает, зачем она нужна и как включить её голосом и произвести некоторые настройки по персонализации. Инструкция для новичков!
Благодаря голосовому помощнику Siri, практически каждый владелец iPhone (4s и старше), iPad (третьего поколения и старше, а также всех устройств линейки iPad mini), iPod touch 5g и Apple Watch может голосом вызывать абонентов, заводить будильники, писать сообщения и даже диктовать тексты. Более подробный список полезных команд можно почитать тут.
И если раньше для активации функции требовалось зажимать кнопку «Домой» (Home), то теперь достаточно произнести фразу «Привет, Siri!» (функция появилась на iOS 9, а также работает на более поздних версиях прошивки). Правда, и тут есть некоторые нюансы.
Полезное видео на тему:
На каких iPhone и iPad работает включение Siri голосом
Вызов Siri голосом будет работать на поддерживаемых устройствах в том случае, если они подключены к источнику питания. Исключением стали топовые гаджеты, такие как iPhone 13, iPhone 13 mini, iPhone 13 Pro, iPhone 13 Pro Max, iPhone 12, iPhone 12 mini, iPhone 12 Pro, iPhone 11, iPhone 11 Pro, iPhone XS, iPhone XR, iPhone X, iPhone 8, iPhone 8 Plus, iPhone 7, iPhone 7 Plus, iPhone 6s, iPhone 6s Plus, iPhone SE и iPad Pro, которые готовы практически всегда по запросу «Привет, Siri!» отозваться и выполнить голосовую команду.
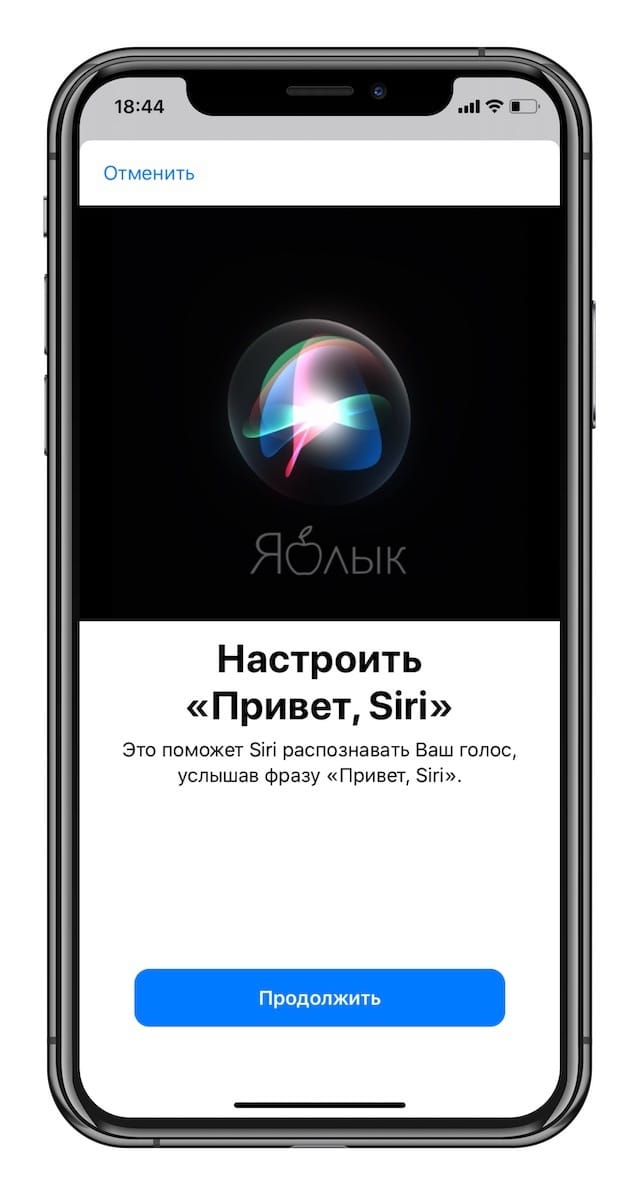
Как активировать функцию «Привет, Siri!» на iPhone и iPad?
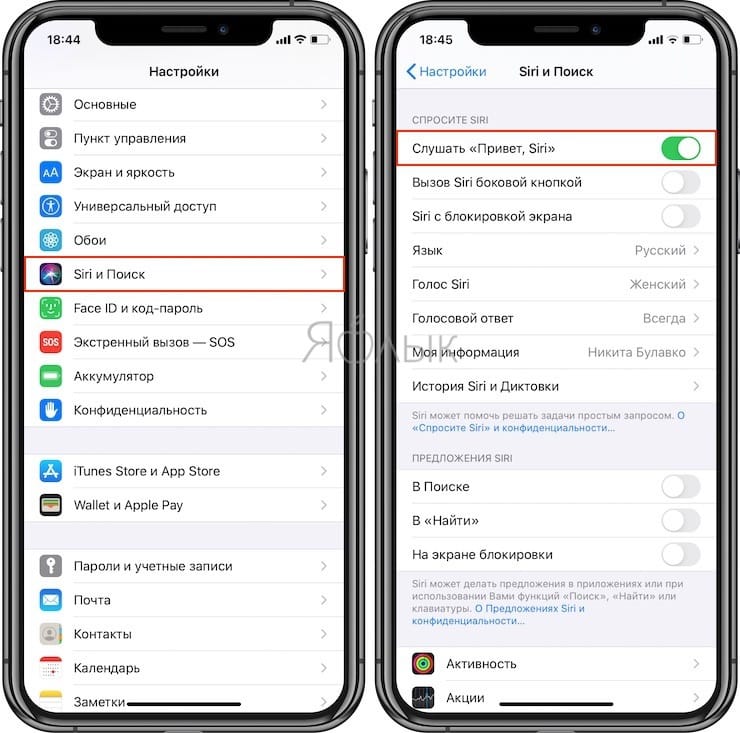
1. Откройте Настройки → Siri и Поиск.
2. Активируйте функцию Слушать «Привет, Siri!», переключив соответствующий тумблер в активное положение.
3. Ассистент предложит нажать кнопку «Настроить» и повторять некоторые простые выражения для лучшего запоминания голоса, чтобы в дальнейшем уменьшить шанс случайной активации Siri на вашем устройстве другими людьми.
После проделанных манипуляций вызывать голосового помощника станет ещё проще.
На заметку владельцам топовых устройств, в которых можно активировать Siri без подключения гаджета к источнику питания, — время автономной работы, безусловно, сократится.
Почему функция «Привет, Siri!» включена, но не работает
Да всё дело в том, что если устройство будет находится в кармане пользователя или будет расположено на горизонтальной поверхности дисплеем вниз, то активизируется защита от ложного срабатывания. Подробно об этом мы уже писали на страницах нашего сайта.
Источник


