- Webcam android via usb
- How to Use an Android Phone As a Webcam For PC [Windows & Linux].
- 1. Use your android phone as webcam using Wifi.
- 2. Use your android phone as webcam using USB.
- Android Smartphone As USB Webcam
- Introduction: Android Smartphone As USB Webcam
- Supplies
- Step 1: Become a Developer
- Step 2: Turn ON USB Debugging
- Step 3: Install IVCam
- Step 4: Connect Your Phone Using a USB Cable
- Step 5: Use Your Smartphone As a Webcam for Zoom Meetings (or As 2nd Camera)
- Step 6: BONUS #1: Simple Smartphone Stand for Zoom Meetings
- Step 7: BONUS #2: Smartphone Holder for Capturing a Whiteboard
- Step 8: Connecting Your IPhone As a Webcam — Some Tips
- 4 People Made This Project!
Webcam android via usb
Краткое описание:
Подключение USB-камеры(смартфон,планшет,тв) через USB,OTG-Кабель
Описание:
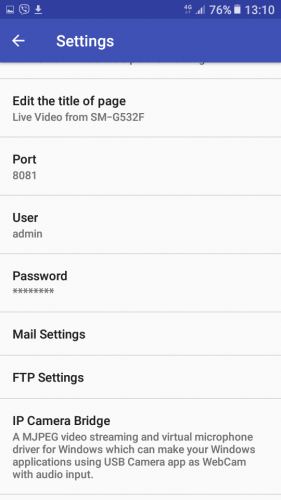
Описание USB-камеры
*** Pro-версия содержит некоторые дополнительные функции (например, ‘картинка в картинке’, ‘отображать видео на экране блокировки», » авто-рекорд за подключение и т. д.) Из общих настроек и без рекламы ***
Совет:
Поддерживает следующие устройства:
1) УФ-камера с микрофоном (поддержка H. 264, для работы с mjpg, yuy2 и т. д.)
2) УФ-граббер видео с аудио-входом (до 1080p через HDMI, поддерживает H. 264, с mjpg, yuy2 и т. д.)
3) позволяет, в том числе аудио с UTV007 / HTV600 / HTV800 чипсетов
4) позволяет в том числе аудио с STK1160 + SAA7113/GM7113 + AC97 чипсетов (аудио 48 кГц стерео версия)
5) Позволяет в том числе аудио с STK1160 + SAA7113/GM7113 (аудио 8кгц моно версия)
6) позволяет в том числе аудио с EM2860 + SAA7113/GM7113 + AC97 чипсетов
7) позволяет в том числе аудио с SMI2021 + SAA7113/GM7113 + ES7240/CS5340 чипсетов
Нажмите значок USB на панели инструментов, чтобы открыть диалоговое окно устройства, чтобы открыть устройство, если система не может обнаружить устройство.
Пожалуйста переключите видео-стандарт (PAL/NTSC) если видео-замораживание при использовании EasyCap.
Пожалуйста используйте кабель хорошего качества OTG и обеспечьте что электропитание
используя HEVC для видеозаписи требует Андроида 7.0 или выше, и прибор должен поддержать кодек HEVC.
«USB-камера» позволяет вашему android-устройству подключаться к веб-камере USB или карте видеозахвата через USB-OTG. Вы можете записывать видео или захватывать снимок, или превратить ваш телефон в беспроводную IP-камеру для мониторинга безопасности с двунаправленной поддержкой звука, вы можете использовать браузер для просмотра, конечно, включите приложение «IP-камера».
«USB-камера» может передавать видео и аудио на RTMP Live media server (например, Push на YouTube, Facebook) и использовать для сетевого вещания. Вы можете включить его с сервера IP-камеры.
«USB камера» поддерживает бок о бок (SBS) вид и он может работать с картоном. (например, FPV goggle)
«USB-камера» может добавлять информацию GPS на видеокадры во время записи и может использовать гарнитуру или Bluetooth-гарнитуру для захвата снимка и записи видео. Он также поддерживает кнопку снимка веб-камеры.
«USB камера» поддерживает запись петли. Можно установить автосегмент при записи и автоматически удалять старые видеоархивы, когда недостаточно памяти. «USB-камера «может использоваться в качестве» Dash Cam «
USB-камера может бесшовное переключение между передним и задним планом. Просто нажмите «Enter background» из меню. Запись не прерывается во время переключения!
Она поддерживает автоматическую видеозапись которая основала на обнаружении движения и видеозапись можно загрузить к серверу FTP автоматически и сообщить вас через электронную почту!
Для двунаправленного звука требуется приложение IP Camera, его можно получить по адресу https://play.google.co…enyaocn.android.WebCam
IP Camera Bridge — Драйвер потокового видео и виртуального микрофона MJPEG для Windows, который позволяет вашим приложениям Windows использовать USB-камеру в качестве веб-камеры с аудиовходом.
https://github.com/shenyaocn/IP-Camera-Bridge
Требуется Android: 4.3+
Русский интерфейс: Нет
Скачать:
Версия: 9.6.2 PRO (moorware)
версия: 9.4.0  USB Camera Connect EasyCap or USB WebCam 9.4.0.apk ( 17.79 МБ )
Скачать APK
Источник
How to Use an Android Phone As a Webcam For PC [Windows & Linux].
For most people a video call such as MSN or Skype, Google+ hangout or a video chat is something occasional. And when you want to start one, you need a webcam. But why spend money for a separate webcam when you can easily use your android phone’s camera as a webcam?
The process involves streaming video from your phone to a particular port on your PC and having a PC driver software capture it and provide it as webcam video to any application that needs webcam access.
Don’t get scared with the details. Its actually very easy and there are two ways to do it.
1. Use your android phone as webcam using Wifi.
Here, you phone video will be streamed and made available to your PC applications via WiFi. This is the easiest and most flexible way to do it.
Requirement -В both your computer and your android phone should be connected to the same network with android connected via WiFi. That means you can either —
- Connect both your phone and computer to the Internet using a wireless router.
- Or connect your Android to the pc internet using virtual router (Only for windows 7)
- Or connect your Android to the PC with a shared wifi network (needs rooted phone with ad-hoc networking enabled).
Once your phone is connected to the same PC network via wifi, follow these steps —
- From android market in your phone, install IP Webcam.
- Open the app and you will get the configuration screen where you can set the options for port, sound, video quality and username/password.
- The default options are good enough, so scroll down and click on he «Start server» option.

- Ip Webcam will now open your camera and start streaming the video to a particular IP address and port. Click on the «How do I connect» button appearing on the top leftВ and choose «I’m using Wi-fi router» to get this IP address and port. You will get some thing like «http://10.42.43.89:8080«.
- Note this address down and type it in your PC web browser. You will get a page with links for various ways in which you can use your new webcam. From the list, you need to use either of the two links.
- Connect to PC for use with Skype and other videochats on Windows.
- Connect to PC for use with Skype and other videochats on Ubuntu GNU/Linux


 Depending on your operating system (Windows or Linux), use the links to download and install the webcam driver on your PC.
Windows — For windows, the driver comes as an easy installer.
Linux — For Linux, it comes as a script which you need to run in a terminal as root. Before running, change the value of the variable » WIFI_IP =» to the ip address from IP Webcam in the script. Make sure the computer is connected to the Internet when you run the script the first time. It will try to download and install additional files if your linux doesn’t already have them. You need to run this script every time you want to use your android as webcam.
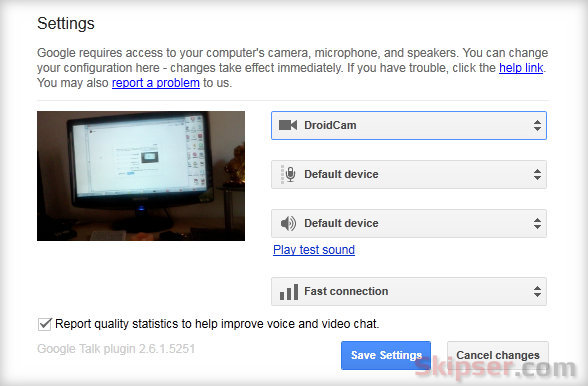
That’s it. Now open Skype, Google+ hangout or any other video call application and for the video section, choose the webcam driver you just installed andВ start it. Here’s a Google+ hangout with my android as webcam in Linux.

Tip: For Linux, disabling sound in IP Webcam settings could make the driver not to work.
2. Use your android phone as webcam using USB.
You can use your android as webcam even without wifi by connecting it to your PC via USB. But doing this requires extra work because android can communicate with PC via USB only in debugging mode by using adb.
Also, for USB mode, we need another app called DroidCam. Although the earlier IP Webcam app is more popular, it is more or less limited to WiFi connections especially for windows. So lets see how toВ configure your android as a webcam via USB —
- Setup your phone in debugging mode (Settings -> Applications -> Development -> USB debugging).
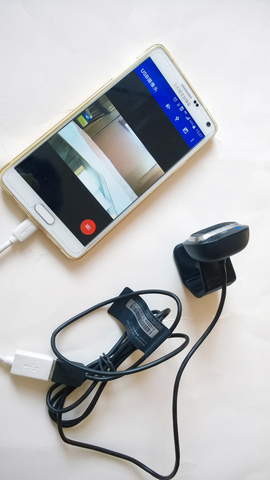
- Connect the phone to your computer via USB (don’t select storage mode if the phone asks while connecting USB).
- Download DroidCam from android market,install it and open it on your phone. It will show a «Starting server» message.
- Download and install the client application in your computer from Dev47Apps.
- Start the DroidCam client and choose the «USB» option or button.


That’s it. DroidCam will now open the camera on your phone and you can use it as webcam on your PC. Just configure the video settings of your video call application to use «DroidCam» driver. Here’s my Google+ hangout with video from my android phone connected via USB.
For Linux, you can use the IP Webcam app as well. Just connect your phone via USB in debugging mode to your computer and start the driver script. It will detect and use adb to initiate a connection using USB automatically.
Источник
Android Smartphone As USB Webcam

Introduction: Android Smartphone As USB Webcam


Over the last few months we’ve all been forced to communicate online rather than in person. As a student, most of my lectures turned into Zoom meetings, and the same happened to my tutoring hours.
In the next few weeks, many students of all ages will go back to their schools or universities but many will still be studying from home. While many people have a desktop computer, not everyone have a laptop with a built-in camera. This means that some people would have to buy a new webcam just for these online meetings. Another option would be to chat directly through your smartphone, but that’s not optimal in most cases. For this reason, I thought it would be useful to connect my smartphone to my computer and use it as a webcam.
In this instructable I’ll show you how to use your smartphone as a webcam using a USB cable. You’d think that this should be trivial — after all, you have a camera and a laptop, why should this be difficult these days?? Turns out this not exactly the case! and since searching google for answers took me a while, I thought I’d save others the trouble.
While you can easily find out how to use your smartphone as a webcam using WiFi, connecting through a USB cable is not just a gimmick. There are many advantages in this method over using WiFi:
1) The connection is much more stable. I found this solution because I had problems with my screen freezing during meetings when I tried to connect through WiFi.
2) Using WiFi will slow down your internet speed — you’re taking up some of your WiFi’s bandwidth for this.
3) The image quality is much better using a USB cable!
4) Almost no latency! Delays are the worst!! Using a USB cable to connect your smartphone solve this problem.
4) The USB cable will charge your phone while you use it as a webcam, so you don’t need another charger just to keep it going during long meetings.
5) With this method, you can also use the microphone on your smartphone! Many methods that use WiFi do not transmit sound to your computer!
Other than keeping you from buying unnecessary webcams for your desktop computer, you smartphone can also serve as a second camera if you already have one! I’ll also teach you how to use this second camera in Zoom!
This is actually what I used it for — while tutoring physics it’s essential that you write down equations and explain stuff on a board. For this reason I wanted a way to capture a whiteboard. I built a simple phone holder and wrote down the equations on a piece of paper just beneath it. I’ll add some explanations for how you can make your own stands — one for video-chats (Zoom) and one for capturing a whiteboard.
** If you find a better way to connect a smartphone as a USB webcam, please let me know!!
Supplies
You’ll need a smartphone, a suitable USB cable and a PC. Obviously if you want to talk to other people online, you’ll also need an internet connection.
Step 1: Become a Developer
You don’t really need to be a developer to become one!
In order to use your smartphone as a webcam using a USB cable, you’ll need access to the phone’s developer options.
The attached photos should guide you through the process, but here’s what you should do:
Find your phone’s ‘build number’. It’s usually located in the ‘about’ section inside the phone’s settings.
Next, click the build number 7 times and insert your phone’s password.
Congratulations, you’re now a developer!! 🙂
Step 2: Turn ON USB Debugging
Next, you’ll need to located the ‘developer options’. It’s usually inside the ‘System’ section.
Once you’re inside ‘System’, look for ‘Advanced’ and there you should find ‘Developer options’.
Now remember that «with great power comes great responsibility» (Peter Parker) — tweaking your phone’s settings can change how it operates. You can always reset it back to factory setting, but I advise that you do not change anything that you don’t understand. Anyway..
Look for ‘USB debugging’ and turn it on.
Step 3: Install IVCam
Download and install iVCam both on your smartphone (through the play store) and on your PC.
While this app offers a free version with low-resolution videos (it’s still very good in my opinion, I only use the free version), you can also pay for the HD version which is nice.
Step 4: Connect Your Phone Using a USB Cable
It’s time to connect your smartphone to the computer!
Once connected, open the IVCam software and you’ll see a window popping up on your smartphone. Make sure you allow USB debugging.
At this point, your computer should be showing the image from the smartphone!
You can also pick which camera to use (front or back), set the exposure and more directly through the software.
*November 2021 update — allparticipate noted correctly that if you restart your phone and want to reconnect, all it takes is to allow USB debugging again (you should see a message at the top of your smartphone screen). Thanks allparticipate for your input!
Step 5: Use Your Smartphone As a Webcam for Zoom Meetings (or As 2nd Camera)
To use your smartphone as the main camera in zoom conversations:
In some cases the software will automatically recognize the smartphone camera and set it as your webcam. In other cases, you’ll have to click the small arrow next to the «Stop video» button and select the ‘e2eSoft iVCam’ as your camera (see first image). Even if you do have a camera on your or PC, chances are that your smartphone has a better camera than the one you have.
To use your smartphone as a 2nd camera (for teaching / sharing hand-writing):
To use your smartphone as a 2nd camera which you can use to capture hand-written notes and what-not, press «Share» (2nd image) and go to «Advanced» (3rd image). Select «Content from 2nd camera». You’ll now have both cameras connected to your zoom meetings!
My main use for this was to teach physics and math, but you can use it to share all kinds of hand-written notes!
Step 6: BONUS #1: Simple Smartphone Stand for Zoom Meetings
I made this using popsicle sticks and hot glue. The images are really self explanatory but if you want more instructions here, let me know in the comments 🙂
I do have a few tips though:
1) Use a milimetric paper while you glue the different parts and use it to lay the pieces straight. That why your final smartphone stand will be stable.
2) The paper-clip on the back lets you adjust the angle at which the phone faces you. It’s useful for video-chatting.
3) I cut a hole at the bottom of the stand so that my USB cable fits through. This is also very useful.
Step 7: BONUS #2: Smartphone Holder for Capturing a Whiteboard
I also made a smartphone holder to capture A4 pages while I write on them as a whiteboard. I would share it too, but there’s a much better version on instructables that I highly recommend. It’s simple, cheap, and much better than mine 🙂
Once you have a smartphone holder, place some printing paper or a small eraser whiteboard just beneath it. That way, when you share the content of your 2nd camera, students or other collaborators could see your hand written notes.
Step 8: Connecting Your IPhone As a Webcam — Some Tips
** I do not have an iPhone, so I have not tried these methods myself, but since people asked for guidance I did some research and included the information I found! Thanks TheFireMan & RobertA282 for the links and information!
1) First, if you have an iPhone but you’re using Windows, you can still use the iVCam app. Here’s a video of a guy showing how to do it.
2) RobernA282 suggested using Epoccam. Looks like you can use it both on Windows / Android and Apple OS.
3) TheFireMan suggested using DroidCam. He pointed out that it should work on Linux, Windows & Mac.
If you need any further help or have any feedback regarding connecting your Android / iPhone as a webcam, feel free you post a comment or message me!
That’s it for now! if you have any comments or questions I’d love to hear them!
You can find some of my other projects on my instructables page and if you like this instructable I’d appreciate if you vote for me in the Back to Basics contest!
If you want to support my projects, you can buy me a (cheap) coffee 🙂
100% of all proceedings will go into future projects! Thanks!!

4 People Made This Project!


Did you make this project? Share it with us!
Источник


