- Русские Блоги
- Использование WebStorm для разработки React Native для отладки проектов Android
- Интеллектуальная рекомендация
- Используйте шаблон состояния вместо if else
- Проектирование архитектуры: схема проектирования уровня балансировки нагрузки (5) — установка одного узла LVS
- Рыба образования, средняя школа закончила в учебном класс, как найти первую работу.
- Синглтон паттерн в питоне
- Java Counce Collection
- Вам также может понравиться
- динамический прокси-сервер jdk (Proxy, InvocationHandler), включая исходный код $ Proxy0
- Юля: Об изменениях в Array 1.0
- студия Android генерирует статическую библиотеку jni
- Nginx 502 раствор
- Java вызывает SMS-интерфейс WebService
- React Native
- Before you start
- Creating a new React Native application
- Starting with an existing React Native application
- Open the application sources that are already on your machine
- Check out the application sources from your version control
- Download the dependencies
- Exclude the android and iOS folders from the project
- Project security
- Coding assistance
- Running and debugging a React Native application
- Create a React Native run/debug configuration
- Prepare a device or a simulator
- Run an application
- Debugging an application
- Debug a React Native application that uses a native bundler
- Debug a React Native application that uses Expo
- Configure Chrome Headless in PhpStorm
Русские Блоги
Использование WebStorm для разработки React Native для отладки проектов Android
Собственная команда печати React-Native
android : react-native log-android
ios : react-native log-ios
Отладка в студии Android, а затем нашел плагин отладки в отладке веб-шторма:react-native-console Добавить плагины прямо из настроек веб-шторма
Файл >> Настройки >> Плагины >> Найдите React Native Console и перезапустите веб-шторм после установки.

Консольный эффект 
Интеллектуальная рекомендация

Используйте шаблон состояния вместо if else
Большинство разработчиков все еще используютif elseСтруктура процесса, виделиjdonизbanqСтатья написана Большим Братом, используяcommand,aopЗамена шаблонаif elseСтруктура процесса. Я не совсем понял эт.

Проектирование архитектуры: схема проектирования уровня балансировки нагрузки (5) — установка одного узла LVS
1 Обзор Предыдущая статья «Проектирование архитектуры: проектирование уровня балансировки нагрузки (4) — Принципы LVS» (http://blog.csdn.net/yinwenjie/article/details/46845997), мы предста.

Рыба образования, средняя школа закончила в учебном класс, как найти первую работу.
Self-брат Я девять ноль, теперь занимается разработкой веб-конца Java. Некоторое понимание и восприятие учебных курсов. Учебное заведение является ямой, дорога, что вы уже прошли, только вы знаете, дл.

Синглтон паттерн в питоне
Дизайн шаблона Шаблон дизайна — это краткое изложение предыдущей работы, которое, как правило, широко распространено людьми и является зрелым решением конкретной проблемы. Он предназначен для многораз.
Java Counce Collection
TRUEEWAP основан на реализации красных навигаций. Это отображение отсортировано в соответствии с его природооформленным порядком или отсортировано в соответствии с компаратором, предусмотренным при со.
Вам также может понравиться
динамический прокси-сервер jdk (Proxy, InvocationHandler), включая исходный код $ Proxy0
1. Связанные классы и методы: java.lang.reflect.Proxy, Прокси предоставляет статические методы для создания динамических прокси-классов и экземпляров. newProxyInstance() Возвращает экземпляр прокси-кл.
Юля: Об изменениях в Array 1.0
Версии до 1.0, например 0.2-0.6, Но теперь 1.0 это сообщит об ошибке. Это использование претерпело серьезные изменения! такие как: Это можно считать серьезным изменением.

студия Android генерирует статическую библиотеку jni
Android Сяобай, который только что вошел в общество, описывает, как использовать студию Android для создания статической библиотеки jni. 1. Подготовка: Сначала установите ndk, сначала сами Baidu, позж.
Nginx 502 раствор
Общие решения Nginx 502 Bad Gateway следующие: Nginx 502 Ошибка 1: Количество сайтов велико, а количество PHP-CGI мало. Для этой 502 ошибки просто увеличивайте количество процессов PHP-CGI. В частност.

Java вызывает SMS-интерфейс WebService
1. Описание интерфейса WebService Отправьте в виде http-сообщения, выше — информация о запросе, а ниже — возвращаемое значение. Представлен раздел возвращаемого значения документа интерфейса. 2. Код J.
Источник
React Native
With React Native you can develop native mobile applications for iOS and Android using JavaScript and React. It is created by Facebook and used for such well-known apps as Instagram, Airbnb, and now JetBrains’ own YouTrack mobile application. Learn more from the React Native official website.
PhpStorm helps you create, edit, lint, run, debug, and maintain your React Native applications. PhpStorm also provides code completion for React and Flow symbols.
Before you start
Make sure you have Node.js on your computer.
Make sure the JavaScript and TypeScript plugin is enabled on the Settings/Preferences | Plugins page, tab Installed . See Managing plugins for details.
Creating a new React Native application
The recommended way to create a React Native application in PhpStorm is to use a dedicated project generator, for example, the React Native CLI.
Click Create New Project on the Welcome screen or select File | New | Project from the main menu. The Create New Project Dialog opens.
In the left-hand pane, choose React Native .
In the right-hand pane:
Specify the path to the folder where the project-related files will be stored.
In the Node Interpreter field, specify the Node.js interpreter to use. Select a configured interpreter from the list or choose Add to configure a new one.
From the React Native list, select npx —package react-native-cli react-native .
Alternatively, for npm version 5.1 and earlier, install the react-native-cli package yourself by running npm install -g react-native-cli in the Terminal Alt+F12 . When creating an application, select the folder where the react-native-cli package is stored.
When you click Create , PhpStorm generates a React Native -specific project with all the required configuration files, downloads the dependencies, and creates a run/debug configuration of the type React Native with default settings..
Install other tools to get started with React Native, for example, an iOS simulator. The list of these tools depends on your operating system and the mobile platform you are going to target your application at. See React Native Getting Started guide for detailed installation instructions.
Starting with an existing React Native application
To continue developing an existing React Native application, open it in PhpStorm and download the required dependencies.
Open the application sources that are already on your machine
Click Open on the Welcome screen or select File | Open Directory from the main menu. In the dialog that opens, select the folder where your sources are stored.
Check out the application sources from your version control
Click Get from VCS on the Welcome screen. Alternatively, select File | Project from Version Control or | Get from Version Control from the main menu.
stands for the Version Control System with which your currently opened project is associated.
In the dialog that opens, select your version control system from the list and specify the repository to check out the application sources from. See Check out a project (clone) for details.
Download the dependencies
Click Run ‘npm install’ or Run ‘yarn install’ in the popup:

You can use npm, Yarn 1, or Yarn 2, see npm and Yarn for details.
Exclude the android and iOS folders from the project
In the Project tool window, select the android or the iOS folder.
From the context menu of the selection, choose Mark Directory As , and then choose Excluded .

Install other tools to get started with React Native, for example, an iOS simulator. The list of these tools depends on your operating system and the mobile platform you are going to target your application at. See React Native Getting Started guide for detailed installation instructions.
Project security
A webpack configuration file from external sources may contain some potentially malicious code that can cause problems when PhpStorm executes the configuration on opening a JavaScript file with import statements. For the sake of security, when you open a React Native project with webpack, PhpStorm analyzes it, resolves the located data, and displays a warning that lets you decide whether the project is trustworthy or not.
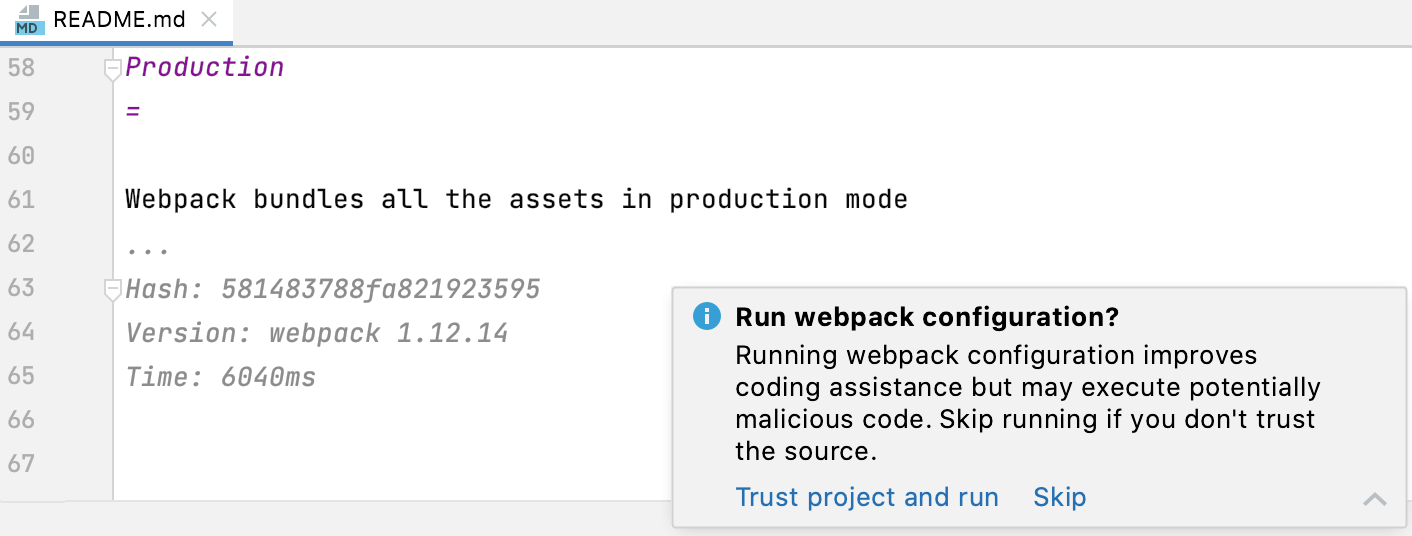
If you click Skip , PhpStorm disables analysis of the webpack configuration in the current project. As a result, PhpStorm might not resolve some of the imports in the project or add imports that don’t use resolution rules configured in the webpack configuration.
Learn more from Webpack and Project security .
Projects created from the Welcome screen or via File | New | Project as described in Creating projects are automatically considered trusted.
Coding assistance
PhpStorm provides code completion for React APIs and JSX in JavaScript code. Code completion works for React methods, React-specific attributes, HTML tags and component names, React events, component properties, and so on. See React: Completing Code for more information.
Code completion for React Native StyleSheet properties is also available:

If you are using Flow in your project, PhpStorm can highlight the errors from this type checker in the editor. See Configuring Flow in PhpStorm and Using Flow in WebStorm for details.
Running and debugging a React Native application
You can run and debug your application on a physical device or on a simulator. Before you launch your application, make sure that the simulator is already running or, if you are using a physical device, it is already connected to your computer.
PhpStorm makes running and debugging React Native applications very flexible. For example, if you are starting your application for the first time, you can choose to run the React Native bundler, build the application, and open it on the simulator — all that as part of a running or debugging session. You can also skip launching the bundler if it is already running or refuse building the application if you have not made any changes to its native code since the previous run.
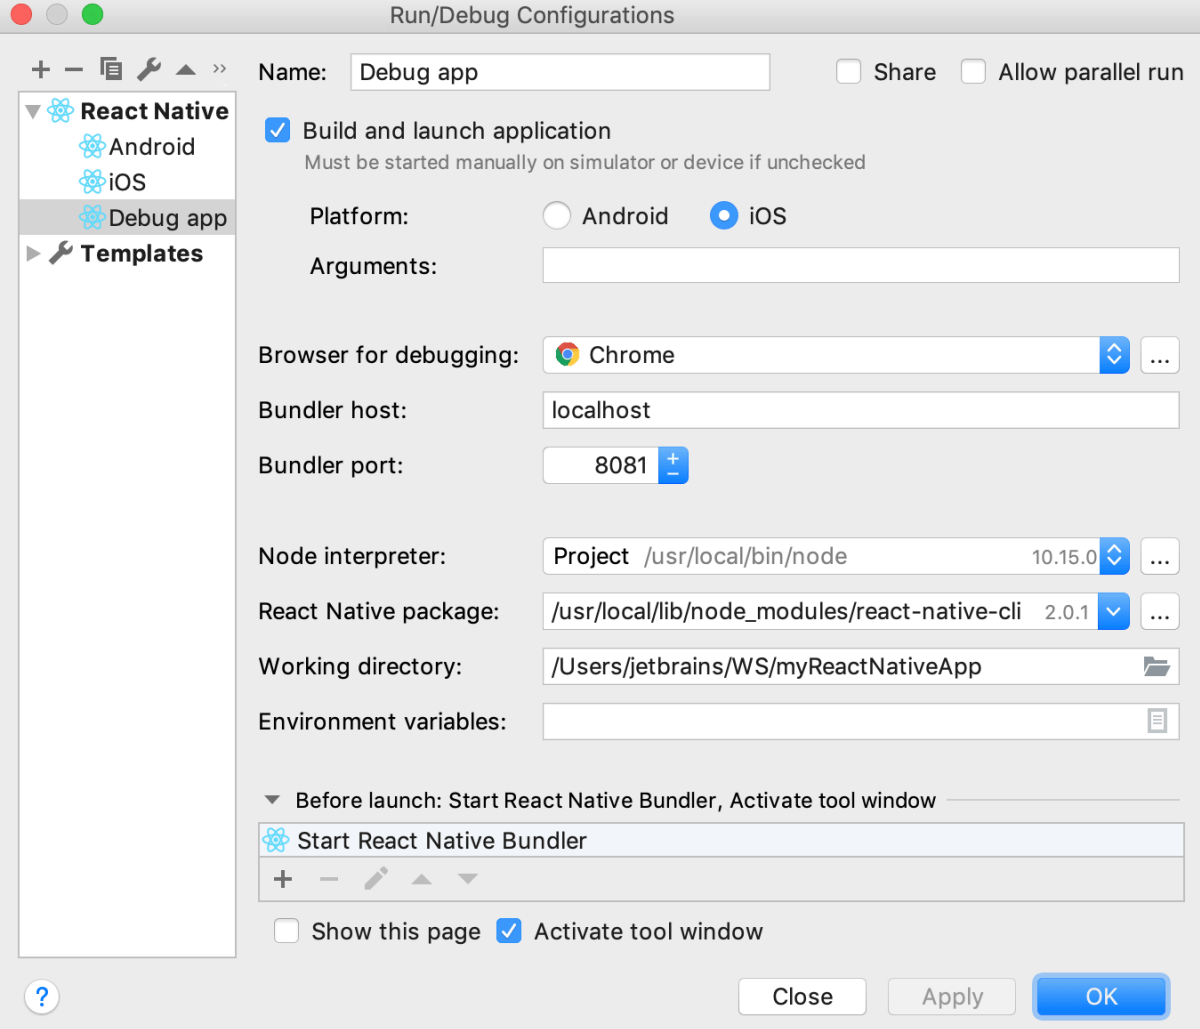
Create a React Native run/debug configuration
On the main menu, go to Run | Edit Configurations , click and select React Native from the list. The opens.
Choose whether you want PhpStorm to build and launch the application for you:
Select the Build and launch checkbox if you are launching your application for the first time or if you have updated its native code since the last run.
Clear this checkbox if you haven’t made any changes to the native code of your application since the last build.
When you start debugging, PhpStorm waits for you to open your application in the simulator with the Remote debug enabled as described on the React Native official website
If your application uses Expo, clear the checkbox because this bundler takes care of the process itself. See Debug a React Native application that uses Expo.
If you selected the Build and launch checkbox, choose the target platform, Android or iOS.
Depending on your choice, PhpStorm will run the bundler with react-native run-ios or with react-native run-android .
To emulate the Android platform, use an Android virtual device .
To emulate the iOS platform, you need to install the ios-sim command-line tool globally. You can do it through the Node Package Manager (npm) , see npm, pnpm, and Yarn, or by running the sudo npm install ios-sim -g command, depending on your operating system.
Optionally, in the Arguments field, type the arguments to be passed to React Native , for example, specify the simulator type through the ‑‑simulator flag: ‑‑simulator=»iPhone 4s» .
Specify the browser to use.
In debugging React Native applications, PhpStorm relies on the Chrome runtime, which is used by React Native itself. You can also use DevTools together with PhpStorm. When you initiate a debugging session, PhpStorm starts a new Chrome instance and attaches to it. If you don’t want to see any new Chrome windows, use the Chrome Headless mode.
In the Bundler host field, specify the host where the React Native bundler runs, the default value is localhost .
If you are using Expo, you may need to change the default bundler host to ensure successful connection with the debugger. This connection may fail because PhpStorm by default uses localhost to start debugging while Expo expects 127.0.0.1 or an external IP address depending on what is selected in Connection field of the Metro bundler configuration. See Debugging a React Native application that uses Expo for details.
In the Bundler port field, specify the port on which the React Native bundler runs, by default 8081 is chosen, learn more from the React Native official website.
If your application uses Expo, you may need to change the port to 19000 or 19001 , depending on the Expo configuration. See Debug a React Native application that uses Expo below.
Choose the Node.js interpreter to use. This can be a local Node.js interpreter or a Node.js on Windows Subsystem for Linux.
Specify the path to react-native-cli and the working directory of the application. Optionally, type the environment variables for react-native run-android or react-native run-ios .
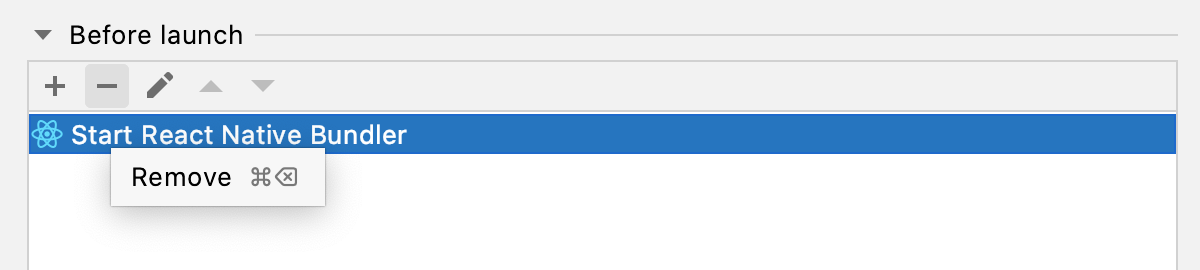
By default, PhpStorm starts the React Native bundler automatically when you invoke the run/debug configuration. If you have already started the bundler from outside PhpStorm, for example, from the command line, you can re-use it without stopping and restarting. Select your bundler in the Before Launch area and click .
For information on the settings that are common for all run/debug configurations, see Run/debug configurations.
Prepare a device or a simulator
If you are using an Android device, you need to prepare it every time you start working with an application.
An iOS simulator has to be installed only once, after that PhpStorm starts it automatically with react-native run-ios .
To prepare an Android device, launch an Android virtual device or enable debugging over USB and connect to a physical Android device via USB.
To prepare an iOS simulator, open the embedded Terminal ( Alt+F12 ) and type:
npm install —global ios-sim
Run an application
Select the newly created React Native configuration from the Select run/debug configuration list on the toolbar and click next to the list. PhpStorm opens the Run tool window and first starts the React Native bundler in a new React Native tab.
After that, the react-native run-ios or react-native run-android command is executed, depending on the selected target platform. If the build is successful, the simulator shows your application:

Debugging an application
With PhpStorm, you can debug applications that use the native React Native bundler and those that use Expo.
In debugging React Native applications, PhpStorm relies on the Chrome runtime, which is used by React Native itself. You can also use DevTools together with PhpStorm. When you initiate a debugging session, PhpStorm starts a new Chrome instance and attaches to it. If you don’t want to see any new Chrome windows, use the Chrome Headless mode.
Debug a React Native application that uses a native bundler
Set the breakpoints in your code as required.
Create a new React Native run/debug configuration as described above. If the bundler is already running outside PhpStorm, select it in the Before Launch area and click .
To start your application, select the newly created React Native configuration from the Select run/debug configuration list on the toolbar and click next to the list. PhpStorm opens the Run tool window and runs the bundler in a new React Native tab.
When the build is completed and the application appears in the simulator, open the In-App Developer Menu and choose Debug JS Remotely . Learn more from the React official website.

The built-in PhpStorm debugger connects to the simulator.
When the first breakpoint is hit, proceed with the debugging session — step through the breakpoints, switch between frames, change values on-the-fly, examine a suspended program, evaluate expressions, and set watches.

Debug a React Native application that uses Expo
With PhpStorm, you can start debugging such React Native applications in several ways:
Create a script that runs Expo and then specify this script as a Before launch task in the React Native run/debug configuration.
First run Expo manually or via a script and then initiate a debugging session without any Expo-related Before launch tasks .
In either case, you may need to change the default bundler port, depending on how Expo is configured.
Set the breakpoints in your code as required.
Create a new React Native run/debug configuration as described above and change the default settings as follows:
Clear the Build and launch checkbox because this bundler takes care of the process itself.
In the Bundler host field, change the default localhost setting to 127.0.0.1 or an external IP address depending on what is selected in Connection field of the Metro bundler configuration.
In the Bundler port field, change the default 8081 setting to 19000 or 19001 , depending on the Expo configuration.
In the Before launch area, select the default Start React Native Bundler task and click .
To start Expo via a script automatically, click and select Run npm script from the list.
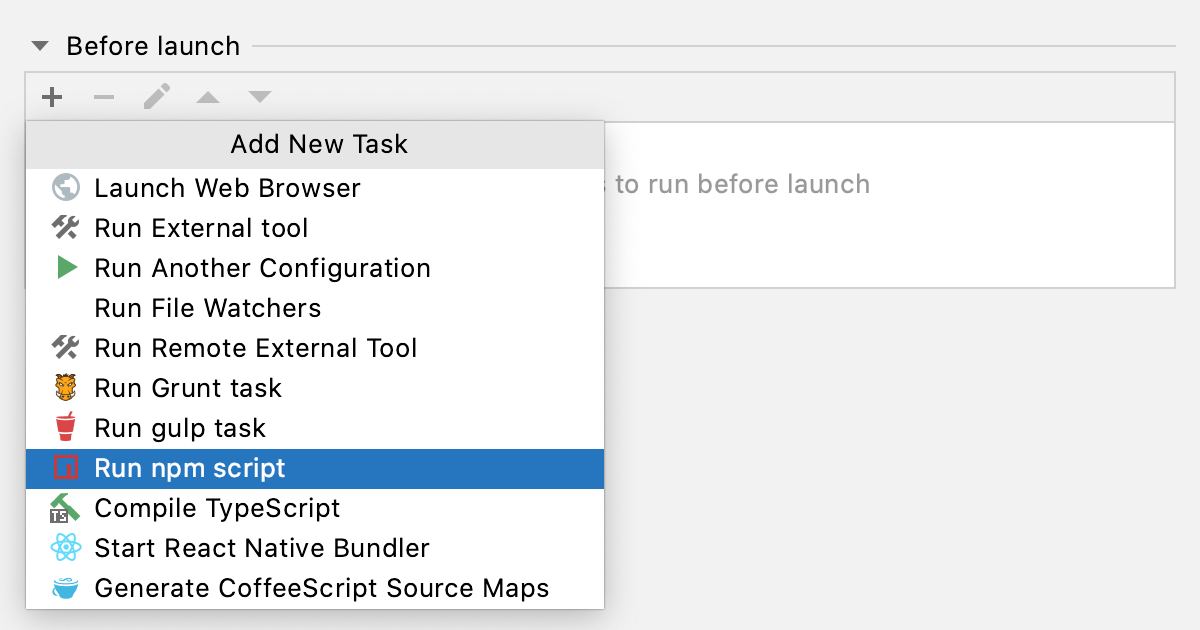
In the NPM Script dialog that opens, select the npm script that starts Expo.

Select the newly created configuration from the Select run/debug configuration list on the toolbar and click next to the list.
Open your Expo client application on your phone or simulator, select the current application, and enable remote debugging, learn more from the Expo official website.
When the first breakpoint is hit, proceed as when debugging an application that uses a native bundler.
Configure Chrome Headless in PhpStorm
The Headless mode is supported for Chrome versions 59 and later on macOS and Linux and for versions 60 and later on Windows.
Click next to the Browser for debugging field. The Web Browsers and Preview dialog opens.
Select Chrome , click , and rename the copied configuration, for example, to Chrome Headless .
Select the new browser configuration, click , and type —headless for macOS and Linux or —headless —disable-gpu for Windows in the Chrome Settings dialog.
In the run/debug configuration, choose the new Chrome Headless configuration from the Browser for debugging list.
Источник


