- Remove or switch the SIM card in your iPhone
- Learn which size SIM card your iPhone or iPad uses
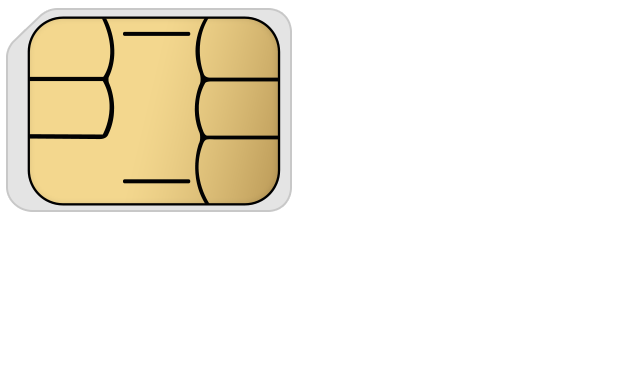
- Nano-SIM card
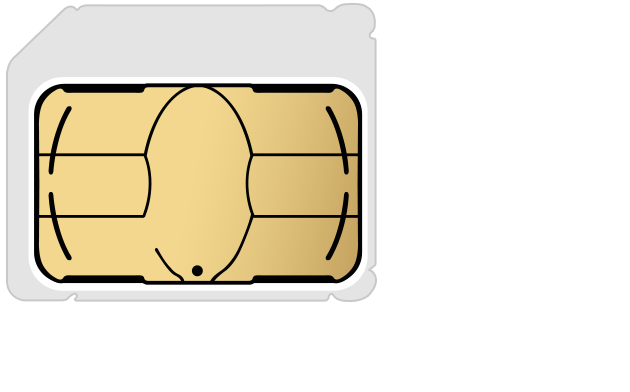
- Micro-SIM card
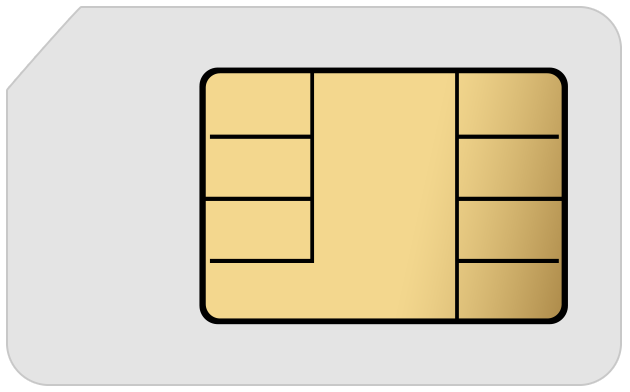
- SIM card
- Embedded Apple SIM
- Everything You Need to Know About iPhone SIM Cards
- SIM cards aren’t unique to iPhones
- What Type of SIM Card Each iPhone Has
- What’s a SIM Card and How Does It Work?
- What Data is Stored on iPhone SIM Cards
- Where to Find the iPhone SIM on Each Model
- How to Remove the iPhone SIM
- What is a SIM Lock?
- Do iPhones Have a SIM Lock?
- Can You Convert Other SIM Sizes to Work With iPhone?
- Why Does My iPhone Say No SIM Card? Here’s The Real Fix!
- What Is A SIM Card And What Does It Do?
- Why Do We Need SIM Cards Anyway? What’s The Advantage?
- Where Is The SIM Card On My iPhone And How Can I Remove It?
- If You Don’t Want To Use A Paperclip…
- How Do I Fix The iPhone “No SIM” Error?
- How To Fix The No SIM Card Error On iPhone and iPad
- 1. Eject The SIM Tray
- 2. Inspect The SIM Card, SIM Tray, And Inside Your iPhone
- A Note About Liquid Damage
- 3. Reinsert The SIM Tray
- 4. Try Using A Friend’s SIM Card
- 5. Turn Your iPhone Off And Back On Again
- 6. Reset Network Settings
- 7. Update Your Wireless Carrier Settings, Preferably Using iTunes On A Computer
- 8. Update iOS, Preferably Using iTunes
- 9. Restore Your iPhone
- A Strong Word Of Warning
- Always Backup Before You Restore
- Still Seeing The “No SIM” Error?
- Wrapping It Up
Remove or switch the SIM card in your iPhone
Learn how to remove or transfer the SIM card in your iPhone.
Use only the SIM tray that came with your device. For example, a SIM tray from an iPhone 6s will not fit in an iPhone 7.
Find your model below to locate the SIM tray. To pop open the SIM tray, insert a paper clip or a SIM-eject tool into the hole beside the tray. Push in, towards the iPhone, but don’t force it. If you’re having difficulty ejecting the SIM tray, take your device to your carrier or an Apple Store for help.
After you remove your SIM card from the tray, notice the notch in one corner of the new SIM card. Place the new SIM card into the tray—it will fit only one way, because of the notch. Then insert the tray into the device completely and in the same orientation that you removed it. The tray also fits only one way.
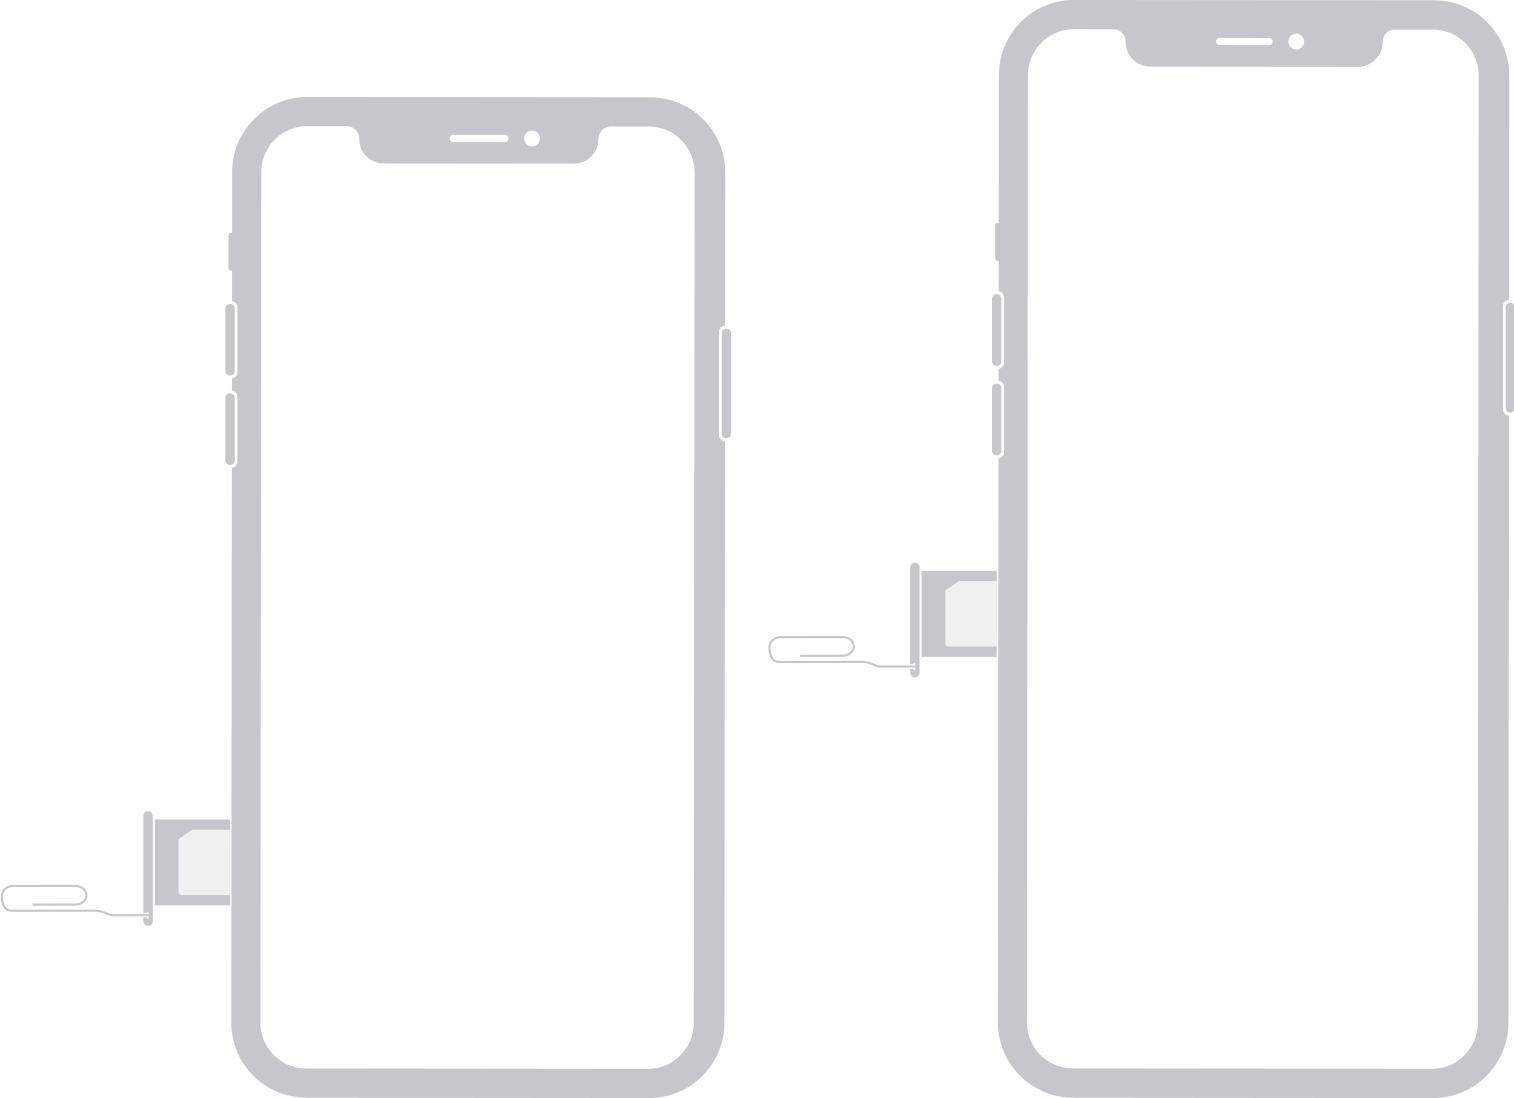
Find the SIM tray on the left side:
- iPhone 13 Pro
- iPhone 13 Pro Max
- iPhone 13
- iPhone 13 mini
- iPhone 12
- iPhone 12 mini
- iPhone 12 Pro
- iPhone 12 Pro Max
In China mainland, the SIM tray on iPhone 13 Pro Max, iPhone 13 Pro, iPhone 13, iPhone 12, iPhone 12 Pro, and iPhone 12 Pro Max can hold two nano-SIM cards.
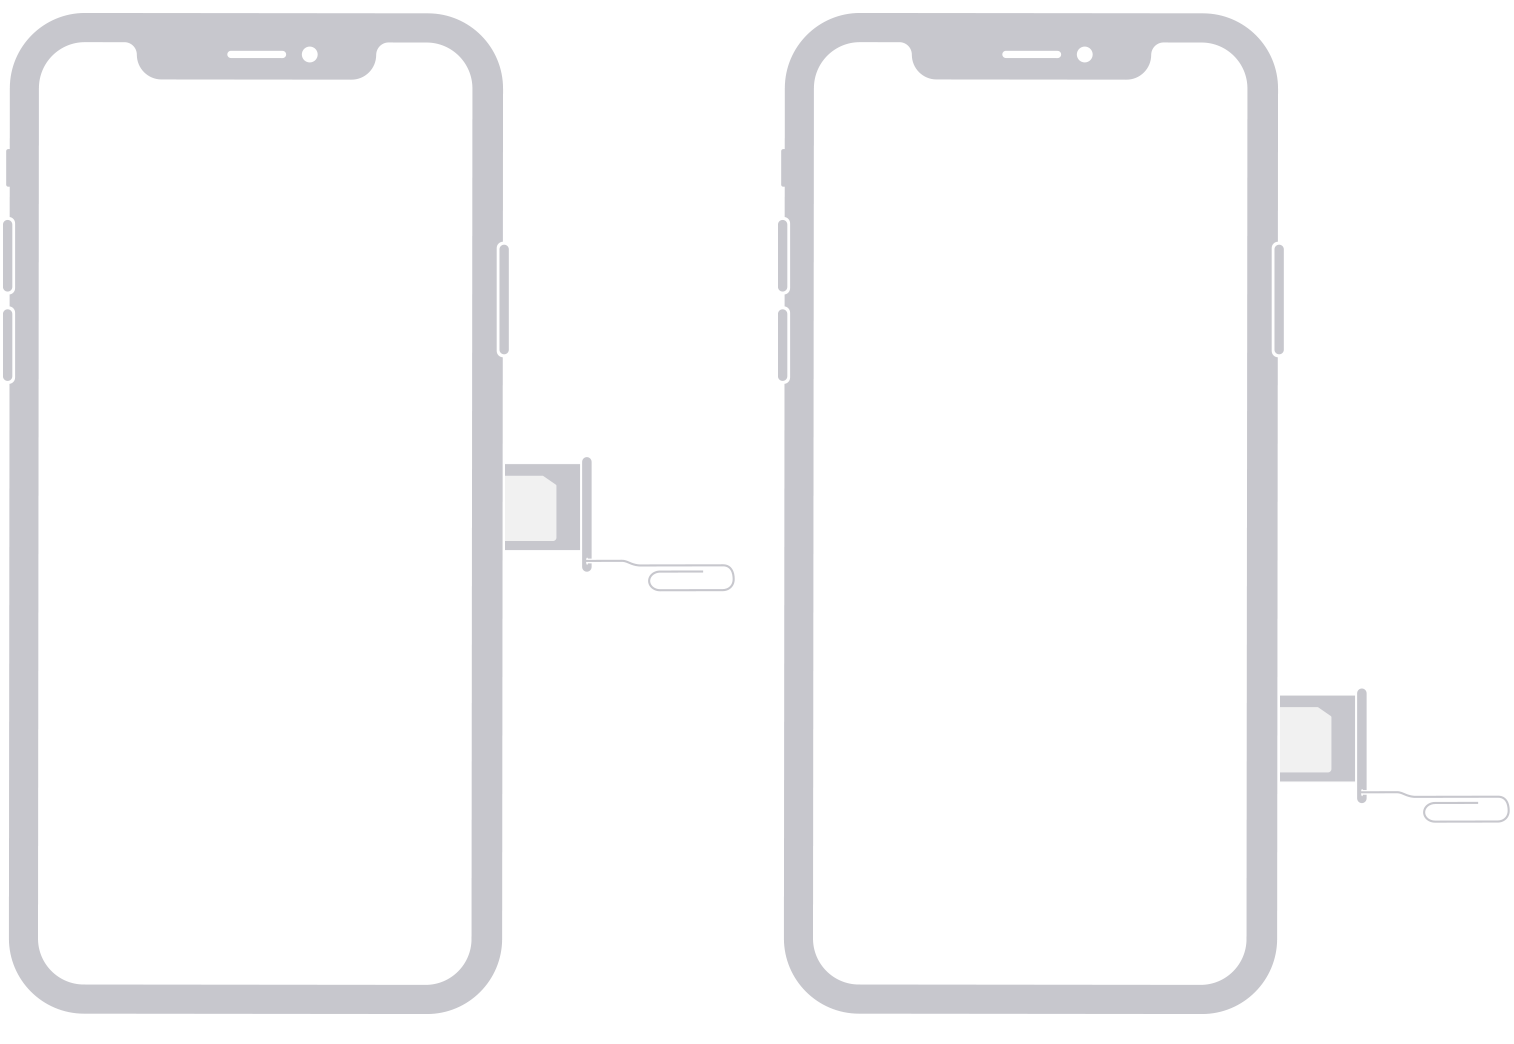
Find the SIM tray on the right side:
- iPhone 11 Pro
- iPhone 11 Pro Max
- iPhone 11
- iPhone XS
- iPhone XS Max
- iPhone XR
- iPhone X
In China mainland, the SIM tray on iPhone 11, iPhone XR, iPhone XS Max, iPhone 11 Pro, and iPhone 11 Pro Max can hold two nano-SIM cards.
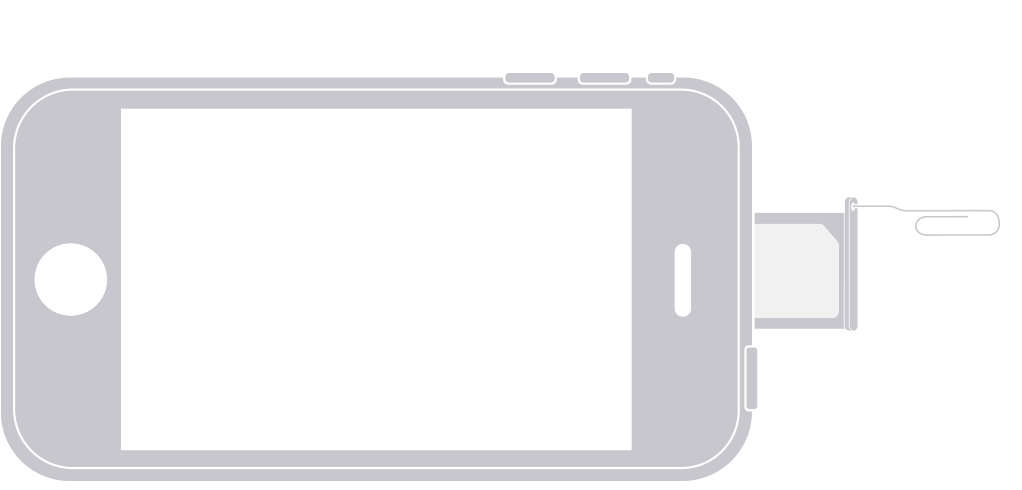
Find the SIM tray on the right side:
- iPhone SE (2nd generation)
- iPhone 8 Plus
- iPhone 8
- iPhone 7 Plus
- iPhone 7
- iPhone 6s Plus
- iPhone 6s
- iPhone 6 Plus
- iPhone 6
- iPhone SE (1st generation)
- iPhone 5s
- iPhone 5c
- iPhone 5
- iPhone 4s
- iPhone 4 (GSM model)
![]()
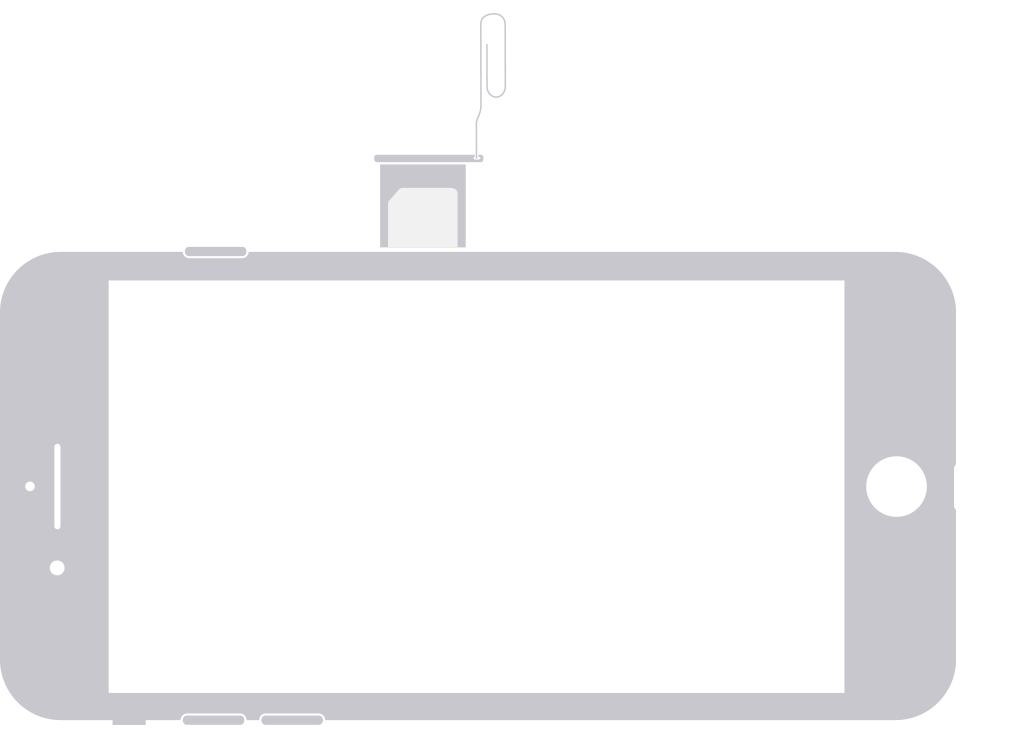
Find the SIM tray on the top:
- iPhone 3GS
- iPhone 3G
- Original iPhone
Источник
Learn which size SIM card your iPhone or iPad uses
To learn which SIM card your iPhone or Wi-Fi + Cellular model iPad uses, find your model in the list.
Nano-SIM card
iPhone
- iPhone 12, iPhone 12 mini, iPhone 12 Pro, iPhone 12 Pro Max
- iPhone SE (2nd generation)
- iPhone 11, iPhone 11 Pro, iPhone 11 Pro Max
- iPhone XS, iPhone XS Max
- iPhone XR
- iPhone X
- iPhone 8, iPhone 8 Plus
- iPhone 7, iPhone 7 Plus
- iPhone 6s, iPhone 6s Plus
- iPhone 6, iPhone 6 Plus
- iPhone SE (1st generation)
- iPhone 5s, iPhone 5c, iPhone 5
iPad*
- iPad (5th generation and later)
- iPad Pro (all models)
- iPad Air (all models)
- iPad mini (all models)
* iPad mini 3 and later, iPad Air 2, and iPad Pro support Apple SIM.

Micro-SIM card
iPhone
iPad
- iPad (4th generation)
- iPad (3rd generation)
- iPad 2
- iPad
SIM card
iPhone
In some countries and regions, certain iPhone models feature an eSIM.
You can activate a cellular plan on an eSIM from a carrier that supports Dual SIM. These models also have a SIM tray for a nano-SIM card—you can use a nano-SIM card from a carrier.
Embedded Apple SIM
These iPad models have an embedded Apple SIM that’s built into the iPad:
- iPad Pro 12.9-inch (2nd generation) Wi-Fi + Cellular model
- iPad Pro 10.5-inch Wi-Fi + Cellular model
- iPad Pro (9.7-inch) Wi-Fi + Cellular model
- iPad mini (5th generation)
- iPad Air (3rd generation)
These iPad models also have a SIM tray for a nano-SIM card—you can use a nano-SIM card from a carrier or an active Apple SIM.* These models won’t support an Apple SIM card that hasn’t been activated.
Источник
Everything You Need to Know About iPhone SIM Cards
SIM cards aren’t unique to iPhones
:max_bytes(150000):strip_icc()/SamCostello-d7fcf106ec2048ccb06d1e2190b3396d.jpg)
SIM cards are small, removable smart cards used in cell phones and smart phones to store data like your mobile phone number, the phone company you use, your billing information and, in some cases, your address book.
SIM (short for Subscriber Identity Module) cards can be removed from one phone and inserted into others. This makes it easy to transfer phone service and address book info to new phones. Just swap the card to a new phone.
Transferring data by moving SIM cards is a general feature of the cards, but the iPhone doesn’t work that way. More on what SIM cards do on the iPhone later in this article.
SIM cards being swappable also makes them useful for international travel. If your phone is compatible with the cellular networks in the country you visit, you can purchase a new SIM in another country, put it into your phone, and make calls and use data like a local. This is cheaper than using an international data plan.
Not all phones have SIM cards. Other phones have them but don’t allow you to remove them.
:max_bytes(150000):strip_icc()/what-is-iphone-sim-card-2000363-a0c3cf72635b4562bfc00c3779221719.png)
What Type of SIM Card Each iPhone Has
Every iPhone uses a SIM card. There are three types of SIMs used in iPhone models:
- SIM: This is the original type of SIM. The full SIM is the size of a credit card, but the part that contains the important data can be popped out of the larger card and used in a phone.
- micro-SIM: When the iPhone 4 debuted in 2010, it was the first smartphone from any company to use the micro-SIM format. The micro-SIM is substantially smaller than the original SIM.
- nano-SIM: The nano-SIM debuted in the iPhone 5 in 2012. The nano-SIM is about 12% smaller than the micro-SIM.
- eSIM: This SIM card is built into a phone and can be programmed for uses, including as a secondary SIM to let one phone have two phone numbers or phone companies. The eSIM debuted on the iPhone XS series and the iPhone XR.
The SIM type used in each iPhone is:
| iPhone Models | SIM Type |
|---|---|
| Original iPhone | SIM |
| iPhone 3G and 3GS | SIM |
| iPhone 4 and 4S | micro-SIM |
| iPhone 5, 5C, and 5S | nano-SIM |
| iPhone 6 and 6 Plus | nano-SIM |
| iPhone SE | nano-SIM |
| iPhone 6S and 6S Plus | nano-SIM |
| iPhone 7 and 7 Plus | nano-SIM |
| iPhone 8 and 8 Plus | nano-SIM |
| iPhone X | nano-SIM |
| iPhone XS and XS Max | nano-SIM eSIM |
| iPhone XR | nano-SIM eSIM |
| iPhone 11 | nano-SIM eSIM |
| iPhone 11 Pro and 11 Pro Max | nano-SIM eSIM |
| iPhone SE (2nd gen.) | nano-SIM eSIM |
Not every Apple product uses one of these four SIMs. Some iPad models that connect to 3G and 4G cellular data networks use an Apple-created card called an Apple SIM.
The iPod touch does not have a SIM. Only devices that connect to cellular phone networks need a SIM, and since the touch doesn’t have that feature, it doesn’t need a SIM card.
What’s a SIM Card and How Does It Work?
What Data is Stored on iPhone SIM Cards
Unlike some other mobile phones, the iPhone’s SIM is only used to store customer data like phone number and billing information.
The SIM on the iPhone can’t be used to store contacts or other user data. You also cannot back up data to or read data from the iPhone’s SIM. Instead, all data that would be stored on the SIM on other phones is stored in the iPhone’s main storage (or in iCloud), along with your music, apps, and other data.
That means that swapping a new SIM into your iPhone won’t affect your access to the address book and other data stored on your iPhone.
Where to Find the iPhone SIM on Each Model
Here’s where to find the SIM on each iPhone model:
| iPhone Model | SIM Location |
|---|---|
| Original iPhone | Top, between on/off button and headphone jack |
| iPhone 3G and 3GS | Top, between on/off button and headphone jack |
| iPhone 4 and 4S | Right side |
| iPhone 5, 5C, and 5S | Right side |
| iPhone 6 and 6 Plus | Right side, below on/off button |
| iPhone SE | Right side |
| iPhone 6S and 6S Plus | Right side, below on/off button |
| iPhone 7 and 7 Plus | Right side, below on/off button |
| iPhone 8 and 8 Plus | Right side, below on/off button |
| iPhone X, XS, XR | Right side, below on/off button |
| iPhone 11 and 11 Pro | Right side, below on/off button |
| iPhone SE (2nd gen.) | Right side, below on/off button |
How to Remove the iPhone SIM
Removing your iPhone’s SIM is simple. All you need is a paperclip (or the «SIM Removal Tool» that Apple includes with some iPhone models).
- Begin by finding the SIM on your iPhone.
- Unfold a paperclip so that one end of it is longer than the rest.
- Insert the end of the paperclip into the tiny hole next to the SIM.
- Press (but not too hard!) until the SIM card tray pops out.
- Remove the tray and then remove the SIM card from the tray.
These steps are good to know when your iPhone gives a SIM not found error. Fixing that is problem requires a very similar technique.
What is a SIM Lock?
Some phones have a SIM lock. This is a feature that ties the SIM to a specific phone company (usually the one that you bought the phone from originally). This is done in part because phone companies sometimes require customers to sign multi-year contracts and use a SIM lock to enforce the contracts.
Phones without SIM locks are referred to as unlocked phones. You can usually purchase an unlocked phone for the full retail price of the device. This gives you more flexibility of what phone company you use the device with.
After your contract ends, you can unlock the phone for free through your phone company. You can also unlock phones via phone company tools and software hacks.
Want to learn how to unlock your phone? No matter your phone company or type of phone, we have instructions on how to unlock your phone.
Do iPhones Have a SIM Lock?
In some countries, especially the U.S., the iPhone is often sold with a SIM lock. However, it is also possible to purchase an unlocked iPhone without the SIM lock. Depending on the country and carrier, you can also unlock an iPhone after a certain period of time under contract.
Can You Convert Other SIM Sizes to Work With iPhone?
Yes, you can convert many SIM cards formats to work with the iPhone. This allows you bring your existing service and phone number from another phone company to the iPhone. Do this you, you have to cut your SIM card down to the size of the micro-SIM or nano-SIM used by your iPhone model. There are some tools available to ease this process, like this one, but we only recommend it for the tech-savvy and those willing to take the risk of ruining their existing SIM card and rendering it unusable.
Источник
Why Does My iPhone Say No SIM Card? Here’s The Real Fix!
The sun is shining, the birds are chirping, and all’s well with the world, until you notice that “No SIM” has replaced your mobile carrier’s name in the upper left-hand corner of your iPhone’s display. You didn’t take the SIM card out of your iPhone, and now you can’t make phone calls, send or receive text messages, or use mobile data.
If you’re wondering, “Why does my iPhone say no SIM card?”, or if you have no idea what a SIM card is, you’ve come to the right place. This issue is generally pretty easy to diagnose, and I’ll walk you through the process step-by-step so you can fix the “No SIM” error for good.
What Is A SIM Card And What Does It Do?
If you’ve never heard of a SIM card, you’re not alone: Ideally, you should never have to worry about it. When you experience issues with your SIM card, having a little knowledge about what your iPhone’s SIM card does will help you to understand the process of diagnosing and fixing the “No SIM” error.
If you ever want to stump your techie friends with mobile phone trivia, SIM stands for “Subscriber Identity Module”. Your iPhone’s SIM card stores the tiny bits of data that distinguish you from all the other iPhone users over the cellular network, and contains the authorization keys that allow your iPhone to access the voice, text, and data services that you pay for on your cell phone bill. The SIM card is the part of your iPhone that stores your phone number and allows you to access the cellular network.
It’s important to note that the role of SIM cards has changed over the years, and many older phones used to use SIM cards to store the list of contacts. The iPhone is different because it stores your contacts on iCloud, your email server, or in your iPhone’s internal memory, but never on your SIM card.
The other notable evolution in SIM cards came with the introduction of 4G LTE. Before the iPhone 5, carriers like Verizon and Sprint who use CDMA technology used the iPhone itself to link a person’s phone number to the cellular data network, not a separate SIM card that would be placed inside. Nowadays, all networks use SIM cards to store their subscribers’ phone numbers.
Why Do We Need SIM Cards Anyway? What’s The Advantage?
SIM cards make it easy for you to transfer your phone number from one phone to another, and they tend to be very resilient. I’ve taken SIM cards out of many iPhones that had been fried by water damage, put the SIM card in the replacement iPhone, and activated the new iPhone without a problem.
SIM cards also make it easy for you to change carriers when you travel, provided your iPhone is “unlocked”. If you travel to Europe, for example, you can avoid exorbitant international roaming charges by briefly signing up with a local carrier (commonplace in Europe) and putting their SIM card in your iPhone. Put your original SIM card back in your iPhone when you get back to the states, and you’re good to go.
Where Is The SIM Card On My iPhone And How Can I Remove It?
All iPhones use a tiny tray called a SIM tray to hold your SIM card securely in place. To access your SIM card, the first step is to eject the SIM tray by inserting a paper clip into the tiny hole in the SIM tray on the outside of your iPhone. Apple has a great page that shows the exact location of the SIM tray on every iPhone model, and it will be easiest for you to take a quick look on their website to find its location and then come right back here. We’re about to diagnose and fix the “No SIM” error for good.
If You Don’t Want To Use A Paperclip…
If you don’t feel comfortable sticking a paperclip inside of your iPhone, you can pick up a handy SIM card adapter kit from Amazon.com that includes a professional sim card ejector tool and an adapter that allows you to use the nano SIM card from an iPhone 5 or 6 in older model iPhones or other cell phones. If your iPhone is ever damaged, you can use this kit to pop out the SIM card and stick it in your old iPhone (or other cell phone that takes a SIM card), and be making phone calls with your phone number right away.
How Do I Fix The iPhone “No SIM” Error?
Apple has created a support page that addresses this issue, but I don’t necessarily agree with the order of their troubleshooting steps and there isn’t any explanation of the rationale behind their suggestions. If you’ve already read their article or others and you’re still experiencing the “No SIM” issue with your iPhone, I hope this article provides you with a solid explanation of the problem and the knowledge you need to fix it.
This may seem obvious, but it’s helpful to restate the problem here: Your iPhone says “No SIM” because it’s no longer detecting the SIM card that’s inserted in the SIM tray, even though it actually is there.
Like many issues on the iPhone, the “No SIM” error can be either a hardware or a software problem. On the next page, we’ll start by addressing the possible hardware issues because they’re usually easy to see with a visual inspection. If that doesn’t fix it, I’ll walk you through the software troubleshooting steps that will help you diagnose and solve your problem.
How To Fix The No SIM Card Error On iPhone and iPad
1. Eject The SIM Tray
Insert a paperclip into the tiny hole in the SIM tray and press until the tray ejects. You may need to apply a fair amount of pressure to get the tray out, and that’s normal – but use your common sense. If you’re not sure of the exact location of the SIM tray on your iPhone, this Apple article will help you find it: Remove the SIM card from your iPhone or iPad.
2. Inspect The SIM Card, SIM Tray, And Inside Your iPhone
Take a close look at the SIM Card and SIM Tray for any damage. If they’re dusty, wipe them off with a soft damp cloth, but be sure they’re completely dry before reinserting them into your iPhone.
Next, check if the SIM tray is bent, as even a tiny misalignment can cause the SIM card to not fully connect with the internal contacts in your iPhone.
Finally, use a flashlight to take a look for any debris inside the SIM tray opening. If there’s gunk in there, try to blow it out with some compressed air.
A Note About Liquid Damage
If you have an iPhone 5 or newer, you’ll see a white circle sticker if you look closely inside the SIM tray opening. That sticker is one liquid contact indicator that Apple techs use to determine whether your iPhone has come into contact with water. If that white sticker has a red dot in the middle, it means that sticker has gotten wet at some point, and water damage can sometimes cause the “No SIM” issue — but not always. Remember that while the SIM card is resilient to water, the internals of the iPhone are not.
3. Reinsert The SIM Tray
Put your SIM card back into the tray, reinsert the SIM tray into your iPhone, and cross your fingers. If the “No SIM” error goes away, congratulations — you fixed the issue!
4. Try Using A Friend’s SIM Card
Find a friend with an iPhone, and try putting their SIM card into your SIM tray and inserting it into your iPhone. If the “No SIM” error goes away, we’ve determined the culprit: You’ve got a problem with your SIM card. Instead of making an appointment with the Apple Store, it might be easier to visit your carrier and tell them you need a replacement SIM card for your iPhone. It’s a quick process and you should be back up and running in no time.
If the “No SIM” error remains and you’re confident there isn’t any physical damage, you may have a software problem with your iPhone. Remember that the software on the iPhone is the brains of the operation. If the software isn’t working correctly, the hardware won’t either.
5. Turn Your iPhone Off And Back On Again
Hold the power button on your iPhone until “slide to power off” appears. Move your finger across the slider to power off your iPhone. After the wheel has stopped spinning and the iPhone display has gone completely black, hold down the power button until you see the Apple logo appear to power your iPhone back on.
If you have an iPhone X or newer, press and hold the side button and either volume button to reach the “slide to power off” screen.
If the “No SIM” error is gone, congratulations — we’ve just resolved the issue! My gut tells me that some people may have to go farther to keep the problem from coming back, and if you’re one of those people, keep reading.
6. Reset Network Settings
Head to Settings -> General -> Transfer or Reset iPhone -> Reset and tap Reset Network Settings on your iPhone. This restores the network configuration to the factory defaults, which can resolve software glitches in the invisible processes that are always running in the background and that are responsible for managing your iPhone’s connection to your cellular and other networks.
Before you do this, note that Reset Network Settings will erase your iPhone’s saved Wi-Fi connections, so make sure you know your Wi-Fi passwords before you give this a try. You’ll have to reconnect in Settings -> Wi-Fi after your iPhone reboots.
7. Update Your Wireless Carrier Settings, Preferably Using iTunes On A Computer
Plug your iPhone into your computer (or you can use a friend’s) and open iTunes. I recommend using iTunes because before it upgrades your iPhone, iTunes will automatically check if a wireless carrier settings update is available for your iPhone, and if there is, iTunes will ask if you’d like to install it.
Alternatively, you can go to Settings -> General -> About on your iPhone to install the wireless carrier settings update, but there isn’t a button to check. Your iPhone will automatically check for the update and a screen will appear after a few seconds if an update is available. I believe that using iTunes to check is more reliable, however, because network issues may prevent your iPhone from connecting to the update server.
8. Update iOS, Preferably Using iTunes
If an iOS update is available, install that too. Along with new features, iOS updates contain bug fixes for all sorts of issues, including those that can cause the “No SIM” error.
I recommend using iTunes to update your iPhone’s software because if your iPhone is already experiencing software problems (as evidenced by the “No SIM” error), I wouldn’t trust the software on the iPhone to do the iOS update if I could avoid it. Chances are, everything would be fine if you updated your software by going to Settings -> General -> Software Update, but my gut tells me that given a choice, using a computer would be the safest option.
9. Restore Your iPhone
If you’re still seeing the “No SIM” error, it’s time to hit the software with “the big hammer”. We’ll restore your iPhone to factory defaults, reactivate with your carrier as part of the setup process, and restore from your an iTunes or iCloud backup.
A Strong Word Of Warning
Your iPhone needs to be activated after you restore it. Activation happens the first time you set up your iPhone. It’s what connects your unique iPhone to your wireless carrier’s network.
Here’s where things can get tricky: Your iPhone needs to be activated before it can restore from a backup – or do anything, for that matter. If the restore process doesn’t fix the “No SIM” error, your iPhone might not be able to activate. You won’t be able to restore your backup, and you’ll be left with an iPhone you can’t use.
I learned this lesson the hard way, and unfortunately, so did the person who couldn’t use his iPhone because it wouldn’t reactivate after it was restored. Here’s what I recommend: Don’t try to restore your iPhone unless you have a backup phone you can use if restoring your iPhone doesn’t fix the “No SIM” error.
Always Backup Before You Restore
If you do choose to restore your iPhone, make sure you have a backup. You can backup your iPhone to iTunes or iCloud, and I’d like to point you toward two Apple support articles that do an great job of explaining the process: “Back up and restore your iPhone, iPad, or iPod touch using iCloud or iTunes” and “Use iTunes to restore your iOS device to factory settings”.
Still Seeing The “No SIM” Error?
If the “No SIM” error still hasn’t gone away, you’re going to need support. When dealing with Apple support, I find it easiest to start at Apple’s support website or call my local Apple Store to make an appointment with the Genius Bar.
This may also be a good time to consider switching wireless carriers, especially if this isn’t the first time you’ve had SIM card issues on your iPhone. You can use UpPhone to compare cell phone plans from dozens of different wireless carriers. You might even save money if you switch!
Wrapping It Up
I really hope this article has helped you to understand, diagnose, and fix the “No SIM” warning on your iPhone. If have any questions or comments you’d like to share, please leave a comment below and I’ll do my best to respond as soon as possible.
Thank you so much for reading and I wish you all the best,
David P.
Источник


