- Access iCloud Drive files from your iPhone and other devices
- Use iCloud Drive on your iPhone, iPad, iPod touch, Mac, or PC
- Automatically save Pages, Numbers, and Keynote files to iCloud Drive
- Add Desktop and Documents files to iCloud Drive
- Manage your iCloud Drive files while offline
- How to access files while you’re offline
- Upload files to iCloud Drive to save changes made offline
- When changes to your files upload to iCloud
- Where to find missing files
- If your files don’t update to iCloud Drive
- How to address a Resolve Conflict message
- iCloud User Guide
- What is iCloud?
- Use iCloud with your favorite apps
- Get more storage and features with iCloud+
- Use iCloud on the web
- iCloud security overview
- Data security
- End-to-end encryption
- Data types and encryption
- Additional information
- iCloud Data Recovery Service
- Messages in iCloud
- Health data
- Privacy
- Learn more
- Check your Apple ID device list to see where you’re signed in
- See where you’re signed in
- Use your iPhone, iPad, iPod touch, or Apple Watch to see where you’re signed in
- Use your Mac to see where you’re signed in
- Use your PC to see where you’re signed in
- Use the web to see where you’re signed in
- Add a device to the list
- Remove a device from the list
- Use your iPhone, iPad, or iPod touch to remove a device
- Use your Mac to remove a device
- Use your PC to remove a device
- Use the web to remove a device
- Permanently remove a device from your account page
Access iCloud Drive files from your iPhone and other devices
Use iCloud Drive to manage, view, edit and update file versions across all of your devices.
Use iCloud Drive on your iPhone, iPad, iPod touch, Mac, or PC
Set up iCloud Drive to keep your files up to date across your devices.
On your iPhone, iPad, and iPod touch with iOS 11 and later, you can access your files from the Files app when you have iCloud Drive set up. The Files app makes it easy to share your documents, collaborate in real time on your Pages, Numbers, and Keynote projects, and manage everything that you store in iCloud Drive.
If you don’t have the Files app on your device, update to iOS 11 or later. If you’re using iOS 9 or iOS 10, you can use the iCloud Drive app.
Automatically save Pages, Numbers, and Keynote files to iCloud Drive
You can update the settings on your iPhone, iPad, or iPod touch so that your documents automatically save to iCloud Drive, On My [device], or a third-party cloud service.
- Go to Settings.
- Choose to update the settings for Pages, Numbers, or Keynote.
- Tap Document Storage.
- Choose where you want to automatically save your documents.
If you choose iCloud Drive, changes you make to Pages, Numbers, and Keynote files on your Mac automatically save to iCloud Drive.
Add Desktop and Documents files to iCloud Drive
If you want to access files from your Mac on your other devices, you can add the Desktop and Documents folder to iCloud Drive.

Manage your iCloud Drive files while offline
If you’re offline and want to access, edit, and save documents in iCloud Drive, follow these steps first.
How to access files while you’re offline
To access your files offline, open the Files app on your iPhone, iPad, or iPod touch and follow these steps.
If you make changes to locally stored versions of your files while offline the changes won’t appear in iCloud Drive. Upload the updated versions of your files to iCloud Drive when you’re back online.
Upload files to iCloud Drive to save changes made offline
You can upload files to iCloud Drive from a Mac or PC by doing one of the following:
- Drag files from either your desktop or a folder window on your computer to the iCloud Drive window. You can also drag your files to a folder icon in the iCloud Drive window. If you drag to a folder icon, it’s highlighted to confirm that the item you’re dragging goes into the folder.
- Click the iCloud Drive upload button in the iCloud Drive toolbar. Select the files you want to upload, then click Choose.
If you don’t have enough space in iCloud for your upload, upgrade your iCloud storage or manage your iCloud storage to free up space.
When changes to your files upload to iCloud
The amount of time it takes for your changes to upload to iCloud depends on the app you’re using. Pages, Numbers, and Keynote regularly upload files to iCloud so you don’t lose any changes. Other apps upload your files to iCloud only after you save them to the iCloud Drive folder. To see your saved files on a Mac, go to Finder > iCloud Drive. On your iPhone, iPad, or iPod touch, go to the Files app. On a PC with iCloud for Windows, go to File Explorer > iCloud Drive.
If you still don’t see the latest changes or you see an «in-progress change» icon or the iCloud icon in the notification area (system tray), try to save a new document to the iCloud Drive folder. Then check the iCloud Drive folder to see if the changes appear.
Where to find missing files
When you turn on iCloud Drive, any documents that you already store in iCloud automatically move to iCloud Drive. You can see your files on iCloud.com, in the Files app on iOS 11 and later, in the Pages, Numbers, and Keynote apps, or in the iCloud Drive app on iOS 10 and iOS 9.
If you don’t see your files in any of those locations, set up iCloud Drive on all of your devices.
If you need to access a file that you deleted within the last 30 days, you can get it back from the Recently Deleted folder in the Files app, or on iCloud.com.
If your files don’t update to iCloud Drive
Check these things first:
- Make sure that you have enough iCloud storage. If you need more space in iCloud, you can buy more iCloud storage or free up space by deleting content.
- Sign in to iCloud on all of your devices and turn on iCloud Drive.
- Make sure that you have an active Internet connection on your Mac and on your iPhone, iPad, and iPod touch.
- Install the latest versions of Pages, Numbers, and Keynote. See which versions of Pages, Numbers, and Keynote you can use with iCloud Drive.
- Create a new document and save it to see if it uploads to iCloud. If it does, see if your other documents start uploading.
If you tried these steps and your files still don’t upload to iCloud, stay signed in to iCloud and save your updated files to a different folder on your Mac or PC. Then contact Apple Support for more help.
How to address a Resolve Conflict message
If you get a Resolve Conflict message when you open a file, choose the version of the document that you want to save. Then choose Keep to update the file in iCloud. This message means the file was updated on another device or from iCloud.com since the last time you signed in to iCloud.
Information about products not manufactured by Apple, or independent websites not controlled or tested by Apple, is provided without recommendation or endorsement. Apple assumes no responsibility with regard to the selection, performance, or use of third-party websites or products. Apple makes no representations regarding third-party website accuracy or reliability. Contact the vendor for additional information.
Источник
iCloud User Guide
What is iCloud?
iCloud is the service from Apple that securely stores your personal information, keeps it up to date on all your devices, and makes it easy to share your photos, files, and more with friends and family.
Use iCloud with your favorite apps
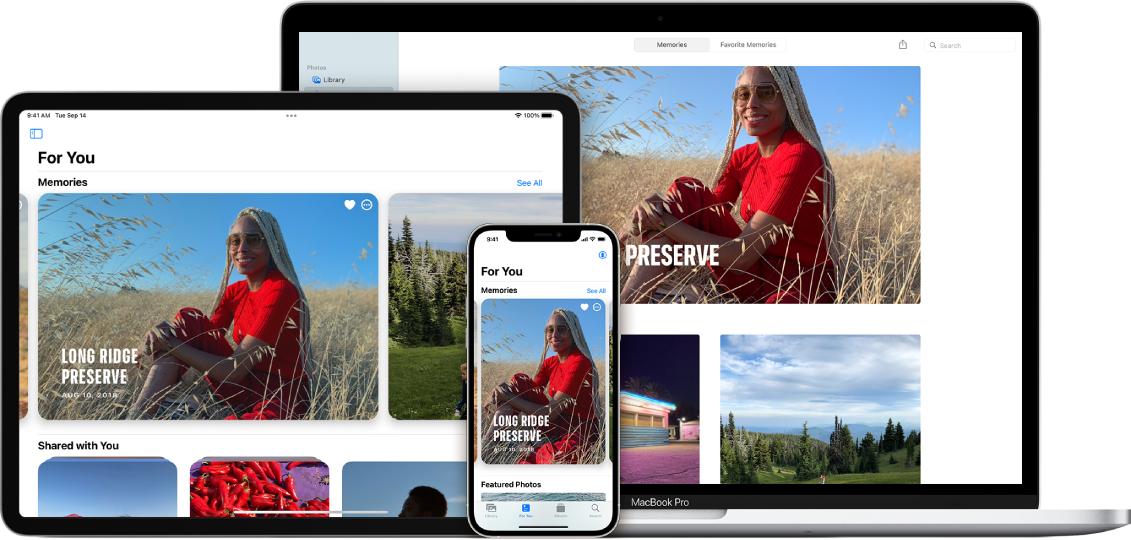
See the same photos and videos everywhere. Keep your files up to date on all your devices. Store data from your favorite apps and see it anywhere iCloud is turned on.
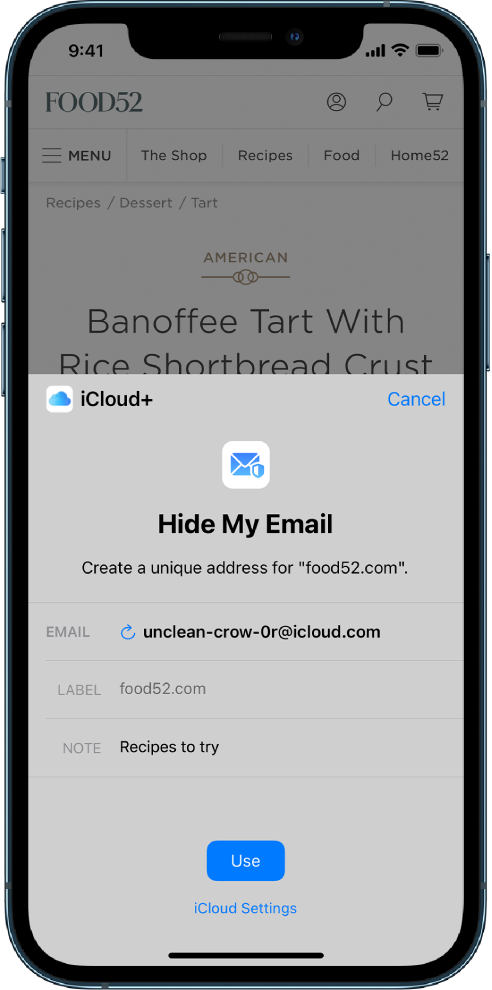
Get more storage and features with iCloud+
When you upgrade to iCloud+, you get more iCloud storage for your photos and files and access to features like iCloud Private Relay (beta) and Hide My Email.
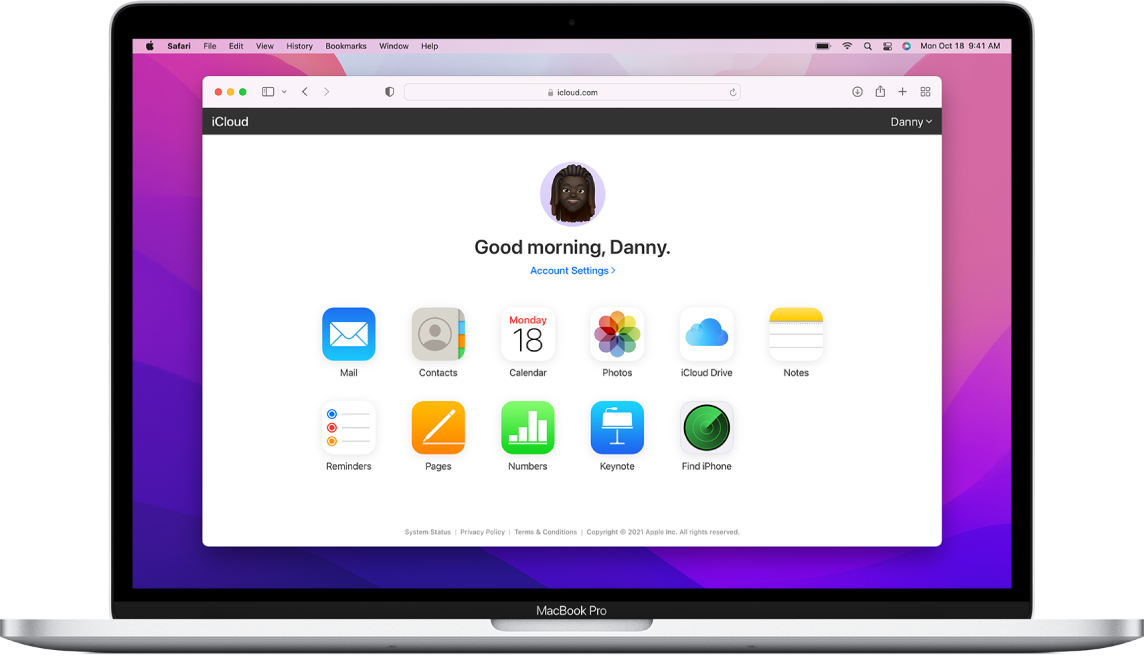
Use iCloud on the web
See your mail, photos, files, and more on iCloud.com. They’re safe, up to date, and available wherever you are.
To explore the iCloud User Guide, click Table of Contents at the top of the page, or enter a word or phrase in the search field.
If you need more help, visit the iCloud Support website.
Not all features are available in all countries or regions.
Источник
iCloud security overview
iCloud uses best-in-class security technologies, employs strict policies to protect your information, and leads the industry by adopting secure, privacy-preserving technologies like end-to-end encryption for your data.
Data security
iCloud secures your information by encrypting it when it’s in transit and storing it in iCloud in an encrypted format. Many Apple services use end-to-end encryption, which means that only you can access your information, and only on trusted devices where you’re signed in with your Apple ID.
In some cases, your iCloud data may be stored using third-party partners’ servers—such as Amazon Web Services or Google Cloud Platform—but these partners don’t have the keys to decrypt your data stored on their servers.
End-to-end encryption
End-to-end encryption provides the highest level of data security. On each of your devices, the data that you store in iCloud and that’s associated with your Apple ID is protected with a key derived from information unique to that device, combined with your device passcode which only you know. No one else, not even Apple, can access end-to-end encrypted information.
End-to-end encryption requires that you use two-factor authentication for your Apple ID and set a passcode on your device. Some features also require recent software, generally iOS 13 or later. With two-factor authentication, your account can be accessed only on devices you trust, like your iPhone, iPad, or Mac. Keeping your software up to date, using two-factor authentication for your Apple ID, and protecting your device with a passcode—or password on Mac—Face ID, or Touch ID are the most important things that you can do to maintain the security of your devices and data.
Data types and encryption
Here’s more detail on how iCloud protects your data.
| Data | Encryption | Notes |
|---|---|---|
| Backup | In transit & on server | A minimum of 128-bit AES encryption |
| Calendars | In transit & on server | |
| Contacts | In transit & on server | |
| iCloud Drive | In transit & on server | |
| Notes | In transit & on server | |
| Photos | In transit & on server | |
| Reminders | In transit & on server | |
| Safari Bookmarks | In transit & on server | |
| Siri Shortcuts | In transit & on server | |
| Voice Memos | In transit & on server | |
| Wallet passes | In transit & on server | |
| iCloud.com | In transit | All sessions at iCloud.com are encrypted with TLS 1.2. Any data accessed via iCloud.com is encrypted on server as indicated in this table. |
| In transit | All traffic between your devices and iCloud Mail is encrypted with TLS 1.2. Consistent with standard industry practice, iCloud does not encrypt data stored on IMAP mail servers. All Apple email clients support optional S/MIME encryption. | |
| Apple Card transactions | End-to-end | |
| Health data | End-to-end | Additional info below |
| Home data | End-to-end | |
| Keychain | End-to-end | Includes all of your saved accounts and passwords |
| Maps Favorites, Collections and search history | End-to-end | |
| Memoji | End-to-end | |
| Messages in iCloud | End-to-end | Additional info below |
| Payment information | End-to-end | |
| QuickType Keyboard learned vocabulary | End-to-end | |
| Safari History, Tab Groups, and iCloud Tabs | End-to-end | |
| Screen Time | End-to-end | |
| Siri information | End-to-end | Includes Siri settings and personalization, and if you have set up Hey Siri, a small sample of your requests |
| Wi-Fi passwords | End-to-end | |
| W1 and H1 Bluetooth keys | End-to-end |
Additional information
iCloud Data Recovery Service
If you forget your password or device passcode, iCloud Data Recovery Service can help you decrypt your data so you can regain access to your photos, notes, documents, device backups, and more. Data types that are protected by end-to-end encryption—such as your Keychain, Messages, Screen Time, and Health data—are not accessible via iCloud Data Recovery Service. Your device passcodes, which only you know, are required to decrypt and access them. Only you can access this information, and only on devices where you’re signed in to iCloud.
Messages in iCloud
For Messages in iCloud, if you have iCloud Backup turned on, your backup includes a copy of the key protecting your messages. This ensures you can recover your messages if you lose access to your Keychain and your trusted devices. When you turn off iCloud Backup, a new key is generated on your device to protect future messages and isn’t stored by Apple.
Health data
If you back up your device on your Mac or iTunes, Health data is stored only if the backup is encrypted. Learn more about managing your Health data.
Privacy
Apple believes that privacy is a human right. Our Privacy Policy covers how we collect, use, disclose, transfer, and store your information. And in addition to adhering to the Apple Privacy Policy, Apple designs all iCloud features with your privacy in mind.
Learn more
Learn more about advanced security features in Apple products.
Information about products not manufactured by Apple, or independent websites not controlled or tested by Apple, is provided without recommendation or endorsement. Apple assumes no responsibility with regard to the selection, performance, or use of third-party websites or products. Apple makes no representations regarding third-party website accuracy or reliability. Contact the vendor for additional information.
Источник
Check your Apple ID device list to see where you’re signed in
Learn which devices appear in your Apple ID device list, how to see your device’s details, and how to remove a device, if necessary.
See where you’re signed in
Use the steps below to see the devices that you’re currently signed in to with your Apple ID.
Use your iPhone, iPad, iPod touch, or Apple Watch to see where you’re signed in
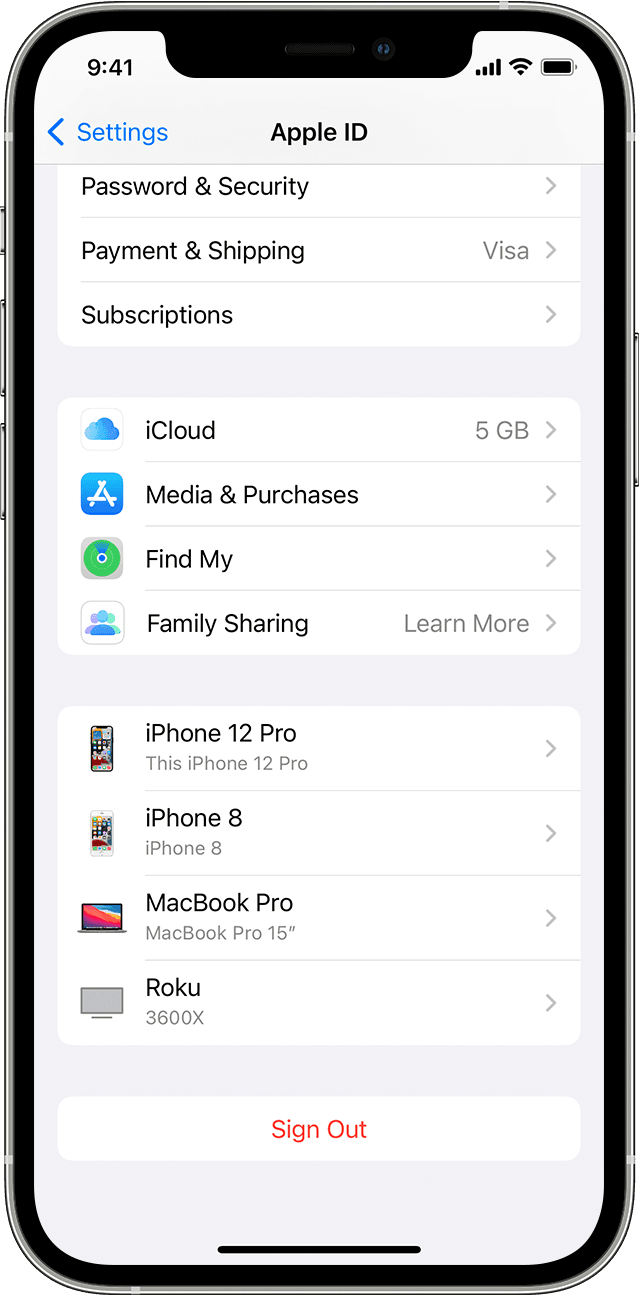
- Tap Settings > [your name], then scroll down.
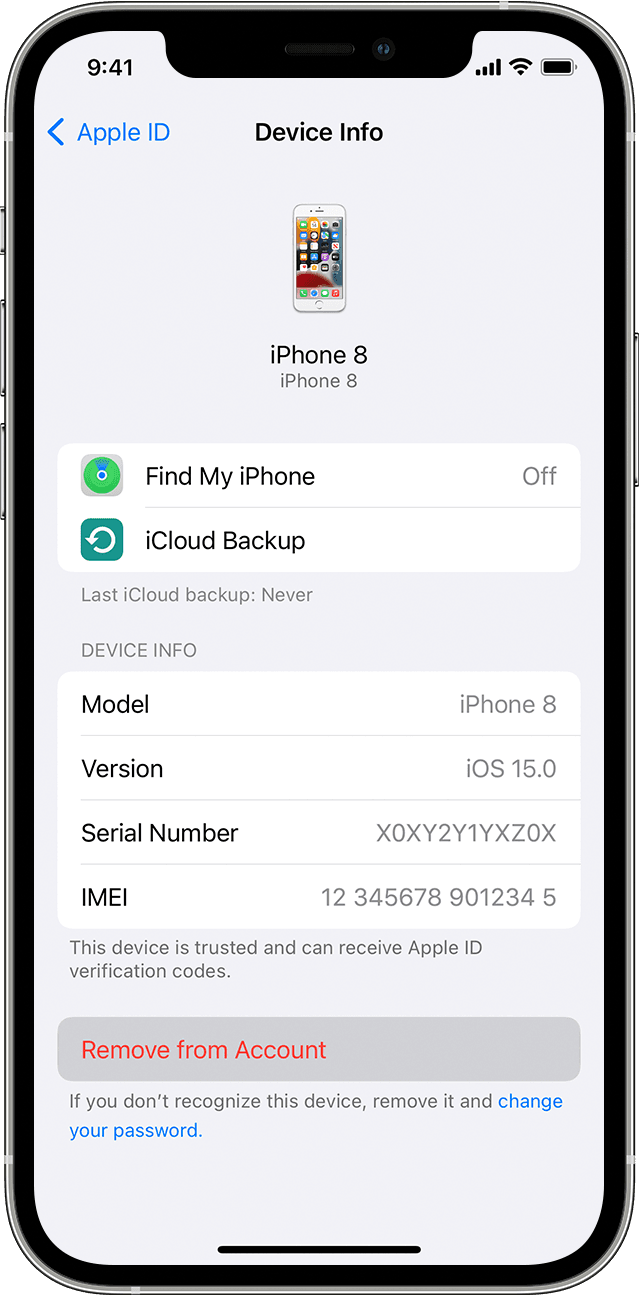
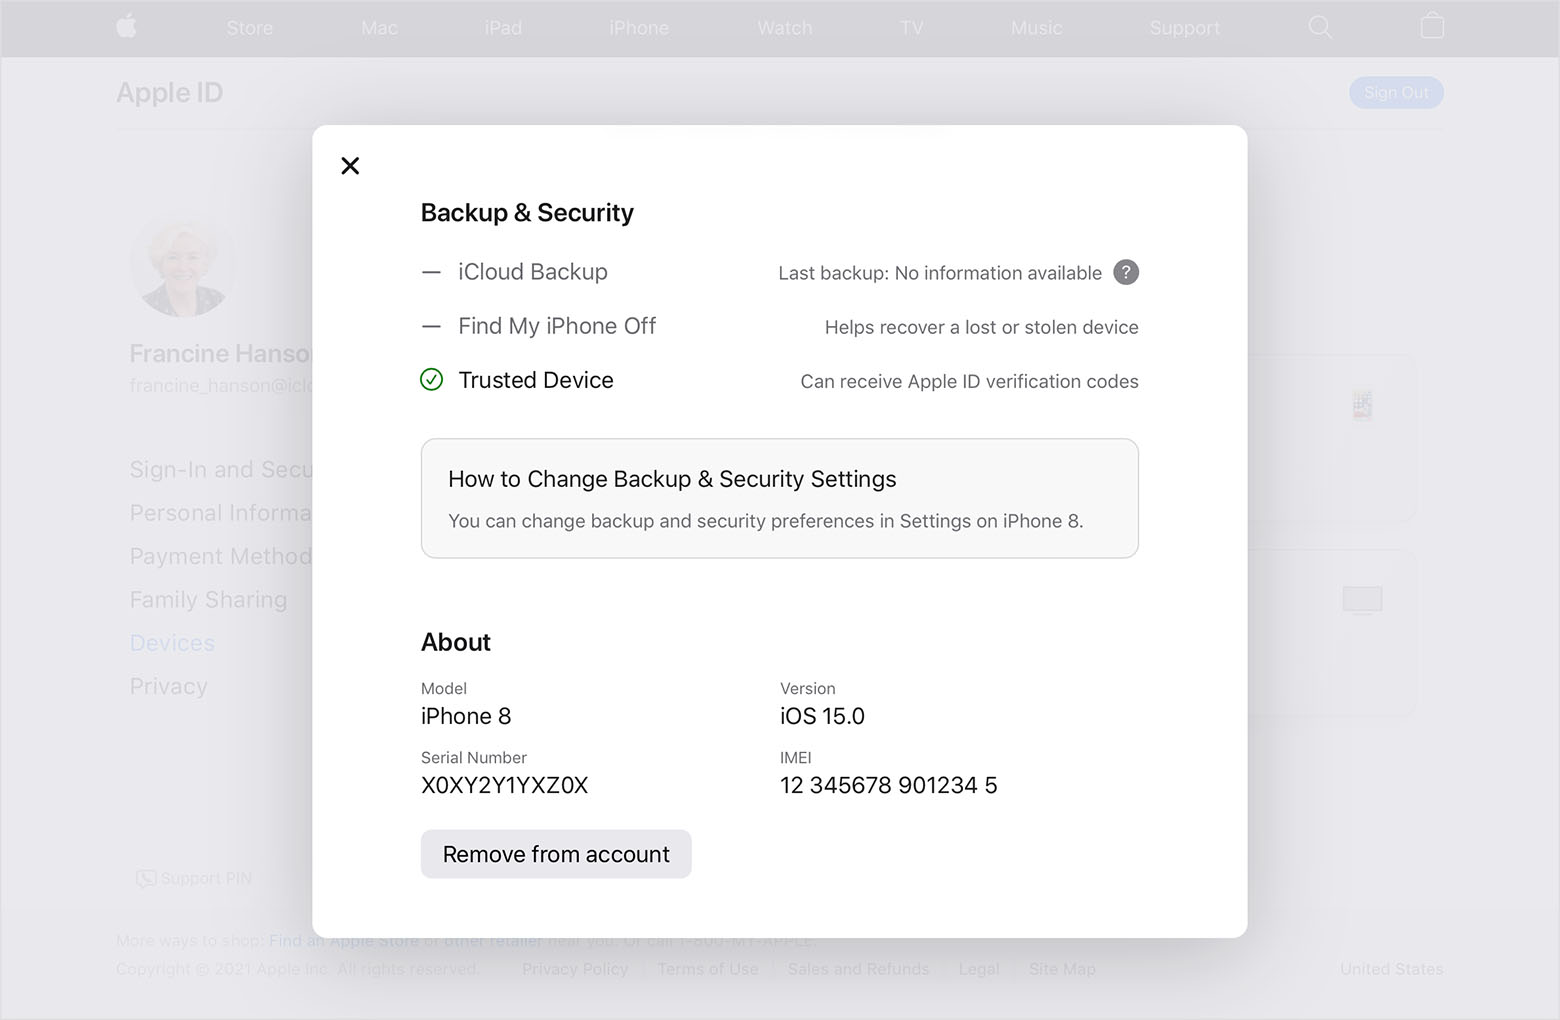
- Tap any device name to view that device’s information, such as the device model, serial number, OS version, and whether the device is trusted and can be used to receive Apple ID verification codes. The information might vary depending on the device type. You might need to answer your security questions to see device details.
![]()
Use your Mac to see where you’re signed in
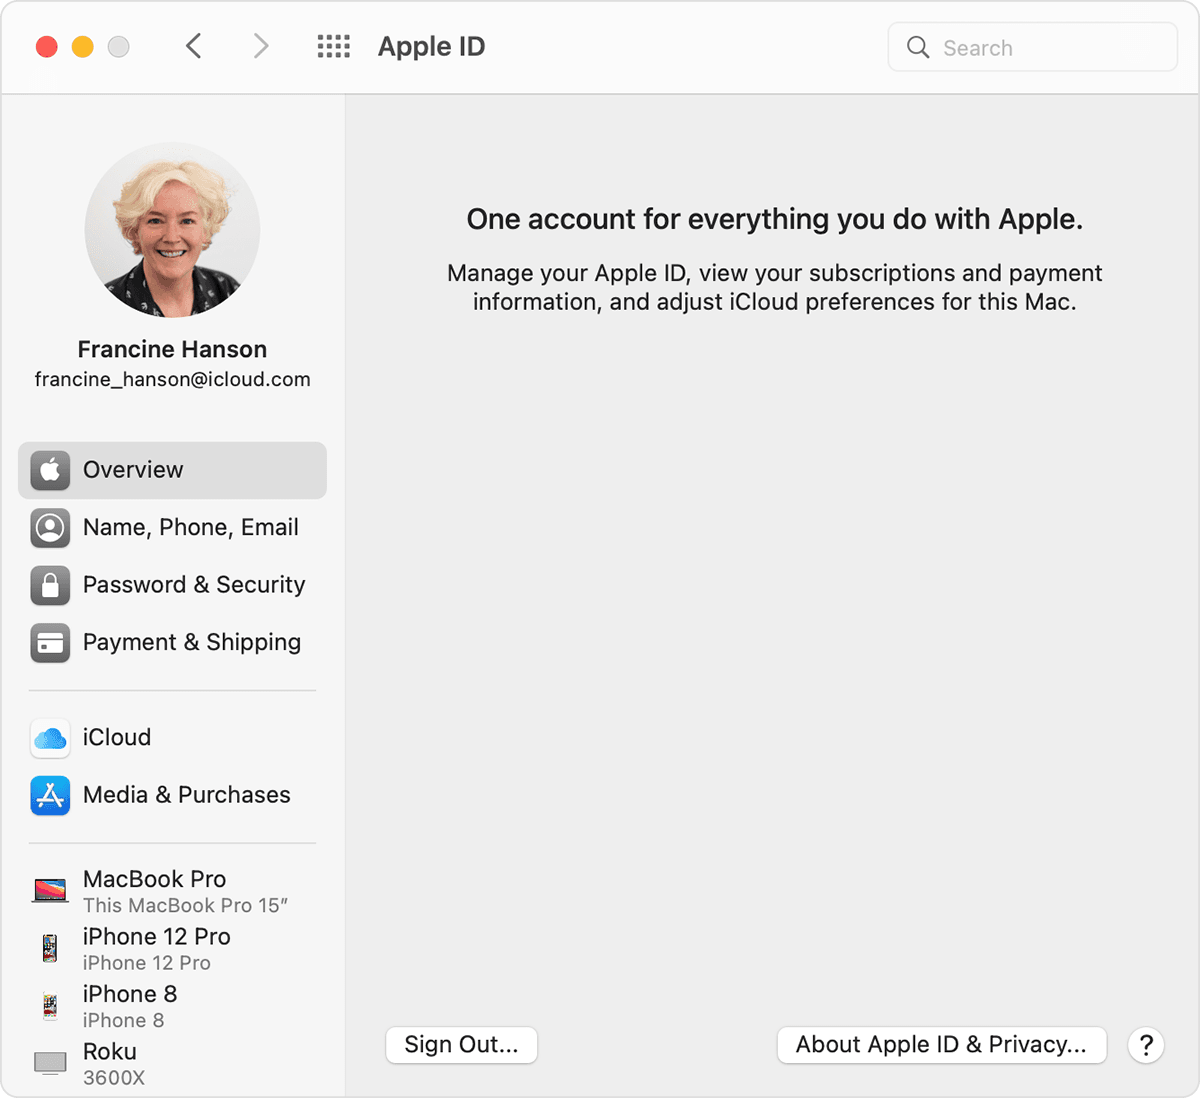
- Choose Apple menu > System Preferences.
- Click Apple ID.

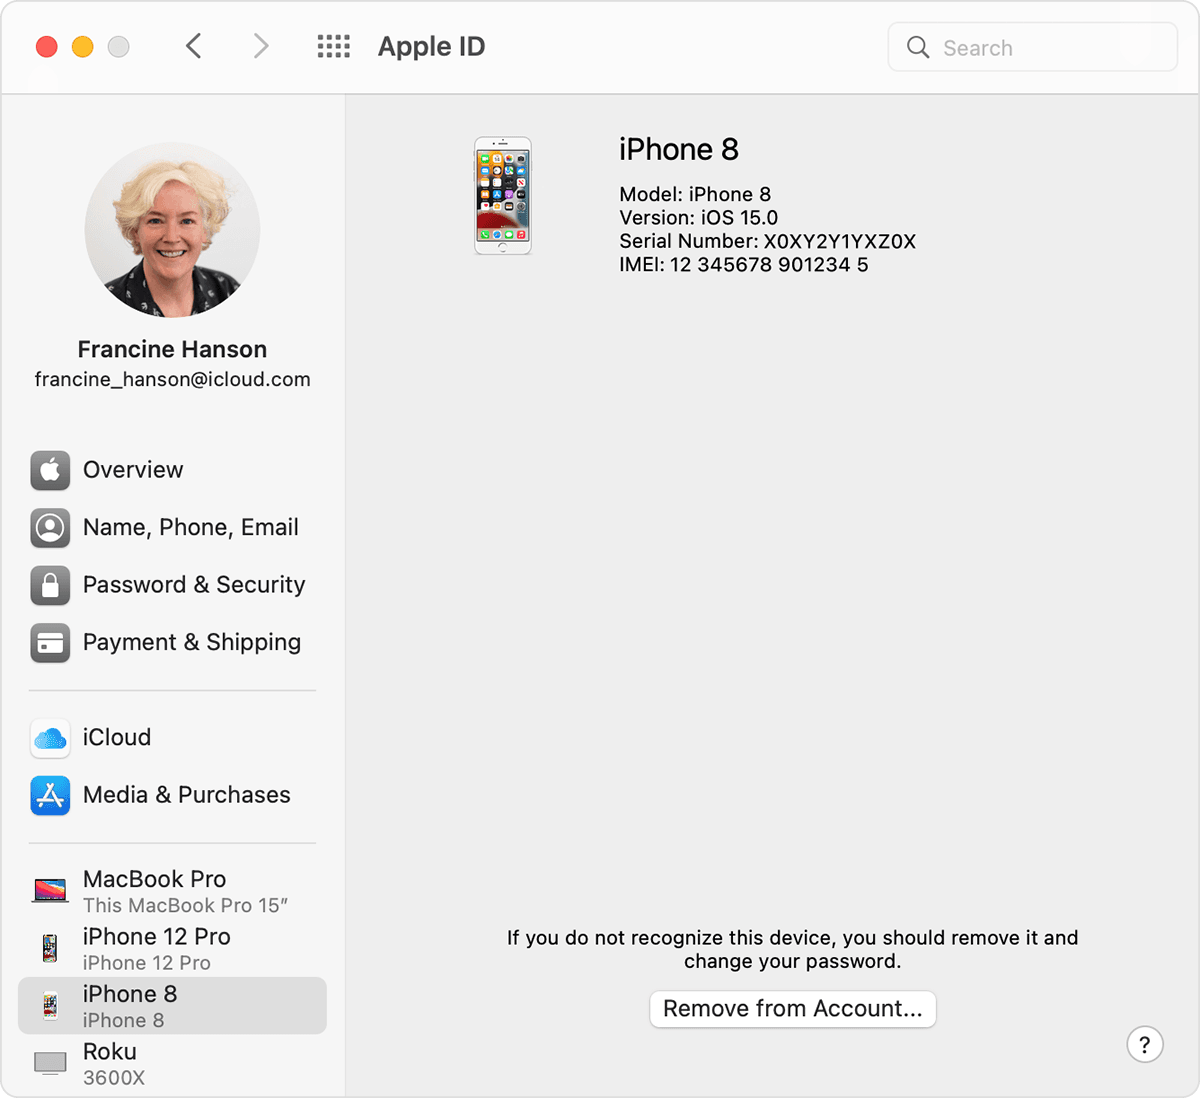
- Click any device name to view that device’s information, such as the device model, serial number, and OS version. The information might vary depending on the device type. You might need to answer your security questions to see device details.
Use your PC to see where you’re signed in
- Open iCloud for Windows.
- Click Account Details, then click Manage Apple ID.
- Click any device name to view that device’s information, such as the device model, serial number, and OS version. The information might vary depending on the device type.
Use the web to see where you’re signed in
From the Devices section of your Apple ID account page, you can see all of the devices that you’re currently signed in to with your Apple ID, including Android devices, consoles, and smart TVs:
- Sign in to appleid.apple.com,* then select Devices.
- If you don’t see your devices right away, click View Details and answer your security questions.
- Click any device name to view that device’s information, such as the device model, serial number, and OS version. The information might vary depending on the device type.

* Depending on how you created your Apple ID, you might be required to provide additional information.
Add a device to the list
To add a device to the list, you need to sign in with your Apple ID. After you sign in on a device with your Apple ID, that device appears in the list. Here’s where you need to sign in:
- For iOS or iPadOS, sign in to iCloud, iMessage, FaceTime, iTunes & App Stores, or Game Center on the device. You can also see your paired Apple Watch.
- For macOS or Windows 10 and later, sign in to iCloud on the device.
- For Apple TV HD and later, sign in to the iTunes and App Store on the device.
- For Apple TV (3rd generation) and earlier, sign in to the iTunes Store on the device.
Your AirPods will appear in the Find My app, but they won’t appear in your Apple ID device list. You can remove your AirPods from your account using Find My. Devices running iOS 7 or earlier or OS X Mavericks or earlier won’t appear in your device list.
Remove a device from the list
If your device is missing, you can use Find My to find your device and take additional actions that can help you recover it and keep your data safe. If you aren’t using your device anymore, or if you don’t recognize it, you might want to remove it from the list.
If you set up two-factor authentication for your Apple ID, removing a device will ensure that it can no longer display verification codes. It also won’t have access to iCloud and other Apple services, including Find My, until you sign in again with two-factor authentication. The device won’t reappear in the list unless you sign in again.
Use your iPhone, iPad, or iPod touch to remove a device
- Tap the device to see its details, then tap Remove from Account.
- Review the message that appears, then tap again to confirm that you want to remove the device.
- Want to permanently remove the device from your account page?
![]()
Use your Mac to remove a device
- Choose Apple menu > System Preferences.
- Click Apple ID.
- Click the device to see its details, then click Remove from Account.
- Review the message that appears, then click again to confirm that you want to remove the device.
- Want to permanently remove the device from your account page?
Use your PC to remove a device
- Open iCloud for Windows.
- Click Account Details, then click Manage Apple ID.
- Click the device to see its details, then click Remove from Account.
- Review the message that appears, then click again to confirm that you want to remove the device.
- Want to permanently remove the device from your account page?
Use the web to remove a device
- Sign in to appleid.apple.com, then select Devices.
- Click the device to see its details, then click «Remove from account.»
- Review the message that appears.
- Click again to confirm that you want to remove the device.
- Want to permanently remove the device from your account page?
Permanently remove a device from your account page
If you’re still signed in with your Apple ID on the device, it might reappear on your account page the next time your device connects to the Internet. To permanently remove the device from your account page, sign out of iCloud, iTunes & App Stores, iMessage, FaceTime, and Game Center on that device, or erase that device.
Источник


