- How to Track Data Usage on Your Android Device
- Avoid extra fees and extend your phone’s battery life
- What to Know
- How to Check Data Usage on Android
- Third-Party Apps for Tracking Data Usage
- Tips for Reducing Data Usage
- Top 10 Apps to Transfer Data From Android To Android
- MobileTrans — Phone Transfer
- 1. SHAREit
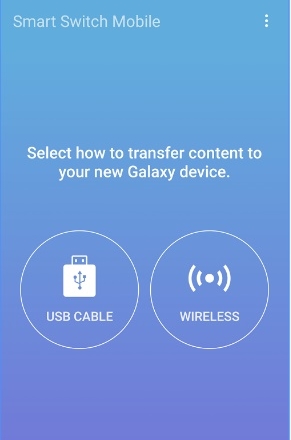
- 2. Samsung Smart Switch
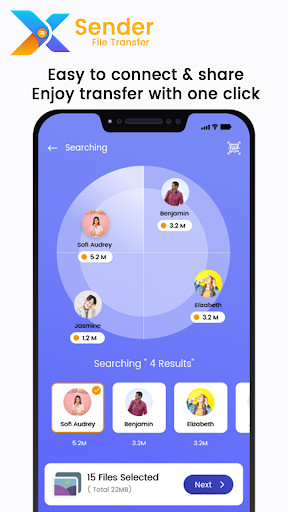
- 3. Xender
- 4. Send Anywhere
- 5. AirDroid
- 6. AirMore
- 7. Zapya
- 8. Bluetooth File Transfer
- 9. LG Mobile Switch
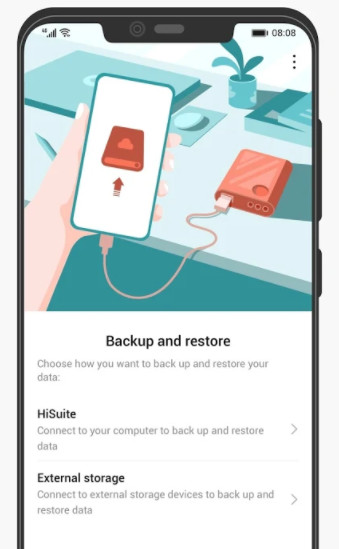
- 10. Huawei Backup
- How to store data locally in an Android app
- Ways to store data
- Using Shared Preferences
- Using internal storage
- External Storage
- SQLite database
How to Track Data Usage on Your Android Device
Avoid extra fees and extend your phone’s battery life
:max_bytes(150000):strip_icc()/Lifewire_Molly-McLaughlin_webOG-327b0af1832c48a6b565fb20f3a87090.jpg)
What to Know
- Go to Settings >Connections >Data usage >Mobile data usage and tap any app for usage info.
- Tap the toggle at Data usage >Data saver to turn it on.
- Or, try a third-party app, such as one offered by your carrier.
This article demonstrates how to track your data consumption and offers ways to cut down on your data usage without much inconvenience.
Instructions in this article apply to smartphones with Android 10, 9, 8, or 7, with minor variations among manufacturers.
How to Check Data Usage on Android
The instructions below should get you information about your data use.
Open the Settings app.
Tap Connections.
Tap Data usage.
Tap Mobile data usage.
The top of the screen displays your data usage for the current month (as determined by your billing cycle). Tap the date to see previous periods.
Scroll down and tap any app to find out how much data it uses and to control whether it can use mobile data, Wi-Fi, or both.
:max_bytes(150000):strip_icc()/002_track-data-usage-on-your-android-121660-317b5e7228f4433c9edc3abb21b20db3.jpg)
Go back to Data usage and tap Billing cycle to set the date when your plan resets the monthly billing cycle.
Go to Data usage > Data saver.
Tap the toggle to turn on Data Saver.
:max_bytes(150000):strip_icc()/003_track-data-usage-on-your-android-121660-e536eb09d61b42a096a2a8f79cd5f127.jpg)
Depending on the carrier, phone manufacturer, and Android version, some phones may have additional options for checking data usage.
Third-Party Apps for Tracking Data Usage
There are also third-party apps for monitoring data usage. The four majors carriers offer apps (myAT&T, T-Mobile My Account, Sprint Zone, and My Verizon Mobile) that sync with your account.
Other popular data management apps include My Data Manager and Data Usage. Each app can set up limits and alerts, and My Data Manager tracks data usage in shared or family plans and across multiple devices. Data Usage tracks Wi-Fi usage and predicts when you might go over your data allotment based on daily use. You can set daily, weekly, and monthly data limits too.
Tips for Reducing Data Usage
If your plan has a data limit, upgrading it is not the only way to control overages. Here are a few strategies:
- Most carriers offer shared plans, so team up with your partner, a trusted friend, or family members to save some money.
- Go to the data usage section of the smartphone settings to restrict background data on apps, either one by one or all at once. This way, apps don’t consume data when you’re not using the phone, although it may affect how they work.
- Use Wi-Fi rather than mobile data whenever possible, such as when you’re at home or work.
Beware of unsecured Wi-Fi networks, such as those at coffee shops and other public locations where your privacy could be compromised. If you use public Wi-Fi, consider investing in a hotspot device.
Источник
Top 10 Apps to Transfer Data From Android To Android


Bought a new Android Phone? Congratulations! Now you might be looking for easy ways to transfer all the important data from your old Android phone to the new one.
With millions of apps available in the market, it is obvious to get confused in selecting which app to use to transfer the data.This article will discuss the best 10 apps among which will easily transfer data from one Android device to another.
So, let’s begin with the list of Apps:
| Apps | Google Play Store Rating |
|---|---|
| SHAREit | 4.1 |
| Samsung Smart Switch | 4.3 |
| Xender | 3.9 |
| Send Anywhere | 4.7 |
| AirDroid | 4.3 |
| AirMore | 3.9 |
| Zapya | 4.5 |
| Bluetooth File Transfer | 4.1 |
| LG Mobile Switch | 3.7 |
| Huawei Backup | 4.2 |
If you’re looking for a desktop software to transfer your photos from Android to Android, you can try MobileTrans — Phone Transfer:
MobileTrans — Phone Transfer
Transfer Photos from Android to Android with One Click
- Easily transfer contacts, music, messages, notes, apps, photos, videos, and more.
- No iTunes, iCloud needed. Easy to operate and fast transfer speed.
- Fully compatible with iOS 14 and Android 10.0.
- Transfer data to a new android phone without resetting.
1. SHAREit
![]()
The first app on the list is one of the most popular and favorite apps of the time: SHAREit. All you need is the downloaded app on both the devices between which the data is to be transferred. The devices need to be connected via Wi-Fi and once that is done, you can see the files you can transfer.
Files of any type like movies, songs, documents, pictures, apps, and much more can be transferred using SHAREit. The receivers can select the files and apps they want to receive without bothering the sender. With SHAREit, you can transfer the files with the speed up to 20 Mb/ second. Not only this, with its CLONEit feature, you can also copy the important data from the sender device within a few minutes.
2. Samsung Smart Switch
Another free app that allows transferring data from one Android device to another wirelessly as well as using a cable is Samsung Smart Switch. It mainly supports Samsung Galaxy devices and even comes preloaded in some Samsung devices like S7, S8, S9, Note 8 and Note 9. It allows the transfer of the data between any two Android devices (Lenovo, HTC, Motorola, etc.). The app can also transfer data between two Android devices through the SD card even.
You can transfer contacts, calendars, pictures, music, text messages, and much more. Another main advantage of using Samsung Smart Switch is that it even allows the devices to connect with devices of other platforms like iOS, Windows, and Blackberry for transferring useful files and folders.
3. Xender
Xender is another user-friendly app for Android users to transfer the data from one Android device to another Android device. All you need is to connect the devices through a hotspot and it doesn’t require any wire, cables, or data connection to transfer files of all types. It allows its users to transfer pictures, videos, messages, games, contacts, and much more.
Not only this, but Xender also allows its users to connect four different devices at the same time to transfer the data. You can even transfer the data across different platforms like iOS and Windows and even to PC without any PC side software installation. Xender can share files at a speed of 40 MB/ second without any restrictions in transferring large files.
4. Send Anywhere
Send Anywhere lets its users transfer the data with maximum protection with strong 256-bit encryption and that is why it is the favorite of maximum users is. The app comes for free with in-app purchases but contains ads. It is a cross-platform and a secure Android data transfer app that lets you transfer the data by entering a special 6-digit code or by scanning the QR code to connect. You can share the data without the help of the internet and mobile data. The data can be shared with multiple people using a custom link.
The app also has cloud storage where the data or files can be stored and then shared with any device. The transferred data is not on any server and can send any number of files and other data. One can also go for Send Anywhere Plus using which data of up to 50 GB can be shared at a single time.
5. AirDroid
![]()
Recommended by various tech websites like PCWorld, CNET, BGR, and Lifehacker, AirDroid is one of the best apps to transfer the data at a good speed and on different networks. AirDroid not only lets you transfer the files and folders from one Android device to another Android device but also enables its users to control their Android devices wirelessly using their computers. Even if the screen of your Android device goes blank, you can still do what you will be doing normally on the phone and even can trace the phone if by any chance it gets lost. You can transfer the files from Android to PC and vice-versa.
Another benefit of using AirDroid is that its users can also back up their files from phone to computer while sharing the clipboard between the two devices. The only limitation of using AirDroid is that it does not allow the transfer of data to multiple devices.
6. AirMore
AireMore is a management tool for Android and iOS devices which allows the transfer of data from Android to Android, iOS to Android, and vice-versa. Multiple data types like pictures, videos, messages, and documents can be transferred using AireMore. It comes free of cost and allows its users to move, store, and stream data using an internet connection.
With the latest version of Airemore, you can even store your data on the free cloud storage and save your phone’s space.
7. Zapya
Another best high-speed file sharing app on the list is Zapya. It is a cross-platform app that allows data transfer between Android, iOS, Windows Phone, MAC, etc. Using Zapya, you can connect four devices and transfer files of all formats among them using QR code.
Zapya comes with instant messenger feature which allows its users to chat and share streaming content with the nearby group of friends. With Zapya’s phone replication option, you can also backup and transfer files and folders from old phone to new phone. Zapya is free of cost with no display ads and in-app purchases.
8. Bluetooth File Transfer
Bluetooth File Transfer is one of the most underestimated file transfer apps but in reality, it comes with a fast inbuilt file browser and a clean User Interface. You can share files over a Bluetooth connection using the Android Bluetooth File Transfer App. All the files are transferred using a secure connection as authorization of incoming connections is mandatory while using this app. You can also use the integrated browser to move, copy, cut, and delete items you want to and even zip and unzip files with encryption.
9. LG Mobile Switch
Using LG Mobile Switch, the users can transfer the data from either Android phone or iPhone to a new LG Android phone. The data can be transferred using a Wi-Fi or a cable. It allows easy and fast transfer of data of different types like call logs, messages, contacts, pictures, videos, audio, etc. from an Android device to an LG phone. The app easily transfers the data but the only limitation is that it cannot transfer the data which is stored in the cloud like Google Drive and iCloud.
10. Huawei Backup
Huawei Backup is actually for backing up all the important data in any form like contacts, pictures, videos, call records, apps, etc. on a storage device or in the cloud. This backup is encrypted with maximum security and can even be saved in the memory cars, USB drivers, or clouds. From the place of storage of data, the data can be easily transferred to any new Android device hassle-free.
Each of the app mentioned in the list has its offerings but, according to the ratings given by the users, LG Mobile Switch has received the lowest ratings making it the least favorite of all the users while Send Anywhere tops the list among all the 10 apps.
There are many apps in the market which transfer the data from Android to Android but, from a plethora of apps, the above-mentioned 10 apps are the most efficient and secure apps to transfer the data. Now, the final decision to select the best-fit app depends upon your requirements.
Источник
How to store data locally in an Android app

Almost every app we use or develop has to store data for one purpose or another. It’s not all the same data, either — some apps need access to settings, images, and much more. The big question is how to manage this data so that your device can grab only what it needs. Luckily for developers, Android is full of ways to store data, and we’re here to run you through how they work.
For this article, we’ll discuss the different data storage techniques available to Android developers, along with sample code to get you started or to refresh your memory.
Ways to store data
Using Shared Preferences

Shared Preferences is the way to go if you’re saving primitive data as key-value pairs. It requires a key, which is a String, and the corresponding value for the said key. The value can be any of the following: a boolean, float, int, long, or another string.
Your Android device stores each app’s Shared Preferences inside of an XML file in a private directory. Apps can also have more than one Shared Preferences file, and they’re ideally used to store app preferences.
Before you can store data with shared preferences, you must first get a SharedPreferences object. There are two Context methods that you can use to retrieve a SharedPreferences object.
For when your app will have a single preferences file, and
for when your app could have multiple preferences files, or if you prefer to name your SharedPreferences instance.
On getting the SharedPreferences object, you then access its Editor using the edit() method. To actually add a value, use the Editor’s putXXX() method, where XXX is one of Boolean, String, Float, Long, Int, or StringSet. You can also remove a key-value preference pair with remove().
Finally, make sure to call the Editor’s commit() method after putting or removing values. If you don’t call commit, your changes will not be persisted.
For our sample app, we allow the user to specify a SharedPreferences filename. If the user specifies a name, we request for the SharedPreferences with that name; if not, we request the default SharedPreference object.
Unfortunately, there is no way to get a single list of all SharedPreferences files stored by your app. Instead, you will need a static list or access to the SharedPreferences name if you’re storing more than one file.
You could also save your SharedPreferences names in the default file. If you need to store user preferences, you may want to use the PreferenceActivity or PreferenceFragment command. Just remember that they both use Shared Preferences, too.
Using internal storage

There are plenty of times where you may need to persist data, but you find Shared Preferences too limiting. For example, you may need to persist objects or images in Java. You might also need to persist your data logically with the file system hierarchy. This is where internal storage comes in. It is specifically for when you need to store data on the file system, but you don’t want other apps or users to have access.
This data storage is so private, in fact, that it’s deleted from the device as soon as you uninstall your app.
Using internal storage is similar to saving with any other file system. You can get references to File objects, and you can store data of virtually any type using a FileOutputStream. What sets it apart is the fact that its contents are only accessible by your app.
To get access to your internal file directory, use the Context getFilesDir() method. To create (or access) a directory within this internal file directory, use the getDir(directoryName, Context.MODE_XXX) method. The getDir() method returns a reference to a File object representing the specified directory, creating it first if it doesn’t exist.
In the sample above, if the user-specified filename is empty, we get the base internal storage directory. If the user specifies a name, we get the named directory, creating first if needed.
To read files, use your preferred file reading method. For our example, we read the complete file using a Scanner object. To read a file that’s directly within your internal storage directory (not in any subdirectory), you can use the openFileInput(fileName) method.
Similarly, to access a file for writing directly within the Internal Storage directory, use the openFileOutput(fileName) method. To save files, we use the FileOutputStream write.
As you can see in the image above, the file path is in a folder not accessible by the file manager or other apps. The only exception to this will be if you have a rooted device.
External Storage

Google has made a few key changes to external storage, beginning with Android 10 and continuing in Android 11. To give users better control over their files and cut down on clutter, apps now have scoped access to external storage by default. This means that they can tap into the specific directory on external storage and the media that the app creates.
For more information about requesting scoped directory access, check out this Android developer tutorial.
If your app tries to access a file that it did not create, you will have to permit it to do so every single time. Data you store outside of select folders will also disappear if you delete your app.
Apps are expected to store files in one of two app-specific locations designed for the app’s specific persistent files and cached files, respectively. To access these locations, the app must verify the storage is available (which is not guaranteed, as it is for internal storage). The volume’s state can be queried using:
If MEDIA_MOUNTED is returned, that means you can read and write files to external storage. You will find a number of predefined directories that should aid with logical storage and prevent clutter. These include the likes of DIRECTORY_DOCUMENTS and DIRECTORY_MOVIES.
You can read a full explanation of how to use scoped storage here.
SQLite database
Finally, Android provides support for apps to use SQLite databases for data storage. The databases you create remain specific to your app and can only be accessed inside your app. Of course, you should have at least some knowledge of SQL before you attempt to store data with an SQLite database.
We’ll discuss each of these in turn, and we use data binding techniques for our sample code. Android provides complete support for SQLite databases. The recommended way of creating SQLite databases is to subclass the SQLiteOpenHelper class and override the onCreate() method. For this sample, we create a single table.
Источник


