- Android и кастомные шрифты или «Да здравствует API 26»
- Как было раньше. Краткий обзор
- view.xml
- CustomFontTextView.class
- Но все изменилось в API 26
- How to Install Fonts on Android
- How to Change the Default Font on Your Android Device
- Install New Fonts on Android Using iFont
- How to Use iFont on a Non-Rooted Smartphone
- How to Use iFont on a Rooted Smartphone
- Install New Fonts on Android Using Action Launcher
- Time to Customize Your Android
- What is the default font family in Android?
- Answers
- How to Install Custom Fonts on Android Device? [Complete Guide]
- Android is open source
- 1. Android Launchers
- 2. iFont (Expert of Fonts)
- A word of caution:
- Here’s How to Download & Install Custom Fonts On Android Without Root
- How to Install Custom Fonts Typefaces on a Rooted Android Device?
- FontFix: This lets you install custom fonts easily.
- What are system fonts?
- How to edit /system/fonts directory- The Right Way.
- Hands-on example:
- Download and install ES File Explorer
- Now, let’s jump to the geeky part where you will be using the ADB commands to install fonts in android.
- Conclusion
Android и кастомные шрифты или «Да здравствует API 26»
Как было раньше. Краткий обзор
Если было много view где требовались нестандартные шрифты, то мы использовали что-то вроде такого:
view.xml
CustomFontTextView.class
И это я пропустил огромный кусок который отвечает за то, чтобы не писать каждый раз путь к шрифту, а указывать
Ну, или шли на гитхаб и в результате находили Calligraphy (7000 звезд!)
Ни для кого не секрет что этот подход содержал много минусов как в огромном количестве boilerplate кода, так и в том, чтобы сделать это эффективно и где-нибудь не утечь по памяти запрашивая каждый раз Typeface.
Но все изменилось в API 26
Похоже, гугл наконец-то сдался и решил отказаться от навязывания Roboto и сделал удобное подключение сторонних шрифтов, за что ему огромное спасибо.
Линк для тех, кто любит читать в оригинале.
Теперь подключение состоит всего из нескольких несложных шагов:
1. Создаем папку font в res
Resource type выбираем font

2. Перетаскиваем в новую папку все нужные нам в проекте шрифты
3. Создаем файл для семейства шрифтов.
Обратите внимание: я сразу добавил в пример то как должен выглядеть файл, если вы хотите поддерживать и более старые версии Андроида. (Начиная с 14). Если вам повезло и у вас таргет только на супер-новые девайсы, то ваш файл сократится в 2 раза
Ну а дальше остается только наслаждаться сборкой
Использование в TextView
Используем в стилях
И у вас больше не болит голова об эффективности 🙂
Источник
How to Install Fonts on Android
So you can be really fontsy
Have you ever paid attention to how many different fonts you look at throughout your day? Fonts are all over the internet, in documents you read, in every app you use, and of course – on your smartphone. Sometimes a certain font can even be a determining factor in whether you choose to read the content or use a certain app or not.
Android phones come with a built-in default font. If you don’t like it, that’s no reason to stop using your phone. Especially since on Android you can easily change it and install another font that you like. Learn about all the methods you can use to install new fonts on your Android smartphone.
How to Change the Default Font on Your Android Device
The easiest way to change fonts on your Android device is by using the built-in option to do it. Unfortunately, if you’re using a clean or “vanilla” Android like a Pixel phone, this option won’t be available and you’ll have to rely on other methods to change your font. However, many devices like Samsung, LG, HTC will allow you to change the font through the smartphone’s settings.
The exact path to changing the default font on your Android will differ depending on your smartphone’s brand. To begin with, open the Settings app on your phone. On some phones, you’ll find the option to change your font under Display > Font Style, while other models allow you to download and install new fonts by following the path Display > Fonts > Download.
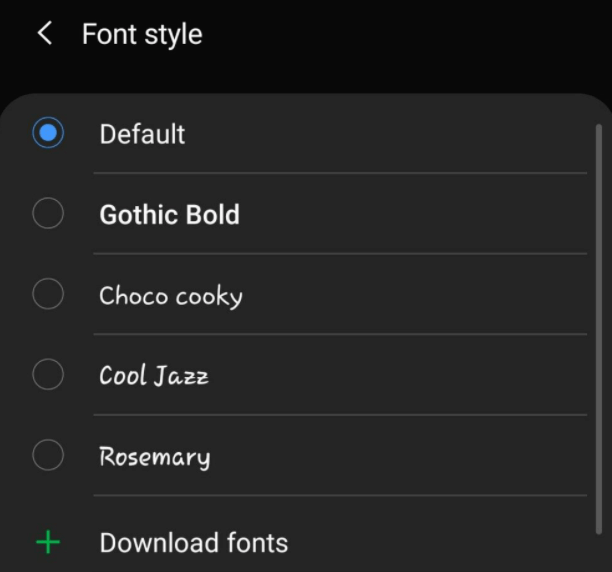
Have a look around your smartphone’s settings and see if any of these options are available for you.
Install New Fonts on Android Using iFont
If you tried the built-in method and it didn’t work for you, the next thing to try is installing a third-party app called iFont that allows you to change install fonts on your Android. iFont is an app that will let you change your default Android font and use a custom one of your choice. Once you install the font, iFont will change it everywhere within your smartphone’s OS (operating system).
iFont works differently depending on whether your smartphone’s rooted or not. Rooting your phone is a procedure that gives you more control over your Android device and allows you to perform such configurations like removing pre-installed bloatware from your phone to free up your memory, or installing and running apps that require special privileges.
How to Use iFont on a Non-Rooted Smartphone
Even if your phone isn’t rooted, you can still give iFont a try and see if you can use it to install fonts on your Android.
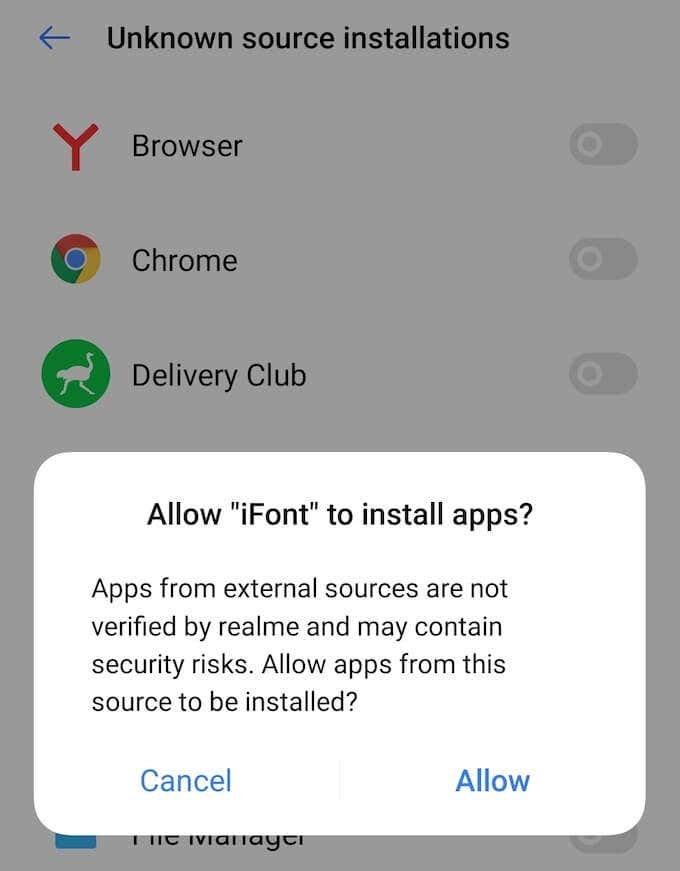
- Before using the app, make sure you enable Unknown source installations on your phone. To do that, follow the path Settings >Security >App Installation >Unknown source installations, then choose iFont >Allow to enable it.
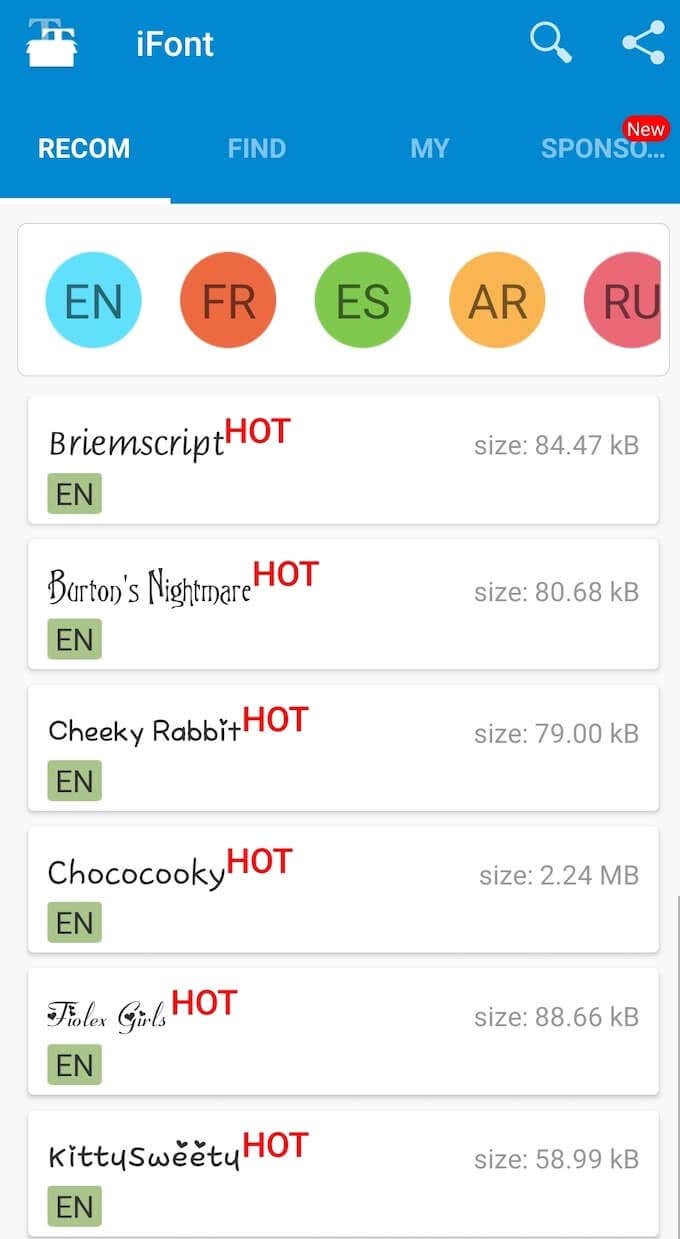
- The next step is to open the app and choose a font that you like. You can either use the Recommended or Find tab to do it.
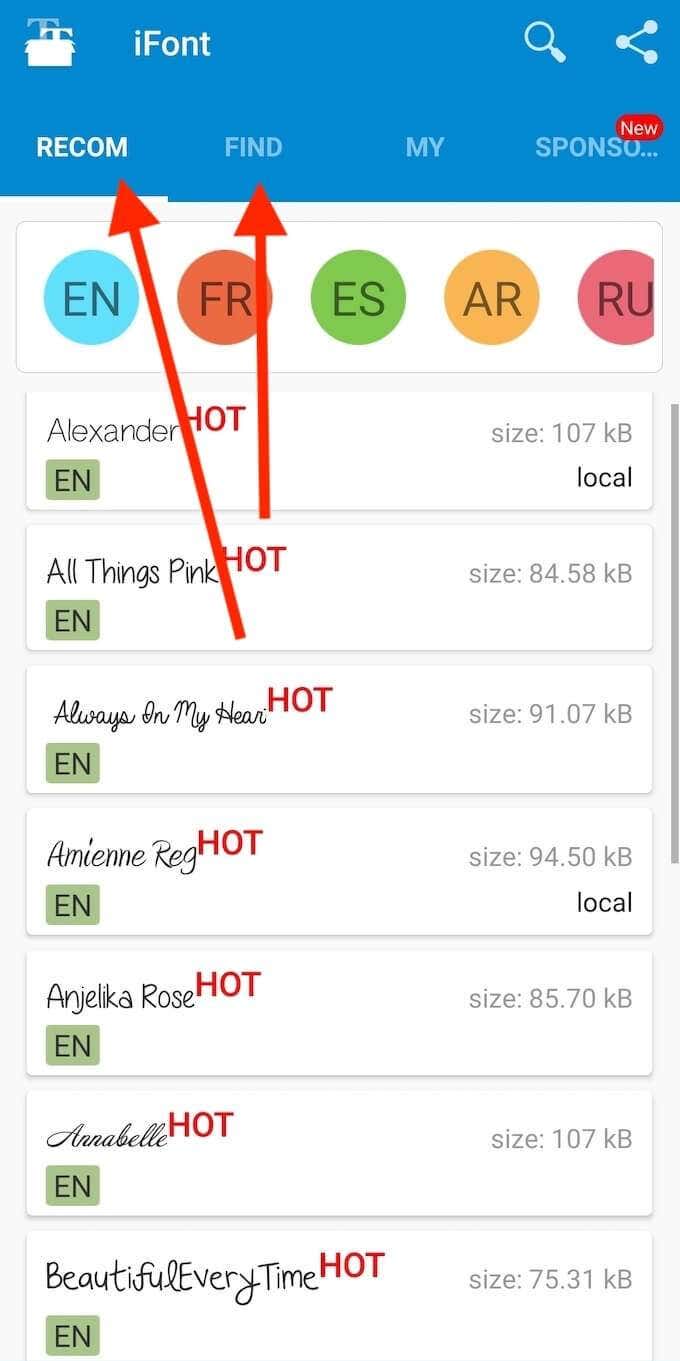
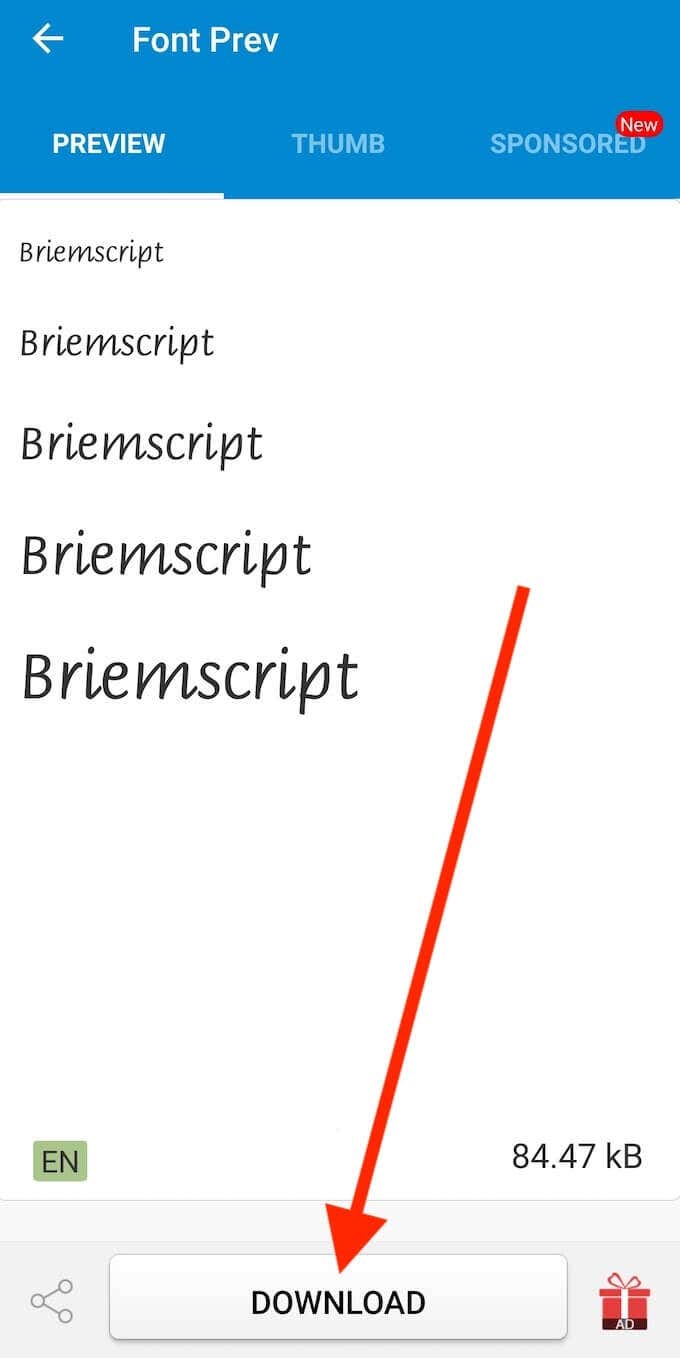
- Select the font that you like. Then select Download.
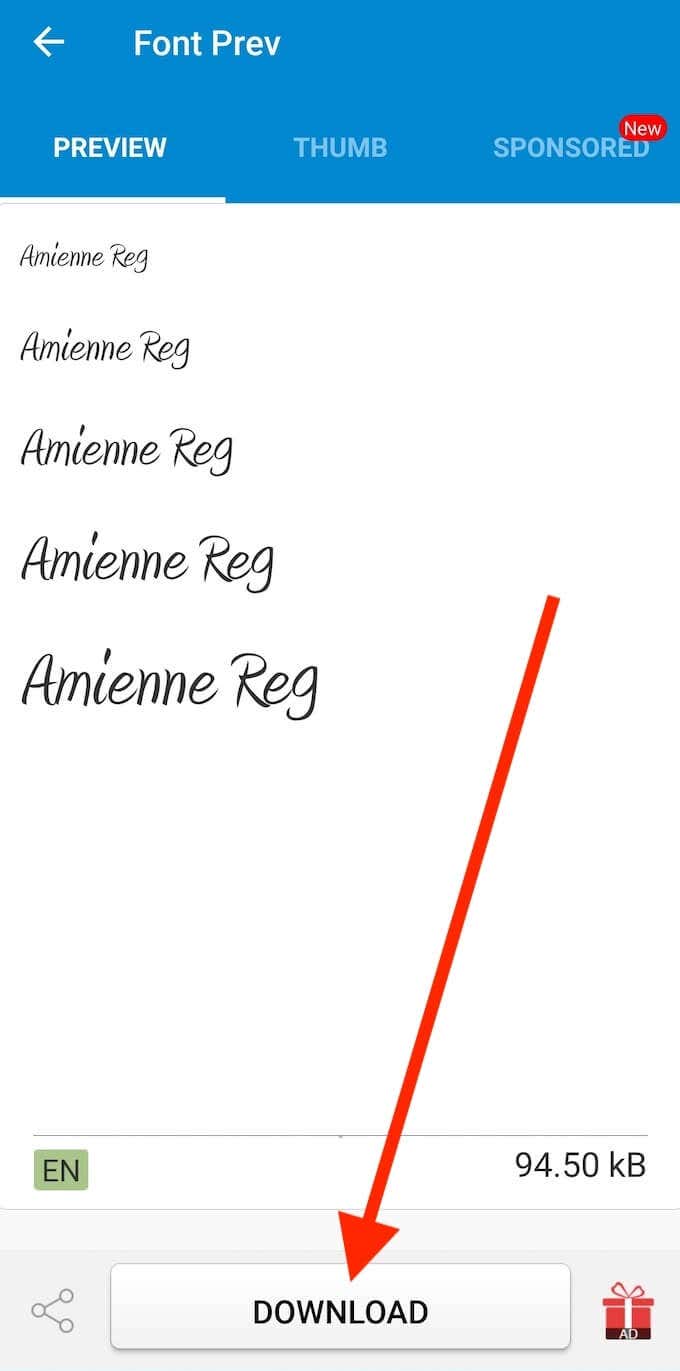
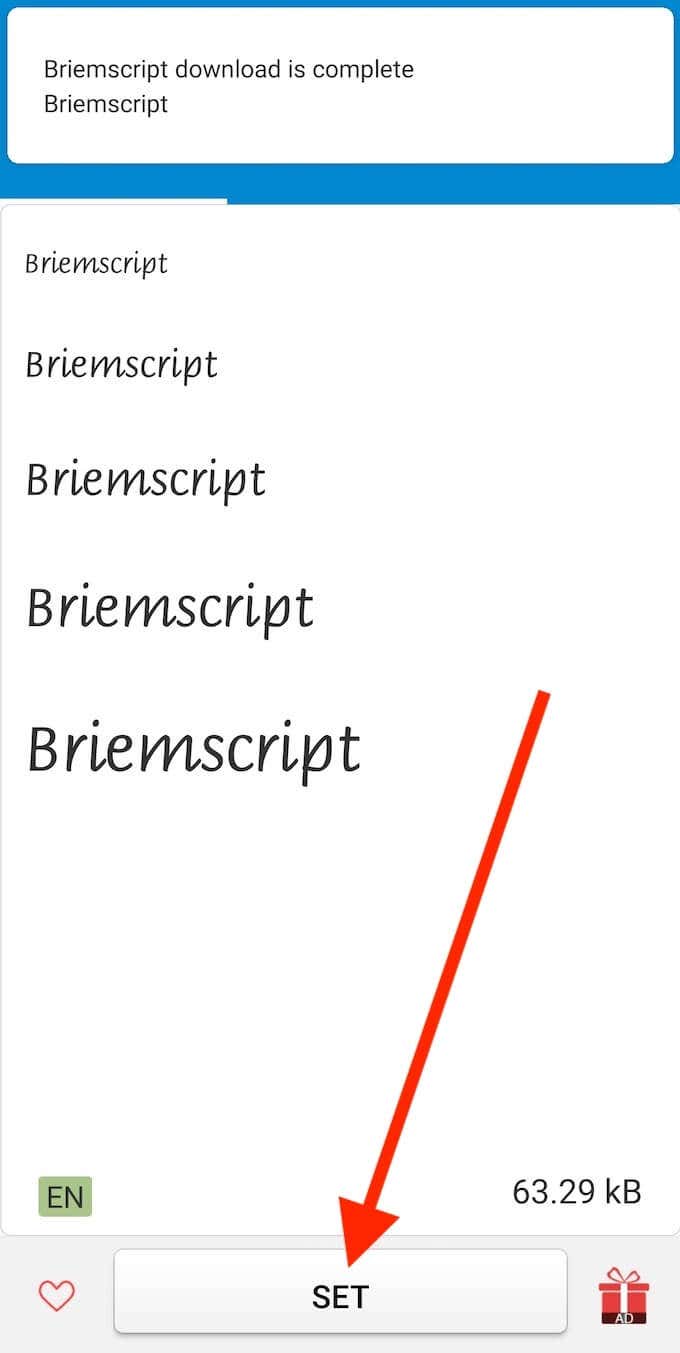
- You’ll see a pop-up message on your phone when the download’s complete. Select Set.
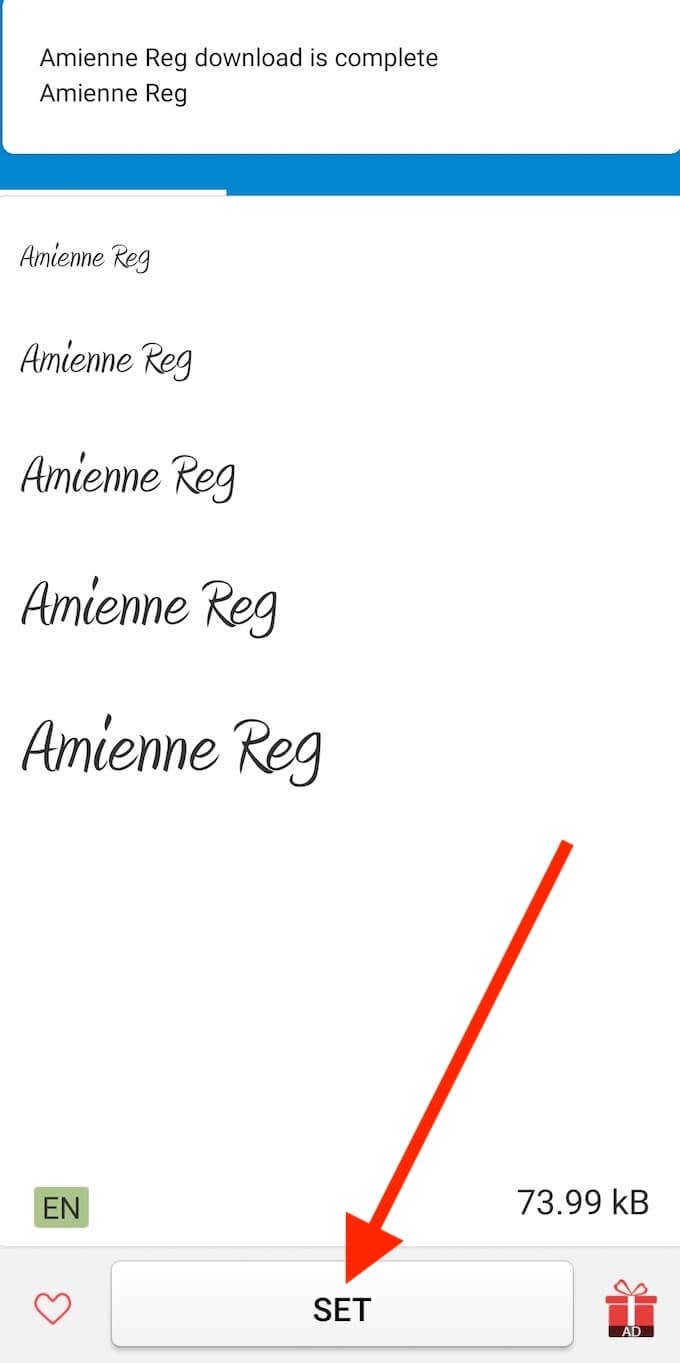
- When using iFont for the first time, the app will prompt you to go through the instructions before changing the font on your smartphone. You can choose to read or skip it.
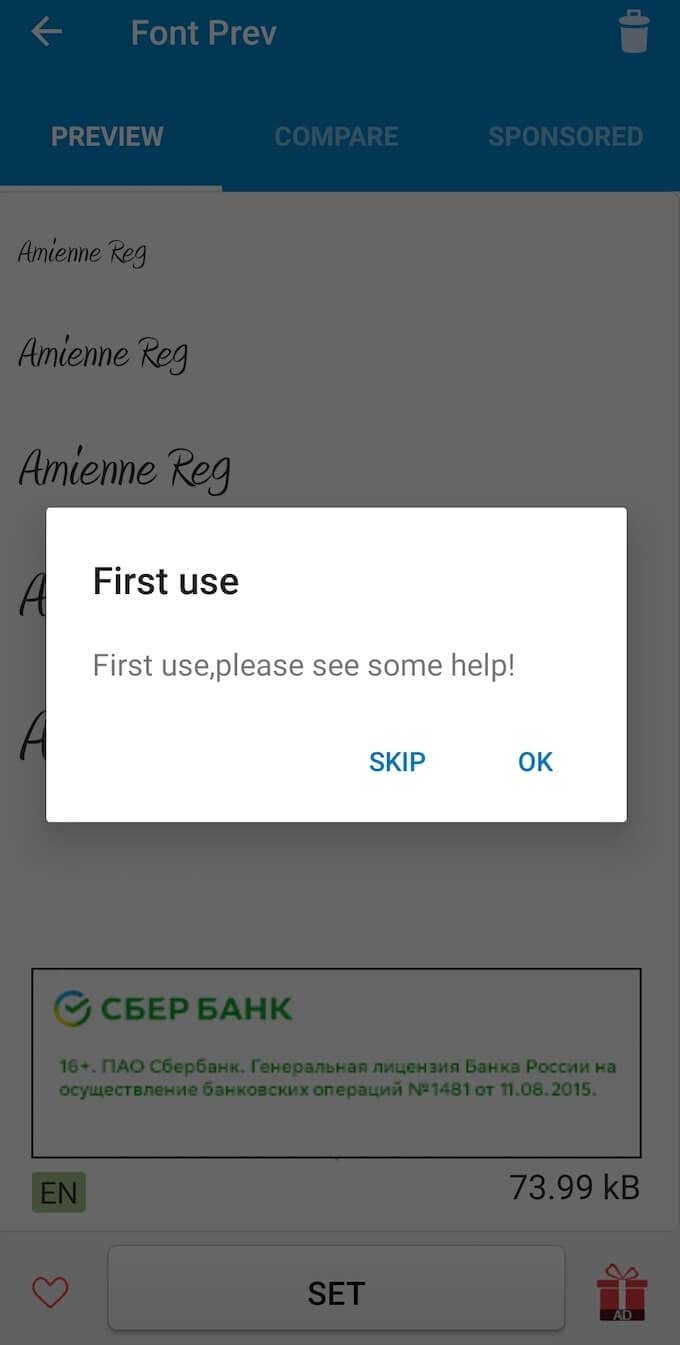
Some smartphones will change the font straight away. If that didn’t happen, follow the path Settings > Display > Font to manually switch to the font you just downloaded.
How to Use iFont on a Rooted Smartphone
For some smartphones, iFont needs special permission to install and change your factory font. That’s no problem for users who have previously rooted their smartphones. If you’re using a rooted Android and have Unknown source installations enabled, here’s how to use the app to install custom fonts on your Android.
- Download and open the iFont app. Then select the font you’d like to use.
- On the desired font’s page, select Download at the bottom of the screen.
- After the download’s complete, select Set.
You’ll see a pop-up message informing you that iFont is requesting SuperUser permissions. After you accept the request, your font should change. If that didn’t happen, follow the path Settings > Display > Font to manually switch to the font you just downloaded.
Install New Fonts on Android Using Action Launcher
If all the methods described above failed, you can try using a third-party launcher to change your factory font on Android. Its main function is to give you more control over the User Interface and layout of your smartphone’s homescreen.
A launcher will also allow you to use a custom font instead of the default one. The only downside is that the changed font will only affect the main UI, meaning that it won’t change the font within the apps you’re using.
There are a few different third-party launchers that you can try, including the Action Launcher. It’s a free app that supports various custom fonts. Here’s how to use it to install a new font on your Android.
- Download and install Action Launcher from the Google Play store.
- Action Launcher will prompt you to go through all of the customization options first and give it permission to change your default Launcher. Select Done after you’re finished.

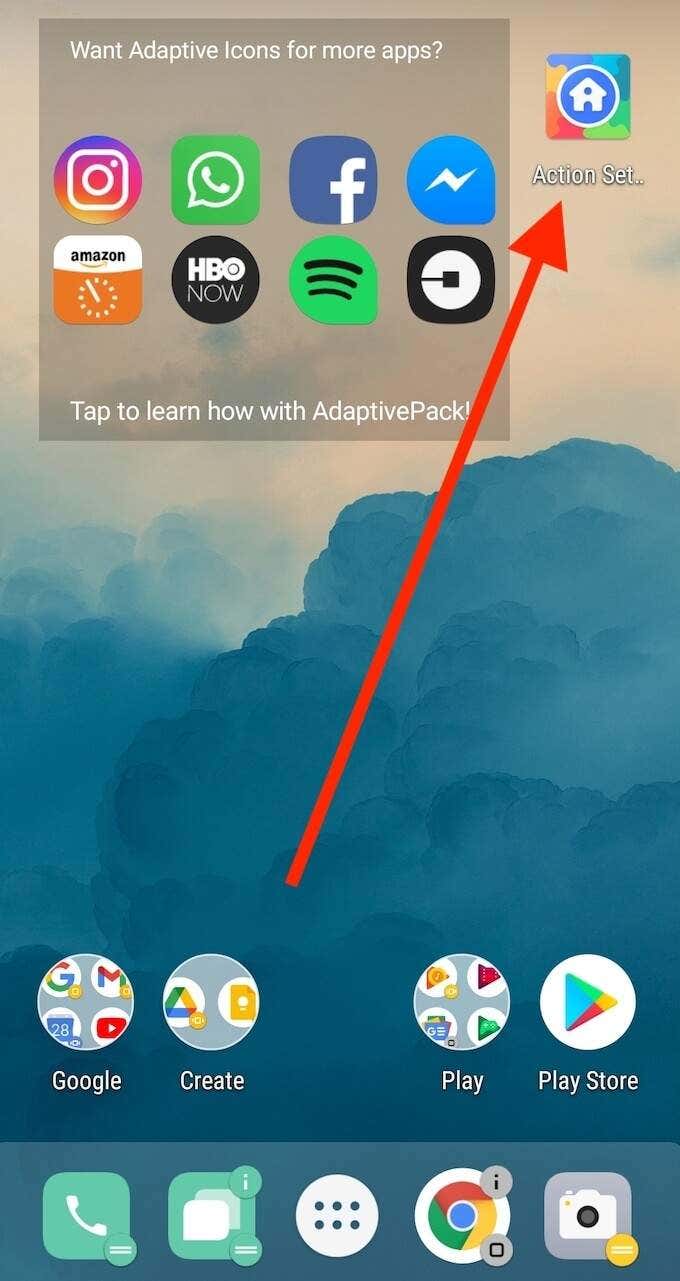
- You’ll now see an Action Launcher Settings icon on your home screen. Select Action Settings.
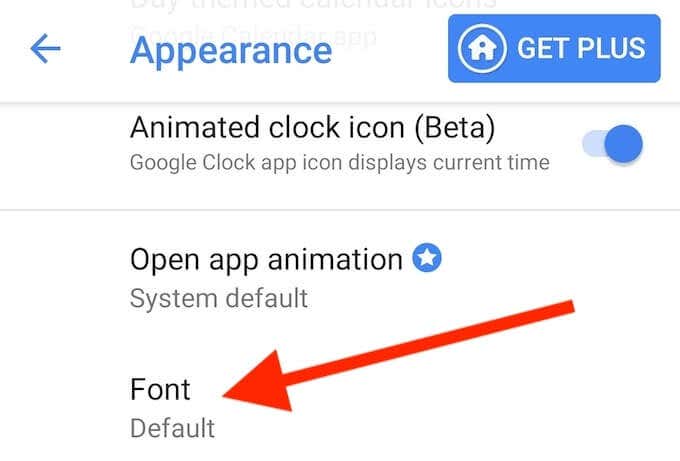
- Select Appearance.

- Select Font to change the default font on your smartphone. Choose a font that you like from the list.
Action Launcher will then automatically apply the font you selected to your main UI.
Time to Customize Your Android
The main advantage of an Android smartphone is how customizable it is. You can tweak and change your phone to your liking, down to the smallest detail such as font. Even though different manufacturers have different paths that you’ll have to follow, you’re bound to find a way to install custom fonts on your Android device after trying the various methods that we described in this article.
Have you ever tried to change the factory font on your Android device? Which method (or methods) did you choose to do it? Share your experience with customizing your smartphone in the comments section below.
Anya is a freelance technology writer. Originally from Russia, she is currently a full-time Remote Worker and Digital Nomad. With a background in Journalism, Language Studies, and Technical Translation, Anya couldn’t imagine her life and work without using modern technology on a daily basis. Always looking out for new ways to make her life and location-independent lifestyle easier, she hopes to share her experiences as a tech- and internet-addict through her writing. Read Anya’s Full Bio
Источник
What is the default font family in Android?
Starting in API 16, Jellybean Roboto was introduced as available font family to use. See whats «new» in Android 16 here.
Specifying android:fontFamily=»sans-serif» (Roboto in API 16+) on a TextView the default fontFamily of the TextView ?
From Material design typography website:
«Roboto and Noto are the standard typefaces on Android and Chrome.»
«Roboto is a sans-serif typeface family developed by Google as the system font for its mobile operating system Android.»
I do not see in the docs what the default fontFamily of Android is. See references:
- https://developer.android.com/reference/android/R.attr.html#fontFamily
- Valid values for android:fontFamily and what they map to?
- https://developer.android.com/about/versions/android-4.1.html#Fonts
- http://alvinalexander.com/photos/android-roboto-fonts-examples
Answers
There is no documentation on d.android.com for font family names. However, if you look at AOSP, the default fonts are loaded in android.graphics.* . The FontListParser loads the default fonts from /system/etc/fonts.xml (Android 5.0+) or /system/etc/system_fonts.xml (Android 4.1). The default fonts are loaded in Typeface#init.
The two XML files have some documentation. The first font is the default font. You can pull /system/etc/fonts.xml from your device. A device manufacturer or custom ROM may change the default system fonts.
fonts.xml (API 21+)
NOTE: this is the newer (L) version of the system font configuration, supporting richer weight selection. Some apps will expect the older version, so please keep system_fonts.xml and fallback_fonts.xml in sync with any changes, even though framework will only read this file.
All fonts withohut names are added to the default list. Fonts are chosen based on a match: full BCP-47 language tag including script, then just language, and finally order (the first font containing the glyph).
Order of appearance is also the tiebreaker for weight matching. This is the reason why the 900 weights of Roboto precede the 700 weights — we prefer the former when an 800 weight is requested. Since bold spans effectively add 300 to the weight, this ensures that 900 is the bold paired with the 500 weight, ensuring adequate contrast.
system_fonts.xml (API 16-20)
This file lists the font families that will be used by default for all supported glyphs. Each entry consists of a family, various names that are supported by that family, and up to four font files. The font files are listed in the order of the styles which they support: regular, bold, italic and bold-italic. If less than four styles are listed, then the styles with no associated font file will be supported by the other font files listed.
The first family is also the default font, which handles font request that have not specified specific font names.
Источник
How to Install Custom Fonts on Android Device? [Complete Guide]
Overview: In this article, you will learn to install custom fonts on the android device wheater it is rooted or not along with a complete installation guide.
Fonts are everything. The state of social media existence depends greatly upon the diversity of fonts available on the internet.
Like computers, smartphones are also enriched with many font typefaces. Though smartphone manufacturers fabricate a handful of well-known font types, you might, at some point in time, want to install fonts on Android that aren’t readily preinstalled.
This comprehensive guide will teach you exactly how to install otf / ttf fonts on Android. The custom fonts as you want.

Android is open source
Even those with some technical expertise would admit that Android’s love for open source makes tinkering a lot more fun as compared to iOS.
Android fonts aren’t by any means easy to install, but at the same time, they aren’t too hard. The concept is pretty simple which I’ll enumerate below.
To lift-off, let us take it easy and discuss some “unrooted” ways to install custom fonts on Android.
1. Android Launchers
Android launchers not only revamp your smartphone top-down they also give you many new fonts to use. The exact font typefaces vary according to font packs that are combined with these launchers.
- iPhone Launcher
- Go Launcher
- Microsoft Launcher
- Nova Launcher
Almost all Android launchers are available on Google Play Store and come with rolling ads. They can be removed by in-app upgrades. Doing so would also give you a lot of free themes, icon packs, and much more.
2. iFont (Expert of Fonts)
iFont contemplates users by delivering a rich set of font typefaces that are compatible with the Android system.
It has multi-lingual support which includes Arabic, Myanmar, Japanese, Korean, Japanese, French, Spanish, Vietnamese, Russian, among several others.
iFont is rewarding owning it but it comes with a downside which is that it might require a rooted Android device unless you own one of the followed enlisted version:
- Meizu
- Xiaomi (MiUi)
- Huawei (Emotion UI)
- Samsung Galaxy S7, S8, S9, Note, and Note II
If you own one of these supported devices, you can install ttf fonts on android without root. To download fonts on android pick a font, hit download, and start using it right away.
iFont does come with one limitation for devices that aren’t listed above. You might face some compatibility issue that asks you to root your device.
You should install TWRP Custom ROM on your Android device and then use either Magisk or SuperSu to root.
A word of caution:
Rooting cancels any outstanding warranty on the smartphone.
Rooting exposes your Android device to many vulnerabilities such as adware, spyware, malware, and other virtual threats.
Your phone could brick in many different ways, if you don’t stick to this guide. Don’t go out venturing into your own tactics.
Keep the tools readily available to perform rooting. There’s no alternative to that.
Last but not the least, make sure you back up all your files before rooting.
With that out in order, let us go to the next point and check the apps that support rooted smartphones.
Once rooted, you can download and use those font typefaces as well.
Here’s How to Download & Install Custom Fonts On Android Without Root
To download fonts on android, first of all, you need to download iFont, once you get this on your device-
- Browse through the list of fonts under Online.
- Then download the desired font and hit Set.
- When prompted for the font mode, select System mode, then tap OK.
- Reboot your device and enjoy the new font.
- To use a local .ttf font file, copy it from your PC and paste it inside the Android device /sdcard/ifont/custom directory.
Thereafter, perform the following steps in a sequence.
- Tap the Menu from the main screen.
- Then tap Settings, Change Font Mode.
- For rooted non-Samsung devices, choose System Mode. For Samsung devices, choose the Samsung mode.
- Hit the Custom tab, then pick the font you like then tap Set later.
- Press OK when the prompt shows up.
- Tap OK again at the prompt.
- Reboot your device after applying the new font.
How to Install Custom Fonts Typefaces on a Rooted Android Device?
Since your Android is now rooted, let us start off with something easy, shall we?
I promise you will forget ever having to put up with the same font again.
FontFix: This lets you install custom fonts easily.
FontFix is a goldmine of Android font typefaces.
Pick any font you like from the ‘preview’ then set it up system-wide.
FontFix is ad-supported. So. if you want to get rid of annoying ads you must shed a few bucks.
All font typefaces on FontFix also have a ‘.ttf’ as a suffix.
If there are Android custom fonts that you want to download, it is recommended that you first download them onto your PC and then move to the /sdcard directory of your device.
Don’t have a .ttf file? Follow these steps.
- Launch FontFix app.
- Go to Menu and choose Select to start backing up the default font.
- When prompted with SuperSu permissions, grant them.
- Locate the .ttf file that you saved earlier.
- Choose the .ttf file to start its installation from the pop-up (this will be set as a default font.)
- Grant SuperSU permissions.
- After the installation is finished, FontFix will require a reboot. Click Yes when prompted.
Instead of bringing over user-defined font typefaces, you can go through preconfigured font styles in the app.
The Server and Preview tabs are displayed from the Local tab in the Font Installer’s interface.
- Select the Server tab.
- Choose the font that you want to download and install.
- Wanna check a sample text written in your chosen font style, tap Preview.
- Finally, confirm your choice by tapping Install. It will install all of the Android font styles.
- Perform another Backup, and then reboot the device when it is ready.
If installed correctly, Android custom fonts will become a part of the system fonts.
Therefore, you need to know about the default system fonts.
What are system fonts?
System fonts come pre-installed from your OEM. Generally, Roboto is the default font.
This popular Sans Serif font pack has variations too.
- Roboto-Regular.tff
- Roboto-Bold.tff
- Roboto-Italic.tff
- Roboto-BoldItalic.tff
Where are fonts stored on Android?
System fonts reside inside the /system/fonts directory.
Before you begin tinkering with system files, you need to locate the .tff file for ROBOTO. Take caution since all changes are permanent.
How to edit /system/fonts directory- The Right Way.
All default system font files reside inside /system/fonts.
As a result, it’s best to use ADB commands.
Also, an efficient File Explorer with root access would be needed.
Hands-on example:
Let’s say you want to install custom font “Proxima-Nova“, gather its .tff file, and using ADB commands, replace Roboto-Regular.tff with Proxima-Nova.tff.
In order to not alter anything within the system, rename “Roboto-Regular.tff” to “Roboto-Regular1.tff“.
Bear in mind not to move this file out of this folder. Everything needs to be within /system/fonts directory.
Create a complete backup of the system at this point.
Since you already have TWRP installed as your Custom ROM, create a NANDroid backup of the system at this point before proceeding any further.
Should anything go awry, you can easily restore everything back to as it was.
Download and install ES File Explorer
Using the ES File Explorer is relatively easier than using the ADB commands. Follow these steps exactly as indicated:
- Launch the application.
- Transfer the renamed file “Roboto-Regular(1).tff” to the /sdcard directory.
- Tap Menu, Settings, Root Settings.
- Open the Root Explorer and grant SuperSU/Magisk permissions.
- Remember to enable “mount file system” feature.
- Locate /system/fonts directory and rename Roboto-Regular.tff
- Navigate to the desired font file & rename it to Roboto-Regular.tff
- Copy this file to /system/fonts, then select OK.
- Open /system/fonts directory and access properties of the custom font.
- Tap “Change” to set Read & Write permission for the User, then tap OK.
- Save changes and hit Reboot device.
So far, you were able to get away without actually using any of the commands.
Now, let’s jump to the geeky part where you will be using the ADB commands to install fonts in android.
Before using the ADB commands, ensure that you have the following:
- A rooted Android device with root access.
- Android Software Development Kit (SDK) installed and setup.
- Device’s USB drivers for Windows PC.
- Verify that the ADB is able to detect your device.
- A USB cable, preferably that came with your device.
- Replacement font files that you want to use.
- Open a Command Prompt or PowerShell with admin privileges.
- Right-click then select Run as Administrator.
Lastly, enter the following set of commands.
Now, on your PC you will perform the following steps.
- Rename Proxima-Nova.tff to Roboto-Regular.tff
- Copy and paste or move the renamed “Proxima Nova” font to the /sd card.
- Open Command Prompt on PC.
Run the following set of commands on the terminal to append changes to your device instantly.
Thereafter, reboot your device normally and verify if the system displays a new font.
Apart from iFont there are some other Android font installer is available one of them is by UpToDown, download font installer, choose the font you would like to install, and hit the install button. This installer works only on the rooted android device.
Conclusion
If you follow the above guide step by step you would be able to install fonts on an android Android device. The hesitation behind performing an Android root is understandable. But that means you are solely relying on Android Launchers.
As good as they come, they are not in the same class as Android custom fonts. With that said, if you do not consider yourself a techie, it would be best to not try these methods, otherwise, have fun Androiding!
Источник


