- How To Use Google Drive On Android
- Using Google Drive on Android
- Google Drive Folder on Android
- Downloading Files to Android and Working Offline
- Viewing Your Cached files
- Moving Files from Android to Google Drive
- Using Multiple Google Drive Accounts
- Transferring Files Between Devices With Google Drive
- Common Questions and Answers
- Summary
- How to sync a local folder with Google Drive on your Android device
- How to sync a local folder on device to storage to the Google Drive
- Some tips to use the FolderSync app
How To Use Google Drive On Android
Last Updated: May 23, 2015

Android tablets and phones come with limited storage space when compared to PCs, and so using some form of external storage is essential.
Some tablets have a micro SD card slot which allows you to add physical external storage.
However all tablets and phones can be configured to use cloud storage like Google Drive.
There are many cloud storage providers, and most provide a free limited storage allowance which can easily be expanded as required.
All Google accounts come with a free 15GB storage allowance on Google drive.
Because you really need a Google account to access the Google Play store, then using Google drive cloud storage is the most obvious and easiest choice.
To access Google drive on Android you can use a web browser e.g. Google chrome, but the easiest way is to use the free Google drive App.
If it it is not already installed on your device you can download it from the Google Play store.

Using Google Drive on Android
If you click on the Google drive App to open it it will show you a list of folders and files that are currently on your drive.

What is important to remember is that these files aren’t stored on your device, but on the Internet i.e. in the cloud.
Therefore if you want to access these files you will need an Internet connection.
If you try to access (open) a file when you don’t have an internet connection then you will see something like:

Google Drive Folder on Android
If you have been using Google drive with a PC then the Google drive App creates a Google drive folder on your PC that syncs with your Google drive cloud storage.

To copy files to your Google drive cloud storage you move them to the Google drive folder and they will automatically be synced to the online storage.
The Google Drive App on Android doesn’t work the same way and you don’t have a Google drive folder on Android.
Downloading Files to Android and Working Offline
If you want to access files stored on your Google Drive when you are offline then you will need to create a local copy.
Google drive lets you download files to your Android downloads folder, or to cache the file by enabling available offline.
Click on the icon to the right of the files to show the file details

You should see a screen like the one below:
- Download the file to your downloads folder/directory on Android.
- Cache the file locally.
If you download the file then you will have to go to the downloads folder to read the file when offline.

The download folder is located under the sdcard folder (called primary in Astro file manager), but you can access it using the downloads icon in your Apps tray.
Once it is the download folder you can use a file manager to move it to another location e.g.an external SD card.
If you cache the file then you can read it from the Google Drive App when offline.
However file caching has size limits, and so it cannot be used for large files like movies, or for lots of files.
[outline style=”yellow”]You cannot move cached files to external storage.[/outline]
Viewing Your Cached files

Click on Menu (top left) or swipe from left edge of screen to the right.
Then select on device from the list.

You will then see a list of files that have been cached, and that you can access when offline.

The size of the cache can be changed by going to settings. The maximum cache size is currently 250MB.

Note: Caching limits didn’t appear to be working when I was testing
You can find the offline files in the following location:
sdcard>Android>data>com.google.apps.docs>files>pinned_docs_files_do_not_edit.
They are stored under a folder with a more or less random name.

Although in the screen shot above it shows a pdf file you cannot open this with adobe reader.
It is in a format that is only understood by the Google Drive App.
Moving Files from Android to Google Drive
You can move files and photos from your android device to Google Drive or from Google Drive to Android by using a file manager.e.g. Astro File Manager.
In Astro File Manager Locate the file then press the menu icon and then share.

Choose Google Drive from the Activity chooser.

If you have multiple Google accounts configured then you can then select the Google account to use.
You also need to select a folder location on Google drive, and then press save to store the file/files.

You can then delete them from your device to free up storage space.
Using Multiple Google Drive Accounts
If you have several Google accounts then each account has an associated Google drive cloud storage available
You can access each of these drives from the Google Drive App.
Click on Menu (top left) or swipe from left edge of screen to the right.
The account currently being used is shown at the top left. Click the small while arrow to show other accounts (if you have them).
Then press on the account you want to switch to, and switch accounts.

Transferring Files Between Devices With Google Drive
You can install Google drive on Linux,MAC,Windows,IOS and Android.
Therefore you can use it to copy,move or share files/pictures etc between your PC and tablet.
You simply copy the file to Google drive and download the file from Google drive onto the other device.
![]()
Common Questions and Answers
Q- Can I store offline files on external sd card storage?
A- It appears not- See the google drive product forum answer.
Q- Can I copy/move Pictures,Files or folders from Google Drive to an External SD Card.
A- Google drive doesn’t let you do this directly, but you can use a file manager line Astro file manager that will let you do it.
You can also download them to the download folder, connect your device to your PC using a USB cable and use the Windows file manager to move the files.
Q- Can I change to location of the download folder?
A- I haven’t found out how although there are several articles on the Internet that say you can.
Summary
Using Google drive cloud storage on your tablet/phone is an ideal way of easily increasing the effective storage space on your phone or tablet, and for moving and sharing files,pictures etc between Android,and other devices.
Related Articles and Resources:
Источник
How to sync a local folder with Google Drive on your Android device
Perhaps it might have occurred to you at least once that if you could sync a folder located in your device internal storage or external storage to Google drive without actually copying the data one by one. No?
You could also be probably wondering, “Why a guide for this silly thing? Google drive must have the feature.” No, my dear!
Although, it may sound an obvious feature, but it’s missing in the Google Drive Android app. Yeah, we’re painted you surprised already! (Also, hey Google! you know, if you are listening, it would be cool if you could sync feature into Drive app.)
Anyway, many apps that you may be using for a purpose or two, do allow adding a folder to Google Drive, but most of them lack the sync feature, which would allow you to upload content of a folder on device storage to a Google Drive folder. So that when you lose your phone, you can simply download the files from Google Drive. Or if you wanna send someone a file, you can simply share its Google Drive link.
What if one of your apps doesn’t support the data upload to Google drive or any other cloud storage in the free version or for that matter in any version – free or pro. What do you do? Should you copy the files one by one to Google drive, every time you add a new file?
With Android, there’s always a way.
So, you need to use an app that solves that problem for you, by automatically uploading all content of the folder you specify, to your Google Drive. For example, you have an SMS backup app that can take a daily backup of your messages. You can set the sync for this app’s messages backup folder to Google Drive, so that you always have your messages backed up in Google Drive.
Just head on to the Google Play Store and download an app called FolderSync Lite (free version). The free version has few limitations as it supports only two cloud accounts, has no sync filters and is bundled with ads – as every free app is. However, if you are keen on removing the ads and using more than two cloud accounts, buy the pro version.
FolderSync allows you to effortlessly sync data to and fro between local storage and cloud storage. Though the app is not intuitive for the first time user (don’t worry we got you covered!), but the sync process is fast and reliable.
Ready to get started?
How to sync a local folder on device to storage to the Google Drive
Step 1. Download and Install FolderSync Lite (free version) from the Google Play Store.
Step 2. If you are using an Android version 6 and above, you are asked to grant permission to access photos, media, and files on your device. Tap Allow to grant the permission, or else the app won’t work.

However, asking for permission below Android Marshmallow (6) wasn’t mandatory, so you will directly see the next screen.
Step 3. Tap “Create new Sync” button located at the bottom to synchronize a local folder to the Google Drive.
Step 4. The sync wizard will start. Give your sync folder pair a name to differentiate it from other pairs. Finally, tap Next.
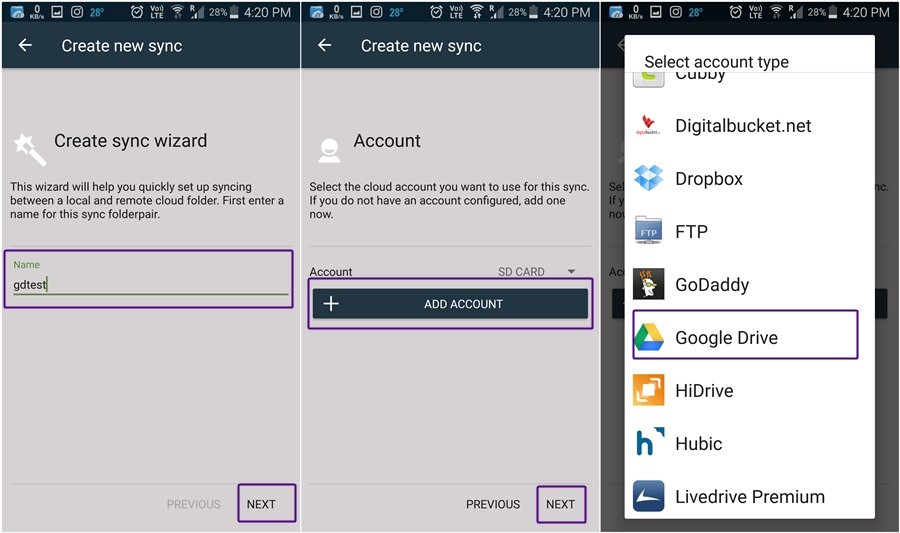
Step 5. Click on “Add Account” to configure your Google Drive account. From the list that appears, select Google Drive.
Psst. If you want to sync the folder to any other cloud service like Dropbox, One Drive, etc., then select that account. The rest of the steps remain the same.
Step 6. The app then asks you to set a unique name for your sync pair. You can name it anything and finally, when you enter the name, make sure you press the authenticate account button and not save. (We know it’s confusing since the SAVE is more prominent while writing the name).

Step 7. You are taken to the Google Sign in Page. Sign in with your account followed by giving permission for offline access.
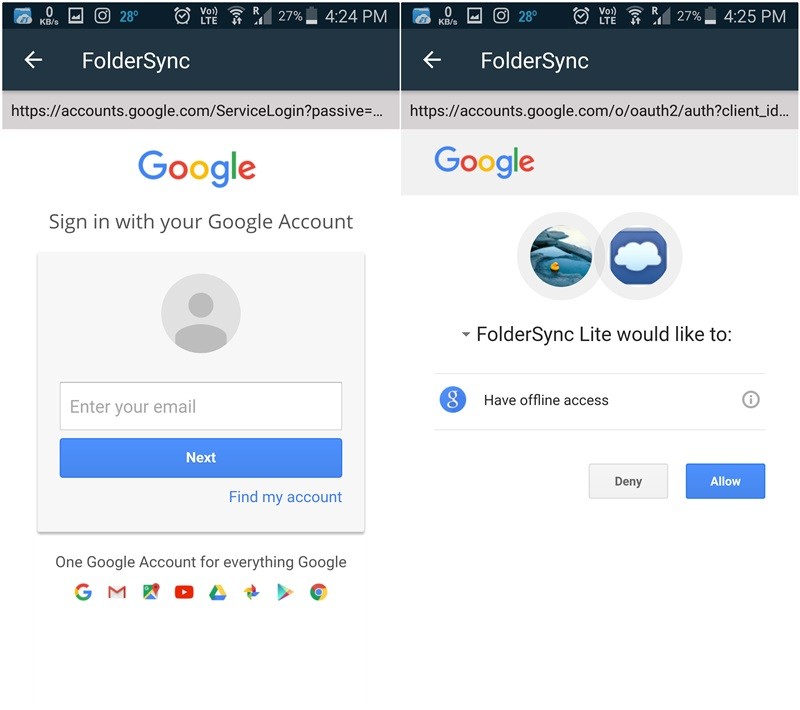
Step 8. If everything has gone well, you will get a toast saying “Login successful”. Also, you will see your Google Name, Google Drive Quota and Google Drive usage statistics in the next screen. You will also see “Authenticate account” has changed to “Unlink account” which you can use to unlink or remove your Google account from the app.
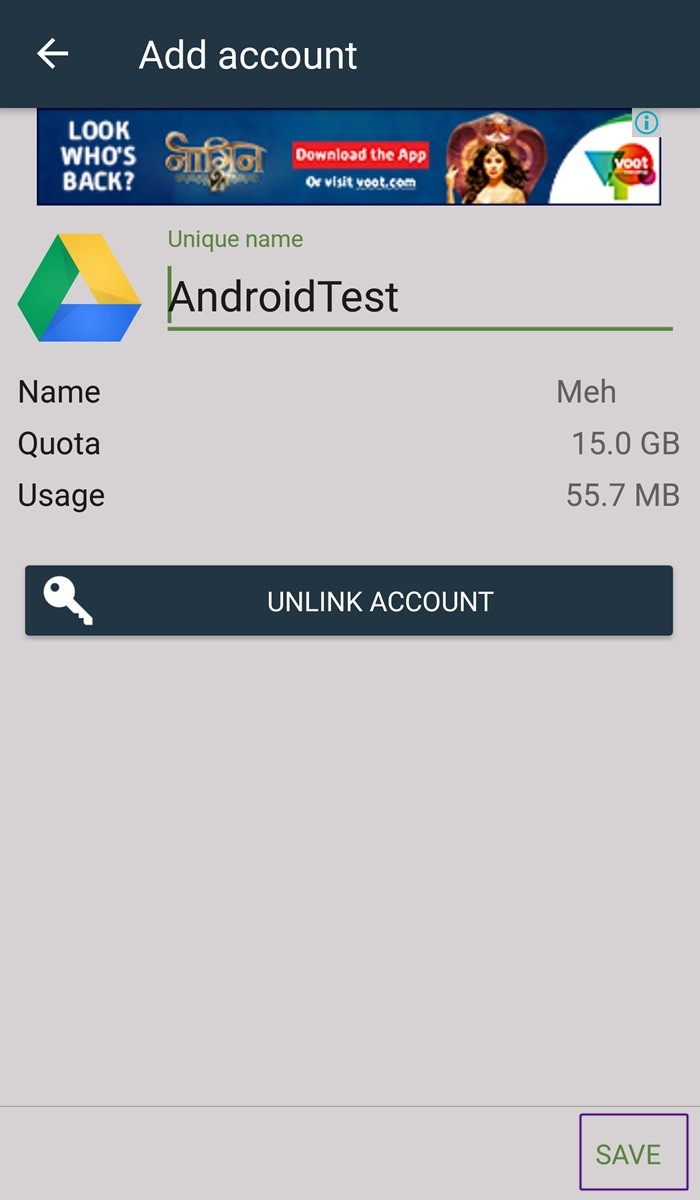
Press the Save button located at the bottom right corner.
Your account is now set up. All you have to do is tell the app which folder to sync to the Google drive.
Step 9. After you tap the Save button, you are redirected to the “create new sync” screen, the one where you started from. However, next to the Account you will see the name you set for this sync. To sync the folder to Google drive, hit NEXT located at the bottom right corner of the screen.

Step 10. Select the Sync type that you want to use for this particular folder. There are three options:
- To local folder: Use this option if you want to sync a folder from Google Drive to your device internal storage. Any changes you make to this folder on your device are not reflected in the Google Drive but the changes you make to the folder in the Google drive, are reflected in your device.
- To remote folder: Use this option if you want to sync a folder from your Android device to Google Drive. Any change you make to this folder in your device is reflected in the Google drive but any change you make to the folder in the Google Drive is not reflected in the app. Note: If you are looking to backup a folder of any other app, use this one, so that that app’s data in a folder on your device gets backup to Google Drive.
- Two Way: Use this option if you want to sync a folder both ways i.e you can change the contents of your folder both in the Google drive and in the device and the same is reflected in the other.
We have selected Two Way option since it is the best-suited one. However, if you want to sync only from local storage to Google drive, go with “To remote folder”. Tap Next.
Step 11. In the remote folder option, select the folder to which you want to sync the data and in local folder select the folder from which you want to sync data. Tap next to go to the next screen.
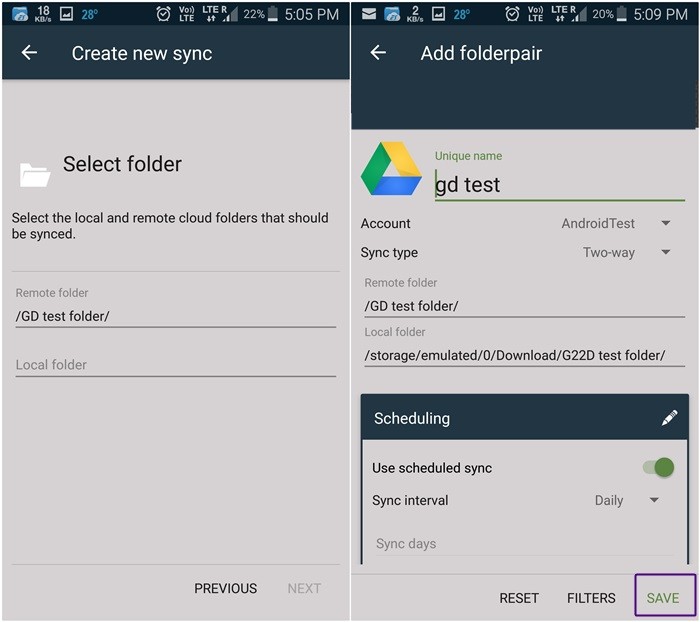
Step 12. Use the scheduled sync option to set the time interval when you want to sync the data. Finally press Save.
Now relax back and let the FolderSync app do its job. Any change you make to this folder in your device will be reflected in the Google Drive and vice versa.
If your message backup takes new backups, the new backup files will be automatically uploaded to Google Drive folder.
Some tips to use the FolderSync app
- To view the sync status and sync history of your folder, tap the Sync Status option in the home screen of the app.
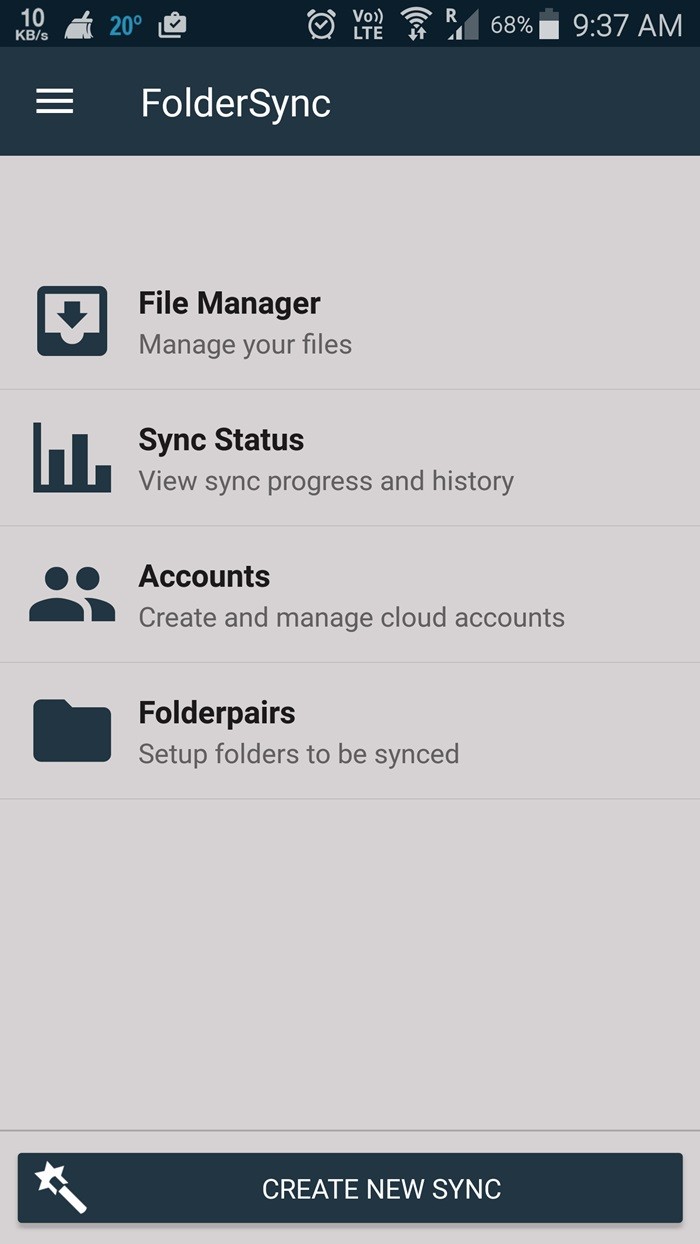
- If you want to add another cloud account, tap the “Accounts” option followed by Plus button located at the bottom. You need to follow the above steps to add another account. However, you can only add two accounts in Lite version. If you want to sync more accounts, you would have to say bye to the free version and buy a pro version.
- If you want to sync more folders, tap the Folderpairs option followed by Plus (Add) button at the bottom of the screen.
- The app gives you multiple sync options to choose from such as “sync subfolders”, “Wifi or Mobile data connection”, “show notifications” etc. You can set the options as per your preference.
- You can change the theme of the app, in case you don’t like the default theme. To do so, tap the three lines located at the top left corner, followed by settings, finally tap the theme option to change the theme.
- Below the theme option, you will find another option called Startup screen. This option allows you to change the startup screen of the app – the first screen that appears when you open the app.
Update 30/03/2019: We have verified that this method to sync a local folder to your Google Drive still works as expected hence you shouldn’t encounter any issues while following the guide.
We hope you liked the tutorial. Think we can do better, let us know in the comments.
Источник


