- Android — Activities
- Example
- Different Types of Activities in Android Studio
- (1) No Activity
- (2) Basic Activity
- (3) Bottom Navigation Activity
- (4) Empty Activity
- (5) Fullscreen Activity
- (6) Google Admob Ads Activity
- (7) Google Maps Activity
- (8) Login Activity
- (9) Master/Detail Flow
- (10) Navigation Drawer Activity
- (11) Settings Activity
- (12) Scrolling Activity
- (13) Tabbed Activity
- (14) Fragment + ViewModel
- (15) Native C++
Android — Activities
An activity represents a single screen with a user interface just like window or frame of Java.Android activity is the subclass of ContextThemeWrapper class.
If you have worked with C, C++ or Java programming language then you must have seen that your program starts from main() function. Very similar way, Android system initiates its program with in an Activity starting with a call on onCreate() callback method. There is a sequence of callback methods that start up an activity and a sequence of callback methods that tear down an activity as shown in the below Activity life cycle diagram: (image courtesy : android.com )
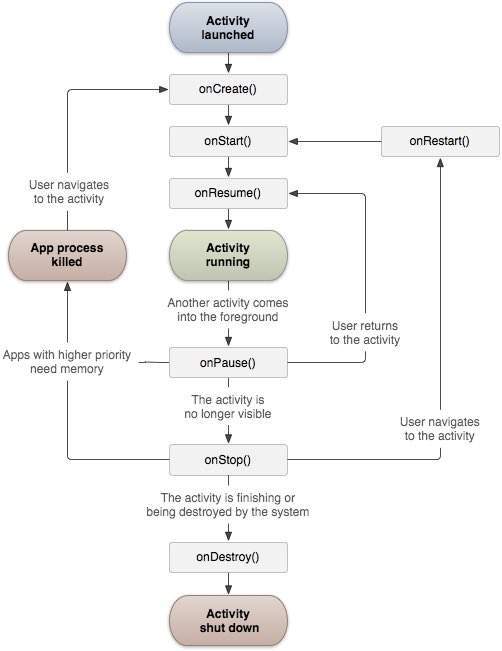
The Activity class defines the following call backs i.e. events. You don’t need to implement all the callbacks methods. However, it’s important that you understand each one and implement those that ensure your app behaves the way users expect.
| Sr.No | Callback & Description | |||||||
|---|---|---|---|---|---|---|---|---|
| 1 |
| Step | Description |
|---|---|
| 1 | You will use Android studio to create an Android application and name it as HelloWorld under a package com.example.helloworld as explained in the Hello World Example chapter. |
| 2 | Modify main activity file MainActivity.java as explained below. Keep rest of the files unchanged. |
| 3 | Run the application to launch Android emulator and verify the result of the changes done in the application. |
Following is the content of the modified main activity file src/com.example.helloworld/MainActivity.java. This file includes each of the fundamental life cycle methods. The Log.d() method has been used to generate log messages −
An activity class loads all the UI component using the XML file available in res/layout folder of the project. Following statement loads UI components from res/layout/activity_main.xml file:
An application can have one or more activities without any restrictions. Every activity you define for your application must be declared in your AndroidManifest.xml file and the main activity for your app must be declared in the manifest with an that includes the MAIN action and LAUNCHER category as follows:
If either the MAIN action or LAUNCHER category are not declared for one of your activities, then your app icon will not appear in the Home screen’s list of apps.
Let’s try to run our modified Hello World! application we just modified. I assume you had created your AVD while doing environment setup. To run the app from Android studio, open one of your project’s activity files and click Run  icon from the toolbar. Android studio installs the app on your AVD and starts it and if everything is fine with your setup and application, it will display Emulator window and you should see following log messages in LogCat window in Android studio −

Let us try to click lock screen button on the Android emulator and it will generate following events messages in LogCat window in android studio:
Let us again try to unlock your screen on the Android emulator and it will generate following events messages in LogCat window in Android studio:
Next, let us again try to click Back button on the Android emulator and it will generate following events messages in LogCat window in Android studio and this completes the Activity Life Cycle for an Android Application.
Источник
Different Types of Activities in Android Studio
Android Studio is the official IDE (Integrated Development Environment) for Android application development and it is based on JetBrains’ IntelliJ IDEA software. Android Studio provides many excellent features that enhance productivity when building Android apps, such as:
- A flexible Gradle-based build system
- A fast and feature-rich emulator
- A blended environment where one can develop for all Android devices
- Apply Changes to push code and resource changes to the running app without restarting the app
- GitHub and Code template integration to assist you to develop common app features and import sample code
- Extensive testing tools and frameworks
- C++ and NDK support
- Built-in support for Google Cloud Platform, making it easy to integrate Google Cloud Messaging and App Engine and many more.
Generally, when a developer wants to create a new project in the android studio he/she needs to select a project template which is consisting of many activities as shown in the below image. (Considering that the developer developing the android app for phone and tablet). So in this article, we are going to discuss what do these activities mean in brief. Here is the list of activities:
- No Activity
- Basic Activity
- Bottom Navigation Activity
- Empty Activity
- Fullscreen Activity
- Google Admob Ads Activity
- Google Maps Activity
- Login Activity
- Master/Detail Flow
- Navigation Drawer Activity
- Settings Activity
- Scrolling Activity
- Tabbed Activity
- Fragment + ViewModel
- Native C++

(1) No Activity
As the name suggests No Activity means creating a new empty project. When the developer selects this activity there will be neither an XML file nor a Java/Kotlin file. No files are automatically generated when you select No Activity. The project structure will look like the following:

(2) Basic Activity
Basic Activity creates a new basic activity with the navigation component. When the developer selects the basic activity, then you will be getting a menu button, and you will also get a floating action button. These files are automatically created when you select Basic Activity:

(3) Bottom Navigation Activity
Bottom Navigation Activity creates a new activity with bottom navigations. We all have come across apps that contain a Bottom Navigation Bar. Some popular examples include Instagram, WhatsApp, etc. These files are automatically created when you select Bottom Navigation Activity and the following is the welcome page:

(4) Empty Activity
This is a popular activity and we frequently select this activity when we start developing an android project. It simply creates a new empty activity.
Note: Please mark the phase in No activity and Empty Activity. In No Activity, it creates a new empty project and in Empty Activity, it creates new empty activity. Please refer to Introduction to Activities in Android to get more information about the activities in android.
These files are automatically created when you select Empty Activity and the following is the welcome page:

(5) Fullscreen Activity
Fullscreen activity creates a new activity that toggles the visibility of the system UI (status and navigation bars) and action bar upon user interaction. Many apps are using Full-Screen Activity to have an attractive screen to show slides etc. These files are automatically created when you select Fullscreen Activity and the following is the welcome page:

(6) Google Admob Ads Activity
To earn money from the Android app or game, there are many ways such as in-App Purchases, Sponsorship, Advertisements, and many more. But there is another popular method to earn money from the Android app is by integrating an advertisement e.g known as Google AdMob. Google AdMob is designed with developers in mind, AdMob helps to earn more app revenue, deliver better user experience, and surface actionable insights all with automated tools that do the hard work for you. There are mainly four types of flexible, high-performing format available in Google AdMob
- Native: Ads that you design to fit the app, seamlessly
- Interstitial: Full-screen ads that capture attention and become part of the experience.
- Banner: Traditional formats in a variety of placements.
- Rewarded Video: An immersive, user-initiated video ad that rewards users for watching.
In Android Studio Google Admob Ads Activity creates an activity with AdMob Ad fragment. These files are automatically created when you select Google Admob Ads Activity and the following is the welcome page:

(7) Google Maps Activity
Android permits to integrate google maps in our application. One can show any location on the map or can show various routes on the map etc. One can also customize the map according to the choices. So Google Maps Activity creates a new activity with a Google Map. These files are automatically created when you select Google Maps Activity and the following is the welcome page:

(8) Login Activity
As the name suggests Login Activity creates a new login activity, allowing users to enter an email address and password to log in or to register with the application. Login Activity is one of the most common activities that almost every application contains this activity. These files are automatically created when you select Login Activity and the following is the welcome page:

(9) Master/Detail Flow
Master/Detail Flow creates a new master/detail flow, enabling users to view a collection of objects as well as details for each object. This flow is presented using two columns on tablet-sized screens and one column on handsets and smaller screens. This template creates two activities, a master fragment, and a detailed fragment. These files are automatically created when you select Master/Detail Flow and the following is the welcome page:

(10) Navigation Drawer Activity
Android Navigation Drawer is a sliding left menu that is used to display the important links in the application. The Navigation drawer makes it easy to navigate to and fro between those links. It’s not visible by default and it needs to open either by sliding from left or clicking its icon in the ActionBar. In broader terms, Navigation Drawer is an overlay panel, which is a replacement of an activity screen that was especially dedicated to showing all the options and links in the application. These files are automatically created when you select Navigation Drawer and the following is the welcome page:

(11) Settings Activity
Setting Activity creates a new activity that allows a user to configure application settings. These files are automatically created when you select Settings Activity and the following is the welcome page:

(12) Scrolling Activity
Scrolling activity is an essential activity to have in the app as it provides the users with a perfect view when the layout is long. It creates a new vertical scrolling activity. These files are automatically created when you select Scrolling activity and the following is the welcome page:

(13) Tabbed Activity
In Android, TabLayout gives a horizontal layout to display tabs. If TabLayout is used then along with it, Fragment is also used, because fragments are lightweight and the app can have more functionality on a single screen if more fragments are added. Whenever the user clicks on the tab it will lead to the transaction of one Fragment to another. ViewPager is used to swipe between the tabs. WhatsApp, Facebook, etc. are a perfect example of TabLayout with ViewPager. This is how a TabLayout looks like.
Tabbed Activity creates a new blank activity with tabs. These files are automatically created when you select Tabbed Activity and the following is the welcome page:

(14) Fragment + ViewModel
As the name suggests Fragment + ViewModel creates a new activity and a fragment with the view model.
- Fragment: A Fragment is a piece of an activity which enable more modular activity design. A fragment encapsulates functionality so that it is easier to reuse within activities and layouts.
- ViewModel: It exposes those data streams which are relevant to the View. Moreover, it servers as a link between the Model and the View. Model: This layer is responsible for the abstraction of the data sources. Model and ViewModel work together to get and save the data. View: The purpose of this layer is to inform the ViewModel about the user’s action. This layer observes the ViewModel and does not contain any kind of application logic.
These files are automatically created when you select Fragment + ViewModel and the following is the welcome page:

(15) Native C++
Native C++ creates a new project with an empty activity configured to use JNI. JNI is the Java Native Interface. JNI describes a way for the bytecode that Android compiles from executed code that is written in the Java or Kotlin programming languages to interact with native code that is written in C/C++. JNI is vendor-neutral, has support for loading code from dynamic shared libraries, and while cumbersome at times is efficient.
Источник


