- Check your Apple ID device list to see where you’re signed in
- See where you’re signed in
- Use your iPhone, iPad, iPod touch, or Apple Watch to see where you’re signed in
- Use your Mac to see where you’re signed in
- Use your PC to see where you’re signed in
- Use the web to see where you’re signed in
- Add a device to the list
- Remove a device from the list
- Use your iPhone, iPad, or iPod touch to remove a device
- Use your Mac to remove a device
- Use your PC to remove a device
- Use the web to remove a device
- Permanently remove a device from your account page
- How to create a new Apple ID
- Create an Apple ID on your iPhone, iPad, or iPod touch
- Create an Apple ID when you set up your device
- Create an Apple ID using the App Store on your device
- Create an Apple ID on your Mac
- Create an Apple ID on your Windows PC
- Create an Apple ID on another device
- Create an Apple ID on the web
- If you see a message that you need to sign in to iTunes
- Learn more
- What Happens When You Sign out Apple ID on iPhone
- Olanrewaju Sodiq
- 1. iCloud
- 2. Apple Music
- 3. Apps and App Store
- 4. iMessage and FaceTime
- 5. Find My (iPhone)
- 6. Files and Documents
- 7. iCloud Email
- Be in the Know
- Read Next
- 6 Best Ways to Manage Notifications on iPhone
- Top 8 Ways to Fix Keyboard Lag on iPhone
- How to Use SharePlay in FaceTime on iPhone and iPad
- Top 7 Ways to Fix Spotify Not Working on iPhone
- Top 7 Ways to Fix Safari Keeps Crashing on iPhone
- 7 Best Ways to Fix iPhone Not Downloading Email From Server
- Top 8 Ways to Fix WhatsApp Notification Sound Not Working
- Top 7 Ways to Fix Snapchat Notifications Not Working on iPhone
- Did You Know
Check your Apple ID device list to see where you’re signed in
Learn which devices appear in your Apple ID device list, how to see your device’s details, and how to remove a device, if necessary.
See where you’re signed in
Use the steps below to see the devices that you’re currently signed in to with your Apple ID.
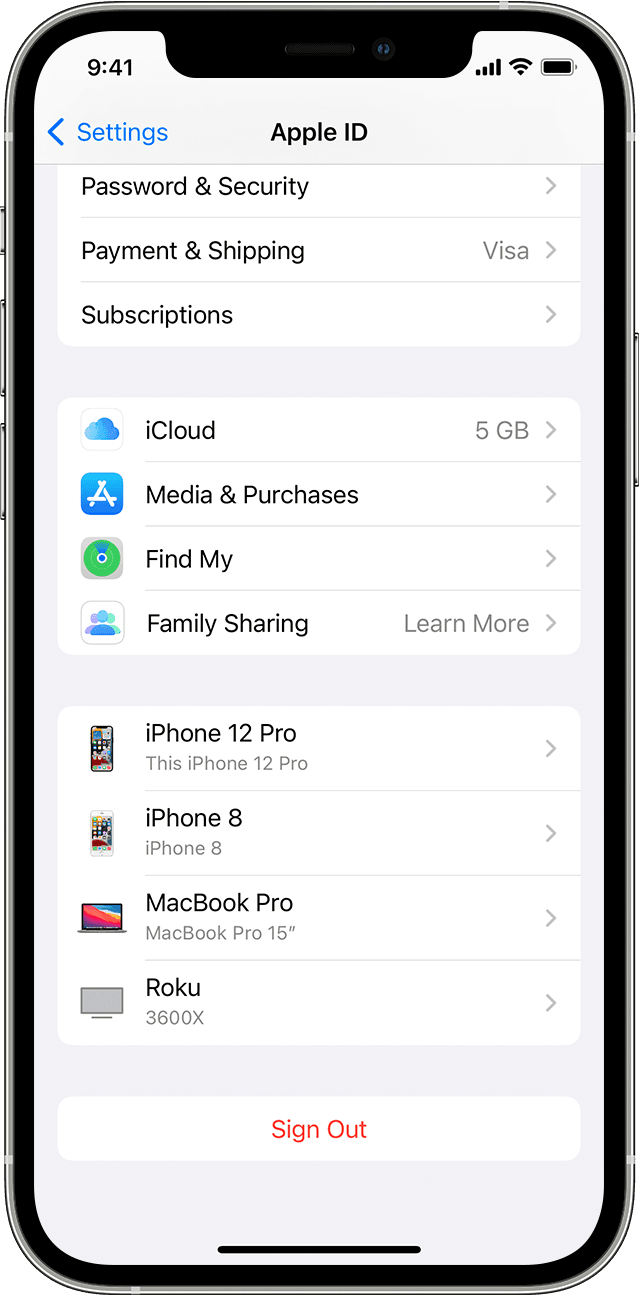
Use your iPhone, iPad, iPod touch, or Apple Watch to see where you’re signed in
- Tap Settings > [your name], then scroll down.
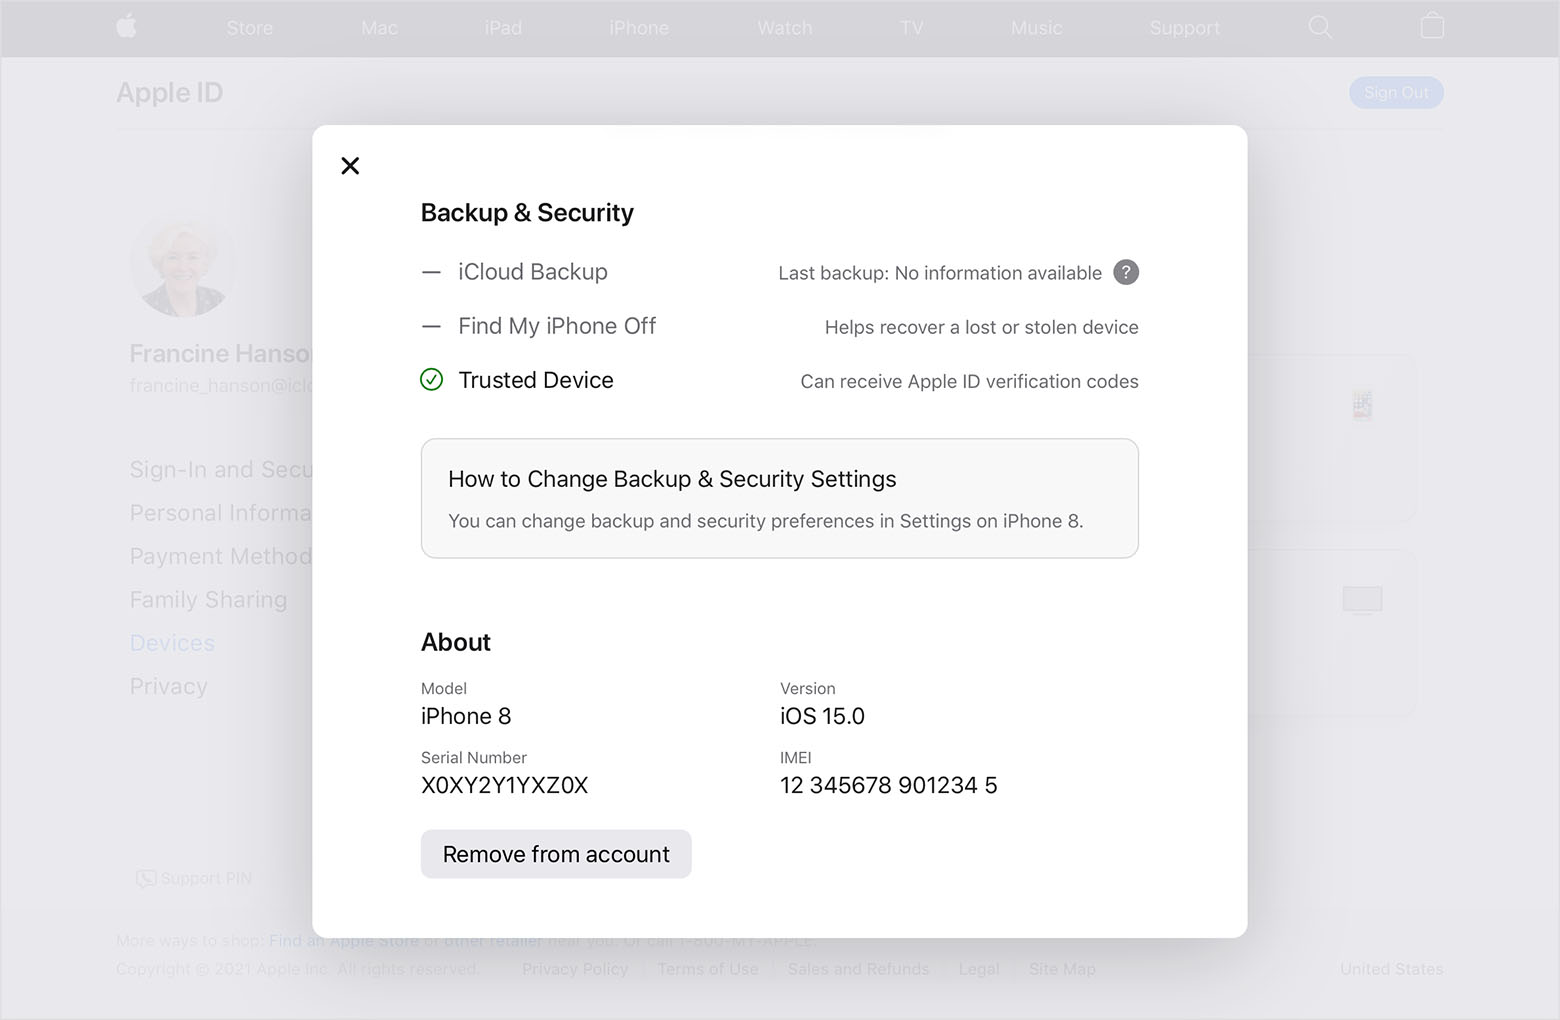
- Tap any device name to view that device’s information, such as the device model, serial number, OS version, and whether the device is trusted and can be used to receive Apple ID verification codes. The information might vary depending on the device type. You might need to answer your security questions to see device details.
![]()
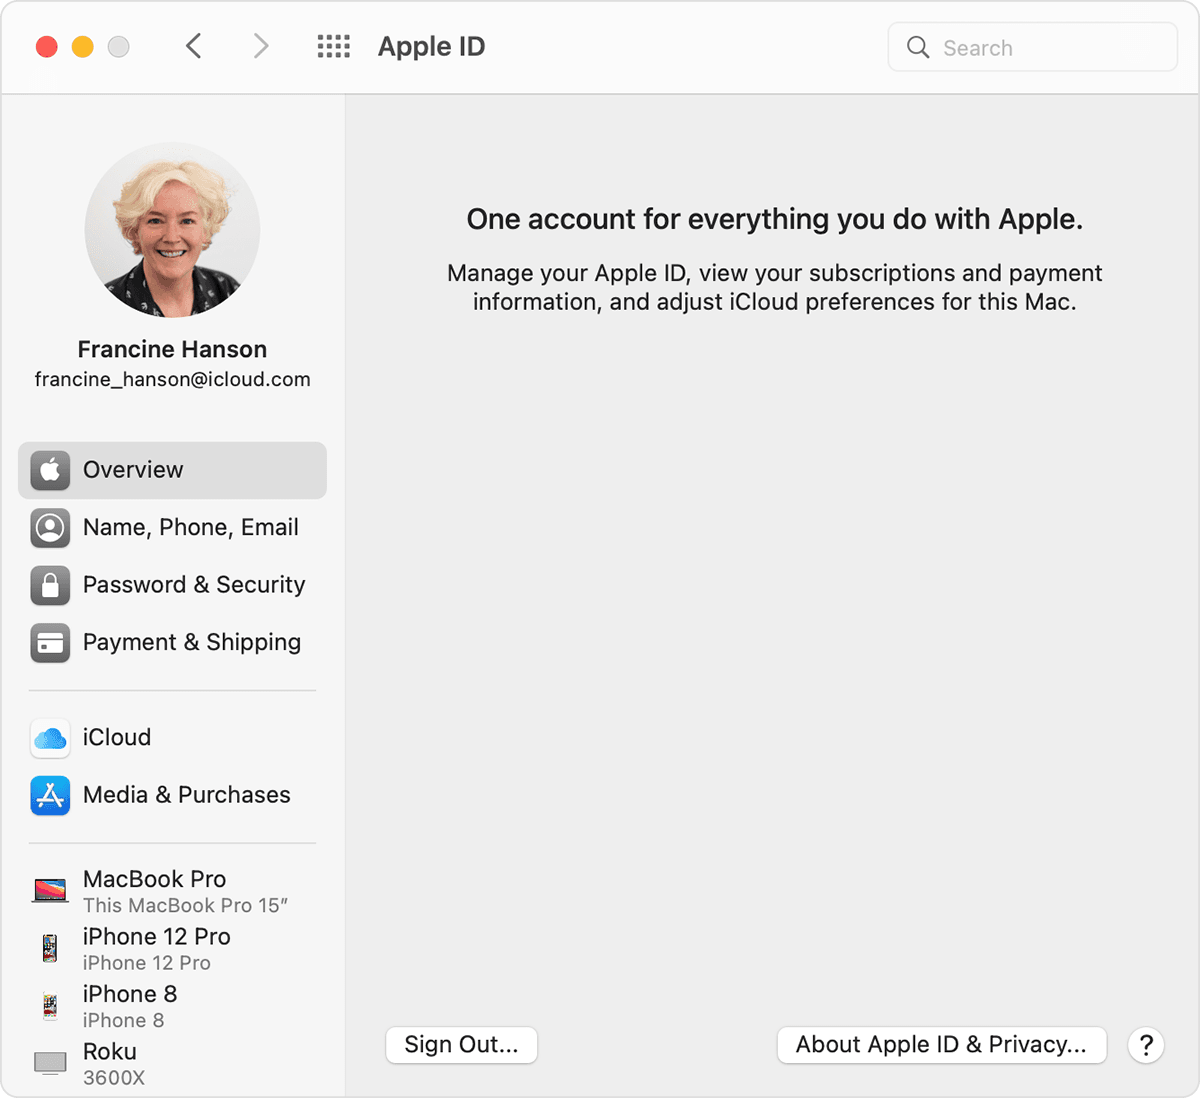
Use your Mac to see where you’re signed in
- Choose Apple menu > System Preferences.
- Click Apple ID.

- Click any device name to view that device’s information, such as the device model, serial number, and OS version. The information might vary depending on the device type. You might need to answer your security questions to see device details.
Use your PC to see where you’re signed in
- Open iCloud for Windows.
- Click Account Details, then click Manage Apple ID.
- Click any device name to view that device’s information, such as the device model, serial number, and OS version. The information might vary depending on the device type.
Use the web to see where you’re signed in
From the Devices section of your Apple ID account page, you can see all of the devices that you’re currently signed in to with your Apple ID, including Android devices, consoles, and smart TVs:
- Sign in to appleid.apple.com,* then select Devices.
- If you don’t see your devices right away, click View Details and answer your security questions.
- Click any device name to view that device’s information, such as the device model, serial number, and OS version. The information might vary depending on the device type.

* Depending on how you created your Apple ID, you might be required to provide additional information.
Add a device to the list
To add a device to the list, you need to sign in with your Apple ID. After you sign in on a device with your Apple ID, that device appears in the list. Here’s where you need to sign in:
- For iOS or iPadOS, sign in to iCloud, iMessage, FaceTime, iTunes & App Stores, or Game Center on the device. You can also see your paired Apple Watch.
- For macOS or Windows 10 and later, sign in to iCloud on the device.
- For Apple TV HD and later, sign in to the iTunes and App Store on the device.
- For Apple TV (3rd generation) and earlier, sign in to the iTunes Store on the device.
Your AirPods will appear in the Find My app, but they won’t appear in your Apple ID device list. You can remove your AirPods from your account using Find My. Devices running iOS 7 or earlier or OS X Mavericks or earlier won’t appear in your device list.
Remove a device from the list
If your device is missing, you can use Find My to find your device and take additional actions that can help you recover it and keep your data safe. If you aren’t using your device anymore, or if you don’t recognize it, you might want to remove it from the list.
If you set up two-factor authentication for your Apple ID, removing a device will ensure that it can no longer display verification codes. It also won’t have access to iCloud and other Apple services, including Find My, until you sign in again with two-factor authentication. The device won’t reappear in the list unless you sign in again.
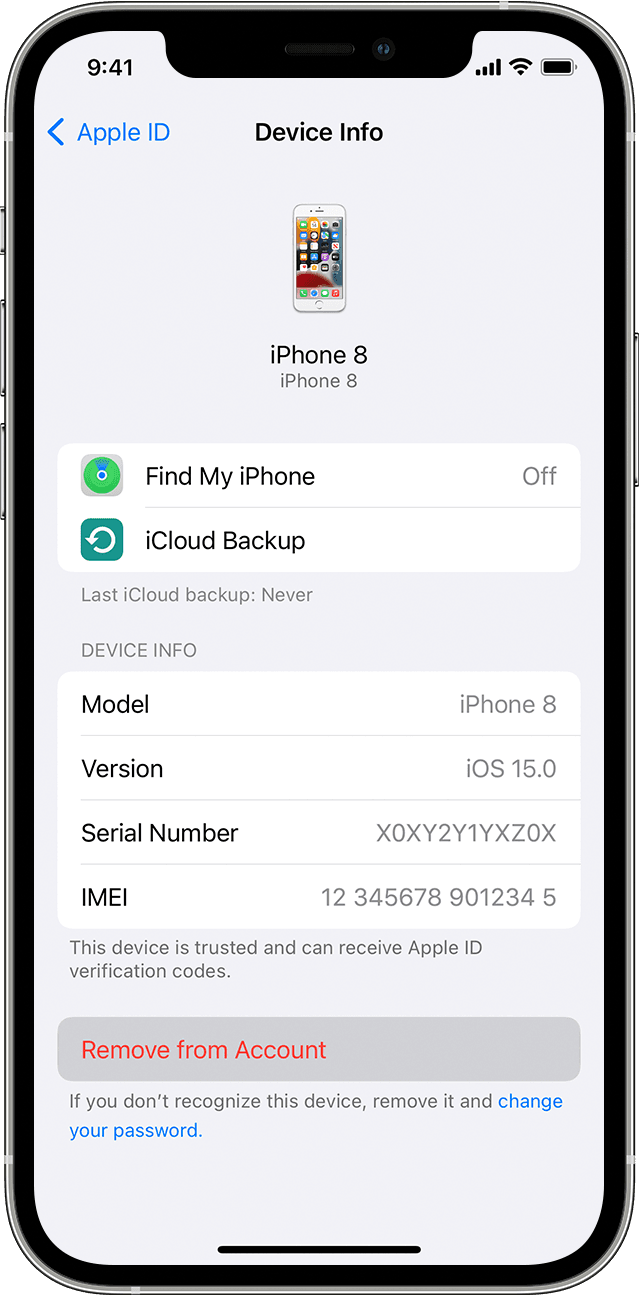
Use your iPhone, iPad, or iPod touch to remove a device
- Tap the device to see its details, then tap Remove from Account.
- Review the message that appears, then tap again to confirm that you want to remove the device.
- Want to permanently remove the device from your account page?
![]()
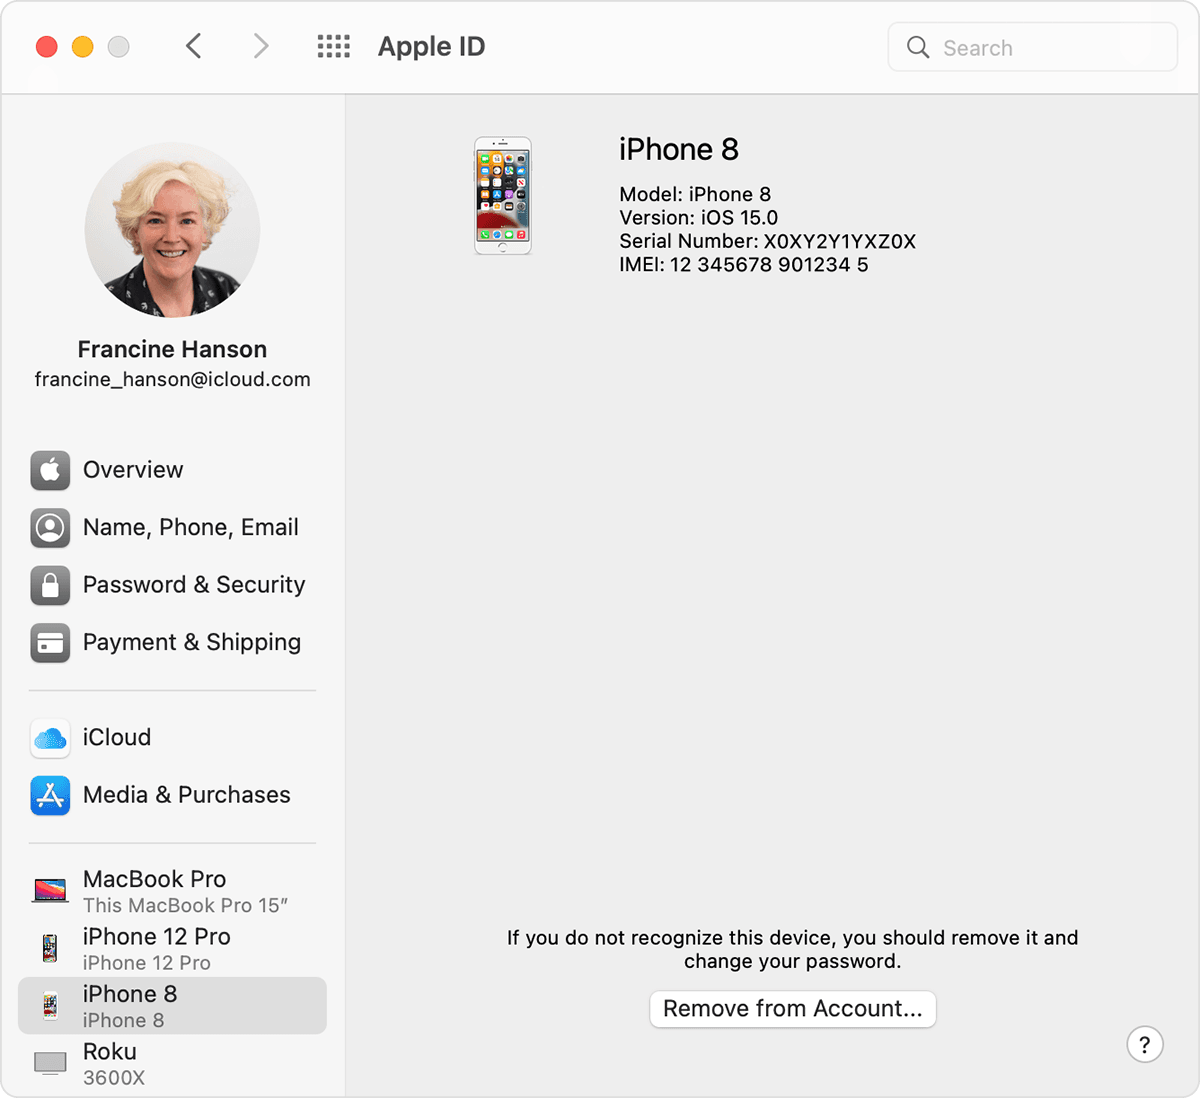
Use your Mac to remove a device
- Choose Apple menu > System Preferences.
- Click Apple ID.
- Click the device to see its details, then click Remove from Account.
- Review the message that appears, then click again to confirm that you want to remove the device.
- Want to permanently remove the device from your account page?
Use your PC to remove a device
- Open iCloud for Windows.
- Click Account Details, then click Manage Apple ID.
- Click the device to see its details, then click Remove from Account.
- Review the message that appears, then click again to confirm that you want to remove the device.
- Want to permanently remove the device from your account page?
Use the web to remove a device
- Sign in to appleid.apple.com, then select Devices.
- Click the device to see its details, then click «Remove from account.»
- Review the message that appears.
- Click again to confirm that you want to remove the device.
- Want to permanently remove the device from your account page?
Permanently remove a device from your account page
If you’re still signed in with your Apple ID on the device, it might reappear on your account page the next time your device connects to the Internet. To permanently remove the device from your account page, sign out of iCloud, iTunes & App Stores, iMessage, FaceTime, and Game Center on that device, or erase that device.
Источник
How to create a new Apple ID
Use the same Apple ID to enjoy all Apple services. All you need is your full name, date of birth, an email address, and phone number.
Not sure if you have an Apple ID, or forgot what it is? To find your Apple ID, enter your name and email address at iforgot.apple.com.
Create an Apple ID on your iPhone, iPad, or iPod touch
Create an Apple ID when you set up your device
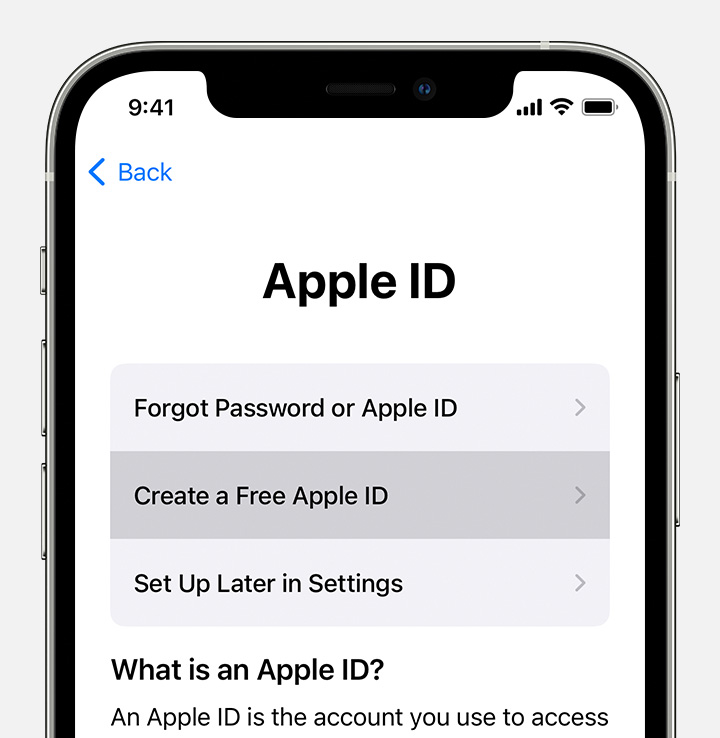
- Tap «Forgot password or don’t have an Apple ID?».
- Tap Create a Free Apple ID.
- Select your birthday and enter your name. Tap Next.
- Tap «Use your current email address», or tap «Get a free iCloud email address.»
- When prompted, follow the onscreen steps to verify your email address and set up two-factor authentication. If you choose to skip this step, you’ll be prompted to do this later in Settings.
Create an Apple ID using the App Store on your device
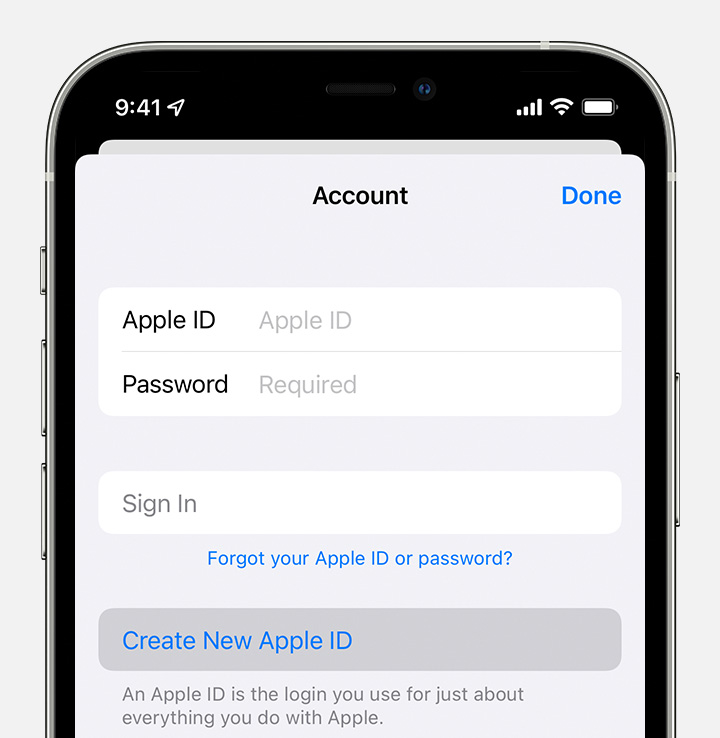
- Open the App Store and tap the sign-in button .
- Tap Create New Apple ID. If you don’t see this option, make sure that you’re signed out of iCloud.
- Follow the onscreen steps. The email address that you provide will be your new Apple ID.*
- Enter your credit card and billing information, then tap Next. You can also choose None. Learn what to do if None isn’t showing or you can’t select it. You won’t be charged until you make a purchase.
- Confirm your phone number. This can help to verify your identity and recover your account if needed. Tap Next.
- Check your email for a verification email from Apple and verify your email address.
After you verify your email address, you can use your Apple ID to sign in to the iTunes Store, App Store, and other Apple services such as iCloud.
* In China mainland, you might be required to provide a +86 phone number for your Apple ID. You can change the number later, or change your country or region to a location that doesn’t require it. This number is only used for verification purposes.
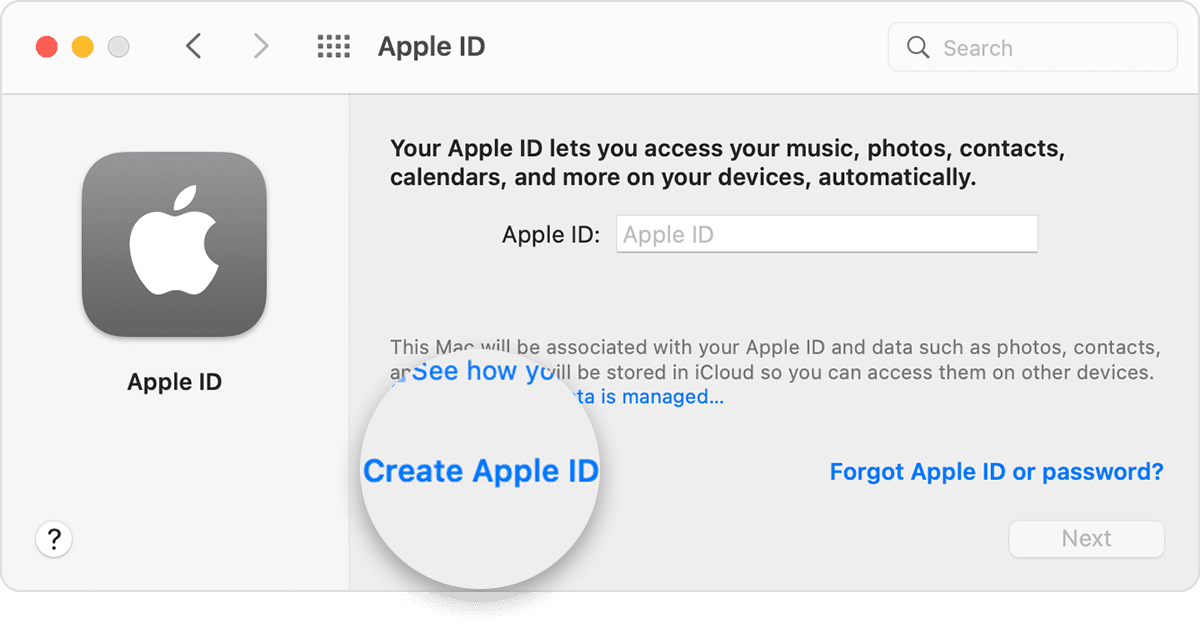
Create an Apple ID on your Mac
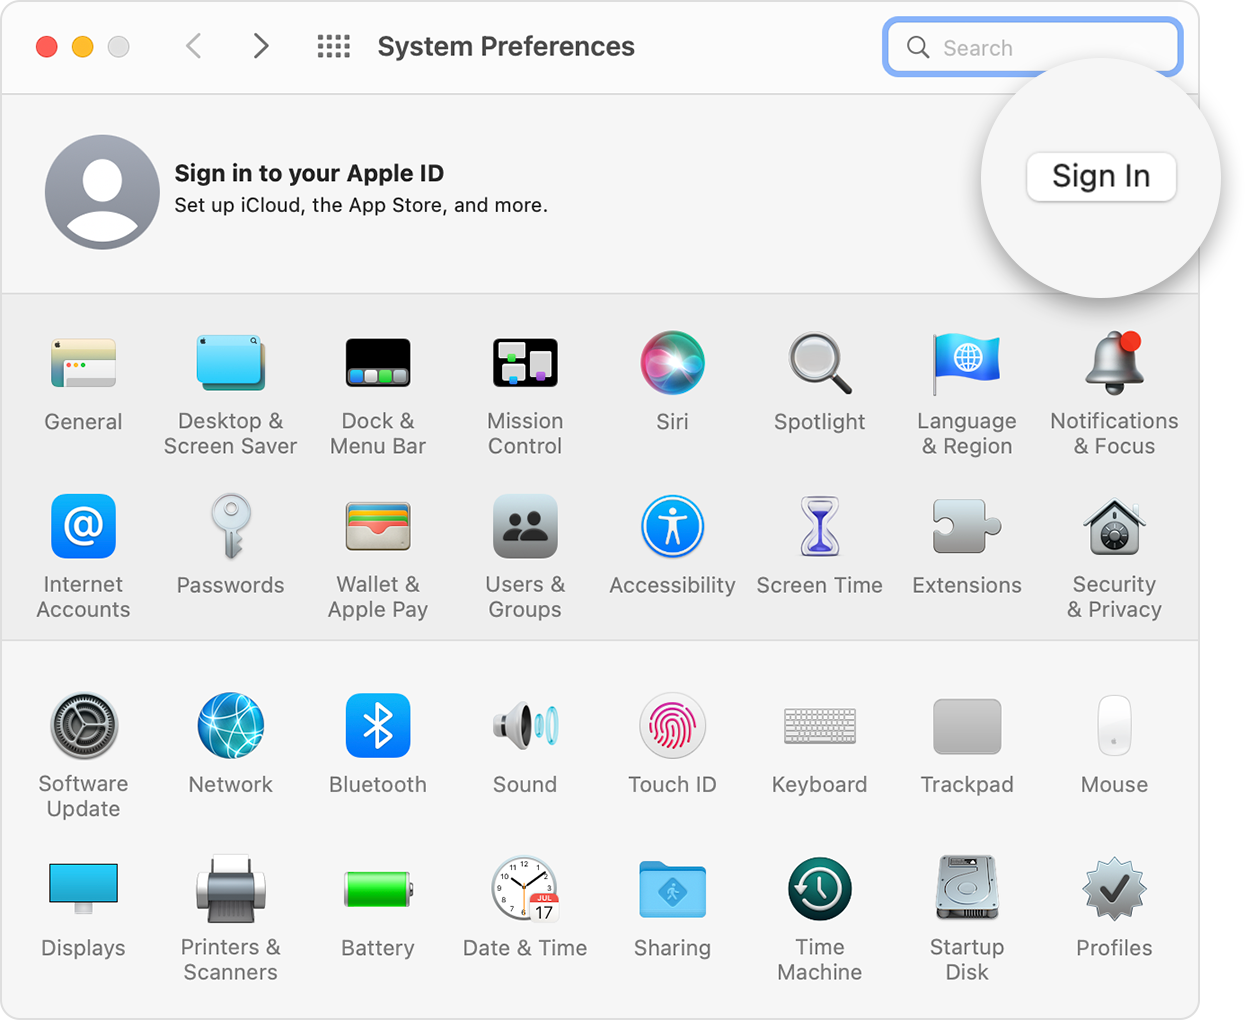
- Choose Apple menu > System Preferences.
- Click Sign In.
- Click Create Apple ID, then follow the onscreen steps. The email address that you provide will be your new Apple ID.*
- Enter your credit card and billing information, then click Continue. You can also choose None. Learn what to do if None isn’t showing or you can’t select it. You won’t be charged until you make a purchase.
- Check your email for a verification email from Apple and verify your email address.
After you verify your email address, you can use your new Apple ID to sign in to the App Store and other Apple services such as iCloud.
* In China mainland, you might be required to provide a +86 phone number for your Apple ID. You can change the number later, or change your country or region to a location that doesn’t require it. This number is only used for verification purposes.
Create an Apple ID on your Windows PC
- Open iTunes for Windows. Make sure that you have the latest version.
- From the menu bar at the top of your computer screen or at the top of the iTunes window, choose Account > Sign In. Then click Create New Apple ID.
- Follow the onscreen steps. The email address that you provide will be your new Apple ID.*
- Enter your credit card and billing information, then click Continue. You can also choose None, and learn what to do if None isn’t showing or you can’t select it. We’ll charge you only when you make a purchase.
- Check your email for a verification email from Apple and verify your email address.
* In China mainland, you might be required to provide a +86 phone number for your Apple ID. You can change the number later, or change your country or region to a location that doesn’t require it. This number is only used for verification purposes.
Create an Apple ID on another device
To create an Apple ID on an Apple TV, Android device, smart TV, or streaming device, you can usually follow the steps provided onscreen and enter your full name, date of birth, an email address or phone number, and a payment method. If you set up the Apple TV app on your smart TV, you might be redirected to activate.apple.com to create your Apple ID. You can also use the steps below to create your Apple ID on the web.
Create an Apple ID on the web
- Go to appleid.apple.com and click Create Your Apple ID.
- Follow the onscreen steps. The email address that you provide will be your new Apple ID.*
- Enter a phone number that you can always access.
- Check the boxes to subscribe to Apple Updates if you’d like. This keeps you up to date on the latest news, software, products, and services from Apple.
- Click Continue.
- Follow the onscreen steps to verify your email address and phone number.

After you verify your email address, you can use your new Apple ID to sign in to the iTunes Store and other Apple services such as iCloud.
* In China mainland, you might be required to provide a +86 phone number for your Apple ID. You can change the number later, or change your country or region to a location that doesn’t require it. This number is only used for verification purposes.
If you see a message that you need to sign in to iTunes
If you created a new Apple ID on the web and see a message that you need to sign in to iTunes, follow the steps below for your device:
- On an iPhone, iPad, or iPod touch: Open Settings, then tap «Sign into device» and sign in with your Apple ID.
- On a Mac: Choose Apple menu > System Preferences, then select Apple ID and sign in with your Apple ID.
- On an Apple TV: Sign in to the App Store, iTunes Store, or Apple Music with your Apple ID.
- On a PC: Sign in to iTunes with your Apple ID.
- On an Android device: Sign in to Apple Music on Android with your Apple ID.
Learn more
- An Apple ID is the account you use to access Apple services like iCloud, the App Store, the iTunes Store, Apple Music, and more.
- If you see a message that says that the email address that you entered is already associated with an Apple ID, you might have already created an Apple ID. Try signing in with that email address. If you don’t remember your password, you can reset your password to regain access to your account.
- Already have an Apple ID? Sign in to all Apple services on your device.
- Learn how to change or remove your Apple ID payment information.
- Learn about how two-factor authentication protects your Apple ID.
Store availability and features might vary by country or region.
Источник
What Happens When You Sign out Apple ID on iPhone
Olanrewaju Sodiq
03 May 2020
Apple ID is at the core of most Apple apps, services, and devices. It is a user’s identity in the Apple ecosystem and likewise, the gateway to access most Apple services. It’s safe to say that an iPhone is almost useless without an Apple ID. Knowing this, do you sometimes wonder what happens when you sign out the Apple ID from your iPhone? Will you still have access to Apple services like App Store, Apple Music, FaceTime, etc? What becomes of your apps, files, and data? This article explains what happens when you sign out your Apple ID on iPhone.

Well, you might want to sign out of Apple ID because you want to use another Apple ID on your device. Signing out of Apple ID is also recommended when selling or buying a used iPhone. Whatever the reason is, the consequences of signing out an Apple ID is the same on all Apple’s mobile devices (iPhone and iPad). Majorly, however, only Apple’s native apps and services are affected. Third-party apps could be also be affected too — if they are synced to your Apple ID or iCloud account.
Without further ado, let’s explore services that would be affected on your iPhone when you sign out of Apple ID.
Also on Guiding Tech

4 Best Ways to Remove a Device From Apple ID
1. iCloud
iCloud is Apple’s cloud storage service that lets you sync and store photos, contacts, and other iPhone data online. Since Apple iCloud service is linked to an Apple ID, all the applications using iCloud on your iPhone will no longer get backed up when you sign out your Apple ID on iPhone. While documents and files you previously backed up will remain in your iCloud storage or iCloud Drive, new documents from apps won’t be uploaded or backed up until you reconnect existing Apple ID or a new one.

2. Apple Music
Apple Music only works when there’s an active Apple ID connected to your account. Signing out of Apple ID on your iPhone will render Apple Music unusable. In addition to being unable to stream songs, all previously-downloaded music will also be removed from your device’s storage. Although your synced playlists and song library will remain in your iCloud, they will be erased from the iPhone.
3. Apps and App Store
Signing out of Apple ID on your devices also translates to the unavailability of the Apple App Store. That means you cannot download or install new apps from the App Store unless you sign back into your Apple ID or connect a new one. Sure, you can use previously-installed apps on your iPhone, but you won’t be able to update them.


4. iMessage and FaceTime
Both iMessage and FaceTime will still be functional when you sign out Apple ID on your iPhone. However, these services will only work if you have a phone number connected to your FaceTime and iMessage. If you used your Apple ID for your iMessage or FaceTime, you will not be able to send iMessage texts or make FaceTime call.
5. Find My (iPhone)
The Find My app also works with your iPhone’s Apple ID. Signing out of your Apple ID means that you won’t be able to remotely locate, lock, or wipe your iPhone should it ever go missing or get stolen. It is also worth noting that removing your Apple ID from your iPhone will also disable Activation Lock. As soon as you unlink Apple ID from your iPhone, you will get a mail from Apple informing you that Find My has been disabled on your iPhone.

6. Files and Documents
Signing out of your Apple ID can cause you to lose some files and app data stored on your iPhone. That means, whatever files or documents you have synced to your iCloud account will be removed locally from your iPhone. For example, if your Notes app syncs to your iCloud account, then signing out of Apple ID will delete all the notes from your iPhone. That means those notes will be accessible only through your iCloud account. When you reconnect your Apple ID to the iPhone, the deleted data will be restored — provided you haven’t deleted it from iCloud.
Note: Only data/files from applications being synced to your iCloud will be deleted from your iPhone.
Interestingly, Apple offers users the choice to keep data from apps using iCloud when signing out of Apple ID.


At the Sign Out point, you will be asked if you want to keep a copy of some of your iCloud data on your device or not. If you choose to have them removed, you can still restore them as they are available in your iCloud account.
7. iCloud Email
If you have an iCloud email connected to the Mail app on your iPhone, it will also be removed when you sign out of your Apple ID.
Also on Guiding Tech

How To Create App-Specific Passwords For Your Apple ID
Be in the Know
Now that you know what happens when you sign out of your Apple ID, you are in a better place to decide whether or not you want to sign out Apple ID on your iPhone. If you really have to do it, it is recommended that you backup your iPhone data to your PC using iTunes. That way, you can easily restore your data should anything go wrong with some of your files or device configurations after signing out of Apple ID.
Next up: Will disabling iCloud delete photos from your iPhone or iPad? Here’s a guide where we explain how iCloud Photos works and what happens when you disable it.
Last updated on 6 May, 2020
The above article may contain affiliate links which help support Guiding Tech. However, it does not affect our editorial integrity. The content remains unbiased and authentic.
Read Next

6 Best Ways to Manage Notifications on iPhone
Manage distractions by learning some of the most effective ways to manage # notifications on the # iPhone.

Top 8 Ways to Fix Keyboard Lag on iPhone
Do you notice lag while typing on the # iPhone # keyboard? Here are the best methods to fix the keyboard lag on your iPhone.

How to Use SharePlay in FaceTime on iPhone and iPad
SharePlay allows you to listen to music and watch videos together over a # FaceTime call. Read along to learn how to use SharePlay on # iPhone and iPad.

Top 7 Ways to Fix Spotify Not Working on iPhone
Is # Spotify not working on # iPhone? Here are some of the solutions to use # troubleshooting to resolve the issue.

Top 7 Ways to Fix Safari Keeps Crashing on iPhone
At times # Safari keeps crashing randomly on your # iPhone and won’t let you browse. Here are 7 best ways you can try to troubleshoot and fix # Safari’s crashing problem.

7 Best Ways to Fix iPhone Not Downloading Email From Server
Is your # iPhone not downloading emails from the server? Here are the best ways to fix your iPhone not downloading emails from server.

Top 8 Ways to Fix WhatsApp Notification Sound Not Working
Are you getting # WhatsApp notifications without any # sound? Here’s how you can fix # WhatsApp notification sound not working on # iPhone and # Android.

Top 7 Ways to Fix Snapchat Notifications Not Working on iPhone
Are you not getting # Snapchat # notifications on your # iPhone? Here’s a guide to fix the problem when # Snapchat # Notifications are not working on iPhone.
Did You Know
Apple facilities are powered by 100% renewable energy.
Источник


