- Assets (Активы)
- Чтение файлов
- Используем собственные шрифты
- Загрузка локальных файлов из активов в WebView
- Получаем список файлов в папке assets
- Ограничение на размер файлов
- Assets Folder in Android Studio
- How the asset folder is different from the Resource Raw folder?
- But when to use which folder?
- How to Create Assets Folder in Android Studio?
- Создание приложения в стиле Android
- Предварительная подготовка
- Всплывающее меню
- Проектирование окна настроек
- Работа с Nine-patch graphics
- How to Create Android App Icons using Image Asset Studio
- Run Image Asset Studio
- Custom Image
- Clip Art
- Text String
- Creating Launcher Icon
- Adaptive and legacy launcher icon
- Legacy launcher icon only
- Creating ActionBar Icons and Tab Icons
- Creating Notification icons
- How to Delete an App Icon from a project
Assets (Активы)
В Android имеется ещё один каталог, в котором могут храниться файлы, предназначенные для включения в пакет — assets. Этот каталог находится на том же уровне, что и res. Для файлов, располагающихся в assets, в R.java не генерируются идентификаторы ресурсов. Для их считывания необходимо указать путь к файлу. Путь к файлу является относительным и начинается с /assets. Этот каталог, в отличие от подкаталога res, позволяет задавать произвольную глубину подкаталогов и произвольные имена файлов и подкаталогов.
По умолчанию проект в студии не содержит данную папку. Чтобы её создать, выберите меню File | New | Folder | Assets Folder.
Чтение файлов
Для доступа к файлам используется класс AssetManager. Пример для чтения текстового файла.
Сначала на Kotlin.
Для доступа к графическому файлу из актива можно использовать следующий код:
Вы также можете загрузить изображение в Bitmap, используя BitmapFactory.decodeStream(), вместо Drawable.
Функция-расширение для Kotlin, которая вернёт Bitmap.
Используем собственные шрифты
Напишем практический пример создания приложения, в котором будут использоваться собственные шрифты, не входящие в стандартную библиотеку шрифтов Android. Для этого мы упакуем нужные шрифты вместе с приложением. Поместим в каталог assets/fonts файлы шрифтов (можно скачать бесплатные шрифты с сайтов 1001 Free Fonts или Urban Fonts ).
В файл разметки добавим пару текстовых полей с заготовленным текстом для вывода этого текста с нашим шрифтом.
В классе активности загрузим объект EditText из ресурсов, а затем создадим объект Typeface, используя вызов статического метода Typeface.createFromAsset(). Метод createFromAsset() принимает два параметра:
- объект AssetManager, который можно получить вызовом метода getAssets()
- путь к файлу актива.
Например, загрузить шрифт для текстового поля EditText можно следующим способом:
Запустив проект, мы увидим в текстовых полях надписи Happy New Year! и Meow!, выводимые нашими собственными шрифтами.

Пример для фрагмента.
Загрузка локальных файлов из активов в WebView
Если нужно загрузить локальные страницы и изображения из активов в WebView, то можно использовать префикс file://android_asset. Подробнее смотрите в статье про WebView.
Получаем список файлов в папке assets
Можно получить список файлов, которые находятся в папке assets. Для быстрой проверки кода я вручную скопировал в папку два файла:
Кроме ваших файлов, также возвращаются странные папки /images, /sounds, /webkit. Учитывайте это в своих проектах. Так как в папке можно создавать собственные подпапки, то можно воспользоваться вспомогательным методом:
Ограничение на размер файлов
По сети гуляет информация, что существует ограничение в 1 Мб на размер файлов в папке assets. При превышении размера у вас может появиться ошибка:
Я не сталкивался, поэтому рецепт решения проблемы не предлагаю.
Источник
Assets Folder in Android Studio
It can be noticed that unlike Eclipse ADT (App Development Tools), Android Studio doesn’t contain an Assets folder in which we usually use to keep the web files like HTML. Assets provide a way to add arbitrary files like text, XML, HTML, fonts, music, and video in the application. If one tries to add these files as “resources“, Android will treat them into its resource system and you will be unable to get the raw data. If one wants to access data untouched, Assets are one way to do it. But the question arises is why in the asset folder? We can do the same things by creating a Resource Raw Folder. So let discuss how the assets folder is different from the Resource Raw folder?
How the asset folder is different from the Resource Raw folder?
In Android one can store the raw asset file like JSON, Text, mp3, HTML, pdf, etc in two possible locations:
- assets
- res/raw folder

Both of them appears to be the same, as they can read the file and generate InputStream as below
But when to use which folder?
Below is some guidance that might be helpful to choose
1. Flexible File Name: (assets is better)
- assets: The developer can name the file name in any way, like having capital letters (fileName) or having space (file name).
- res/raw: In this case, the name of the file is restricted. File-based resource names must contain only lowercase a-z, 0-9, or underscore.
2. Store in subdirectory: (possible in assets)
- assets: If the developer wants to categories the files into subfolders, then he/she can do it in assets like below.

3. Compile-time checking: (possible in res/raw)
- assets: Here, the way to read it into InputStream is given below. If the filename doesn’t exist, then we need to catch it.
- res/raw folder: Here, the way to read it into InputStream is:
So putting a file in the res/raw folder will provide ensure the correct file-name during compile time check.
4. List filenames at runtime: (possible in assets)
- assets: If the developer wants to list all the files in the assets folder, he/she has used the list() function and provide the folder name or ” “ on the root folder as given below.
- res/raw: This is not possible in this folder. The developer has to know the filename during development, and not runtime.
So, in assets, one can read the filename during runtime, list them, and use them dynamically. In res/raw, one needs to code them ready, perhaps in the string resources file.
5. Filename accessible from XML: (possible in res/raw)
So if you need to access your file in any XML, put it in the res/raw folder. Let’s make a table to remember the whole scenario easily.
| Res/Raw Folder |
|---|
| Flexible File Name NO |
| Store in subdirectory NO |
| Compile-time checking YES |
| List filenames at runtime NO |
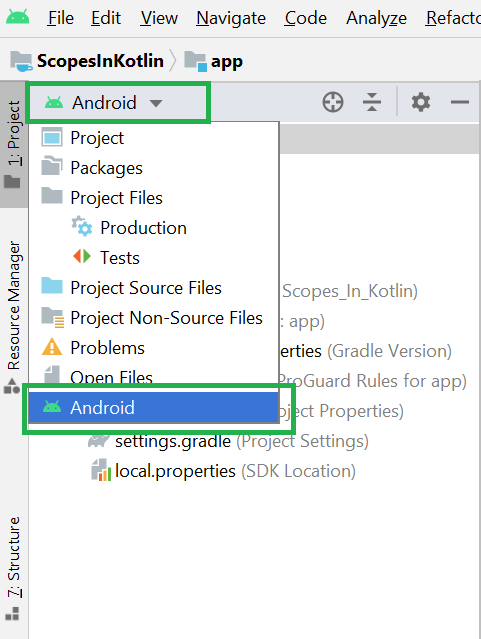
Filename accessible from XML How to Create Assets Folder in Android Studio?Now let’s discuss how to create an assets folder in the android studio. Below is the step-by-step process to create an assets folder in Android studio. Step 1: To create an asset folder in Android studio open your project in Android mode first as shown in the below image.
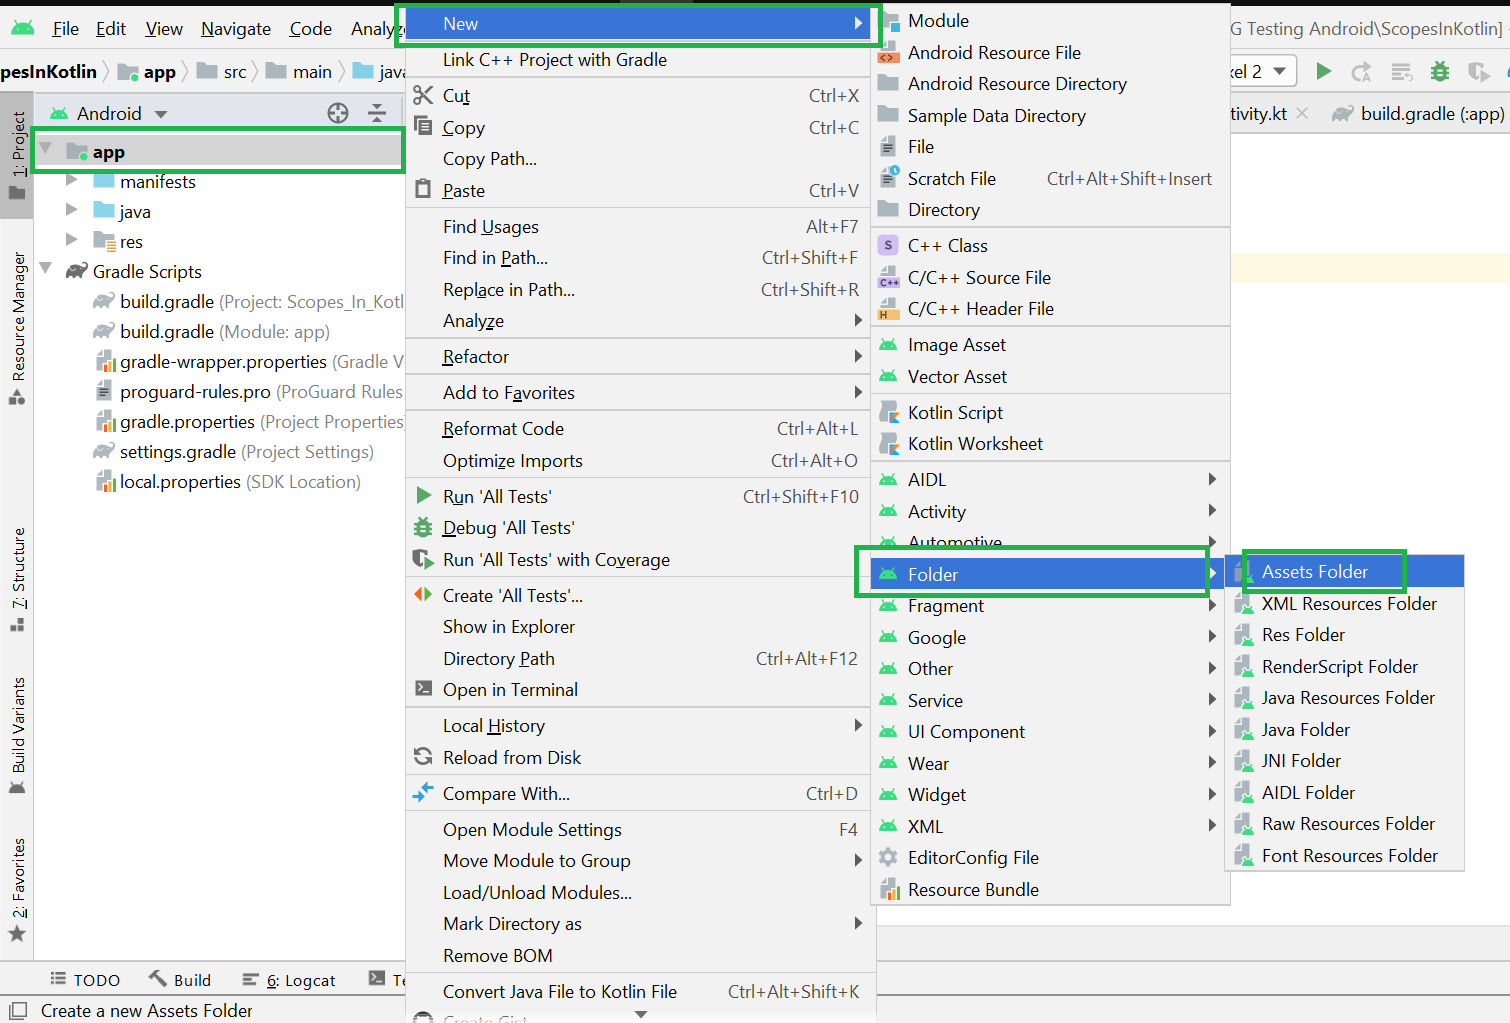
Step 2: Go to the app > right-click > New > Folder > Asset Folder and create the asset folder.
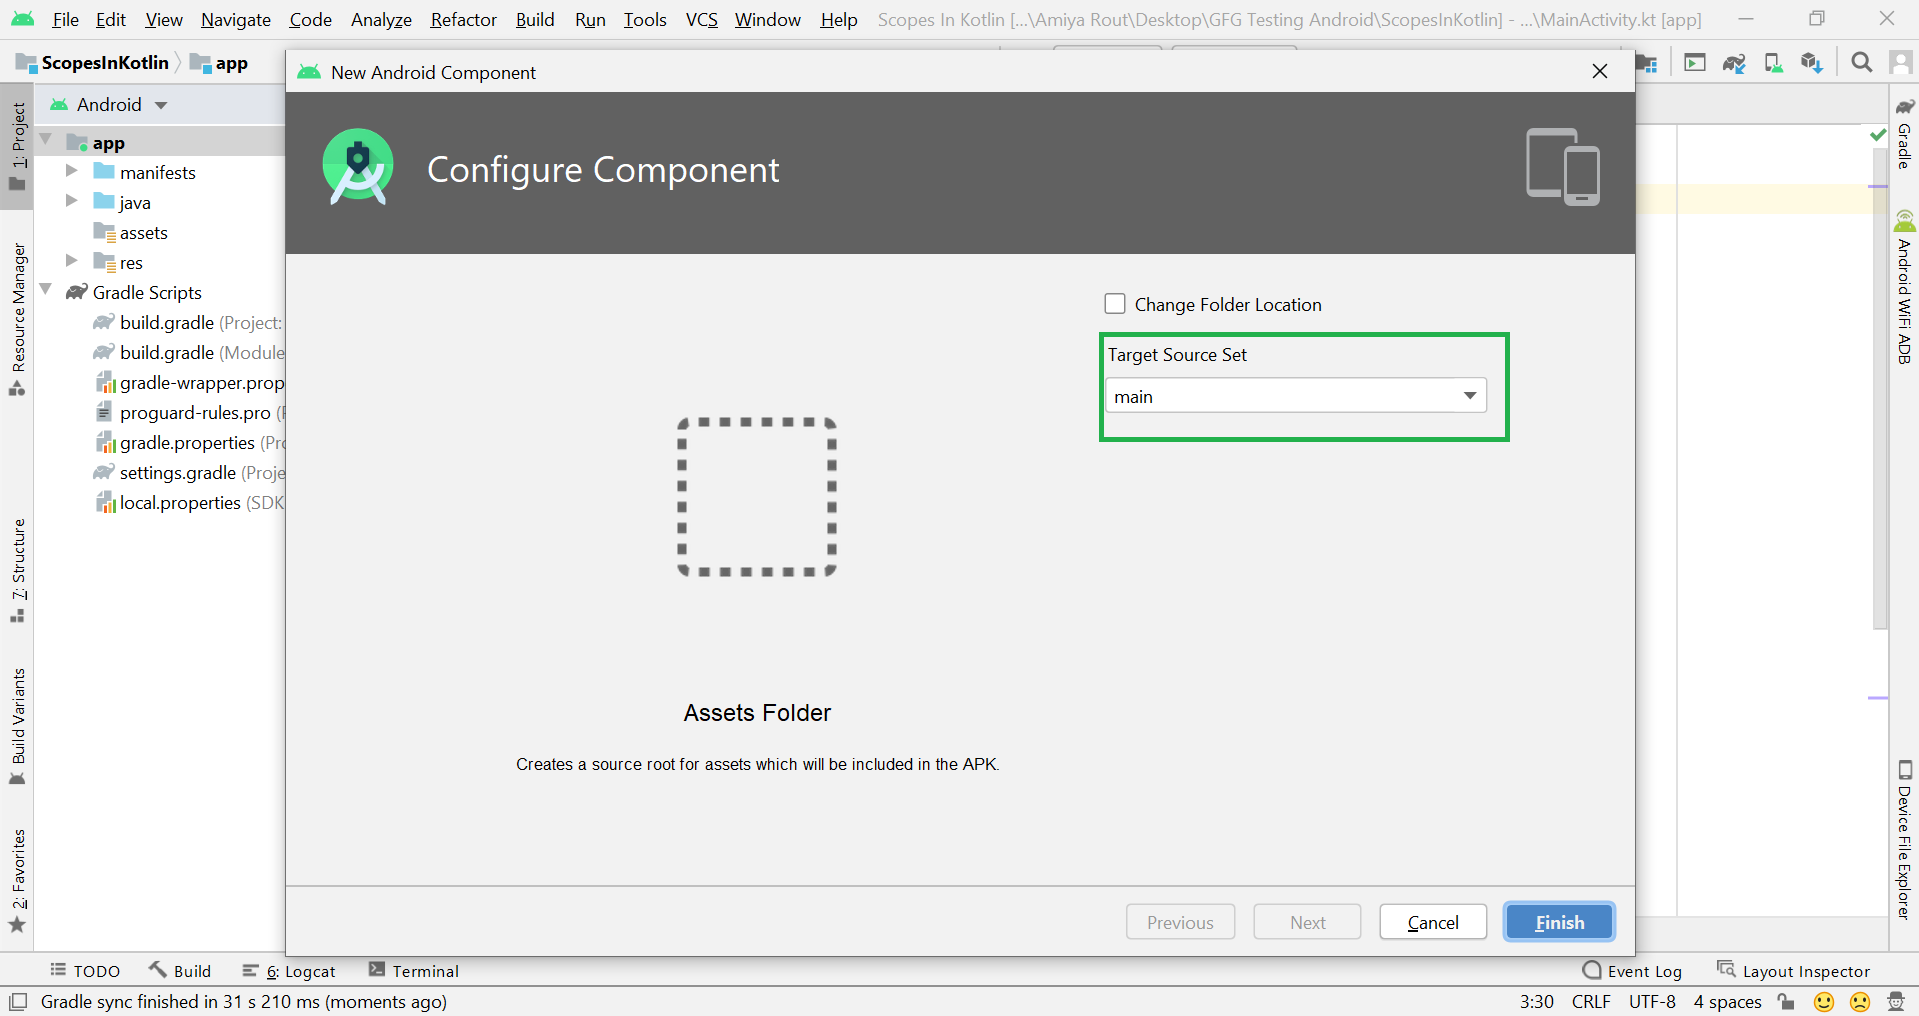
Step 3: Android Studio will open a dialog box. Keep all the settings default. Under the target source set, option main should be selected. and click on the finish button.
Step 4: Now open the app folder and you will find the assets folder by the name of “assets” as shown in the below image. Источник Создание приложения в стиле AndroidПредварительная подготовка1. Создаем приложение AdvancedHelloWorld. Для программ, которые не используют спецефическую функциональность определенной версии ОС, я предпочитаю ставить BuildTarget — Android 1.6, а Min SDK Version — 3. В этом случае будет работать разделение ресурсов по плотности экрана (на hdpi, mdpi, ldpi), но и пользователи Android 1.5 не останутся в стороне. Об Android Asset StudioOpen source онлайн проект, ценность которого сложно переоценить. Позволяет быстро создавать иконки приложения (launcher icons), иконки меню, закладок и оповещения. Для работы он просит Chrome 6, в других браузерах некоторые элементы не работают. Ссылка в конце статьи. Замечание по поводу ресурсовНа мой взгляд, наиболее рациональный выбор — это использование отдельного набора графики для hdpi-устройств и отдельного — для всех остальных, в разрешении, адаптированном под mdpi. Да, мы не используем возможность адаптации под ldpi, но этих устройств сравнительно немного и можно оставить полную адаптацию на «закуску», когда все графическое оформление уже устоялось. В любом случае, поскольку мы задекларировали поддержку Android 1.5, в папке drawable должны быть все испльзуемые графические элементы. Остальное — по желанию. Всплывающее менюМеню описываются, как не сложно догадаться, в xml файлах. Сделаем один такой файл для нашего главного окна: res\menu\main_menu.xml Два момента: При создании меню первым делом стоит поискать иконки в стандартном наборе. Все они есть в установленном SDK — android-sdk-windows\platforms\android-1.6\data\res\drawable\ic_menu_*.png Фактическое создание пунктов меню происходит в onCreateOptionsMenu: Обработка нажатий — в onOptionsItemSelected: @Override Проектирование окна настроекИ снова, основная работа в xml. В res\xml создем settings.xml: Набор поддерживаемых настроек не очень широкий, но основные потребности он покроет. Устанавливая флаг «persistent» нам даже не придется кодировать сохранение/загрузку. Достаточно прочитать нужное значение из SharedPreferences: SharedPreferences settings = PreferenceManager.getDefaultSharedPreferences(context); В качестве дополнительных приятных моментов можно отметить зависимости (android:dependency), которые позволяют «включать» определенные пункты только в случае отмеченного «ведущего» элемента, а также простую работу с вложенными наборами, которые в приложении выглядят как отдельные окна. PreferenceActivity плохо поддается стилизации. Можно, конечно, для соответствующего тэга в AndroidManifest.xml добавить android:theme=»@android:style/Theme.Light», но для вложенных настроек получится каша. Обсуждение этой проблемы на Stackoverflow сводится к мысли, что, в общем случае, лучше оставлять все как есть, на черном фоне. Работа с Nine-patch graphicsNine-patch — это стандартный метод, позволяющий сделать графику в Android-приложении независимой от разрешения и размера экрана. По сути, это обычное изображение в формате png с однописксельной служебной рамкой. Для правильной работы с этой рамкой в состав SDK входит специальная утилита draw9patch. Черной линией толщиной в 1 пиксель сверху и слева отмечается область, которая будет дублироваться при увеличении изображения. Линии справа и снизу определяют «рабочую область». Для обычной кнопки, например, это место для текста. Источник How to Create Android App Icons using Image Asset StudioCreating an application interface that the user will like and will be unlikely to forget can be intimidating. But creating an attractive launcher icon for your app, that the user will first come across while looking at your app, anyway needs more brainstorming. For Android, you need to create these graphics that have to be compatible and supporting to all devices running Android, sizes varying from a smartphone to TV. The introduction of Android Image Asset Studio in Android Studio has made it easy. In this article, you will see how you can easily create your application icon in one go. Image Asset Studio is a tool introduced in Android Studio 3. It can be used to generate app icons for all the screen densities in one go, using custom images, material design icons as well as text strings. Application icon in Android includes the following,
Here is a list of icon/image sizes that you need to create for different screen densities, for each image that you use in your application. No matter if you are a good designer, creating each of these is tedious!
Image Asset Studio helps to create all these icons for all screen densities and stores them in respective density folders. It provides a preview of all the icons that will be created, in different shapes, with options to edit them. Let’s see how to create each one of them. Run Image Asset Studio
3. Create the icon for your app i.e.
4. You can select the following Asset Type. The icon appears on the right side, in the preview panel. Custom ImageYou can use custom images of PNG (recommended), JPG or GIF (avert) format and adjust it to create icons. Set the path of your custom image if you select this. Clip ArtYou can select the icons from the list of Google Material Design Icons provided in the dialog. Click on the clip art icon to get the dialog with icon set. Text StringYou can use the fonts installed on your computer to generate the icons out of the text strings. It will create these text-based icons in PNG format in respective drawable-density folders. Set the string and select the font to use it. If you are comfortable learning from video, you can refer to this for Launcher Icons and App Bar Icons: Creating Launcher IconLauncher Icons represent our app in the device home screen, on the app list screen, in the Google Play Store and everywhere else. Android 8.0 (Oreo) and above supports Adaptive Icons and can be displayed in different shapes across various platforms. Image Asset Studio provides the option to create these adaptive icons as well as the legacy icons for Android 8.0 below. It also creates web icons(512 x 512 px) that represents our app on the Google Play Store. The Launcher Icons are stored in the res/mipmap-density folder. Adaptive and legacy launcher iconIf your app doesn’t support android version 8.0 or above, create legacy icon only for your app. After opening Image Asset Studio, follow the steps below to create the legacy icons for your android app.
7. Chose the resource directory for your image asset.
Check the mipmap folders for the Launcher Icons. Legacy launcher icon onlyIf your app supports android version 8.0 or above, create adaptive and legacy launcher icon for your app. After opening Image Asset Studio, follow the steps below to create adaptive and legacy icons for your android app.
5. Chose the resource directory for your image asset.
Check the mipmap folders for the Launcher Icons. Creating ActionBar Icons and Tab IconsActionBar icons are the ones present on the ActionBar that represents individual action. Whereas, the tab icons are used in the apps having multiple tabs. Using material icons for this category is recommended. The ActionBar and Tab Icons are stored in the res/drawable-density folder. You can also use Vector Asset Studio to have XML vectors for these categories of icons. It will reduce the size of your APK considerably. After opening Image Asset Studio, follow the steps below to create action bar and tab icons for your android app.
5. Chose the resource directory for your image asset.
Check the drawable folders for the Icons created. Creating Notification iconsTo learn from the video: The user sees the notification when he is outside your app. Notification icons come up with these notifications. The Notification Icons are stored in the res/drawable-density folder. There are a few other folders created too.
After opening Image Asset Studio, follow the steps below to create notification icons for your android app.
5. Chose the resource directory for your image asset.
Check the drawable folders for the Icons created. How to Delete an App Icon from a projectTo delete the app icon,
Источник  Когда к мобильному устройству присоединены наушники  ОС Google Android развивается, и по всему видимому |