- 5 Free Ways to Run Android Apps on Your PC
- Mirror Your Phone With Windows
- Run Your Favorite Apps With BlueStacks
- Emulate Full Android Experience With Genymotion
- Run Android Directly on Your PC With Android-x86
- Install Android Apps From the Amazon Appstore
- How to install Android on PC: These are your best options
- Using Android Studio and the virtual device
- Pure Android emulation with Genymotion
- Open source Android x86.org Android on PC
- Old but gold – BlueStacks
- One for the gamers – MEmu
- Comparing the best options to install Android on PC
5 Free Ways to Run Android Apps on Your PC
Want to use Android apps on a PC? These are the apps, services, and OSes that can make it happen.


Ever wish you could run an Android app or game on your PC so you weren’t relegated to a tiny phone screen? Maybe you need to test a feature on Android, but don’t have an Android device handy. Your options will depend on what mobile device you own or what version of Windows you’re running, but here are a few ways to run Android (and its apps) on your computer.
Mirror Your Phone With Windows
For apps installed on your phone, you don’t need anything fancy to get Android on your PC. Microsoft’s Your Phone app allows you to connect your Android mobile device to Windows in order to access apps, view notifications and photos, and send messages. You can even add Android apps to Favorites or pin them directly to the Windows taskbar.
If you want to mirror your phone screen directly, just click the phone screen image in the Your Phone desktop app. Grant permission to the app on your phone, and your phone screen will be displayed in Windows. You can then navigate the phone screen with the click of the mouse.
This isn’t always the ideal solution. While the feature will work with many Android phone manufacturers, it works best with Samsung phones. Some features require a Windows 10 PC running the May 2020 Update or later with at least 8GB of RAM and Android 11. If you’re looking to play games, this may come with some delay and graphical blurriness, and you won’t be able to easily share files from your PC directly to an app in Android. But for quick access to Android apps you already have installed, it definitely works in a pinch.
Run Your Favorite Apps With BlueStacks
If you’re just looking to run a couple apps and don’t need the emulator to look like Android, you should try BlueStacks. Over the years, it’s become the best Android app emulator around, and it’s packed with features that ensure your apps and games run smoothly. Since it uses virtualization to emulate Android, you’ll want to jump into your computer’s BIOS and enable Intel VT-x or AMD-V, if your computer supports it, for best performance.
Install BlueStacks as you would any other Windows or Mac app. BlueStacks 5, the latest version of the software, takes up 5GB of space on your computer (plus any apps you download). Open the app, and you’ll be greeted with a customized home screen and access to the Play Store. Download any apps you want, and they will appear on the BlueStacks home screen and your Windows desktop as their own shortcuts. Just double-click an icon to run the app in question.
BlueStacks is great for apps that don’t have corresponding desktop apps, but the emulator really shines when it comes to games. The emulator features built-in mappings for your mouse and keyboard, which you can customize to the touch controls you find on different Android games.
You can also adjust the resolution, DPI, FPS, and amount of CPU or RAM allocated to the emulator, ensuring you get the best balance between speed and graphical fidelity. (This is useful given that BlueStacks is fairly resource-intensive, as many virtual machines are.)
BlueStacks does, unfortunately, come with some ads and clutter, but it’s not as intrusive as it once was, and it’s a small price to pay for the functionality you get—especially considering the Android version options it offers.
Emulate Full Android Experience With Genymotion
If you’re looking to explore the Android operating system itself—rather than individual apps—Genymotion is a decent emulator. Its main product is designed for developers and costs money to use, but there is a free version of the software you can download for personal use; you just need to first create an account on the website.
Genymotion uses VirtualBox to emulate Android, so you’ll either need to have VirtualBox installed on your PC or download the version with VirtualBox bundled. Install it like you would any other program, ensuring you select the Personal Use version during the wizard. (And, like BlueStacks, you’ll want to enable Intel VT-x or AMD-V from your computer’s BIOS if you have it.)
When you start Genymotion, it’ll present you with a list of device templates you can install—this determines the screen resolution, Android version, and resources allotted to the emulator. Install the template you want and double-click it to enter Android. You’ll be able to navigate around the home screen, launch apps, and emulate certain events like GPS location.
Note that you’ll start with a very barebones version of Android that doesn’t even come with many of Google’s apps or modern features, though you can add the Play Store by clicking the Open Gapps icon in the sidebar to install it.
Also, no matter which template you choose, you won’t get any custom versions of Android—picking the Samsung Galaxy S10 template, for example, won’t get you Samsung’s One UI. It just determines the resolution and specs of the virtual machine. (Genymotion does support Android versions from 4.4 all the way up to 10.0, though.)
Genymotion works well for exploring Android’s settings and other built-in features, though I wouldn’t necessarily use it to run individual apps, as it doesn’t integrate as well with your PC as something like BlueStacks. If Genymotion doesn’t suit your needs, Google’s official Android software development kit also comes with an Android emulator, though setup is more complex.
Run Android Directly on Your PC With Android-x86
If you’re looking for something a bit more full-featured, the Android-x86 project gets you as close as you can get to true Android on your PC. Android-x86 is an open-source project that ports Android to the x86 platform, allowing you to run it on your computer instead of an ARM-based phone or tablet.
To run Android-x86, you have a couple of options. If you want to run Android on its own, as a desktop operating system for your PC, you can download it as an ISO disc image and burn it to a USB drive with a program like Rufus. Then, insert that USB drive into the PC in question, reboot, and enter the boot menu (usually by pressing a key like F12 during the boot process).
By booting from your Android-x86 USB drive, you’ll either be able to run Android in a live environment—without having any effect on your PC—or install it to your PC’s hard drive for permanent usage (and better performance).
Alternatively, if you want to run Android-x86 on top of your existing operating system, you can download the disc image and run it inside VirtualBox. This is, again, a bit more advanced if you aren’t familiar with VirtualBox, but our guide to running Windows on a Mac can get you acquainted with the process.
The official site has some tips for getting Android-x86 up and running in a virtual machine as well. It’s more work than using something like BlueStacks, but it’s also closer to pure Android, which is a nice perk.
Install Android Apps From the Amazon Appstore
With Windows 11, Microsoft adds built-in support for Android apps, but for now it’s limited to those enrolled in the Windows Insider beta program, who can currently play around with 50 apps from the Amazon Appstore. You’ll also need a PC that can run Windows 11.
Windows 11 taps into a feature called Windows Subsystem for Android, which makes Android apps compatible with Microsoft’s own OS. You’ll need to install the Amazon Appstore from the Microsoft Store, which will prompt you to install Windows Subsystem. Here’s a full rundown.
Like What You’re Reading?
Sign up for Tips & Tricks newsletter for expert advice to get the most out of your technology.
This newsletter may contain advertising, deals, or affiliate links. Subscribing to a newsletter indicates your consent to our Terms of Use and Privacy Policy. You may unsubscribe from the newsletters at any time.
Your subscription has been confirmed. Keep an eye on your inbox!
Источник
How to install Android on PC: These are your best options
Android is the most popular mobile operating system in the world, but just because it’s meant for mobile doesn’t mean it can’t be installed on a desktop. There are many ways to get Android running on a PC, including virtual device emulators, bootable USB versions, and even full standalone applications like BlueStacks. Each has its advantages and disadvantages depending on your needs.
If you’re looking to install Android on PC, we have your back! Here is the full breakdown of each of the best options available.
Using Android Studio and the virtual device

For the most part, Android development requires a tool called Android Studio. This is the software developers use to enter their code, test their apps, and manage their projects. It also happens to include a powerful “Android virtual device manager” (AVD Manager) for setting up and installing emulators that can run full-fat Android extremely well.
Using this Android virtual device has many advantages. If you select x86_64 as the architecture, there is the option to run the Android virtual device using Intel’s Hardware Accelerated Execution Manager (HAXM) to speed up the performance. In many cases, this will offer a seamless experience; especially on more powerful hardware.
Another big advantage of the AVD is that it comes with the latest version of Android. In fact, this is how most developers will first try out new updates to Android, to see how they affect their apps. That means you can even try beta versions of Android before they’re released! Another way that the virtual device has evolved since the early days is by including the Google Play Store on some devices. This means you can access all the apps you’ve already purchased!
The AVD does require a little more set-up than some options on this list. You’ll need to download Android Studio first (alongside the SDK) and then you’ll need to create your new virtual device. This process does give you the option to choose the display size, memory, and even Android version. Unfortunately, the combination of Android Studio, the Android SDK (which houses the Android Virtual Device), and the Android platform all take up a lot of hard drive space.
This method will work on OS X, Windows, and Linux without issue. Android Studio, including the AVD Manager, can be found here.
Pure Android emulation with Genymotion

Genymotion is a legacy Android on PC project, offering pure Android emulation with thousands of configuration options available to tailor your experience. The software runs an Android Virtual Device from within VirtualBox, which you’ll also need to install.
One of Genymotion’s biggest draws is the simulation of GPS, camera, SMS & calls, multi-touch, and basically all the other familiar Android hardware features. Other features include ADB access, support for a variety of app testing frameworks, even cloud access through services like Amazon and Alibaba.
Remember though, Genymotion is primarily targeted at developers looking for an environment in which to test their applications. As such, it’s a professional environment with a selection of price plans to match. However, you can download and use the Personal Edition for free.
Open source Android x86.org Android on PC
Next on our list is a free open-source option – Android x86.org.
Based on the Android Open Source Project, Android-x86.org set out to make Android available to anyone with a PC. This makes Android x86 one of the best options if you’re looking to install the latest version of Android on PC and use it as your primary operating system or run it in a VM. The software offers near complete stock Android with no additions whatsoever, which is a mixed bag. The good news is that Google Play Services is installed by default. The bad news is that using something made for touch on a desktop is not that intuitive.
Unfortunately, installation is also a little more involved than some of the applications listed below. The standard method is to burn an Android-x86 version to a bootable CD or USB stick and install the Android OS directly to your hard drive. Alternatively, you can install Android-x86 to a Virtual Machine, such as VirtualBox. This gives you access from within your regular operating system.
From inside your Virtual Machine, you can install the ISO file and then boot into the operating system. Find an official guide to the installation options for Android-x86 here.
Old but gold – BlueStacks

BlueStacks is one of the longest-enduring methods to install Android on PC, founded in 2011 and still going strong. BlueStacks has impressive performance, though it’s got more to it than just an Android Virtual Device. Additional features include: a simplified UI, optimizations dedicated to gaming, key-mapping, multi-instance support to run multiple apps, and even Google Accounts at once.
The user interface on Windows is more akin to what you would see in a web browser. It offers quick app switching in a tab format on the top of the window. However, those hoping to install their own launchers will be disappointed. The option was removed with the release of BlueStacks 4. On the plus side, BlueStacks also integrates with Windows to transfer files like APKs and there is even universal copy and paste.
BlueStacks remains a virtual machine at its core. So you don’t quite get native system performance, but this keeps the application simple to install and run. The latest version, Bluestacks 5, runs on either 32-bit or 64-bit Nougat, and has many performance enhancements to run on both high- and low-end PCs. It is also heavily monetized, which some find distasteful. It will repeatedly request that you download apps from its partners, and suggest sponsored apps and games on the main menu.
Even so, BlueStacks remains one of the best methods of running Android on PC out there. Check out what BlueStacks has to offer by clicking on the link below.
One for the gamers – MEmu
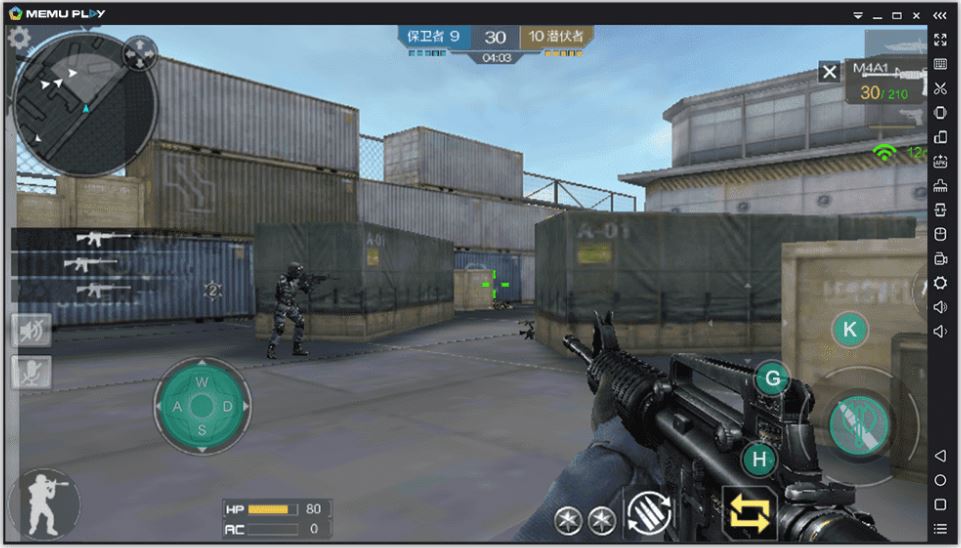
If you’re after a simple way to run Android games on a Windows PC, MEmu might be the way to go. The Chinese software is ad-supported, which might be a put-off compared to alternatives. However, MEmu’s gaming-focused features might be worth it for some.
MEmu supports multiple instances, allowing you to run several apps at once to level up multiple accounts. There’s also support for keyboard and mouse input as well as gamepads so you can play your way. Other functionalities include the ability to sideload apps and window resizing with a minimum sizing that prevents apps from becoming unusable.
In terms of performance, MEmu initially gained popularity as a faster emulator compared to BlueStacks 3. However, the race is much closer these days given BlueStack 5’s performance improvements. The latest MEmu version supports up to Android 7.1, with Android 5.1 and 4.4 compatibility included too.
There are a number of other game-focused clients that let you install Android on PC, including Gameloop (formerly Tencent Gaming Buddy), NoX, and others. Check out our list of the best Android emulators for more niche options.
Comparing the best options to install Android on PC
Each method has its advantages and disadvantages, but it really depends on what you want out of having Android on your desktop.
Bluestacks and other emulators like it have some baggage. Genymotion uses VirtualBox’s virtualization. Android-x86 works great as a proof of concept, but it isn’t that practical to use when comparing it to the other options discussed in this article.
On balance, we find installing the AVD Manager to be the optimal solution. While it comes packaged with Android Studio, the performance and flexibility are unmatched. Plus it is genuinely free, officially supported by Google, and constantly up-to-date. Hey Google! Why not release the virtual device separately?
Источник


