- What Is the Difference between Canary, Beta, RC and Stable Releases in Android Studio?
- 1.) Canary channel
- 2.) Dev channel
- 3.) Beta channel
- 4.) Stable channel
- 1.) Canary release
- 2.) Beta release
- 3.) RC release
- 4.) Stable release
- Arch Linux User Repository
- Search Criteria
- Package Details: android-studio-canary 2021.2.1.5-1
- Package Actions
- Dependencies (7)
- Required by (0)
- Sources (2)
- Latest Comments
- nextdimension commented on 2021-11-19 08:34
- air_guidear commented on 2021-09-03 23:08
- bittin commented on 2021-05-18 20:14
- bittin commented on 2021-05-18 20:04
- ellcs commented on 2019-03-06 23:31
- tilal6991 commented on 2018-11-28 23:57
- Girafferson commented on 2018-11-28 21:09
- hacker1024 commented on 2018-11-10 23:50
- perqin commented on 2018-08-19 04:23
- hooger commented on 2018-05-14 22:47
- Android Studio 4.0 Canary: Motion Editor!
- Getting Started with MotionLayout
- Note the following:
- Interpolated attributes
- Custom attributes
- Example: Change background color
- Additional MotionLayout attributes
- Getting Started with Motion Editor!
What Is the Difference between Canary, Beta, RC and Stable Releases in Android Studio?

Oct 31, 2017 · 4 min read
Have you ever wondered what is the difference between canary, beta, RC and stable releases in the Android Studio? Well, I have and I did some research. So let’s get started.
You have probably realized that you don’t receive all the updates, if you are using the stable channel. What do I mean by stable channel? Android Studio has a built-in preview update mechanism. Preview channels are used to send users the appropriate build of the Android Studio. For example, if you are in a stable preview channel you will only get the stable releases, but if you are in a canary channel you will get all the updates including the buggy ones. So if you want to test the new features right when they are released, you must not be on a stable channel. Here is how you can change your channel:
Open the Settings dialog (File > Settings on Windows/Linux, or Android Studio > Preferences on Mac).
In the left panel, select Appearance & Behavior > System Settings > Updates, then select a channel from the drop-down list.
If you want to have an unstable version alongside your stable Android Studio, you can download it here.
Ok, so you want to test the new features and report some bugs, but which preview channel is right for you? Here is a list of all the available channels:
1.) Canary channel
Canary channel gets all the newest releases (including stable). That means that you can test all the features as soon as they are built. Updates are usually released weekly and are mostly used to show the new latest and greatest features. You should not expect any bug-free experience.
2.) Dev channel
Dev channel gets hand-picked releases form older canary builds that have been tested for a while. Just like the canary channel, this channel is used to show people what is new as soon as possible. It is still very unstable and it should be only used to test new features. Dev channel releases are usually released weekly or monthly.
3.) Beta channel
If you are interested in using the new features, with minimal risk, beta channel is for you. Beta channel releases normally contain all the features that a team has decided to put in, but it is still expected to have some bugs and performance issues.
4.) Stable channel
Finally, the stable channel. This channel’s releases get the full testing and are the best to avoid crashes and other issues. In this channel Android Studio doesn’t change much more in its current version. You can expect reliability and good performance. This is probably why all the users will use this channel for production use.
Ok, I have explained the differences between the channels and you have probably seen that going down the list, channels get less, but more and more stable releases.
So now let’s focus on the different releases. To explain that I will use Android Studio 3.0 as an example. This version of IDE was released in the following releases:
1.) Canary release
Android Studio 3.0 began its journey as the canary release, because just like I have mentioned before canary releases’ intention is to showcase the new features. Although these builds are tested, they are still very unstable. 3.0 version of the Android Studio had 9 canary releases. Every canary release almost always provides some bug fixes or sometimes some new features. Documentation of the last canary release can be accessed here.
2.) Beta release
IDE went through its canary releases and showed the new features to the world. It had gotten some bug fixes and then the next step was the beta release. Beta release is usually more stable and usable, but it is still totally normal to experience some bugs. Android Studio 3.0 had 7 beta releases and it was slowly being polished to the final product. If you are interested in what the last beta release introduced, you can access the documentation here.
3.) RC release
RC stands for release candidate and it is also known as “going silver.” It is the last step before the stable release. At this stage Android Studio 3.0 was ready for use on a production site, but it had still not been marked as a stable version just in case if more bugs appeared. Android Studio 3.0 had 2 RC versions and only general bug fixes were introduced. The last RC release’s documentation can be found here.
4.) Stable release
Stable release is, as you might have guessed it, also known as “going gold.” This is the release most people are going to use, because hopefully it doesn’t have annoying bugs, it is performant and reliable. Link to the documentation is here.
Hopefully, I have managed to explain the differences between the releases and next time when the new version of Android Studio is released, you will know what to expect from it.
Thanks for reading! If you think that I forgot to mention something important, or I was wrong somewhere, please let me know in the comments!
Источник
Arch Linux User Repository
Search Criteria
Package Details: android-studio-canary 2021.2.1.5-1
Package Actions
| Git Clone URL: | https://aur.archlinux.org/android-studio-canary.git (read-only, click to copy) |
|---|---|
| Package Base: | android-studio-canary |
| Description: | The Official Android IDE (Canary branch) |
| Upstream URL: | http://tools.android.com/ |
| Keywords: | android development |
| Licenses: | Apache |
| Submitter: | danyf90 |
| Maintainer: | tilal6991 (Vanpra) |
| Last Packager: | Vanpra |
| Votes: | 57 |
| Popularity: | 0.53 |
| First Submitted: | 2014-01-09 10:27 |
| Last Updated: | 2021-12-04 20:11 |
Dependencies (7)
- freetype2 (freetype2-old-hinting, freetype2-infinality, freetype2-infinality-remix, freetype2-minimal-git, freetype2-ttmetrics, freetype2-v35, freetype2-git, freetype2-ultimate5)
- libxrender
- libxtst
- unzip (unzip-natspec) (make)
- zip (zip-natspec) (make)
- gtk2 (gtk2-ubuntu, gtk2-git, gtk2-minimal-git, gtk2-patched-filechooser-icon-view, gtk2-maemo) (optional) – GTK+ look and feel
- libgl (glshim-git, libhybris-ext-libgl-git, libhybris-libgl-git, mesa-libgl-noglvnd, swiftshader-git, nvidia-340xx-utils, libglvnd-git, amdgpu-pro-libgl, libglvnd) (optional) – emulator support
Required by (0)
Sources (2)
Latest Comments
nextdimension commented on 2021-11-19 08:34
air_guidear commented on 2021-09-03 23:08
Does this package auto enable HAXM if supported? I’m confused because I’m getting HAXM level performance for emulators on a clean install just by installing this package.
bittin commented on 2021-05-18 20:14
bittin commented on 2021-05-18 20:04
There was a new Canary build at Google I/O Online 2021 today
ellcs commented on 2019-03-06 23:31
I suggest to change the description to something similarto «Canary build Get the bleeding-edge features in a lightly tested build.» as described in https://developer.android.com/studio/preview
tilal6991 commented on 2018-11-28 23:57
The best way to tell me that things are out of date is to simply mark it so. I always update within 2-3 days of stuff being marked out of date. I don’t constantly monitor for updates so I do rely on people marking.
(also note that we are precisely one minor version behind so it’s hardly like I’ve missed many versions and this was released 3 days ago)
Girafferson commented on 2018-11-28 21:09
I agree with @hacker1024 I’ve been using this repo for years and this package always has issues staying up to date.
hacker1024 commented on 2018-11-10 23:50
You’re taking a long time to update this package when a new version comes out. If you can’t reliably maintain it anymore, could you abandon it? I’d happily maintain it.
perqin commented on 2018-08-19 04:23
Changing product name doesn’t produce new WM_CLASS on my Arch:
hooger commented on 2018-05-14 22:47
There is a new Canary version available. Just edit the PKGCONFIG and change
Copyright © 2004-2021 aurweb Development Team.
AUR packages are user produced content. Any use of the provided files is at your own risk.
Источник
Android Studio 4.0 Canary: Motion Editor!

Oct 25, 2019 · 8 min read
Android Studio 4.0 Canary 1 is now available in the Canary and Dev channels.

If you want to check the update you can check it from Help > Check for Updates ( Android Studio > Check for Updates on macOS). Otherwise, you can download it here.
This version of Android Studio has some of the new, cool features including Jetpack Compose toolkit, Java 8 Library desugaring in D8 and R8, Smart editor features when editing R8/ProGuard rules, Support for Kotlin DSL script files, Kotlin Android live templates, Fragment wizard and new fragment templates.
You can see the full update notes here
But the coolest feature that this Canary version has is “Motion Editor”
An d roid Studio now includes a visual design editor for the MotionLayout layout type, making it easier to create and preview animations.
The Motion Editor provides a simple interface for manipulating elements from the MotionLayout library that serves as the foundation for animation in Android apps. In previous releases, creating and altering these elements required manually editing constraints in XML resource files. Now, the Motion Editor can generate this XML for you, with support for start and end states, keyframes, transitions, and timelines.
Getting Started with MotionLayout
Follow these steps to start using MotionLayout in your project.
Add the `ConstraintLayout` dependency: To use MotionLayout in your project, add the ConstraintLayout 2.0 dependency to your app’s build.gradle file. If you’re using AndroidX, add the following dependency:

If you’re not using AndroidX, add the following support library dependency:

Following guide will follow the AndroidX Artifacts. You can use support Library as well and if you like to migrate to AndroidX you can do it from Refactor > Migrate to AndroidX on your Android Studio!
“ Make sure to Backup your project as Zip” so you can’t blame me 😛
So great we are now ready to go ahead.
Create a MotionLayout file: MotionLayout is a subclass of ConstraintLayout, so you can transform any existing ConstraintLayout into a MotionLayout by replacing the class name in your layout resource file, as shown in the following examples:

Here’s a full example MotionLayout file that can be used to create the motion.

Create a MotionScene: In the previous MotionLayout example, the app:layoutDescription attribute references a MotionScene. A MotionScene is an XML resource file that contains all of the motion descriptions for the corresponding layout. To keep layout information separate from motion descriptions, each MotionLayout references a separate MotionScene. Note that definitions in the MotionScene take precedence over any similar definitions in the MotionLayout.
Here’s an example MotionScene file that describes the basic horizontal motion.

Note the following:
- motion:constraintSetStart and motion:constraintSetEnd are references to the endpoints of the motion. These endpoints are defined in the elements later in the MotionScene.
- motion:duration specifies the number of milliseconds that it takes for the motion to complete.
lets you control the motion via touch.
- motion:touchAnchorId refers to the view that you can swipe and drag.
- motion:touchAnchorSide means that we are dragging the view from the right side.
- motion:dragDirection refers to the progress direction of the drag. For example, motion:dragDirection=»dragRight» means that progress increases as you drag to the right.
is where you define the various constraints that describe your motion. In this example, we define one ConstraintSet for each endpoint of our motion. These endpoints are centered vertically (via app:layout_constraintTop_toTopOf=»parent» and app:layout_constraintBottom_toBottomOf=»parent» ). Horizontally, the endpoints are at the far left and right sides of the screen.
For a more detailed look at the various elements that MotionScene supports, see the MotionLayout examples.
Interpolated attributes
Within a MotionScene file, ConstraintSet elements can contain additional attributes that are interpolated during transition. In addition to position and bounds, the following attributes are interpolated by MotionLayout:
- alpha
- visibility
- elevation
- rotation , rotationX , rotationY
- translationX , translationY , translationZ
- scaleX , scaleY
Custom attributes
Within a , you can use the element to specify a transition for attributes that aren’t simply related to position or View attributes.

A contains two attributes of its own:
- motion:attributeName is required and must match an object with getter and setter methods. The getter and setter much match a specific pattern. For example, backgroundColor is supported, since our view has underlying getBackgroundColor() and setBackgroundColor() methods.
- The other attribute you must provide is based on the value type. Choose from the following supported types:
- motion:customColorValue for colors
- motion:customIntegerValue for integers
- motion:customFloatValue for floats
- motion:customStringValue for strings
- motion:customDimension for dimensions
- motion:customBoolean for booleans
Note that when specifying a custom attribute, you must define endpoint values in both the start and end elements.
Example: Change background color
Building on our previous example, let’s have the view change colors as part of its motion.
Add a element to each ConstraintSet elements, as shown below:

Additional MotionLayout attributes
In addition to the attributes in the example above, MotionLayout has other attributes that you might want to specify:
- app:applyMotionScene=»boolean» indicates whether to apply the MotionScene. The default value for this attribute is true .
- app:showPaths=»boolean» indicates whether to show the motion paths as the motion is running. The default value for this attribute is false .
- app:progress=»float» lets you explicitly specify transition progress. You can use any floating-point value from 0 (the start of the transition) to 1 (the end of the transition).
- app:currentState=»reference» lets you specify a specific ConstraintSet .
- app:motionDebug lets you display additional debug information about the motion. Possible values are «SHOW_PROGRESS», «SHOW_PATH», or «SHOW_ALL».
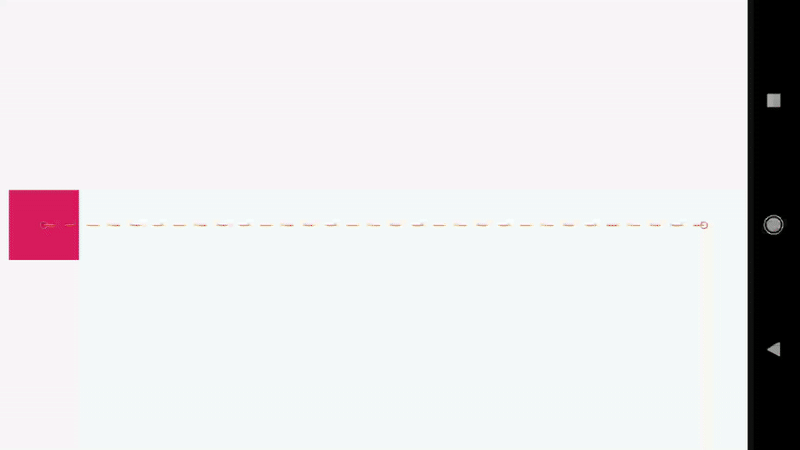
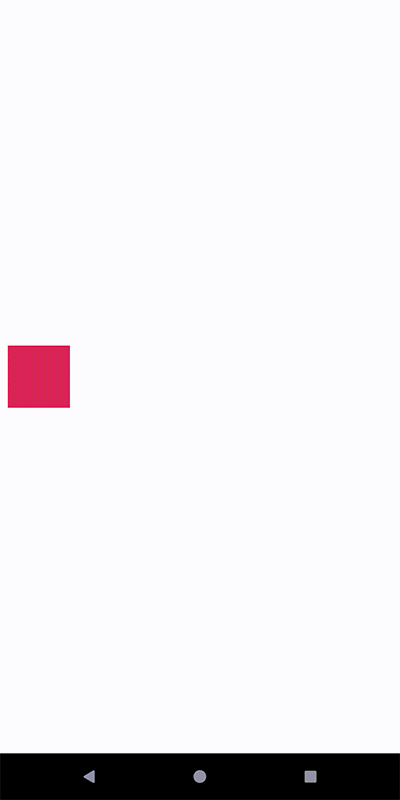
Getting Started with Motion Editor!
As previously mentioned
The Motion Editor provides a simple interface for manipulating elements from the MotionLayout library that serves as the foundation for animation in Android apps. In previous releases, creating and altering these elements required manually editing constraints in XML resource files. Now, the Motion Editor can generate this XML for you, with support for start and end states, keyframes, transitions, and timelines.
Here I have created one layout using Constraint layout
As you can see I have a simple layout with ImageView and TextView in ConstraintLayout
Simply right click on it and select Convert to MotionLayout as the following picture shows.
It will migrate into MotionLayout from ConstraintLayout plus create a scene file that’s gonna store all the key frame that we’re about to create
Select the Start State and change some of the view’s constraint for instance:
Like remove bottom and end constraint to see a preview of your both views or more views to see changes as I have done here
Источник


