- How to Tether Your Android Phone for Free
- Turn your Android into a personal Wi-Fi hotspot
- Types of Tethering
- How to Tether Your Phone
- Using an App
- Rooting Your Smartphone
- Extra: Tethering Tips
- Tethering и Reverse tethering
- Tethering
- Reverse tethering
- How to Wifi Tether ANY Rooted Android Smartphone or Tablet! [Universal Guide]
How to Tether Your Android Phone for Free
Turn your Android into a personal Wi-Fi hotspot
:max_bytes(150000):strip_icc()/Lifewire_Molly-McLaughlin_webOG-327b0af1832c48a6b565fb20f3a87090.jpg)
This article explains how to tether your Android phone so that you can share its internet connection with your laptop, tablet, or another mobile device for free when you’re away from your home or office. The directions below generally apply regardless of the device manufacturer.
Before setting up tethering, check your carrier’s terms. Some carriers have no restrictions regarding tethering, whereas others offer it at low speeds, require a supplemental plan, or block it altogether.
Types of Tethering
Three types of tethering are common to most phones:
- Wi-Fi sharing is easy and quick, supports sharing with multiple devices, and tends to drain the phone’s battery.
- Bluetooth is the slowest and allows sharing with one device at a time.
- A USB connection is faster, and the laptop simultaneously charges the smartphone.
How to Tether Your Phone
Connecting to a Wi-Fi hotspot is the easiest, most convenient, and most commonly used option of the three types. Essentially, the phone creates a Wi-Fi network to which you connect your laptop in the usual way. Here’s how to set it up.
On your phone, go to Settings > Connections > Mobile Hotspot and Tethering.
Depending on the Android version and manufacturer, you might see something like Tethering, Mobile Hotspot, or Tethering & portable hotspot instead.
Turn on Mobile Hotspot.
:max_bytes(150000):strip_icc()/androidmobhotspottethering-6bfbcdf757e34c32b947ca824c50f78e.jpg)
Choose a network name and password.
Tap Save.
:max_bytes(150000):strip_icc()/androidfirsttimehotspot-b9266947ba024b72b799068c473175f2.jpg)
Connect your second device to the network you just created, just as you would to any other Wi-Fi network.
Alternatively, to share your connection via Bluetooth, pair the devices and toggle Bluetooth to On in Mobile Hotspot and Tethering.
Likewise, to use USB, toggle on USB tethering and connect your phone to your other device with a USB cable.
Using an App
If your carrier blocks tethering, try a third-party app. For example, PdaNet+ is a free mobile app with a companion desktop app that shares a smartphone connection over your choice of Bluetooth, USB, or Wi-Fi.
Depending on your carrier, you might not be able to download the app directly, but the app maker offers a way around that. See the app’s Google Play listing for other possible restrictions.
Rooting Your Smartphone
Another method involves rooting your smartphone; free, unrestricted tethering is one of its many benefits. Rooting a phone could void the warranty or, if done incorrectly, render the phone unusable. In most cases, though, the good outweighs the bad. Once your smartphone is rooted, you’ll have no restrictions on apps (such as the Wi-Fi Tethering app from OpenGarden) that you can download.
Extra: Tethering Tips
Tethering is best in scenarios where an alternative secure connection is not available. When you’re finished tethering, be sure to turn it off in Settings. Turn off any connection you’re not actively using, such as Wi-Fi and Bluetooth, which will save battery life. Also, tethering uses data, so it’s best used for short periods if your plan doesn’t include unlimited data.
If you need to tether your phone to your laptop’s data connection, check out our article on setting up a reverse tether.
Источник
Tethering и Reverse tethering
Tethering
Стандартные решения
С появлением версии Android 2.2 стали возможны 2 технологии: USB-Tethering и WiFi-Tethering.
USB-Tethering
Для подключения необходим стандартный кабель Android-USB.
Включается в Настройки->Беспроводные сети->Режим модема->USB-модем.
После подключения Android устройства к приемнику (ноутбук, настольный компьютер. ) с помощью кабеля происходит запрос на включение USB-Tethering. После положительного ответа пользователя становится возможным использование интернет трафика Android устройства на приемнике.
Большим плюсом данного подхода является возможность подключения Android устройства к WiFi Точке Доступа и разделение этого подключения по USB каналу.
Из минусов стоит отметить необходимость держать Android устройство в непосредственной близости с приемником и ограниченность только одним приемником.
WiFi-Tethering
Для подключения необходим WiFi-адаптер на приемнике.
Если ранее приходилось использовать android-wifi-tether, требовавшую Root, то теперь, с появлением Android 2.2, это делается стандартными средствами.
Включается в Настройки->Беспроводные сети->Режим модема->Точка доступа Wi-Fi.
После включения данной функции Android устройство становится Wi-Fi точкой доступа, к которой могут подключаться другие устройства.
Большим минусом является невозможность одновременного получения и раздачи интернет трафика Android устройством через WiFi, т.е. Android устройство становится 3G модемом для приемника.
3rd Party
EasyTether
Для подключения необходим либо стандартный кабель Android-USB, либо WiFi-адаптер на приемнике.
Позволяет подключить Android устройство к приемнику и осуществить Tethering.
Необходима установка приложения как на Android устройство, так и на приемник.
Не имеет смысла после появления Android 2.2, но, в свое время, очень гибкий и полезный инструмент.
Reverse tethering
Перейдем к самому интересному месту статьи.
Т.к. четко структурированной информации по данному вопросу очень мало, я считаю очень важным донести факты, касательно текущей ситуации до сведения интернет-сообщества.
На данный момент Reverse tethering, как таковой, стандартными средствами еще не реализован. Нет, так же, и 3rd Party продуктов, позволяющих без специальной настройки произвести Reverse tethering. Но, внимательный читатель уже заметил фразу «специальная настройка». Этим мы и займемся. От банального к более сложному.
В основе некоторых предложенных решений будет лежать широко известный механизм разделения интернет трафика, который в данной статье мы рассматривать не будем. Статей, описывающих этот механизм, множество. Что действительно интересно — варианты соединения Android устройства и источника.
Стандартные решения
WiFI Точка Доступа
Самый очевидный вариант решения.
Высокая скорость, средняя территориальная доступность, для честных людей — еще и некоторые денежные затраты.
Но не всегда есть под рукой точка доступа. Тогда…
На сегодняшний день зона покрытия еще не стабильна, цены сильно завышены, скорость средняя.
Перспективы хорошие, но доступно не всем. Ладно, остается последняя надежда.
Ad-hoc
Перед нами стоит компьютер (источник), подключенный к сети интернет через стандартный сетевой кабель — витую пару. У него есть WiFi-адаптер, который мы используем для подключения к Android устройству. Такое подключение называется Ad-hoc.
Однако такое подключение на сегодняшний день для Android устройств недоступно, хотя в саму платформу Android такая возможность заложена.
Настоятельно прошу всех проголосовать за исправление данной недоработки на официальной странице ошибки. Достаточно поставить звездочку в левом верхнем углу. Спасибо.
Нестандартные решения
Виртуальная WiFI Точка Доступа
В Windows 7 появилась возможность создавать виртуальную WiFI Точку Доступа.
Это позволяет подключить Android устройство к источнику без применения реальной WiFI Точки Доступа.
Для упрощения процедуры была создана программа Сonnectify.
Очевидный минус — не все хотят работать (нет возможности установить) Windows 7.
Ad-hoc
Есть возможность создания Ad-hoc подключения вручную. Но только при использовании Root.
В файле /system/etc/wifi/tiwlan.ini правим:
WiFiAdhoc = 1
dot11DesiredSSID = HTCG1Default
dot11DesiredBSSType = 0
Тем самым вы создаете одно подключение Ad-hoc.
Подробности вы можете поискать сами, т.к. я строго не рекомендую пользоваться данным методом.
Ad-hoc — перепрошивка
Существует неофициальный патч, который включает возможность находить и подключаться к Ad-hoc сетям, помечая их *. Опять же — на свой страх и риск.
Есть возможность настройки USB подключения вручную. Только при использовании Root.
Инструкция написана понятно и легко.
Источник
How to Wifi Tether ANY Rooted Android Smartphone or Tablet! [Universal Guide]
by Max Lee · April 11, 2013
Most U.S. carriers including AT&T, T-Mobile, Sprint, and Verizon, will charge you an extra “tethering monthly fee” (around $20-30) if you want wifi tethering enabled on your phone so you can share your phone’s internet with other wifi devices you own such as Android tablets, desktop computer, etc…etc…Now, U.S. is the ONLY country in the world where carriers charge you twice for the same internet you already paid for. In countries like South Korea, Thailand, and the rest of the world, there’s no extra tethering monthly charges to use the wifi tethering feature.
Luckily, there are ways to circumvent wifi tether block on most Android smartphones or tablets (that support SIM cards) by installing tether apps like FoxFi (which works on most Motorola/Verizon phones without root) or Wifi Tether app for Rooted users (which works on most rooted Android smartphones).
There are cases like Verizon’s Jelly Bean update on Galaxy S3/Note 2, Sprint’s Jelly Bean update on Galaxy S3/Note 2, or T-Mobile’s Jelly Bean on Galaxy S2, where tethering is blocked completely.
For Verizon or Sprint, your tethering application will just not work and for T-Mobile, you will be re-directed to a T-mobile wifi tether website where it asks you to pay for it.
Well, there’s a simple solution to all of this, a universal method that works on all rooted Android smartphones and tablets (as far as I’ve tested with 30+ devices I own on all U.S. major networks).
Tired of paying your carrier twice for the internet you paid for already? Let’s get started.
We will be using the same Wifi Tether app for Rooted Users but modified by XDA user TrevE, which circumvents carrier blocks.
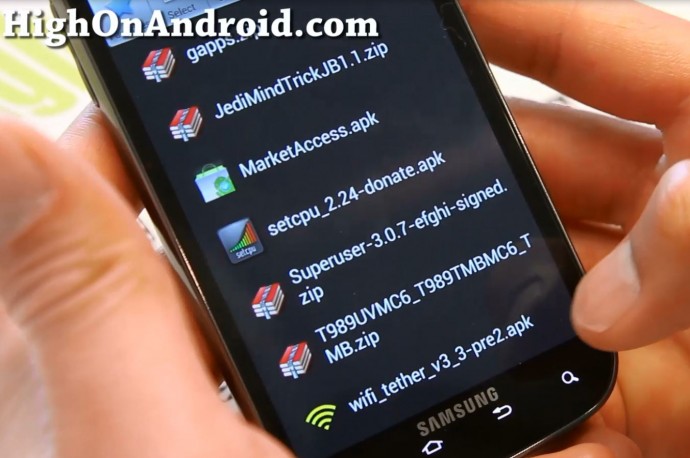
Step 1. Download Wifi Tether TrevE Mod app and install using ES File Explorer (or your favorite file manager app). Make sure “Unknown Sources” is checked under Settings if it asks you to.
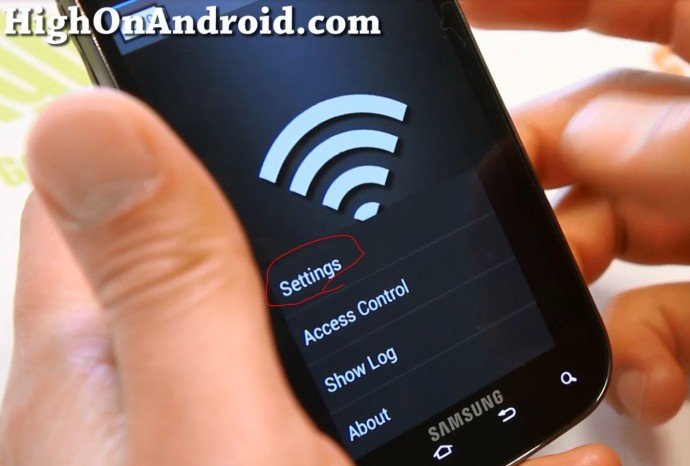
Step 2. Open the Wifi Tether app, hit Menu button and hit “Settings”.
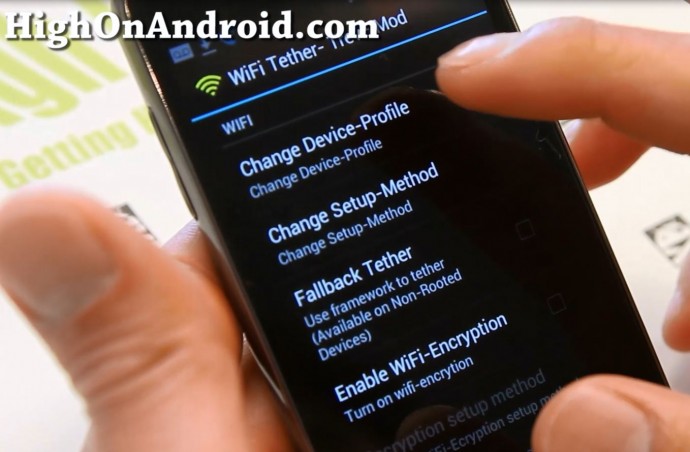
Step 3. Press on “Change Device-Profile”.
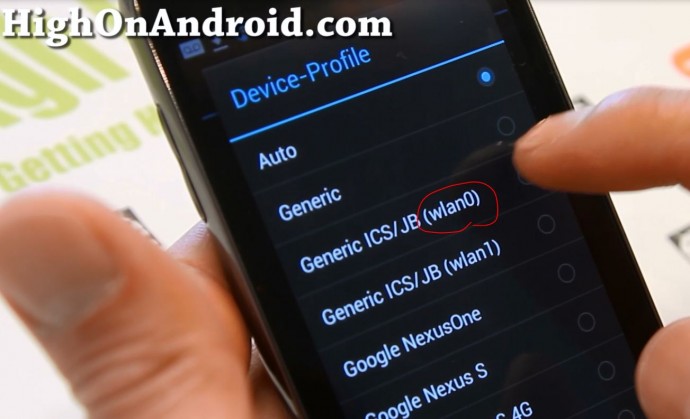
Step 4. Choose “Generic ICS/JB (wlan0)”.
Step 5. Choose “Change Setup-Method”.
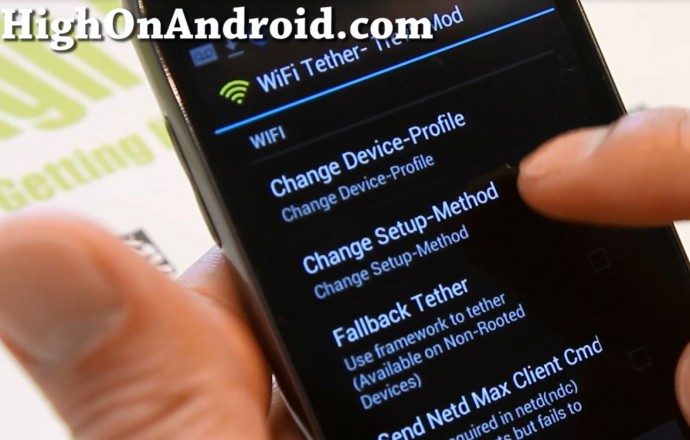
Step 6. Choose “Netd-Ndc (master)”.

Step 7. Choose “Send Netd Max Client Cmd”.
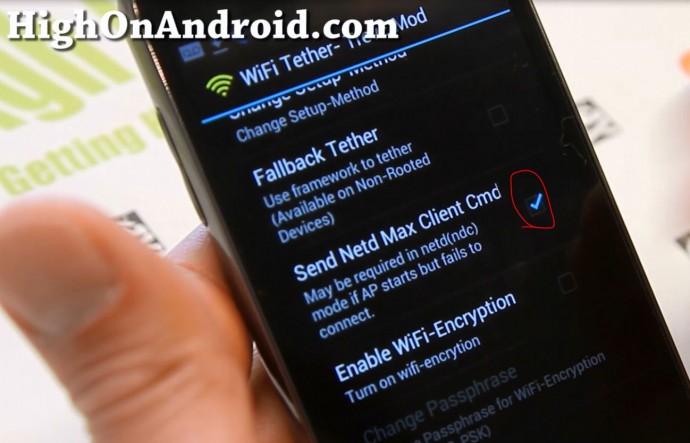
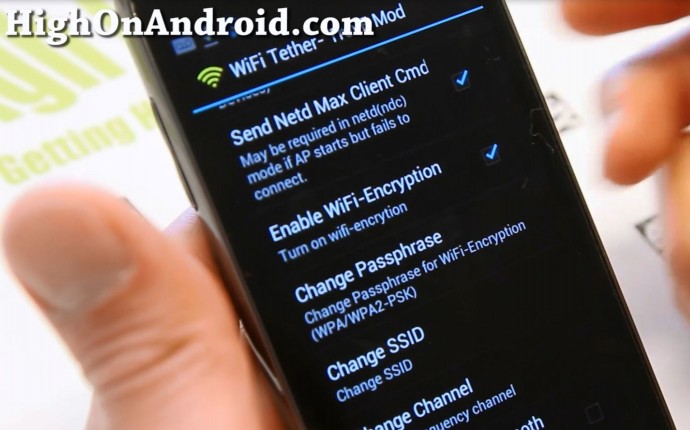
Step 8. You can set your wifi encryption and SSID here to whatever you’d like.
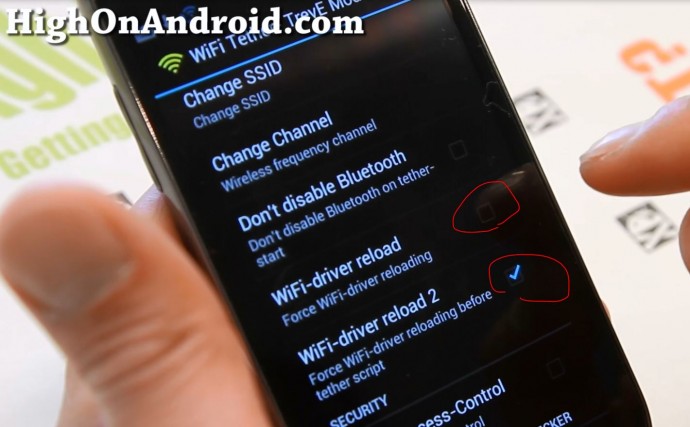
Step 9. Make sure either “WiFi-driver reload” or “WiFi-driver reload 2” is checked on. If wifi tether fails for some reason you can change this to the one you didn’t use.
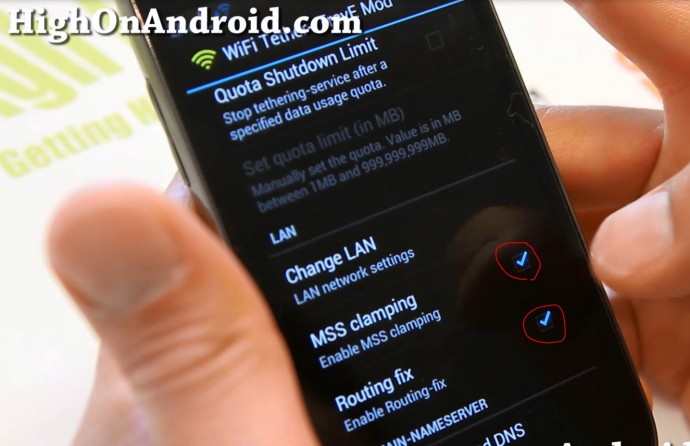
Step 10. Scroll down and make sure “MSS clamping” and “Routing fix” are both checked on.
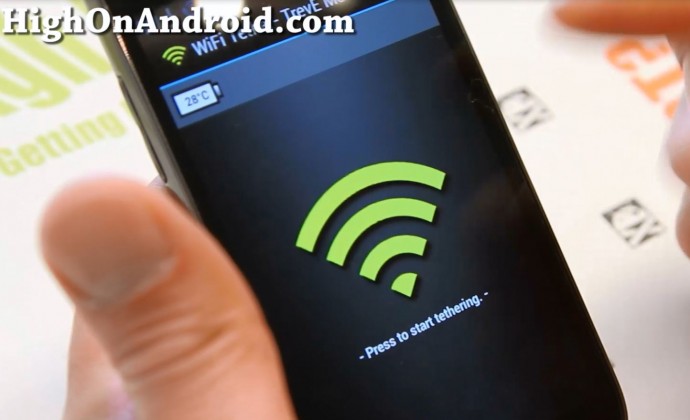
Step 11. Turn on tethering by hitting the Wifi icon.
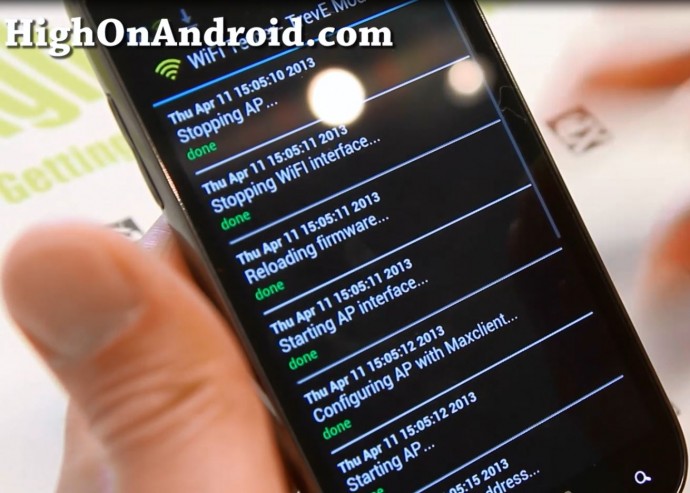
Step 12. You can check logs by hitting Menu button->Show Log. If you don’t see any errors you are good to go.
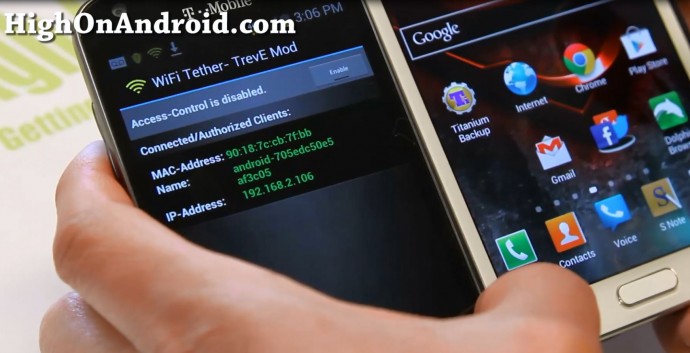
Step 13. Now, try connecting to your wifi tether using your computer or another wifi device. Once connected, it should show up under Access Control. (hit Menu then Access Control)
Step 14. Enjoy your wifi tether without paying carriers twice!

Don’t forget to share this with your friends on Twitter, Facebook, or Google+ thx!
*Note – This only enables wifi tether on Android smartphones/tablets so you can bypass
monthly tethering charges but it will still count under your data plan (unless you have unlimited/grandfathered plan).
Is it illegal? Nope. Charging for wifi tethering should be illegal though, most
countries outside the U.S. do not charge extra for wifi tether, it just counts
under the data plan. (e.g. South Korea, Thailand, and pretty much rest of the world)
If you have trouble tethering on T-Mobile, try these T-Mobile APN settings:
Источник


