- Новые возможности Apple Configurator
- Новые возможности Apple Configurator 2.12.1
- Новые возможности Apple Configurator 2.11.1
- Новые возможности Apple Configurator 2.11
- Новые возможности Apple Configurator 2.10
- Новые возможности Apple Configurator 2.9
- Новые возможности Apple Configurator 2.8.2
- Новые возможности Apple Configurator 2.8.1
- Revive or restore a Mac with Apple silicon using Apple Configurator 2
- What does a revive do to your Mac?
- What does a restore do to your Mac?
- Before you begin
- How the revive and restore processes work
- Step 1: Connect the Mac computers
- Step 2: Prepare the Mac you want to revive or restore
- Step 3: Revive the firmware and install the latest recoveryOS
- Step 4: Restore the firmware, erase all data and reinstall the latest version of recoveryOS and macOS
- Revive or restore an Intel-based Mac using Apple Configurator 2
- What does a revive do to your Mac?
- What does a restore do to your Mac?
- Before you begin
- How the revive and restore processes work
- Step 3: Revive the firmware
- Step 4: Restore the firmware and erase all data
Новые возможности Apple Configurator
Узнайте о последних обновлениях Apple Configurator.
Новые возможности Apple Configurator 2.12.1
В этом обновлении добавляется поддержка восстановления прошивки на Mac Pro (2019 г.).
Для ОС iOS:
- VPN — настройка установленных поставщиком требований для подключения собственного SSL-сертификата.
- VPN — настройка доступа к сети для подключения Cisco, Juniper, Pulse, F5, SonicWall, Aruba, CheckPoint и собственного SSL-сертификата:
- Отправка всего трафика через VPN
- Исключение локальных сетей

Новые возможности Apple Configurator 2.11.1
Новые возможности Apple Configurator 2.11
Поддержка нового оборудования.
Новые возможности Apple Configurator 2.10
Для ОС iOS
- Wi-Fi — настройка типа защиты «Личный WPA3»
- VPN IKEv2 — настройка параметра «Включить возврат» для поддержки функции «Помощь Wi-Fi»
- Exchange ActiveSync — отдельное включение приложений «Почта», «Календарь», «Контакты» и «Напоминания» для управляемых учетных записей
- Настройка новых ограничений, которые являются только контролируемыми — разрешить приложению «Файлы» доступ к функциям «Найти устройство», «Найти друзей», включению и выключению Wi-Fi, а также внешнему жесткому диску
- Настройка полезной нагрузки единого входа в приложение
- Пропуск панелей «Темный режим» и «Приветствие» в ассистенте настройки
- Возможность непрерывного ввода текста
Для ОС tvOS:
- Wi-Fi — настройка типа защиты «Личный WPA3»
- DeviceSleep
Новые возможности Apple Configurator 2.9
- Номер телефона, ICCID и IMEI подключенных устройств с двумя SIM-картами теперь можно просмотреть на панели сведений об устройстве и в cfgutil
- Пропуск информации о новых функциях в ассистенте настройки с помощью действия Automator
- Настройка новых ограничений — изменение параметра «Режим модема» (только под контролем)
- Настройка полезной нагрузки прозрачности сертификата
Новые возможности Apple Configurator 2.8.2
Поддержка нового оборудования.
Новые возможности Apple Configurator 2.8.1
Для ОС iOS
Новые параметры полезной нагрузки «Ограничения»:
- Разрешить запросы на передачу пароля на основе приближенности (только контролируемые устройства)
- Разрешить передачу пароля (только контролируемые устройства)
- Разрешить автозаполнение пароля (только контролируемые устройства)
- Автоматически устанавливать дату и время (только контролируемые устройства)
- Разрешить использование USB-аксессуаров, когда устройство заблокировано (только контролируемые устройства)
- Разрешить управляемым учетным записям приложения «Контакты» записывать данные в неуправляемые учетные записи
- Разрешить неуправляемым учетным записям приложения «Контакты» читать данные управляемых записей
- Разрешить изменение параметров eSIM (только контролируемые устройства)
Новые параметры полезных нагрузок «Почта» и «Обмен»:
- Разрешить пользователю включать или выключать подпись S/MIME
- Разрешить пользователю изменять выбор сертификата подписи S/MIME
- Разрешить пользователю включать или выключать шифрование S/MIME
- Разрешить пользователю изменять выбор цифрового сертификата S/MIME
Новые параметры полезной нагрузки «Обмен»:
- Использование OAuth для аутентификации
Новые параметры полезной нагрузки «Уведомления»:
- Разрешить объединение уведомлений
- Указать, разрешено ли приложению отправлять важные предупреждения
- Показывать в CarPlay
Новые параметры, которые можно пропустить при регистрации устройства на панели ассистента настройки:
- iMessage и FaceTime, «Экранное время» и «Обновление устройства»
- Разрешить установку обновлений ПО пользователям, не имеющим прав администратора
- Добавить сотовый тариф
Для ОС tvOS:
Новые параметры полезной нагрузки «Ограничения»:
- Разрешить запросы на передачу пароля на основе приближенности (только контролируемые устройства)
Источник
Revive or restore a Mac with Apple silicon using Apple Configurator 2
In very rare circumstances, such as a power failure during a macOS update or upgrade, a Mac may become unresponsive and so the firmware must be revived or restored.
Important: First try reviving the computer. If that fails or if you can’t start the Mac from the startup volume or the recoveryOS, you must restore the firmware and erase the internal flash storage.
What does a revive do to your Mac?
A revive updates the firmware and updates recoveryOS to the latest version. A revive is designed to not make any changes to the startup volume, the user’s data volume, or any other volumes. User data may be retained if recoverable.
What does a restore do to your Mac?
A restore updates the firmware, updates recoveryOS to the latest version, and erases and installs the latest version of macOS on your internal storage. When this process is complete, any data on any internal volumes is unrecoverable.
You must restore the firmware and erase the internal flash storage if:
Reviving the firmware is unsuccessful
You can’t start the Mac from the startup volume or the recoveryOS
Before you begin
These revive and restore instructions cover the following Mac computers with Apple silicon:
MacBook Pro (16-inch, 2021)
MacBook Pro (14-inch, 2021)
iMac (24-inch, M1, 2021)
Mac mini (M1, 2020)
MacBook Pro (13-inch, M1, 2020)
MacBook Air (M1, 2020)
Make sure you have:
The latest version of Apple Configurator 2 installed on a Mac running macOS 10.15.6 or later
You may need to configure your web proxy or firewall ports to allow all network traffic from Apple devices to Apple’s network 17.0.0.0/8. For more information on the ports used by Apple products, see the Apple Support article Use Apple products on enterprise networks. For more information on whether your network uses a web proxy or firewall, consult your router manual or your internet provider.
A supported USB-C to USB-C charge cable, such as the one sold by Apple (may not be available in all countries or regions) or a supported USB-A to USB-C cable
The USB-C cable must support both power and data. Thunderbolt 3 cables aren’t supported.
How the revive and restore processes work
The revive and restore processes involve the following steps:
Step 1. Plug the Mac computers together with a supported USB-C cable, locate Apple Configurator 2 in the Applications folder or in Launchpad, then launch Apple Configurator 2 on the first Mac.
Step 2. Restart the second Mac using a special key sequence. The key sequence varies according to the type of Mac you want to revive or restore.
Step 3. Use Apple Configurator 2 to revive the Mac.
Step 4. If a revive is unsuccessful, you can use Apple Configurator 2 to restore the Mac.
Step 1: Connect the Mac computers
Make sure your first Mac is plugged into a power source and started.
Plug in the USB-C cable (along with any adapters needed) and connect the two Mac computers.

Launch Apple Configurator 2  .
.
Step 2: Prepare the Mac you want to revive or restore
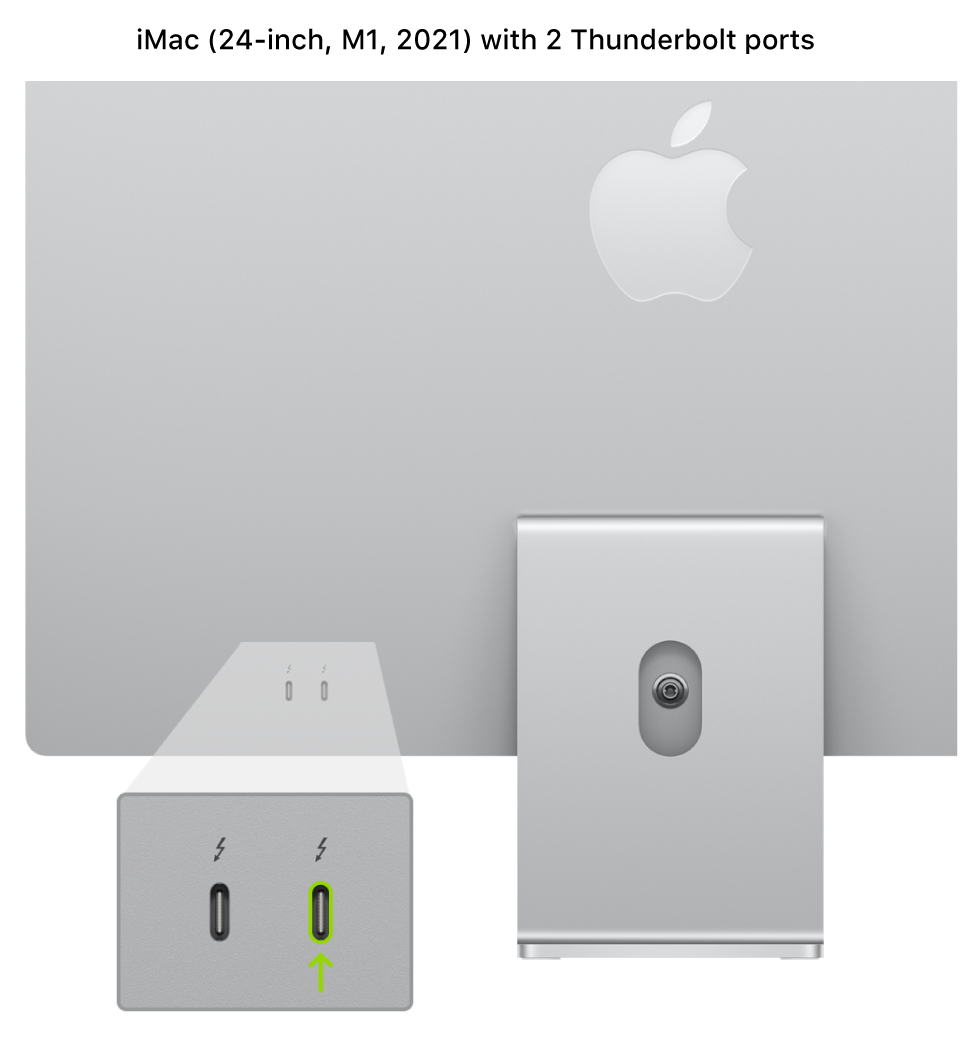
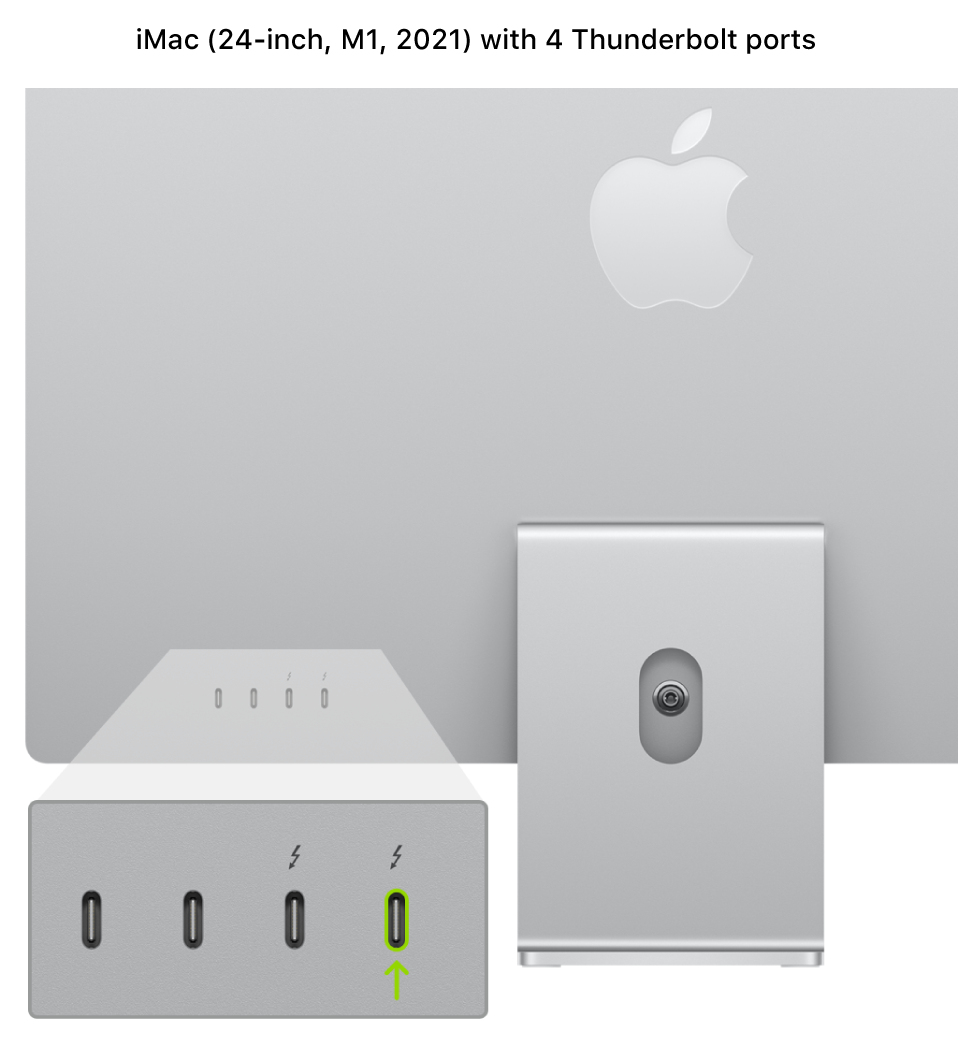
If reviving or restoring an iMac (24-inch, M1, 2021)
1. Disconnect the iMac from power.
2. Plug the USB-C cable into the Thunderbolt port closest to the stand.
3. While holding down the power button, connect the iMac to power and continue to hold the power button for about 3 seconds.
Note: You won’t see any screen activity from the iMac you want to revive or restore.
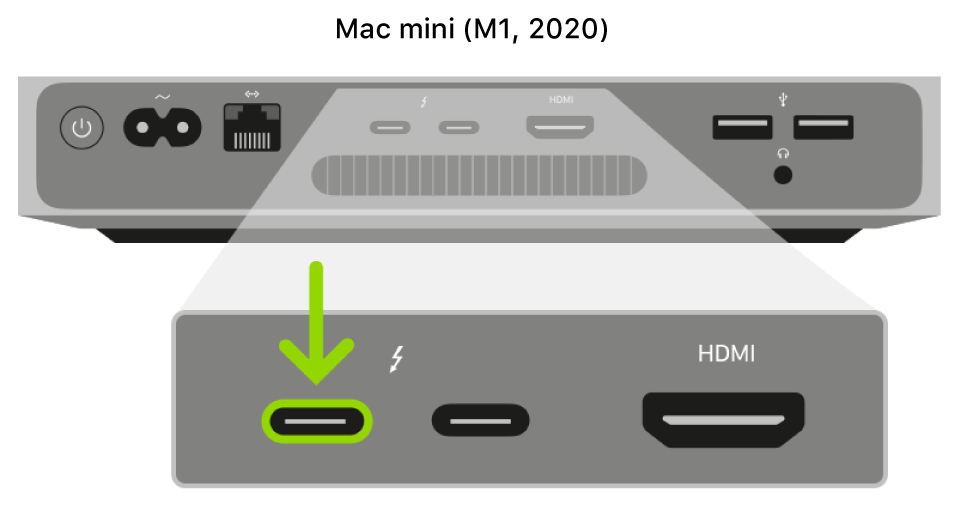
If reviving or restoring a Mac mini
1. Connect a monitor to your Mac mini (so you can see when the process is complete).
2. Disconnect the Mac mini from power for at least 10 seconds.
3. Press and hold the power button.
4. Reconnect power while still holding the power button.
5. Release the power button.
The status indicator light should turn amber, and a DFU icon should appear in Apple Configurator 2 on the Mac mini .
Note: You won’t see any screen activity from the Mac mini you are trying to revive or restore.
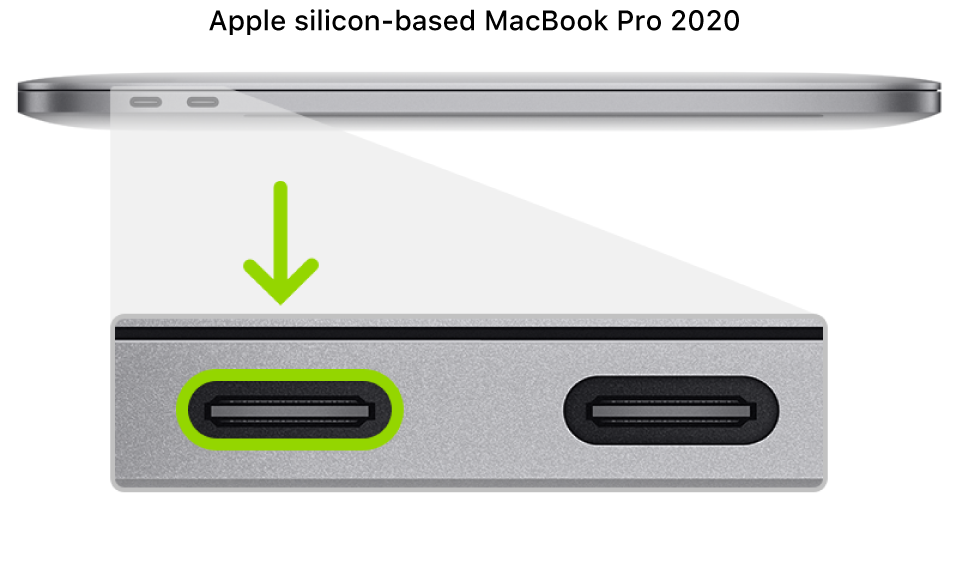
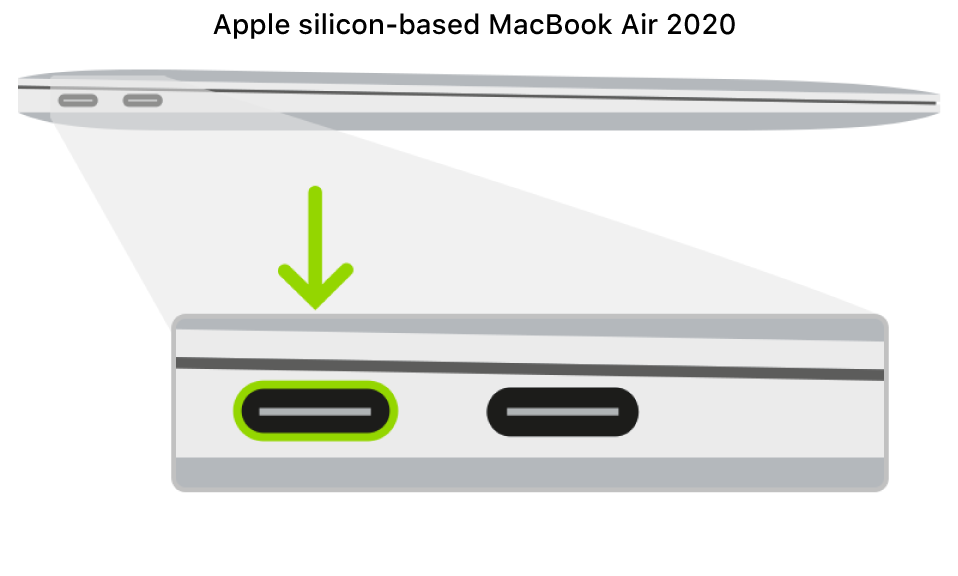
If reviving or restoring an Apple notebook computer
1. Press the power button.
2. While holding down the power button, at the same time press all three of the following keys for about 10 seconds:
The right Shift key
The left Option key
The left Control key
3. After 10 seconds, immediately release the three keys but continue to hold down the power button until a DFU icon appears in Apple Configurator 2 on the first Mac.
Note: You won’t see any screen activity from the MacBook Air or MacBook Pro you’re trying to revive or restore. If the MacBook Pro uses a MagSafe connector, you won’t see the LED charging light.
Step 3: Revive the firmware and install the latest recoveryOS
In the Apple Configurator 2 window on the first Mac, select the DFU icon of the Mac whose chip firmware you want to revive and whose recoveryOS you want updated to the latest version.
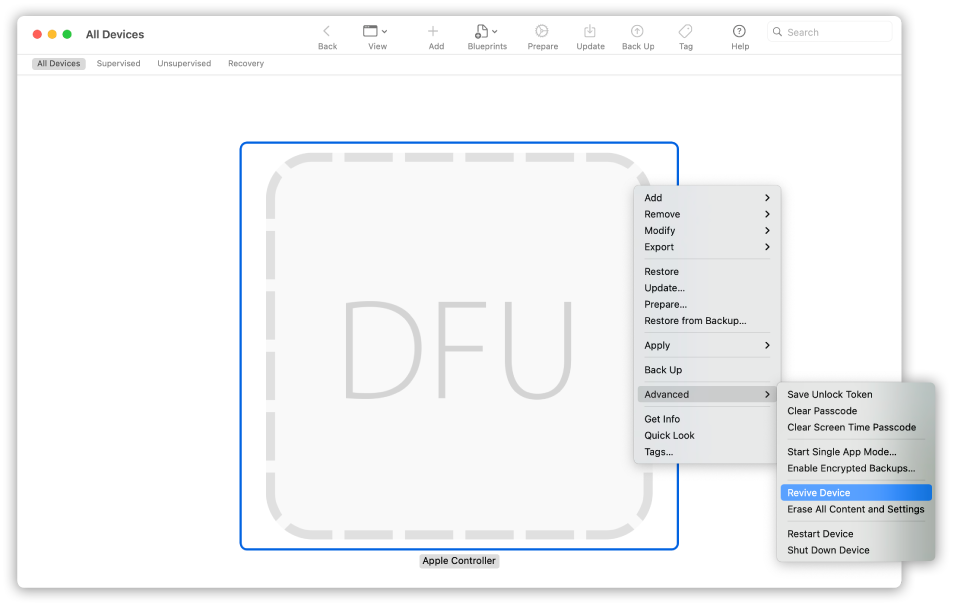
Do one of the following:
Choose Actions > Advanced > Revive Device, then click Revive.
Control-click the selected DFU icon, then choose Advanced > Revive Device, then click Revive.
Note: If you lose power to either Mac during this process, begin the revive process again.
Wait for the process to complete. During this process, an Apple logo will appear and disappear on the second Mac.
After the process successfully completes, your Mac will reboot.
Note: If the revive was unsuccessful, proceed to Step 4 below.
Quit Apple Configurator 2 on the first Mac, then unplug any cables and adapters.
Step 4: Restore the firmware, erase all data and reinstall the latest version of recoveryOS and macOS
In the Apple Configurator 2 window on the first Mac, select the DFU icon of the Mac to be restored.
Do one of the following:
Choose Actions > Restore, then click Restore.
Control-click the selected DFU icon, then choose Actions > Restore, then click Restore.
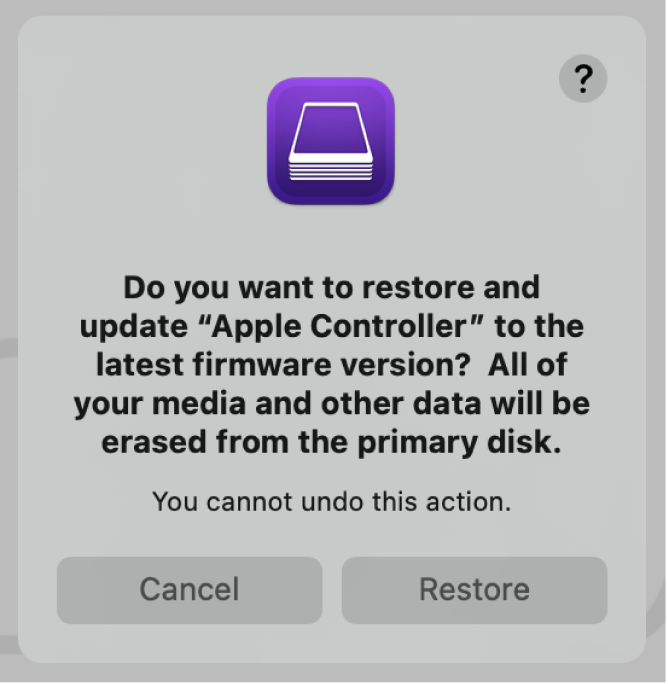 The restore confirmation dialog.
Note: If you lose power to either Mac during this process, begin the restore process again.
Wait for the process to complete. During this process, an Apple logo will appear and disappear on the second Mac.
After the process completes, your Mac will restart.
If the process was successful, you’re presented with the macOS Setup Assistant on the second Mac. If the macOS Setup Assistant doesn’t appear, repeat the restore process.
Quit Apple Configurator 2 on the first Mac, then unplug any cables and adapters.
Источник
Revive or restore an Intel-based Mac using Apple Configurator 2
In very rare circumstances, such as a power failure during a macOS update or upgrade, a Mac may become unresponsive and so the firmware must be revived or restored.
Important: First try reviving the computer. If that fails or if you can’t start the Mac from the startup volume, recoveryOS, or Internet Recovery, you must restore the firmware and erase the internal flash storage.
What does a revive do to your Mac?
A revive updates the firmware on the Apple T2 Security Chip. A revive is designed to not make any changes to the startup volume, the user’s data volume, or any other volumes. User data may be retained if recoverable.
What does a restore do to your Mac?
A restore updates the firmware and erases recoveryOS and macOS on your internal storage. When this process is complete, any data on any internal volumes is unrecoverable.
You must restore the firmware and erase the internal flash storage if:
Reviving the firmware was unsuccessful
You can’t start the Mac from the startup volume, recoveryOS, or Internet Recovery
Before you begin
These revive and restore instructions cover the following Intel-based Mac computers with an Apple T2 Security Chip:
MacBook Pro (13-inch, 2020, Four Thunderbolt 3 Ports)
MacBook Pro (13-inch, 2020, Two Thunderbolt 3 Ports)
MacBook Pro (13-inch, 2019, Four Thunderbolt 3 Ports)
MacBook Pro (13-inch, 2019, Two Thunderbolt 3 Ports)
MacBook Pro (13-inch, 2018, Four Thunderbolt 3 Ports)
MacBook Pro (16-inch, 2019)
MacBook Pro (15-inch, 2019)
MacBook Pro (15-inch, 2018)
MacBook Air (Retina, 13-inch, 2020)
MacBook Air (Retina, 13-inch, 2019)
MacBook Air (Retina, 13-inch, 2018)
Make sure you have:
The latest version of Apple Configurator 2 installed on a Mac running macOS 10.15.6 or later
You may need to configure your web proxy or firewall ports to allow all network traffic from Apple devices to Apple’s network 17.0.0.0/8. For more information on the ports used by Apple products, see the Apple Support article Use Apple products on enterprise networks. For more information on whether your network uses a web proxy or firewall, consult your router manual or your internet provider.
A supported USB-C to USB-C charge cable, such as the one sold by Apple (may not be available in all countries or regions) or a supported USB-A to USB-C cable
The USB-C cable must support both power and data. Thunderbolt 3 cables aren’t supported.
How the revive and restore processes work
The revive and restore processes involve the following steps:
Step 1. Plug the Mac computers together with a supported USB-C cable, locate Apple Configurator 2 in the Applications folder or in Launchpad, then launch Apple Configurator 2 on the first Mac.
Step 2. Restart the second Mac using a special key sequence. The key varies according to the type of Mac you want to revive or restore.
Step 3. Use Apple Configurator 2 to revive the Mac.
Step 4. If a revive is unsuccessful, you can use Apple Configurator 2 to restore the Mac.
Step 1: Connect the Mac computers
1. Make sure your first Mac is plugged into a power source and started.
Important: Don’t launch Apple Configurator 2 until after you have connected both Mac computers with the USB-C cable.
2. Plug in the USB-C cable (along with any adapters needed) and connect the two Mac computers.
Step 2: Prepare the Mac you want to revive or restore
Select the Mac you want to revive or restore.
If reviving or restoring an iMac (2020) or iMac Pro (2017):
1. Disconnect the iMac Pro or iMac from power.
2. Plug the USB-C cable into the Thunderbolt port closest to the Ethernet port.
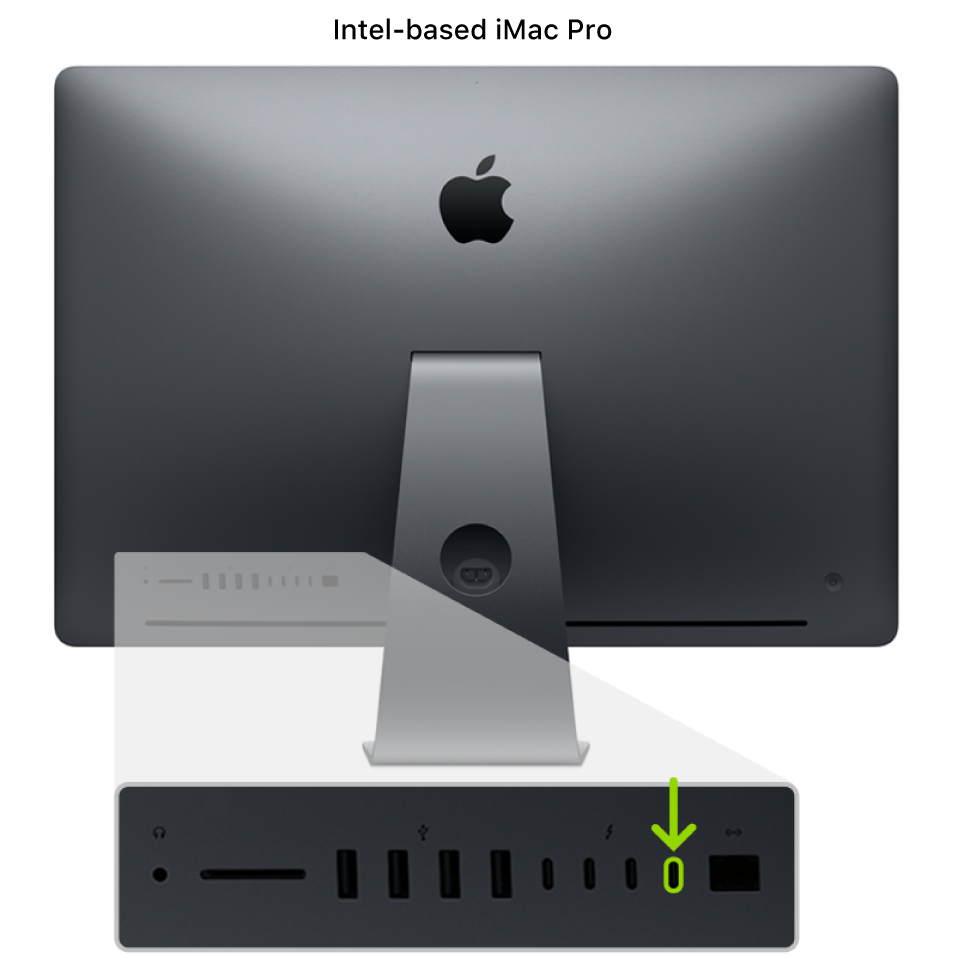

3. While holding down the power button, connect the iMac Pro or iMac to power and continue to hold the power button for about 3 seconds.
Note: You won’t see any screen activity from the iMac Pro or iMac you are trying to revive or restore.
If reviving or restoring a Mac mini (2018):
1. Connect a monitor to your Mac mini (so you can see when the process is complete).
2. Disconnect the Mac mini from power for at least 10 seconds.
3. Plug the USB-C cable into the Thunderbolt port closest to the HDMI port.
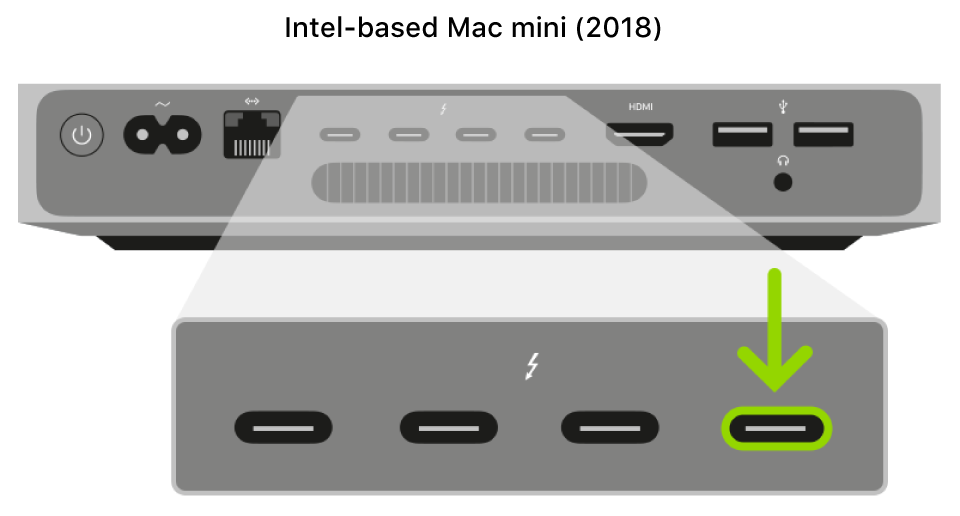
4. While holding down the power button, connect the Mac mini to power and continue to hold the power button for about 3 seconds.
Note: You won’t see any screen activity from the Mac mini you are trying to revive or restore.
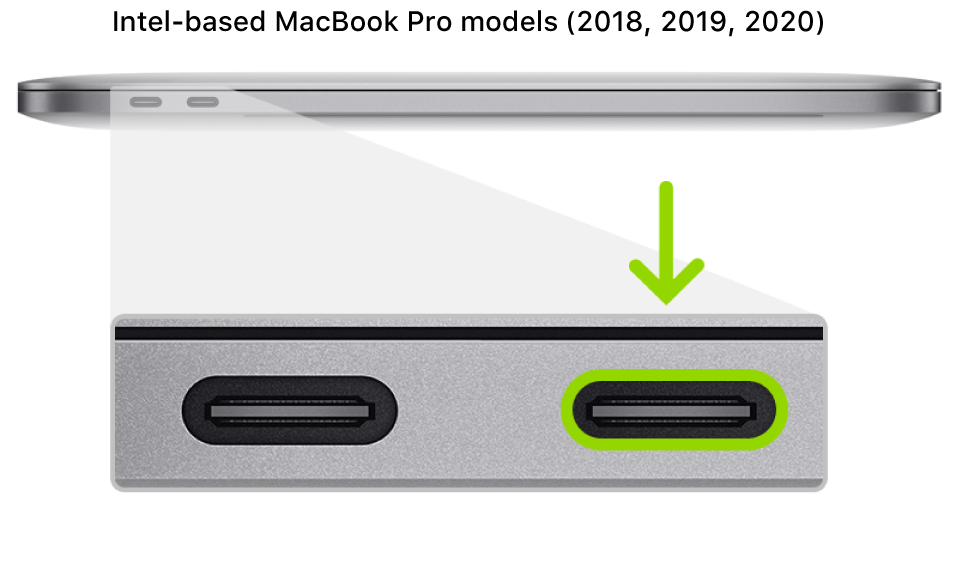
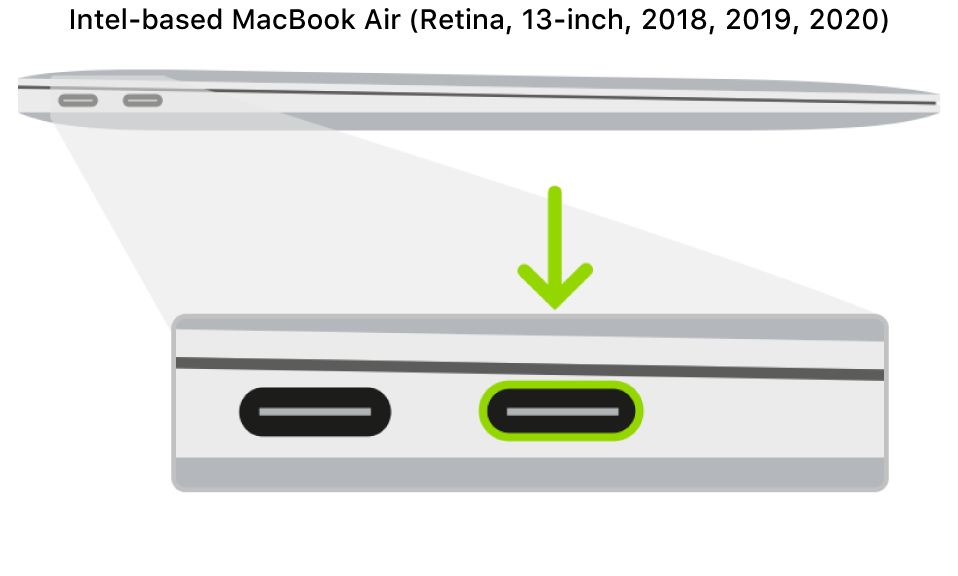
If reviving or restoring an Intel-based Apple notebook computer:
1. Press the Sleep/Wake button for about 5 seconds to shut down the Apple notebook computer.
2. Plug the USB-C cable into the front Thunderbolt port on the left side of the Apple notebook computer.
3. While holding down the power button, at the same time press all three of the following keys for about 3 seconds:
The right Shift key
The left Option key
The left Control key
Note: You won’t see any screen activity from the Apple notebook computer you are trying to revive or restore.
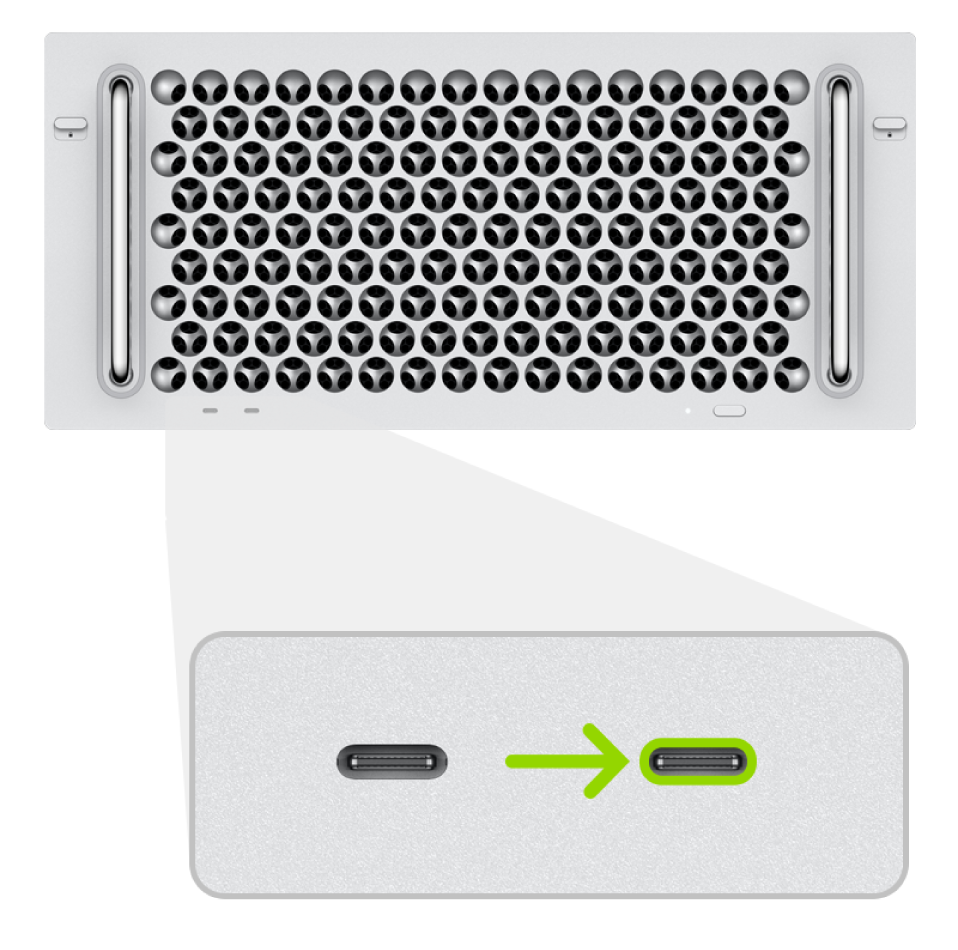
If reviving or restoring a Mac Pro (2019):
You need to revive the firmware in a Mac Pro if the light turns amber and flashes the following sequence in under 4 seconds: three short flashes, three long flashes, and three short flashes again. For more information, see the Apple Support article Mac Pro (2019) status indicator light behavior.
1. Connect a monitor to your Mac Pro (so you can see when the process is complete).
2. Disconnect the Mac Pro from power, then do one of the following:
For the desktop Mac Pro , plug the USB-C cable into the Thunderbolt port farthest away from the power button.
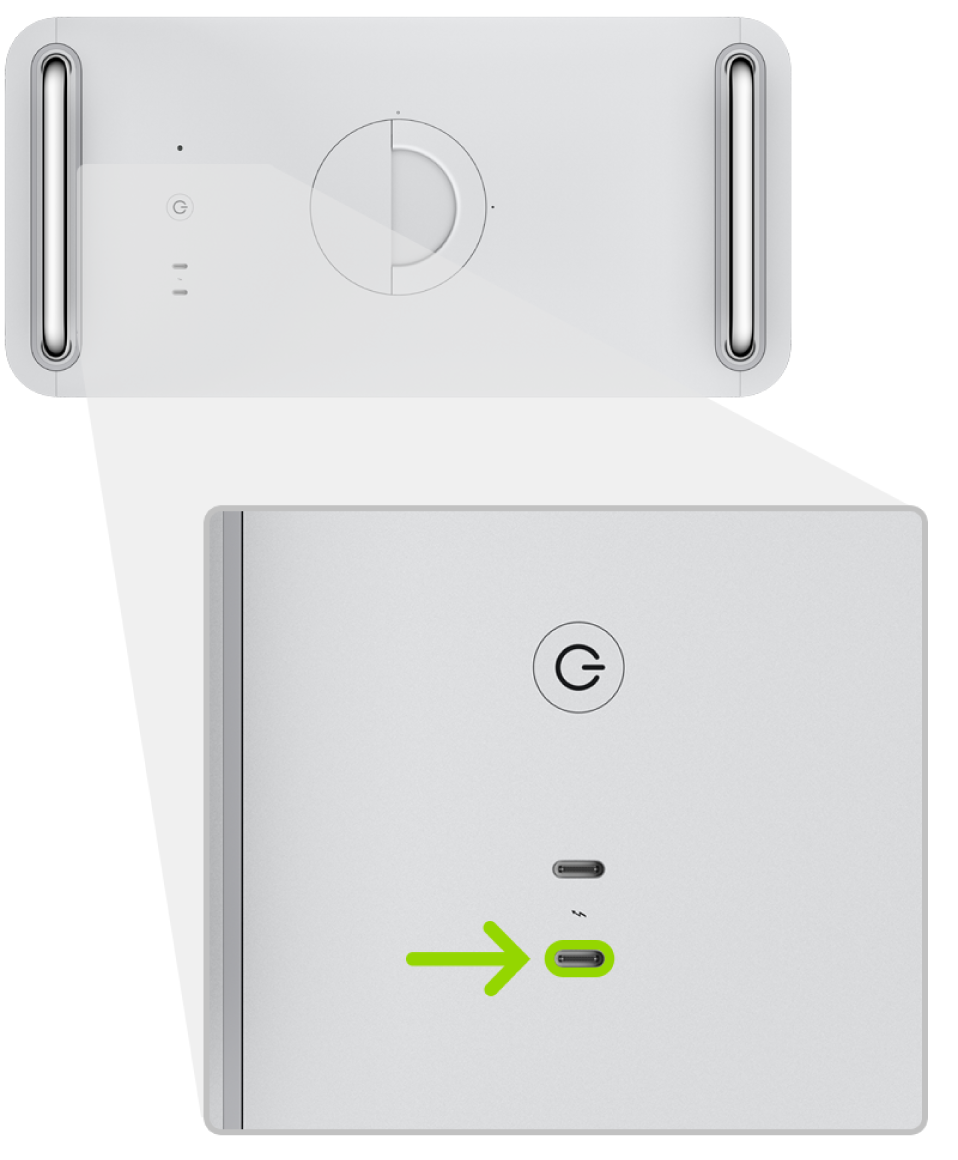
For the rack mount Mac Pro , plug the USB-C cable into the Thunderbolt port closest to the power button.
3. While holding down the power button, connect the Mac Pro to power and continue to hold the power button for about 3 seconds.
Note: You won’t see any screen activity from the Mac Pro you are trying to revive or restore.
Step 3: Revive the firmware
In the Apple Configurator 2 window on the first Mac, select the DFU icon of the Mac whose chip firmware you want to revive.
Do one of the following:
Choose Actions > Advanced > Revive Device, then click Revive.
Control-click the selected DFU icon, then choose Advanced > Revive Device, then click Revive.
Note: If you lose power to either Mac during this process, begin the revive process again.
Wait for the process to complete. During this process, an Apple logo will appear and disappear on the second Mac.
After the process successfully completes, your Mac will reboot.
Note: If the revive was unsuccessful, proceed to step 4.
If necessary, use recoveryOS to reinstall macOS.
Quit Apple Configurator 2 on the first Mac, then unplug any cables and adapters.
Step 4: Restore the firmware and erase all data
In the Apple Configurator 2 window on the first Mac, select the DFU icon of the Mac to be restored.
Do one of the following:
Choose Actions > Restore, then click Restore.
Control-click the selected DFU icon, then choose Actions > Restore, then click Restore.
The restore confirmation dialog.
Note: If you lose power to either Mac during this process, begin the restore process again.
Wait for the process to complete. During this process, an Apple logo will appear and disappear on the second Mac.
After the process completes, your Mac will restart.
After the Mac restarts, press Shift-Option-Command-R at startup (Internet Recovery) to install the macOS that came with your Mac, or the closest version still available.
See the Apple Support article How to reinstall macOS.
Quit Apple Configurator 2 and unplug any adapters and cables.
Источник


