- Designing Native-Like Progressive Web Apps For iOS
- 1. Make it standalone
- 2. Add a custom icon
- 3. Add a custom splash screen
- 4. Change the status bar
- 5. Give it a short name
- 6. Disable selection, highlighting, and callouts
- 6.1 Disable text selection
- 6.2 Disable highlighting
- 6.3 Disable callouts
- 7. Enable tap effects
- Safari Web Content Guide
- Configuring Web Applications
- Specifying a Webpage Icon for Web Clip
- Specifying a Launch Screen Image
- Adding a Launch Icon Title
- Hiding Safari User Interface Components
- Changing the Status Bar Appearance
- Linking to Other Native Apps
- Safari HTML Reference
- Supported Meta Tags
- Apple-Specific Meta Tag Keys
- apple-mobile-web-app-capable
- apple-mobile-web-app-status-bar-style
- format-detection
- viewport
Designing Native-Like Progressive Web Apps For iOS

One of the main characteristics of a Progressive Web App (PWA) is app-likeness. Although your app is technically run in the web browser, you should strive to make it look — and feel — as good as a native application. That includes making it installable on the home screen, adding a custom icon, disabling the address bar, and so on. Unlike Android, for which many native-like features are automatically generated by the Web App Manifest, iOS requires some additional HTML and CSS tricks. Here are seven suggestions on how to make your PWA more native-like on iOS.
1. Make it standalone
There are two ways to make your PWA run as a standalone application (that is, in a new window without the web browser’s UI controls) on iOS. The first way is to use the apple-mobile-web-app-capable meta tag in the head element of your HTML code with the following code.
The second way is to set the display property of your Web App Manifest to standalone . An example Web App Manifest could look like the following.
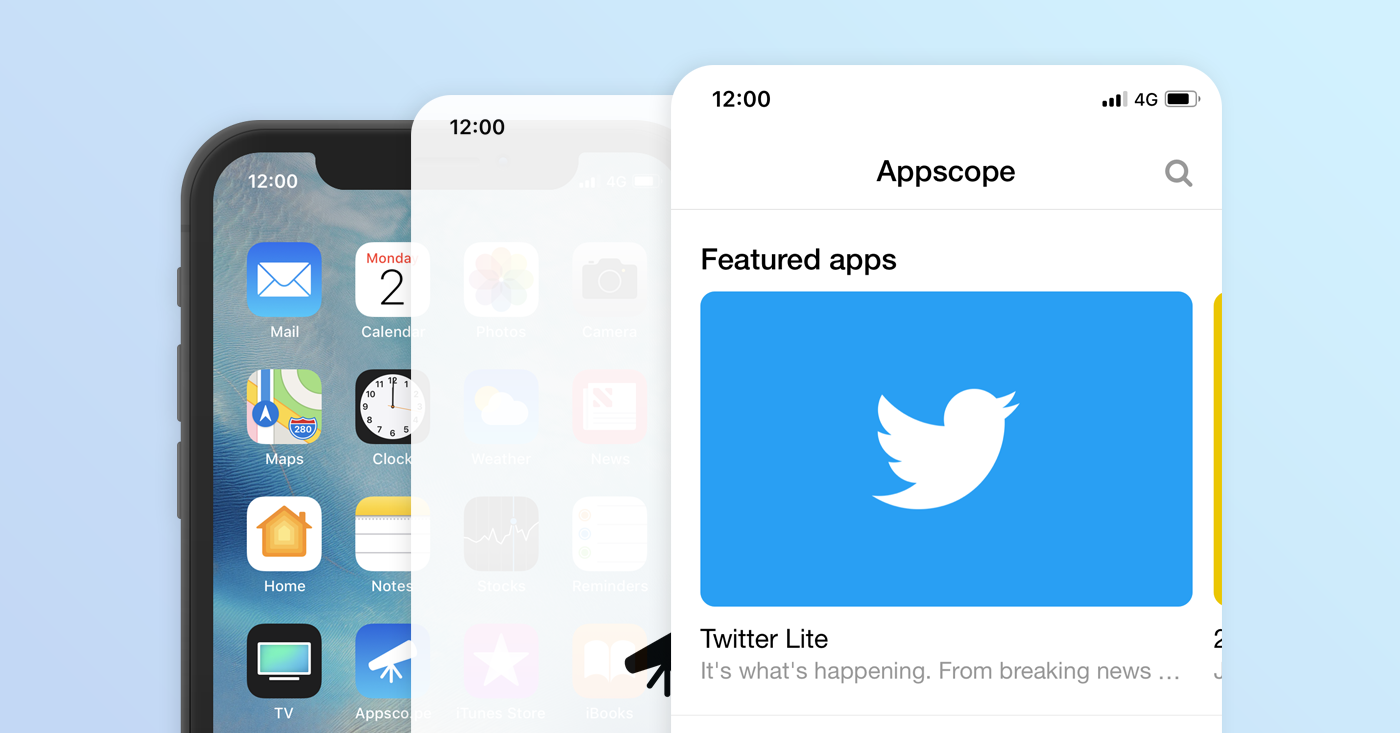
2. Add a custom icon
Unfortunately, iOS does not use the icons specified in the Web App Manifest. Instead, to use a custom icon for all pages of your app, you must provide your icon in PNG format and with the name apple-touch-icon.png in the root document folder of your PWA.
If you want to add a specific icon for a single page of your app, use the following line in the head element of your HTML code.
Different iOS devices use different sizes for the home screen icons. To specify an icon for a particular size, use the sizes attribute of the link element. If no icon is specified for the recommended icon size for the device, the icon with the smallest size larger than the recommended one is used instead.
The following example, which specifies sizes for the most common iOS devices, is from Apple’s Safari Web Content Guide.
Recall that iOS requires opaque icons. Any transparent parts of the icon will be colored black.
3. Add a custom splash screen
The next step to make your Progressive Web App more native-like is to replace the dull, white launch screen with your own image. To add a custom splash screen, use the following link element.
In order for this image to show, it is important that its dimensions are the same as those of the device the app is run on. For example, to work on an iPhone X, launch.png would have to be of the size 1125 by 2436 pixels. The problem that arises here is that there are multiple iOS devices with different resolutions, and unfortunately we cannot just simply repeat this code multiple times for images of different sizes. Instead, we need to use the media attribute to specify which launch image is intended for which device.
Add the following code to the head element of your PWA to support custom splash screens for the different iOS devices.
If you need help setting up splash screens for your PWA, check out the Splash Screen Generator at Appscope.
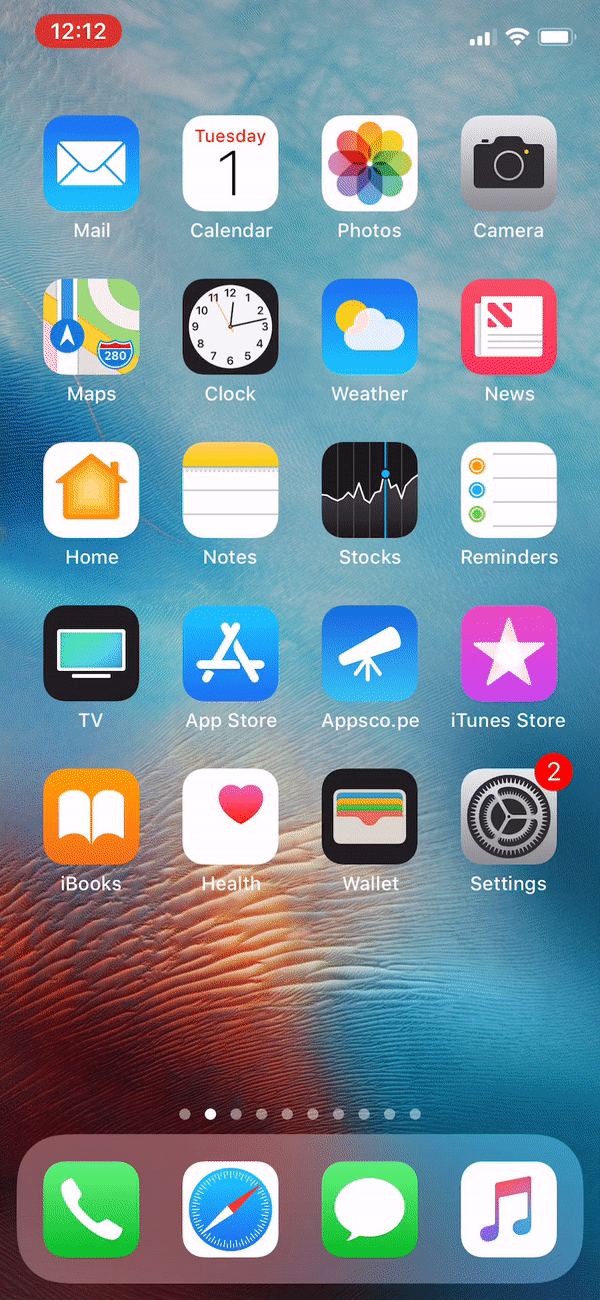
4. Change the status bar

You may also customize the iOS status bar (the area along the upper edge of the screen displaying the time and battery status) of your PWA. In order to do this, you must use the apple-mobile-web-app-status-bar-style meta tag in the head element of your code.
Unfortunately, the number of ways to customize the status bar is fairly limited, but Apple offers three distinct settings for the content attribute.
- default results in a white status bar with black text and symbols.
- black results in a black status bar and black text and symbols, making it appear completely black. If you do not use the status bar meta tag, this is what status bar will look like.
- black-translucent results in white text and symbols, and the status bar will take the same background color as the body element of your web app.
5. Give it a short name
The title of your PWA will be shown below its launch icon on the home screen. To avoid truncation, this title should not be longer than 12 characters, although it ultimately comes down to the width of the characters used (for example, the letter w is wider than the letter i.) If the original name of your PWA does not fit below the icon, you may assign a short version of the name.
One way to specify a short name for your PWA is to use the apple-mobile-web-app-title meta tag with the following line in the head element of your code.
Another way is to use the short_name property in your Web App Manifest. An example Web App Manifest could look like the following.
6. Disable selection, highlighting, and callouts
On default, the iOS web browser adds certain interactive effects for texts and links that native applications do not have. Therefore, to make your PWA feel more native-like — and less like a website or document — you may disable (or at least partially disable) these effects. The following subsections target the three most common types of effects.
6.1 Disable text selection
Just like most native iOS applications do not allow text selection, you may disable this feature in your PWA. To do this, set the -webkit-user-select CSS property to none for the elements you do not want selectable. To turn off text selection completely, assign the property to your body element.
6.2 Disable highlighting
When tapping a link in the iOS web browser, a grey box appears around the element. Although there is no simple way of disabling this effect, you may change the highlighting color to transparent, and thus effectively make it disappear. To do this for your PWA, set the -webkit-tap-highlight-color property to transparent for the desired elements (or assign it to the body element to disable link highlighting for all elements.)
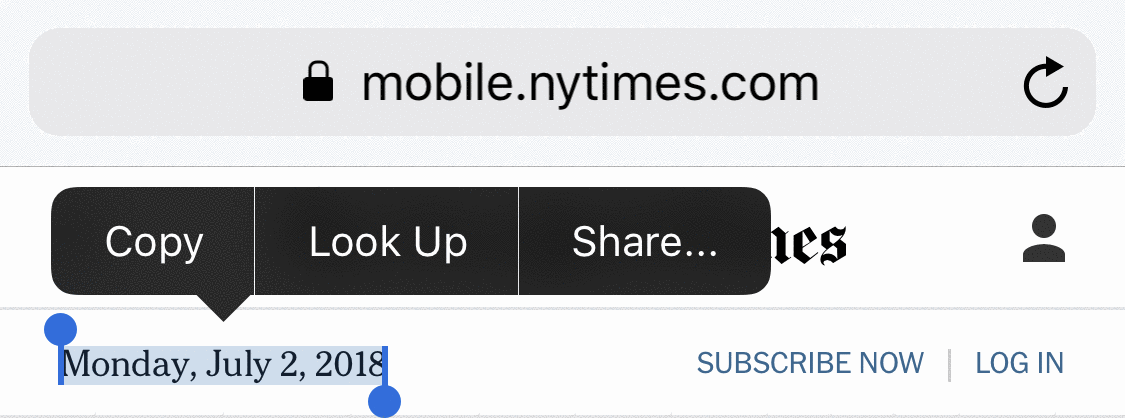
6.3 Disable callouts

If you tap and hold on an element in the iOS browser, it will open a callout menu (like the one above.) To disable this effect on iOS, set the -webkit-touch-callout property to none for the desired elements. Again, to disable the effect for all elements, assign the property to your body element.
7. Enable tap effects

Instead of using the default gray highlighting when tapping a link, you may add your own on-tap effects. By including the ontouchstart attribute in the body tag of your code and keeping its value empty, links and other elements will display their :hover and :active effects when tapped. Use the following code and play around with different :hover and :active styles to find the effects that work best for your PWA.

Appscope is the leading directory for progressive web apps and offers a collection of the best web-based applications that are compatible with all devices.
Источник
Safari Web Content Guide
Configuring Web Applications
A web application is designed to look and behave in a way similar to a native application—for example, it is scaled to fit the entire screen on iOS. You can tailor your web application for Safari on iOS even further, by making it appear like a native application when the user adds it to the Home screen. You do this by using settings for iOS that are ignored by other platforms.
For example, you can specify an icon for your web application used to represent it when added to the Home screen on iOS, as described in Specifying a Webpage Icon for Web Clip . You can also minimize the Safari on iOS user interface, as described in Changing the Status Bar Appearance and Hiding Safari User Interface Components , when your web application is launched from the Home screen. These are all optional settings that when added to your web content are ignored by other platforms.
Read Viewport Settings for Web Applications for how to set the viewport for web applications on iOS.
Specifying a Webpage Icon for Web Clip
You may want users to be able to add your web application or webpage link to the Home screen. These links, represented by an icon, are called Web Clips. Follow these simple steps to specify an icon to represent your web application or webpage on iOS.
To specify an icon for the entire website (every page on the website), place an icon file in PNG format in the root document folder called apple-touch-icon.png
To specify an icon for a single webpage or replace the website icon with a webpage-specific icon, add a link element to the webpage, as in:
In the above example, replace custom_icon.png with your icon filename.
To specify multiple icons for different device resolutions—for example, support both iPhone and iPad devices—add a sizes attribute to each link element as follows:
The icon that is the most appropriate size for the device is used. See the “Graphics” chapter of iOS Human Interface Guidelines for current icon sizes and recommendations.
If there is no icon that matches the recommended size for the device, the smallest icon larger than the recommended size is used. If there are no icons larger than the recommended size, the largest icon is used.
If no icons are specified using a link element, the website root directory is searched for icons with the apple-touch-icon. prefix. For example, if the appropriate icon size for the device is 58 x 58, the system searches for filenames in the following order:
Note: Safari on iOS 7 doesn’t add effects to icons. Older versions of Safari will not add effects for icon files named with the -precomposed.png suffix. See First Steps: Identifying Your App in iTunes Connect for details.
Specifying a Launch Screen Image
On iOS, similar to native applications, you can specify a launch screen image that is displayed while your web application launches. This is especially useful when your web application is offline. By default, a screenshot of the web application the last time it was launched is used. To set another startup image, add a link element to the webpage, as in:
In the above example, replace launch.png with your startup screen filename. See the “Graphics” chapter of iOS Human Interface Guidelines for current launch screen sizes and recommendations.
Adding a Launch Icon Title
On iOS, you can specify a web application title for the launch icon. By default, the tag is used. To set a different title, add a meta tag to the webpage, as in:
In the above example, replace AppTitle with your title.
Hiding Safari User Interface Components
On iOS, as part of optimizing your web application, have it use the standalone mode to look more like a native application. When you use this standalone mode, Safari is not used to display the web content—specifically, there is no browser URL text field at the top of the screen or button bar at the bottom of the screen. Only a status bar appears at the top of the screen. Read Changing the Status Bar Appearance for how to minimize the status bar.
Set the apple-mobile-web-app-capable meta tag to yes to turn on standalone mode. For example, the following HTML displays web content using standalone mode.
You can determine whether a webpage is displaying in standalone mode using the window.navigator.standalone read-only Boolean JavaScript property. For more on standalone mode, see apple-mobile-web-app-capable .
Changing the Status Bar Appearance
If your web application displays in standalone mode like that of a native application, you can minimize the status bar that is displayed at the top of the screen on iOS. Do so using the status-bar-style meta tag.
This meta tag has no effect unless you first specify standalone mode as described in Hiding Safari User Interface Components . Then use the status bar style meta tag, apple-mobile-web-app-status-bar-style , to change the appearance of the status bar depending on your application needs. For example, if you want to use the entire screen, set the status bar style to translucent black.
For example, the following HTML sets the background color of the status bar to black:
For more on status bar appearance, see the “UI Bars” chapter of iOS Human Interface Guidelines .
Linking to Other Native Apps
Your web application can link to other built-in iOS apps by creating a link with a special URL. Available functionality includes calling a phone number, sending an SMS or iMessage, and opening a YouTube video in its native app if it is installed. For example, to link to a phone number, structure an anchor element in the following format:
For a complete look of these capabilities, see Apple URL Scheme Reference.
Copyright © 2016 Apple Inc. All Rights Reserved. Terms of Use | Privacy Policy | Updated: 2016-12-12
Источник
Safari HTML Reference
Supported Meta Tags
Apple-specific meta tags are described here.
Apple-Specific Meta Tag Keys
apple-mobile-web-app-capable
Sets whether a web application runs in full-screen mode.
Syntax
If content is set to yes , the web application runs in full-screen mode; otherwise, it does not. The default behavior is to use Safari to display web content.
You can determine whether a webpage is displayed in full-screen mode using the window.navigator.standalone read-only Boolean JavaScript property.
Availability
Available for iOS.
Support Level
apple-mobile-web-app-status-bar-style
Sets the style of the status bar for a web application.
Syntax
This meta tag has no effect unless you first specify full-screen mode as described in apple- apple-mobile-web-app-capable .
If content is set to default , the status bar appears normal. If set to black , the status bar has a black background. If set to black-translucent , the status bar is black and translucent. If set to default or black , the web content is displayed below the status bar. If set to black-translucent , the web content is displayed on the entire screen, partially obscured by the status bar. The default value is default .
Availability
Available for iOS.
Support Level
format-detection
Enables or disables automatic detection of possible phone numbers in a webpage in Safari on iOS.
Syntax
By default, Safari on iOS detects any string formatted like a phone number and makes it a link that calls the number. Specifying telephone=no disables this feature.
Support Level
viewport
Changes the logical window size used when displaying a page on iOS.
Syntax
Use the viewport meta key to improve the presentation of your web content on iOS. Typically, you use the viewport meta tag to set the width and initial scale of the viewport.
For example, if your webpage is narrower than 980 pixels, then you should set the width of the viewport to fit your web content. If you are designing a Safari on iOS-specific web application, you should set the width to the width of the device.
Table 1 describes the properties supported by the viewport meta key and their default values. When providing multiple properties for the viewport meta key, you should use a comma-delimited list of assignment statements. Follow these rules when setting multiple properties:
Do not use a semicolon as a delimiter.
A space may work as a delimiter, but a comma is preferred.
For numeric properties, if the value contains a nonnumeric character but starts with a number, then the number prefix is used as the value. For example, 1.0x is equivalent to 1.0 and 123×456 is equivalent to 123 . If the parameter doesn’t begin with a number, the value is 0 .
When referring to the dimensions of a device, you should use the constants described in Table 2 instead of hard-coding specific numeric values. For example, use device-width instead of 320 for the width, and device-height instead of 480 for the height in portrait orientation.
You do not need to set every viewport property. If only a subset of the properties are set, then Safari on iOS infers the other values. For example, if you set the scale to 1.0 , Safari assumes the width is device-width in portrait and device-height in landscape orientation. Therefore, if you want the width to be 980 pixels and the initial scale to be 1.0 , then set both of these properties.
For example, to set the viewport width to the width of the device, add this to your HTML file:
To set the initial scale to 1.0 , add this to your HTML file:
To set the initial scale and to turn off user scaling, add this to your HTML file:
Use the Safari on iOS console to help debug your webpages as described in the Safari Web Inspector Guide. The console contains tips to help you choose viewport values—for example, it reminds you to use the constants when referring to the device width and height.
Support Level
The width of the viewport in pixels. The default is 980 . The range is from 200 to 10,000 .
You can also set this property to the constants described in Table 2 .
The height of the viewport in pixels. The default is calculated based on the value of the width property and the aspect ratio of the device. The range is from 223 to 10,000 pixels.
You can also set this property to the constants described in Table 2 .
The initial scale of the viewport as a multiplier. The default is calculated to fit the webpage in the visible area. The range is determined by the minimum-scale and maximum-scale properties.
You can set only the initial scale of the viewport—the scale of the viewport the first time the webpage is displayed. Thereafter, the user can zoom in and out unless you set user-scalable to no . Zooming by the user is also limited by the minimum-scale and maximum-scale properties.
Specifies the minimum scale value of the viewport. The default is 0.25 . The range is from > 0 to 10.0 .
Specifies the maximum scale value of the viewport. The default is 5.0 . The range is from > 0 to 10.0 .
Determines whether or not the user can zoom in and out—whether or not the user can change the scale of the viewport. Set to yes to allow scaling and no to disallow scaling. The default is yes .
Setting user-scalable to no also prevents a webpage from scrolling when entering text in an input field.


