- Install, Remove or Export iOS Provisioning and Configuration Profiles
- What are profiles?
- What are the different profile kinds?
- What are configuration profiles?
- What are provisioning profiles?
- Where can profiles be viewed on a device?
- How to manage profiles using iMazing?
- Before you begin
- Installing profiles
- Installing profiles from iMazing’s library
- Removing profiles
- Exporting profiles
- iOS Provisioning Portal Help
- Retired Document
- Creating a Distribution Provisioning Profile
- iOS Team Administration Guide
- Retired Document
- Creating and Downloading a Distribution Provisioning Profile
- Creating a Distribution Provisioning Profile
- Downloading and Installing a Distribution Provisioning Profile
- What is a provisioning profile on iOS?
Install, Remove or Export iOS Provisioning and Configuration Profiles
What are profiles?
Profiles are small units of information which can define a certain desirable behavior for an iOS device and are typically loaded onto a device by its owner in the form of a file. These files can contain various settings, restrictions, certificates, and other content, that enable or disable functionality on the device.
What are the different profile kinds?
iOS devices accept two kinds of profiles, Configuration profiles, and Provisioning profiles. Both kinds come in different file formats, each with its own file extension:
| Profile Kind | File Extension |
|---|---|
| Configuration Profile | .mobileconfig |
| Provisioning Profile | .mobileprovision |
What are configuration profiles?
Configuration profiles, allow an iOS device owner to load a set of precomposed settings to their device without having to enter each of these settings separately in a manual fashion on the device itself.
These profiles include some of the most common settings found in the Settings app on the device. Among them are instructions for the device on how to connect to the internet, what email servers to connect to, what is the desired passcode behavior, how to pop notifications, and more.
Configuration profiles can also include settings that are not available through the Settings app, such as what certificates should be provided on the device, what web clips should the device show on the home screen, and they can also install custom fonts on the device.
In addition, through configuration profiles, a device owner can set certain restrictions on the device, such as disabling the cameras, turning off iCloud or other Apple services, forcing encryption and passcode, and more.
Organizations that manage hundreds of devices or more typically use configuration profiles to load all of their necessary organizational settings into a certain device in one go, and to place restrictions according to their compliance and data protection requirements. Configuration profiles can be encrypted in order to protect sensitive settings, and can be digitally signed to identify their issuer.
What are provisioning profiles?
Provisioning profiles, enable iOS devices to run applications that were developed by the owner of a profile, without having to download the app from the App Store.
They are typically used by app developers during the development process to load apps into provisioned devices directly from their development machines for testing.
Provisioning profiles are issued by Apple for developers on a per-device basis. This means that a provisioning profile is good only for the device it was issued for.
Where can profiles be viewed on a device?
You can browse installed configuration profiles on your device in the Settings app, under the General > Profiles section. Note that this section may only appear if there are profiles installed on your device.
How to manage profiles using iMazing?
Before you begin
Download and install iMazing on your Mac or PC computer
iMazing lets you manage installed configuration and provisioning profiles on your iOS device using its Profiles dataset, both live from the device or from a backup. Here’s how to start:
- Install and launch iMazing on your Mac or PC.
- Connect your iPhone or iPad to your computer, or select a backup of the device that you have made earlier.
- Click the Profiles icon.

After following these steps, you will be presented with all profiles installed on your device listed by their name, organization (or development team), kind, identifier, and whether or not they can be removed from the device.
Installing profiles
- On the toolbar at the bottom of the list, click Install.
- Select the profile file that you would like to install and click Select.
- For each configuration profile, follow installation steps on the screen of the device itself.
Alternatively, you can also drag and drop profiles to the profiles list to install them.
💡 Tip: To easily create configuration profiles, we recommend using iMazing Profile Editor which comes bundled with iMazing. Here’s how.
Installing profiles from iMazing’s library
If you click Install from Library instead of Install, iMazing will present a sheet listing profiles located in its profile library, letting you quickly pick and even edit profiles in place before deploying them: 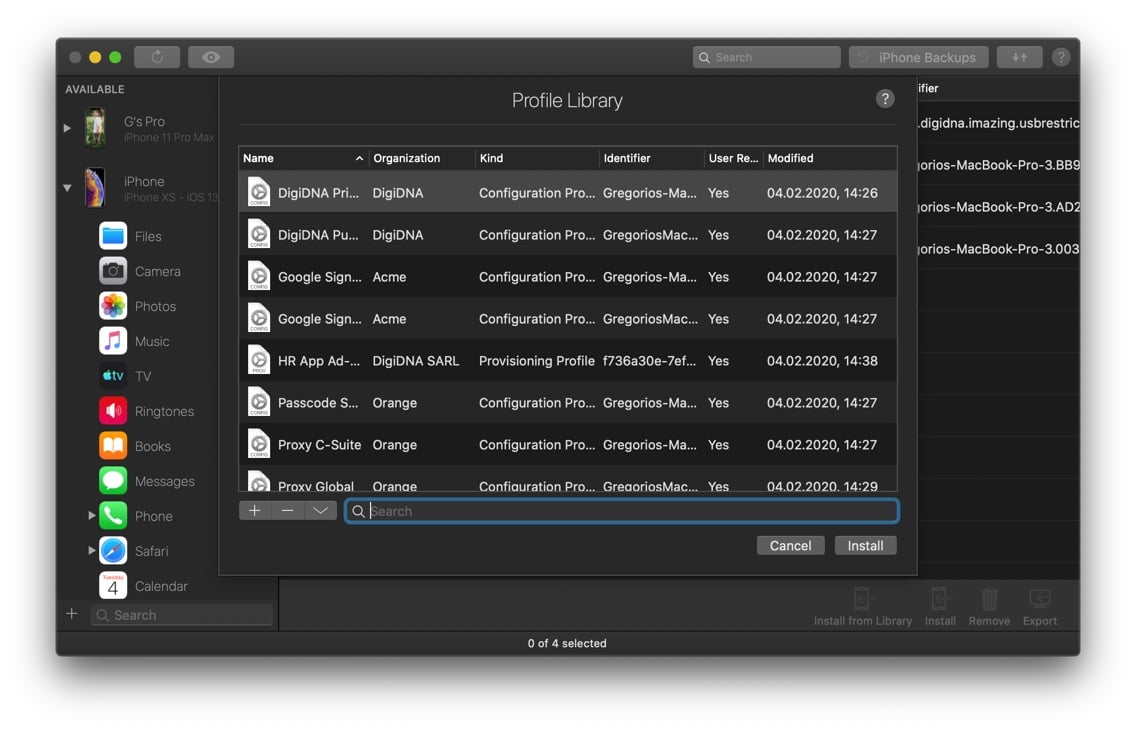
The profile library is one of the core components of iMazing’s Configurator, and can be used along with blueprints to configure and provision devices on-premise. Learn more about iMazing Configurator.
💡 User Consent: on supervised iOS devices, installing profiles only require the device to be unlocked or passcode free. On non-supervised devices, iOS will prompt you to install downloaded profiles.
Removing profiles
- Select the profile(s) that you would like to remove.
- On the toolbar at the bottom of the list, click Remove.
- Confirm.
💡 On supervised devices, configuration profiles can be set to be non removable. For such profiles, the Removable column of the profiles list will display No, and they will not be removable by the user but may be removed by iMazing.
⚡ To truly prevent removal of a profile, it must be configured as non-removable, signed, and installed on a supervised device. Providing that all these requirements are satisfied, the profile will only be removable by admins which have access to the supervision identity.
Exporting profiles
- Select the profile(s) that you would like to export.
- On the toolbar at the bottom of the list, click Export.
- Select where you would like the profiles to be saved on your drive.
💡 Tip: You can also drag and drop profiles from iMazing to your desktop to export them.
If you are exporting configuration profiles, you may be asked whether you would like to export from the current backup of the device, or to make a fresh back and export from it. This is because iOS devices do not expose their configuration profiles except through a device backup. Choose Export from Current Backup to save time, or, if you know that a profile has changed since the last backup was made, choose Back Up Now to get the latest version.
If the profile that you are exporting is not in the current backup already, you will simply be asked to make a backup at the time of export.
⚠ Some of the settings in configuration profiles are not stored on the device along with their profile, and therefore are not included in a configuration profile file when it is exported from a device. These settings include fonts, and settings which were set to device defaults. This means that exported configuration profiles will not necessarily be identical to the ones originally sent to the device for installation.
Источник
iOS Provisioning Portal Help
Retired Document
Important: This document has been replaced by App Distribution Guide . App Distribution Guide offers step-by-step instructions for configuring, testing, and submitting your app for approval. This new document describes how to use Xcode and other Apple developer tools to create and configure your project, request signing certificates, create provisioning profiles, configure special App Store technologies, test your app on devices, create your app record in iTunes Connect, and submit your app for approval to Apple. If you have a company Apple Developer Program membership, you’ll also learn how to manage your team’s certificates and provisioning assets.
Creating a Distribution Provisioning Profile
Important This document has been replaced by App Distribution Guide . App Distribution Guide offers step-by-step instructions for configuring, testing, and submitting your app for approval. This new document describes how to use Xcode and other Apple developer tools to create and configure your project, request signing certificates, create provisioning profiles, configure special App Store technologies, test your app on devices, create your app record in iTunes Connect, and submit your app for approval to Apple. If you have a company Apple Developer Program membership, you’ll also learn how to manage your team’s certificates and provisioning assets.
After logging in to the iOS Provisioning Portal, click Provisioning in the sidebar and click the Distribution tab.
Click New Profile.
Select the distribution method and enter a profile name.
Confirm that your team’s distribution certificate is displayed.
Choose the app ID for the app you want to distribute.
For ad hoc distribution only, select up to 100 devices you want to be able to run the app.
Источник
iOS Team Administration Guide
Retired Document
Important: This document has been replaced by App Distribution Guide . App Distribution Guide offers step-by-step instructions for configuring, testing, and submitting your app for approval. This new document describes how to use Xcode and other Apple developer tools to create and configure your project, request signing certificates, create provisioning profiles, configure special App Store technologies, test your app on devices, create your app record in iTunes Connect, and submit your app for approval to Apple. If you have a company Apple Developer Program membership, you’ll also learn how to manage your team’s certificates and provisioning assets.
Creating and Downloading a Distribution Provisioning Profile

To distribute an app, a team admin must create a distribution provisioning profile (this profile is different from a Development Provisioning Profile). The distribution provisioning profile consists of a name, a distribution certificate, and an app ID. The name is used only so that you can identify a provisioning profile. A provisioning profile is valid for one year.
Apps can be distributed either through the App Store with an iTunes Connect account or through ad hoc distribution. If you are enrolled in the Enterprise Program, you can also use in-house distribution. For more on distribution methods see Distributing an App .
To publish an app to the App Store, create a distribution provisioning profile specifying App Store as the distribution method.
To use ad hoc distribution, create a distribution provisioning profile specifying Ad Hoc as the distribution method and include a list of up to 100 devices authorized to run the app.
To use in-house distribution, create a provisioning profile specifying In-House as the distribution method.
Creating a Distribution Provisioning Profile
Downloading and Installing a Distribution Provisioning Profile
To install the provisioning profile on your Mac, drag the .mobileprovision file onto the Xcode, iPhone Configuration Utility, or iTunes icon in the Dock.
Copyright © 2013 Apple Inc. All Rights Reserved. Terms of Use | Privacy Policy | Updated: 2013-04-23
Источник
What is a provisioning profile on iOS?

Apr 20, 2020 · 9 min read
Ever come across an error or documentation that refers to provisioning profiles and start to question your life choices of becoming a software developer? Don’t worry, you’re not alone.
Part of being an iOS developer includes distributing your app, whether that’s to an internal testing environment on actual devices or out to the App Store for the public. Provisioning profiles are a small piece of the much larger topic of distribution.
- Apple needs a way to safely distribute your app and does so by guaranteeing to the user of your app that you are a trusted developer and that the code running your app hasn’t been tampered with.
- A provisioning profile holds all the information needed to do that.
Let me also preface this by s a ying that Xcode allows you to automate (with the check of a box) everything that we’ll talk about below. You just need to tell Xcode which development team you want to use and it will automatically generate certificates, provisioning profiles and take care of code signing. If you’re confused on what all that is and would care to learn, please keep reading!
Before we explain where provisioning profiles fit in we’ll need to take a step back to get some context.

As mentioned above, provisioning profiles are related to app distribution. Since Apple places a high priority on security, it holds developers to certain standards to make sure they are distributing safe code.
When you want to distribute your app, Apple wants a surefire way of knowing that your code comes from you (or your developer team) and that it hasn’t been corrupted or tampered with by malicious actors on the Internet.
A key concept that we’ll to dive into to make sure you understand all of this is asymmetric cryptography. Now I know what you’re thinking, “Oh god did he really just say cryptography? I came here to learn about provisioning profiles… 😑” Please bear with me as it’ll be difficult to grasp why we use provisioning profiles without this broader context.
Asymmetric cryptography is a technology that is used to securely transfer data by encrypting it before sending out to the Internet where hackers could potentially intercept that data and do bad things with it.
The encryption algorithms work with a public and private key pair. A user’s public key is used to encrypt data, and as it’s name indicates, it is public meaning that anyone can see it. That same user’s private key is used to decrypt data and should only be accessible to that user, thus the name “private”.
Let’s use a theoretical example. Bob wants Alice to send him sensitive information over the Internet. He can do that by sending Alice a request along with his public key. This way Alice can use Bob’s public key to encrypt the sensitive data, then send it to Bob, and Bob can decrypt it using his private key. Great.
However, Alice wants to be sure that Bob is the one sending the request before sending him the sensitive data. How can Bob guarantee his identity to Alice? What if an unknown actor, Elliot, gets a hold of Bob’s public key (since it’s public) and uses it to send Alice a request pretending to be Bob.
This is where we can use something called signing in asymmetric cryptography. Bob can sign his request to guarantee that he is the one making it. Take a look at the illustration below.

Bob’s request to Alice is: “Send Me $”. Bob uses his private key to sign his request before sending it to Alice. Once Alice receives it, she uses Bob’s public key to verify the digital signature of the request. In order to be validated, the signature must have been created using Bob’s private key and since Bob is the only one with access to his private key, Alice is guaranteed that the request comes from Bob. Now Alice can send Bob the sensitive data with the assurance that Bob is requesting it.
Guaranteeing your identity is also known as authentication.
🚨🚨🚨 Reminder: NEVER share your private key to the public. This defeats the purpose of asymmetric cryptography all together since private keys are needed to decrypt data.
Now that we understand more generally how signing can help us guarantee our identity we can explain what provisioning profiles are right? Unfortunately not just yet…

The provisioning profile is used to tie together all of the different parts we need in order to prove to Apple that we are distributing our code safely. That being said, it’s difficult to explain provisioning profiles without first explaining those different parts.
First of all we need to prove to Apple that we are a trusted developer. We do this by requesting a certificate from Apple which is essentially a rubber stamp of approval confirming that Apple has verified our identity.
Apple is what is referred to as a certificate authority. It’s a recognized organization that acts to validate the identity of entities such as individual developers or teams by distributing certificates to them.
As a developer who wants their identity to be validated, you need to make a certificate signing request (CSR) to Apple so that it can send you back that certificate you’re trying to obtain.
In practice you can do this via Keychain Access on your mac. I won’t go into the details since this post is more about understanding what’s happening and not a step by step implementation guide. Using Keychain Access, you submit a CSR which contains some basic information about you (common name, email, country, etc). In addition, Keychain Access creates a public-private key pair, signs the request with your private key, and includes the public key with the request. Sound familiar? This is exactly what we talked about in the illustrated example with Bob and Alice. 🤠

Because the public key is included with the request, Apple can use it to verify its digital signature and confirm that you (the owner of the private key) are in fact the one making the request. Apple can now send you the certificate.
You actually need to ask Apple to send it to you via the developer portal. You specify what type of distribution you will be needing along with some other information and then download the certificate to your local machine. There will be a public-private key pair associated with it. This key pair is very important but you will use it down the line so we’ll explain its use a little later.
Now that Apple knows who you are and trusts you, you need a way to tell it which app you want to distribute. We use an App ID to do that. It’s a unique identifier that every app has and it’s created by combining your Bundle ID and your team or developer ID.
And now that we’ve explained all the individual pieces, we can now get into what a provisioning profile is!

A provisioning profile is a file that contains the information about your developer team, your app, and how you want to distribute it.
- The intended distribution type (Development, Ad Hoc, App Store).
- The signing certificate you got from Apple verifying your identity.
- The App ID to know which app you would like to distribute.
- A list of devices you want to run your app on (for Development and Ad Hoc distribution types).
- Other information that’s not important for this blog post.

Yep, the provisioning profile is an important piece of the puzzle but it’s just that: a piece of a much larger puzzle. 🤓
Now that we have all our information in our provisioning profile and that Apple trusts us, how does that help us distribute our code safely?
That question brings us to the topic of code signing. Not to be mistaken with the signing that we did above to guarantee our identity to Apple. Code signing uses some of the same concepts as the signing we were doing before but these are two separate terms.
Let’s get into it.
Code signing allows Apple to guarantee that the code you are trying to distribute has not been corrupted or tampered with between the time you sent it out for distribution and time it gets to a user’s device. It can also guarantee that the code is coming from you, a trusted source.
After your project is built, Xcode uses an internal code signing tool for this purpose.
All the contents of your app need to be signed in your final app bundle: executables, resources, the Info.plist file, code requirements, etc. Everything that your app needs to function!
An important concept in code signing is known as the seal. Think of what it means to seal something. We run into sealed items on a day to day basis. For example, when you go to the store and buy a bag of chips, you buy a sealed bag. Because it is sealed, you know that the contents inside the sealed bag are good to eat (or stuff your face with depending on how you’re feeling).
The same thing can be said for your app. The seal is a way to check the integrity of the contents of your app. The code signing tool runs various parts of your code through a hashing algorithm that produces a series of checksums to uniquely map each part. A verifying entity can then run the same parts of your code through the same algorithm and verify that it produces the exact same checksums. If this verification fails, it means that your code was modified or corrupted after the initial hashing algorithm was run. Even the smallest change in your code will cause the verification to fail.
Another important concept in code signing is the digital signature. Apple needs to ensure that the code being verified comes from you the developer or your team. Checksums only allow us to verify the integrity of the code, but how can we be sure that you are the one who submitted the code? The answer: with a digital signature. As we saw in the illustrated example of Bob and Alice above, we can guarantee authenticity with a public-private key set. This is exactly what we’ll do during the code signing process.
Once the bundle has been sealed and the set of checksums have been produced, the code signing software encrypts these checksums with your private key that Apple sent you when you generated your signing certificate. The software turns to the provisioning profile to know which certificate to use. This is why that public-private key pair that Apple sends you with your certificate is so important!
Because only you have access to this private key, you are the only one who can perform this encryption. This encrypted set of checksums along with your signing certificate make up your digital signature. As we stated above, a verifying entity runs your code through the same hashing algorithm originally used to produce the encrypted set of checksums. It then uses your public key (embedded in your signing certificate) to decrypt the set of checksums and compares them with the results from the hashing algorithm it just ran. If there are no differences, the code hasn’t been tampered with. And since it was able to decrypt the data signed by your private key, it is guaranteed that the code comes from you.
And that is how Apple makes sure that app distribution is done in a secure fashion.

Please feel free to leave comments to continue this discussion!
Источник


