- Как использовать Sound Check на iPhone и iPod
- Как работает Sound Check
- Включите проверку звука на iPhone и других устройствах iOS
- Включить проверку звука на iPod Classic/Nano
- Используйте проверку звука в iTunes и на iPod Shuffle
- Включить проверку звука на Apple TV 4K и 4-го поколения. Apple TV
- ‘What is Sound Check on an iPhone?’: How to protect your ears from downloaded songs with higher volume
- Check out the products mentioned in this article:
- iPhone 11 (From $699.99 at Best Buy)
- How Sound Check works on your iPhone
- How to enable Sound Check on your iPhone
- How to Use Sound Check on iPhone
- Set all your music to play at the same volume
- What Is Sound Check on iPhone?
- How Sound Check Works
- How to Turn on Sound Check on iPhone and Other iOS Devices
- How to Enable Sound Check on iPod Classic and iPod nano
- How to Use Sound Check in Apple Music, iTunes and on iPod Shuffle
- How to Turn On Sound Check on Apple TV 4K and 4th Generation Apple TV
- Как использовать Sound Check на iPhone и iPod
- Как работает Sound Check
- Locate backups of your iPhone, iPad, and iPod touch
- Find backups stored on your Mac or PC
- Search for the backup folder on your Mac
- Search for the backup folder on Windows 7, 8, or 10
- Delete or copy backups on your Mac or PC
- Copy backups to another location
- Delete backups
- Locate and manage backups stored in iCloud
Как использовать Sound Check на iPhone и iPod
Проверка звука – это одна из тех функций, о которых большинство пользователей iPhone и iPod не знают, но вам почти наверняка стоит воспользоваться. Включив его, вы не только получите лучший опыт прослушивания музыки, но и защитите свой слух.
Песни записываются с разной громкостью и по разным технологиям (это особенно верно для старых записей, которые часто тише современных). Из-за этого громкость по умолчанию, на которой воспроизводятся песни на вашем iPhone или iPod, может отличаться. Это может раздражать, особенно если вы просто увеличили громкость, чтобы услышать тихую песню, а следующая звучит так громко, что это причиняет боль вашим ушам. Проверка звука может заставить все ваши песни играть примерно с одинаковой громкостью. Более того, он встроен во все последние iPhone и iPod. Вот как это использовать.
Как работает Sound Check
Проверка звука кажется крутой, но как это работает? Несмотря на то, что концепция функции может заставить вас задуматься, согласно Apple Sound Check фактически не редактирует ваши музыкальные файлы, чтобы изменить их громкость.
Вместо этого Sound Check сканирует всю вашу музыку, чтобы понять ее основную информацию о громкости. Каждая песня имеет тег ID3 (вид тега, который содержит метаданные или информацию о песне), который может контролировать уровень громкости. Sound Check применяет то, что он узнает о средних уровнях громкости вашей музыки, и настраивает тег ID3 каждой песни, который необходимо изменить, чтобы создать примерно одинаковую громкость для всех песен. Тег ID3 изменяется для регулировки громкости воспроизведения, но сам музыкальный файл никогда не изменяется. В результате вы всегда можете вернуться к исходной громкости песни, отключив проверку звука.
Узнайте больше о том, что такое теги ID3 и для чего они используются, в разделе «Как изменить имя исполнителя, жанр и другую информацию о песне в iTunes».
Включите проверку звука на iPhone и других устройствах iOS
Чтобы включить проверку звука на вашем iPhone (или любом другом устройстве iOS, например, iPod touch или iPad), выполните следующие действия:
Нажмите на приложение Настройки , чтобы открыть его.
Нажмите Музыка .
Прокрутите вниз до раздела Воспроизведение .
Переместите ползунок Проверка звука в положение/зеленый.
Эти шаги работают на основе iOS 10 и выше, но варианты похожи на более ранние версии. Просто посмотрите на настройки приложения Музыка, и Sound Check должен быть легко найден.
Включить проверку звука на iPod Classic/Nano
Для устройств, которые не работают на iOS, таких как оригинальная линейка iPod/iPod Classic или iPod nanos, инструкции немного отличаются. Эти шаги предполагают, что вы используете iPod с Clickwheel. Если ваш iPod имеет сенсорный экран, как некоторые более поздние модели iPod nano, адаптация этих инструкций должна быть довольно интуитивной.
Используйте колесо прокрутки для перехода в меню Настройки .
Нажмите центральную кнопку, чтобы выбрать Настройки .
Прокрутите до половины меню Настройки , пока не найдете Проверка звука . Выделите это.
Нажмите центральную кнопку iPod, и Проверка звука теперь должна выглядеть как Вкл .
Используйте проверку звука в iTunes и на iPod Shuffle
Проверка звука не ограничивается мобильными устройствами. Он также работает с iTunes. И, если вы заметили, что последний урок не включал iPod Shuffle, не беспокойтесь. Вы используете iTunes, чтобы включить проверку звука в Shuffle.
Узнайте, как использовать Sound Check с iTunes и iPod Shuffle в этой статье.
Включить проверку звука на Apple TV 4K и 4-го поколения. Apple TV
Apple TV может стать центром домашней стереосистемы благодаря поддержке воспроизведения вашей музыкальной библиотеки iCloud или вашей коллекции Apple Music. Как и другие устройства в этой статье, Apple TV 4K и 4-го поколения. Apple TV также поддерживает проверку звука, чтобы выровнять громкость вашей музыки. Чтобы включить проверку звука на этих моделях Apple TV, выполните следующие действия.
Выберите Настройки .
Выберите Приложения .
Выберите Музыка .
Выделите меню Проверка звука и нажмите на пульте дистанционного управления, чтобы переключить меню в Вкл .
Источник
‘What is Sound Check on an iPhone?’: How to protect your ears from downloaded songs with higher volume
When streaming music on your phone, an abrupt ad-break can be a real vibes killer. A better solution might be to craft a playlist using music downloaded to your iPhone.
However, doing so leaves yourself open to another cringe-worthy glitch — when you’ve turned up the volume a quiet song, only to get your ears blown off by songs that are way louder.
Fortunately, the iPhone offers a solution in the form of its «Sound Check» feature, which plays all the music on your phone at the same volume, no matter how loud the sound file itself is.
Note, though, that this only works with music that’s downloaded onto your iPhone or streamed with Apple Music — music from Spotify or Pandora, for instance, won’t be affected by Sound Check.
Check out the products mentioned in this article:
iPhone 11 (From $699.99 at Best Buy)
How Sound Check works on your iPhone
Sound Check doesn’t go in and modify your music files on a molecular level, so to speak. All your music is still the same.
Instead, the iPhone scans the song to see how loud it is, and stores that information in what is called its «ID3 tag.»
When Sound Check is on, your phone automatically reads and adjusts the playback volume based on how loud the ID3 tag says the song normally is. Conversely, when Sound Check is off, the ID3 data is ignored, and no volume adjustments are made.
Enabling the Sound Check feature is simple. With three steps, you can ensure that your iPhone’s music consistently hits your ears at a consistent decibel range, regardless of what song you’re listening to.
How to enable Sound Check on your iPhone
1. Open your iPhone’s Settings app.
2. Tap «Music.» You can also use the search bar at the top to find the page quicker.
3. In the «Playback» section, tap the switch next to «Sound Check» to turn it on.
Источник
How to Use Sound Check on iPhone
Set all your music to play at the same volume
:max_bytes(150000):strip_icc()/SamCostello-d7fcf106ec2048ccb06d1e2190b3396d.jpg)
Sound Check is a hidden feature of the iPhone and other Apple devices. With it turned on, not only do you have a better music-listening experience, but you also protect your hearing. Read on to learn what Sound Check is and how to use it.
The information in this article applies to iPhones, iPads, and iPod touches running iOS 10 and up.
What Is Sound Check on iPhone?
Sound Check is a feature of the iPhone, iPod, and other devices that plays all of your songs at roughly the same volume, no matter their original volume. It’s designed to make listening to music a consistent, comfortable experience no matter what song is playing.
Songs are recorded at different volumes and with different technologies. This is especially true of older recordings, which are often quieter than modern ones. Because of this, the default volume of songs on your iPhone or iPod differs. This can be annoying, especially if you turned up the volume to hear a quiet song, and the next one is so loud that it hurts your ears. Sound Check is designed to fix that.
How Sound Check Works
The way Sound Check works is really smart. It doesn’t edit music files or actually change their real volume. Instead, Sound Check scans all of your music to understand its basic volume information.
Sound Check then calculates the average volume level of all of your music. With that information, it tweaks the ID3 tag of each song to create a roughly even volume for all songs. The ID3 tag contains metadata, or information, about the song and its volume level. Sound Check changes the ID3 tag to adjust the playback volume, but the music file itself isn’t changed. You can return to the song’s original volume by turning off Sound Check.
How to Turn on Sound Check on iPhone and Other iOS Devices
To enable Sound Check on your iPhone, iPod touch, or iPad, follow these steps:
Tap the Settings app.
Tap Music.
Scroll down to the Playback section and move the Sound Check slider to On/Green.
:max_bytes(150000):strip_icc()/001-sound-check-iphone-1999784-dcf37c5e660e433aa5dba64edcb70d0c.jpg)
How to Enable Sound Check on iPod Classic and iPod nano
For iPods like the original iPod line, iPod Classic, or iPod nano that don’t run the iOS, the instructions are slightly different. These steps apply to an iPod with a Clickwheel. If your iPod has a touch screen, like some later models of the iPod nano, adapting these instructions is easy.
Use the Clickwheel to navigate to the Settings menu.
Click the center button to select Settings.
Scroll about halfway down the Settings menu until you find Sound Check. Highlight it.
Click the iPod’s center button to turn on Sound Check.
How to Use Sound Check in Apple Music, iTunes and on iPod Shuffle
Sound Check also works with Apple Music and iTunes, and levels out your playback volume in those apps. If you have an iPod Shuffle, you use iTunes to enable Sound Check on the Shuffle.
Launch Apple Music or iTunes on your Mac or PC.
Click the Music or iTunes menu on a Mac and select Preferences. On Windows, select Edit > Preferences.
:max_bytes(150000):strip_icc()/002-sound-check-iphone-1999784-e41764ee41cf461a936195797c24542d.jpg)
Select the Playback tab at the top of the Preference window.
:max_bytes(150000):strip_icc()/003-sound-check-iphone-1999784-3d77d6ef3da64afdae9e2b367cace3ef.jpg)
Click the Sound Check box.
:max_bytes(150000):strip_icc()/004-sound-check-iphone-1999784-ccf4a8af64d14087b0c270b3d38d915d.jpg)
Select OK to save the change.
How to Turn On Sound Check on Apple TV 4K and 4th Generation Apple TV
The Apple TV can be the center of a home stereo system with its support for playing an iCloud Music Library or Apple Music collection. The Apple TV 4K and the 4th generation Apple TV also support Sound Check. To enable Sound Check on those models of the Apple TV, follow these steps:
Using the remote control, select the Settings app on the Apple TV.
Choose Apps.
Select Music.
Go to the Sound Check option and click the remote control to toggle the menu to On.
Источник
Как использовать Sound Check на iPhone и iPod

Проверка звука — это функция, о которой многие пользователи iPhone и iPod не знают, но вы, вероятно, должны ее использовать. Когда он включен, вы не только получаете лучший опыт прослушивания музыки, но и защищаете свой слух .
Песни записаны на разных объемах и с разными технологиями. Это особенно верно для старых записей, которые часто тише, чем современные. Из-за этого громкость по умолчанию, которую используют песни на вашем iPhone или iPod, отличаются. Это может раздражать, особенно если вы просто увеличили громкость, чтобы услышать тихую песню, а следующая настолько громкая, что у вас болит уши. Функция Sound Check позволяет воспроизводить все ваши песни примерно с одинаковой громкостью. Более того, он встроен во все последние iPhone и iPod.
Информация в этой статье относится к устройствам iPhone, iPad и iPod touch под управлением iOS 12, iOS 11 или iOS 10.
Как работает Sound Check
Проверка звука кажется крутой, но как это работает? Несмотря на то, что вы думаете, по мнению Apple, Sound Check не редактирует ваши музыкальные файлы для изменения громкости.
Вместо этого Sound Check сканирует всю вашу музыку, чтобы понять основную информацию о громкости. Каждая песня имеет тег ID3, который содержит метаданные или информацию о песне и может контролировать уровень ее громкости. Sound Check применяет то, что он узнает о средних уровнях громкости вашей музыки, и настраивает тег ID3 каждой песни, который необходимо изменить, чтобы создать примерно одинаковую громкость для всех песен. Тег ID3 изменяется для регулировки громкости воспроизведения, но сам музыкальный файл никогда не изменяется. Вы можете вернуться к исходной громкости песни, отключив проверку звука.
Источник
Locate backups of your iPhone, iPad, and iPod touch
Find a list of your iOS or iPadOS backups on your Mac, PC, and iOS or iPadOS device. Learn how to delete backups, copy them, and more.
Find backups stored on Mac or PC
Delete or copy backups stored on Mac or PC
Find and manage backups stored in iCloud
Find backups stored on your Mac or PC
To avoid ruining any of your backup files, here’s what you should know:
- The Finder and iTunes save backups to a Backup folder. The location of the Backup folder varies by operating system. Though you can copy the Backup folder, you should never move it to a different folder, external drive, or network drive.
- Don’t edit, relocate, rename, or extract content from your backup files, because these actions might ruin the files. For example, to restore from a relocated backup file, you need to move it back or the file won’t work. Backups serve as a safe copy of your entire device. So while you might be able to view or access a backup file’s contents, the contents usually aren’t stored in a format that you can read.
Search for the backup folder on your Mac
To find a list of your backups:
- Click the magnifier icon in the menu bar.
- Type or copy and paste this:
/Library/Application Support/MobileSync/Backup/
To find a specific backup:
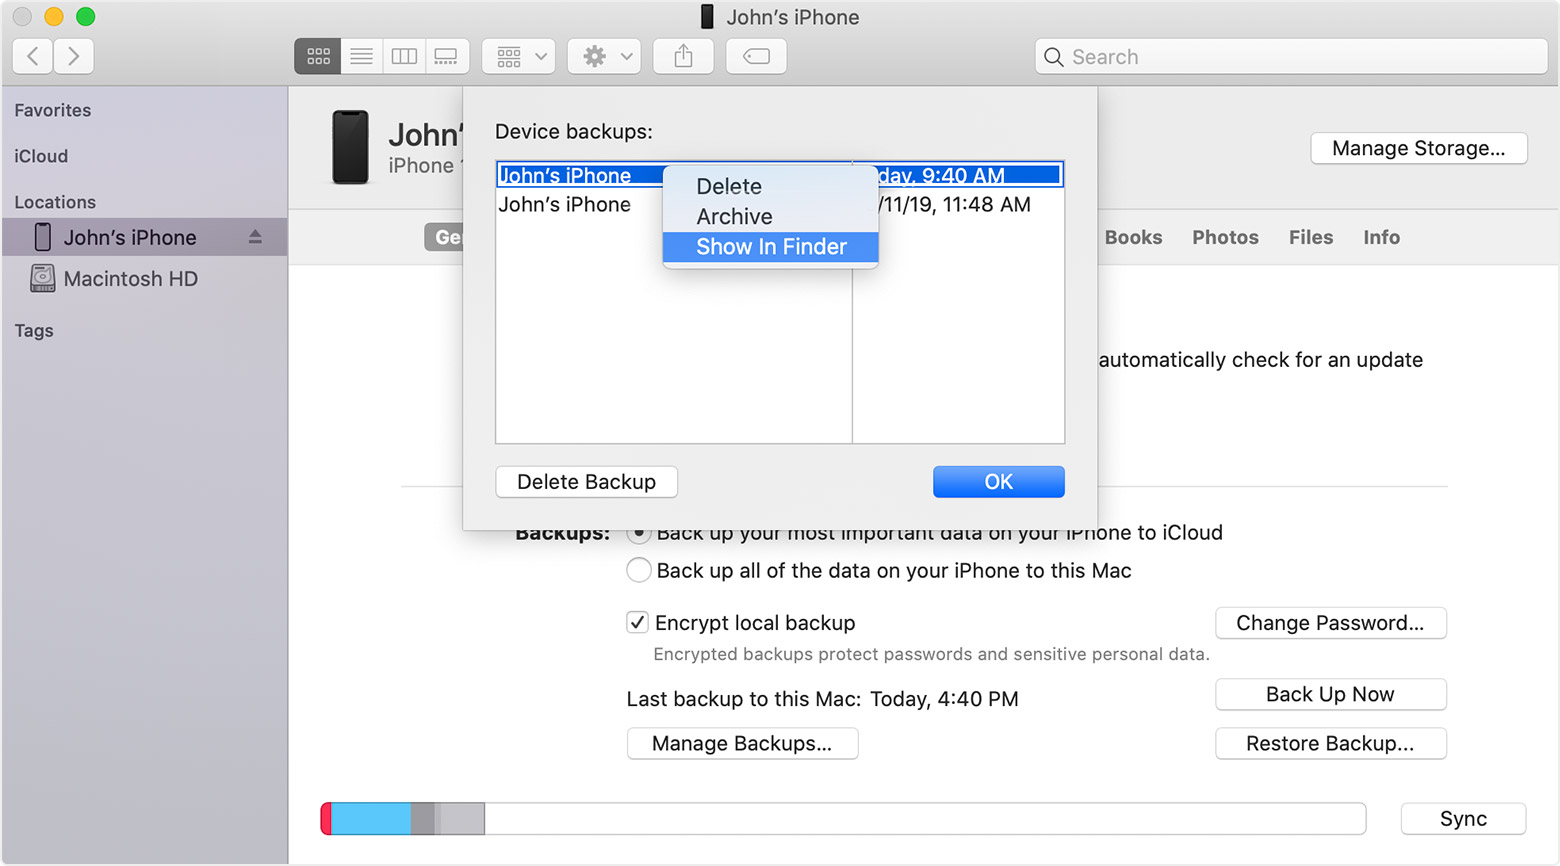
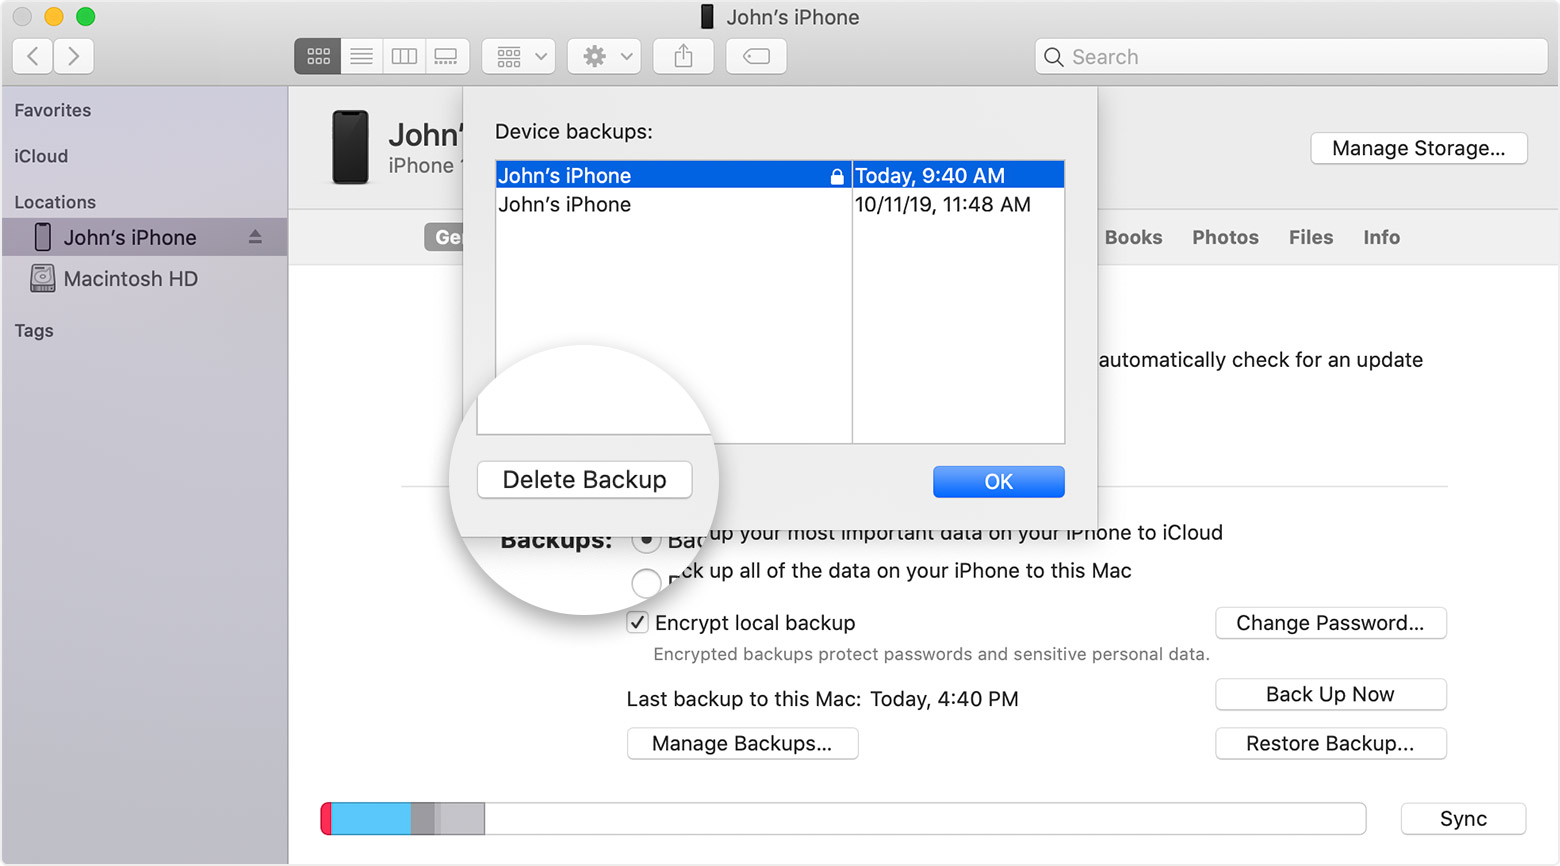
- On a Mac with macOS Catalina 10.15 or later, open the Finder. On a Mac with macOS Mojave 10.14 or earlier, or on a PC, open iTunes. Click your device.
- In the Finder, under the General tab, click Manage Backups to see a list of your backups. From here, you can right-click on the backup that you want, then choose Show in Finder, or you can select Delete or Archive. In iTunes, choose Preferences, then click Devices. From here, you can right-click on the backup that you want, then choose Show in Finder, or you can select Delete or Archive.

- Click OK when you’re finished.
Search for the backup folder on Windows 7, 8, or 10
- Find the Search bar:
- In Windows 7, click Start.
- In Windows 8, click the magnifying glass in the upper-right corner.
- In Windows 10, click the Search bar next to the Start button.
- In the Search bar, enter %appdata%. If you don’t see your backups, enter %USERPROFILE%.
- Press Return.
- Double-click these folders: «Apple» or «Apple Computer» > MobileSync > Backup.

Delete or copy backups on your Mac or PC
Don’t edit, relocate, rename, or extract content from your backup files, because these actions might ruin the files. Use the following sections to make copies of your backups or delete backups that you no longer need.
Copy backups to another location
If you need copies of your backups, you can find the Backup folder and copy the entire folder (not just part of it) to another place, like an external drive or network-storage location.
When you use Time Machine, it automatically copies your Backup folder when you back up the Home folder on your Mac.
Delete backups
- On a Mac with macOS Catalina 10.15 or later, open the Finder. On a Mac with macOS Mojave 10.14 or earlier, or on a PC, open iTunes. Click your device.
- In the Finder, under the General tab, click Manage Backups to see a list of your backups. From here, you can right-click on the backup that you want, then select Delete or Archive. In iTunes, choose Preferences, then click Devices. From here, you can right-click on the backup that you want, then choose Delete or Archive. Click OK when you’re finished.
- Click Delete Backup, then confirm.
Locate and manage backups stored in iCloud
If you use iCloud Backup, you won’t find a list of your backups on iCloud.com. Here’s how to find your iCloud backups on your iOS or iPadOS device, Mac, or PC.
On your iPhone, iPad, or iPod touch:
- Using iOS 11 or later and iPadOS, go to Settings > [your name] > iCloud > Manage Storage > Backups.
- Using iOS 10.3, go to Settings > [your name] > iCloud. Tap the graph that shows your iCloud usage, then tap Manage Storage.
Tap a backup to see more details about it, choose which information to back up, or delete the backup.
You can choose which content to back up only from the Settings menu of the device that stores that content. For example, while you can view your iPad backup from your iPhone, you can choose which iPad content to back up only from the Settings menu of your iPad.
On a Mac with macOS Catalina 10.15 or later:
- Choose Apple () menu > System Preferences.
- Click Apple ID.
- Click iCloud.
- Click Manage.
- Select Backups.
On a Mac with macOS Mojave 10.14 or earlier:
- Choose Apple () menu > System Preferences.
- Click iCloud.
- Click Manage.
- Select Backups.
- Open iCloud for Windows
- Click Storage.
- Select Backup.
Источник


