- Back up and restore your iPhone or iPad to your Mac or to iCloud
- Back up your device
- Restore your device from a backup
- Restore your device to its factory settings
- 5 Ways You Should Grasp to Backup iPhone Notes
- Part 1. How can I transfer notes from iPhone to computer?
- Part 2. How to backup iPhone notes to iCloud?
- Part 3. How to sync iPhone notes with iTunes?
- Part 4. How to move iPhone notes to Google Drive?
- Part 5. How to copy iPhone notes to Dropbox?
Back up and restore your iPhone or iPad to your Mac or to iCloud
One of the best ways of safeguarding the information on an iPhone or iPad against damage or loss is backing up or copying your files and settings to either your Mac or to iCloud. Backing up is also useful if you get a new device and want to transfer your previous settings to it.
After you back up your device, you can use the backup to restore the information on your device whenever needed. If your device has issues that can’t be fixed by restoring from a backup, you can also restore your device to its factory settings and then restore a recent backup to see if that fixes the problem.
Back up your device
Connect your device to your Mac.
You can connect your device using a USB or USB-C cable or using a Wi-Fi connection. See Sync content between your Mac and iPhone or iPad over Wi-Fi.
In the Finder  on your Mac, select the device in the Finder sidebar.

If you connect your device to your Mac using a USB cable and can’t see the device in the Finder sidebar, see If your device doesn’t appear in the sidebar.
Click General in the button bar.

To select backup options, do any of the following:

Select the “Back up your most important data on your [device] to iCloud” button to store backup data on iCloud and not on your Mac.
Select the “Back up all the data on your [device] to this Mac” to store backups on your Mac.
Select the “Encrypt local backup” tickbox to encrypt your backup data and protect it with a password. To change your password later, click Change Password.
Click Back Up Now.
Restore your device from a backup
If your device has an issue, you can use a recent backup to restore the information on the device.
Connect your device to your Mac.
You can connect your device using a USB or USB-C cable or using a Wi-Fi connection. See Sync content between your Mac and iPhone or iPad over Wi-Fi.
In the Finder on your Mac, select the device in the Finder sidebar.
Click General in the button bar.
Click Restore Backup.
Click the Backup pop-up menu, choose the backup you want to restore to the device, then click Restore.
If your backup is encrypted, you must enter the password before restoring your files and settings.
Restore your device to its factory settings
You can reinstall the software originally on your device and restore it to its factory settings. You might need to do this if you’re having problems with the device (for example, if it freezes or crashes frequently) of if you’re getting ready to sell or give it away.
Important: Restoring a device to its factory settings deletes all your information and settings. However, before doing so, your Mac backs up your device. You can use this backup to restore your information and settings on the device.
Note: You must turn off the Find My app in iCloud Settings on your device before you can restore your device.
Connect your device to your Mac using a USB or USB-C cable.
You can’t restore your device using a Wi-Fi connection.
In the Finder on your Mac, select the device in the Finder sidebar.
Click General in the button bar.
Click “Restore [device]”, then follow the onscreen instructions.
Источник
5 Ways You Should Grasp to Backup iPhone Notes
If you use iPhone notes to capture a quick thought, create checklists, sketch ideas, sign a document and more, do not forget to backup iPhone notes for the important information. This page collects 5 ways to help you backup notes from iPhone 12/11/XS/XR/X/8/7/6/5/4.
If you use iPhone notes, you will find this app very great. Why?
IiPhone Notes enables you to capture a quick thought, create checklists, sketch ideas, add photo/video attachment, scan and sign document, and more.
ISo even if you are forgettable, or want o remember your inspirations, even deal with the business job, you could use Notes on iPhone. For the important notes you written on your iPhone, you should save them safely. As a result, you should backup iPhone notes. That’s the topic we will discuss today.
Backup Notes on iPhone
In this page, we will show you 5 stories, which you may also experienced in backing up iPhone notes.
Just keep reading to get the 5 ways from the 5 stories to backup iPhone notes to iTunes, iCloud, Google Drive, Dropbox and computer.
Part 1. How can I transfer notes from iPhone to computer?
The first story is from Torrin Bouvia, who is the manager of a company.
Let’s see what troubles him.
I am very busy every day. I have to pick up many calls from my staff and partners on the go. I have to take notes for their needs on my iPhone, and then check one by one in my office to deal with them one by one. But checking notes on my iPhone is not very continent, because I have to read one by one, and rewrite them on my computer. Is there any way that helps me to backup iPhone notes to my computer? PS, I also keep many attachments (photos, videos).
Ok. Torrin Bouvia wants to find a way to backup iPhone notes to computer for viewing, including the attachments.
Now, let’s find the solutions below.
For making iPhone notes to computer, you need iOS Data Backup & Restore.
Check the steps below:
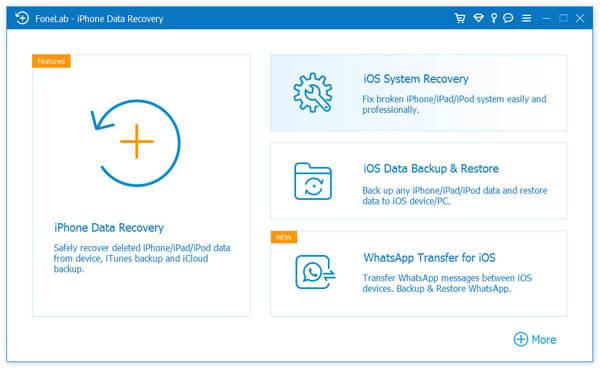
Step 1 Download iPhone notes backup app
Download this software on your computer, install and run this software on your computer. Just click «iOS Data Backup & Restore».
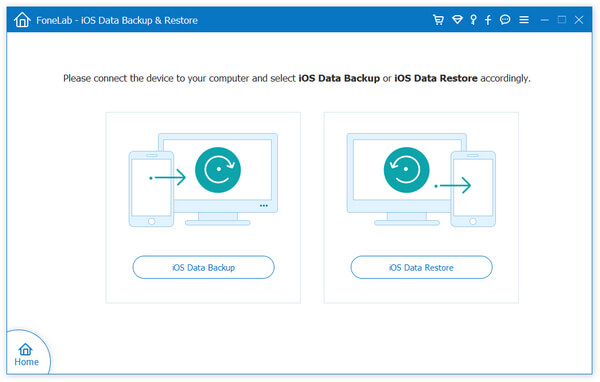
Step 2 Connect iPhone
Plug iPhone to computer with USBcable, and click «iOS Data Backup».
Step 3 Backup iPhone notes to computer
In the pop-up interface, you are given two options to backup your iPhone notes, Standard or Encrypted. Select the one you like, and click «Start» to select data type to backup. Here we tick «Notes & Attachments», and then click «Next» to start to backup iPhone notes.
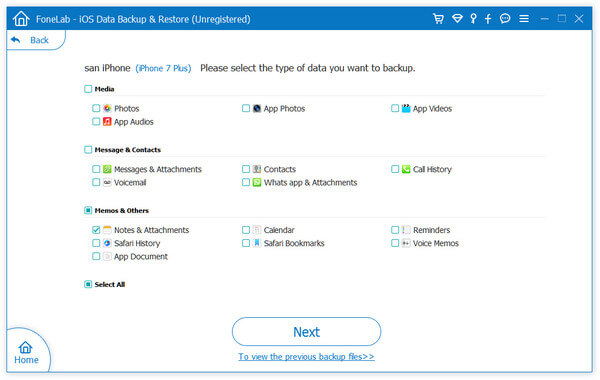
Select iPhone notes
You just need to wait seconds to see your iPhone notes are successfully saved to computer from the interface.
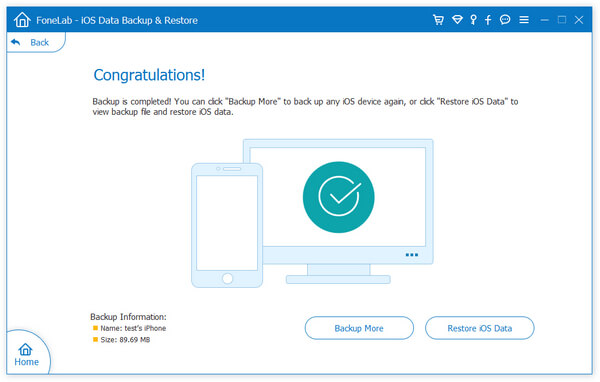
Backup iPhone notes to computer Successfully
The notes backup is saved as the library file, and no one can read it. If you want o read it on PC, just do one more step.
Step 4 Check and read iPhone notes on computer
After backing up the notes, click «Restore iOS Data» > Select the notes backup >to start scanning the notes > Click «Restore to PC» and you can open and read the notes on your computer easily.
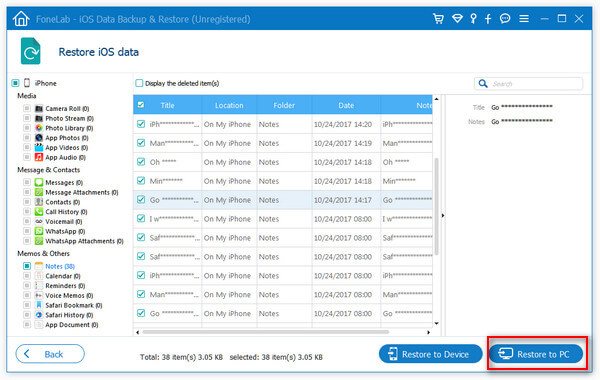
Check and read iPhone notes on computer
Easy, right? This way does backup iPhone notes to computer, but also lets you read the iPhone notes on computer facilely.
Check this video demo to get more details about bakup iPhone notes.
Part 2. How to backup iPhone notes to iCloud?
This is the second story from DrDaddio, the solution seeker on Apple Discusssion.
I can’t figure out how to get the Notes on my iPhone5c backed up to iCloud. It seems to get the contacts, but not the notes. What am I not understanding? I’ve searched and read all kinds of documents about what iCloud does and does not backup and really can’t make much sense of it. I just want to backup all our Notes.
I can’t figure out how to get the Notes on my iPhone5c backed up to iCloud. It seems to get the contacts, but not the notes.
What am I not understanding? I’ve searched and read all kinds of documents about what iCloud does and does not backup and really can’t make much sense of it. I just want to backup all our Notes.
1. You need to turn on WLAN on your iPhone for backing notes to iCloud.
2. iCloud storage is free with 5GB. If you have stored data more than 5GB on it, just clear iCloud storage or purchase more.
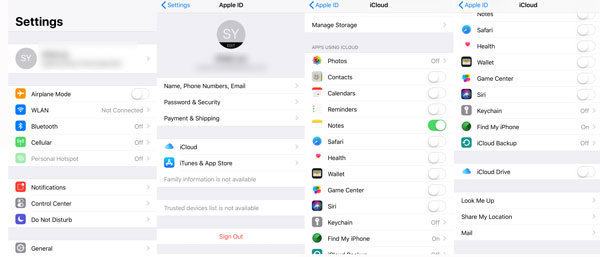
Step 1 Go to «Settings» > Find your iCloud name and tap it > «iCloud».
Step 2 Turn on «Notes» > Slide «iCloud Backup» to ON > Hit «Back Up Now» to start to save the iPhone notes to iCloud..
If you want to check the notes backup on computer, just visit www.icloud.com.
Part 3. How to sync iPhone notes with iTunes?
This is the third story from Graham Mottram, who gets his new iPhone X recently.
I bought the first iPhone in my life. I really like my iPhone X, because it is very easy for me to add notes on iPhone. I am always inspired outside, and always keep the sketches on my paper. Without pen and paper, I will make the sketches on my iPhone. I made those a lot. Now, I want to keep the notes backup to iTunes, just in case. I am fresh to use iPhone, and who can show me the detailed steps to use iTunes to transfer iPhone notes?
Clearly. How to use iTunes to backup iPhone notes?
ind the answer here.
1. iTunes will backup other data apart from notes, like photos, contacts, text messages, music, etc. to computer forcibly.
2. You cannot read the notes from iTunes directly.
Step 1 Step 1. Connect iPhone to computer, where you install the latest iTunes version.
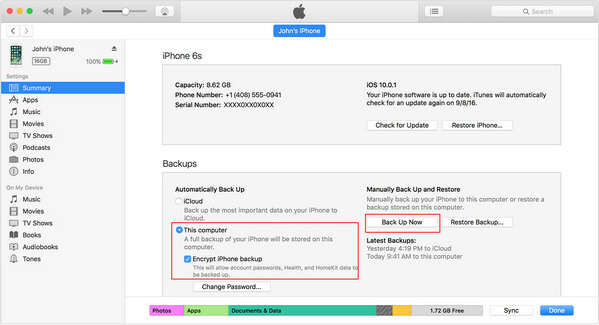
Step 2 iTunes will detect your iPhone automatically, and click iPhone icon > «Summary» (Summary is always the default selected in the interface).
Step 3 Click the checkbox of This computer and click «Back Up Now» to start to backup notes to computer with iTunes.
If you want to read the iPhone notes, you could visit this page: How to recover and view notes on iTunes.
Part 4. How to move iPhone notes to Google Drive?
This story is from Andrew, who gets the request from Apple Discusssion.
I add Gmail account to my iPhone, and always to backup my photos, contacts to Google Drive. I would like to have the notes on my iPhone 6s to gmail. It seems like I cannot do that. Am I missing something? I read a lot of different forums, but cannot find the answer I am looking for.
Andrew is seeking for a way to get the contacts from iPhone to Gmail.
Look here to get the solution.
1. Notes synced to Google account will be deleted automatically if you delete the notes form iPhone.
2. This solution only applies to iPhone 5s/5c/5/4S/4/3GS.
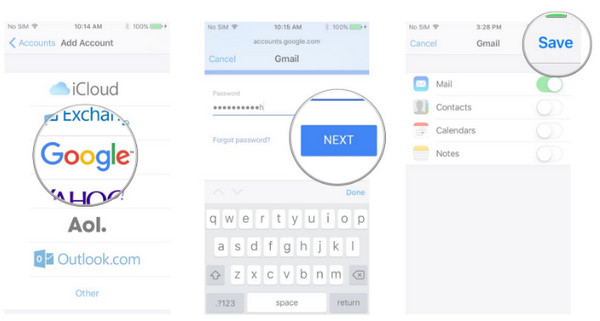
On your iPhone, go to «Settings» > «Notes» > «Account» > «Add Account» > Select Google Account to add your Gmail account to your iPhone. And your notes will be synchronized to Google.
Backup iPhone Notes with Gmail
Part 5. How to copy iPhone notes to Dropbox?
This is the last story from Joshua Larson, who is the college student, who uses Dropbox to make his iPhoen data backup.
I really like Dropbox, the file hosting service. It is very easy for me to share the files with my friends. I take many notes with photos and videos within it, and want to send them to my Dropbox for backup. How can I do that?
Joshua Larson hopes to find the method to backup notes to Dropbox, without iCloud.
1. You need to guarantee your iPhone Internet connected.
2. You have to save notes one by one to Dropbox.
Take the steps here:
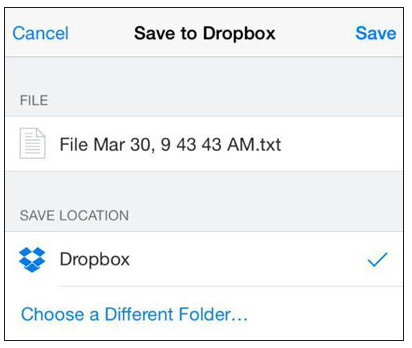
Step 1 Run Notes app on your iPhone. Navigate the note that you want to save to Dropbox, hit the Share button (On the right top corner).
Step 2 Choose «Save to Dropbox» and follow the on-screen instructions to keep the notes to Dropbox.
Backup iPhone Notes to Dropbox»
Here, we should conclude that no matter what situations you get stuck in, you could find the best one solution from the 5 ways to help you backup iPhone notes to iTunes, iCloud, PC/Mac and Dropbox.
If you accidentally deleted notes on iPhone, how can you find them? CHECK HERE: How to recover deleted iPhone notes.
What do you think of this post?
Rating: 4.8 / 5 (based on 220 ratings)

December 16, 2020 07:36 / Updated by Louisa White to Data Backup, Note
How do you transfer notes from one iPhone to another? This article teaches you to transfer notes from iPhone to iPhone.
How to use iPhone notes app? We list 5 great notes apps for iPhone and show you how to recover data from iPhone notes app.
Got frustrated with your message loss? What you need to do is to backup those iPhone messages timely. This tutorial will help you make it.
Источник


