- Ликбез по Recovery и вайпам для новичков
- (1) Recovery (кастомный)
- (2) WIPE
- (3) Форматирование пользовательского раздела (/data)
- (4) Процедура выборочного стирания
- How to Recover Cache Files on Android SD Card
- How to Restore Deleted Cache Files on Android SD Card
- Manual Method — Recover Deleted Cache ImagesВ
- Automated Method — Recover Cached Images and Files from Android SD card
- # 1. Download reliable file recovery software
- How to Restore Deleted Cache Files on Android Internal Memory
- The Bottom Line
- How To Recover Cache Files From Android: Recovering Deleted Cache Guide
- Did you accidentally clear all the cache files on your Android device? Click the link to know how you can recover deleted cache files from your device with just a few clicks!
- Part 1: What Are Cache Files? Why Does My Phone Have Them?
- Part 2: Why Is There A Need To Recover Cache Files On An Android?
- Part 3: How To Recover Deleted Cache Files From An Android SD Card
- Conclusion
Ликбез по Recovery и вайпам для новичков
(1) Recovery (кастомный)
В двух словах, CWM, TWRP – это альтернативные рекавери (recovery) для Android устройств. Обычно их устанавливают по инструкции после разблокировки бутлоадера. С их помощью устанавливают/обновляют прошивки, патчи, гапсы и прочее.
Немного банального (азы):
— Install — установка прошивки и прочих файлов *.zip (update.zip, gapps.zip, lineageos.zip и т.д.)
— Wipe — очистка данных (подробнее об этом поговорим ниже)
— Backup — бэкап системы (с возможностью выбора нужных разделов), в дальнейшем при необходимости (проблемах) можно будет воспользоваться этим (созданным заранее) бэкапом.
— Restore — собственно команда отвечающая за восстановление системы из бэкапа (если таковой был сделан).
— Mount USB Storage — монтирование флешки, подключенной через OTG. Обычно это нужно для подключения устройства к ПК прямо из рекавери (twrp), например чтобы скинуть другую прошивку, гаппсы и прочие файлы.
— File Manager – менеджер файлов.
— Reboot — перезагрузка устройства
(2) WIPE
— Wipe Factory Reset — это совокупность нескольких вайпов (wipe data, cache и dalvik cache) по простому сброс до заводских настроек. Сотрутся все программы, обновление системных приложений, аккаунты, смс, вызовы, телефонная книга, настройки программ и системы. Получаем аппарат как с магазина, кроме оставшихся: фото, видео, документов, скаченных файлов, картинок и прочего, Вами скопированного на встроенный, внешний накопители, контента.
— Вы можете выбрать Advanced wipe и выбрать те вайпы которые необходимо сделать. Коротко про каждый вайп:
— Cache — очистка раздела /cache , удаляться временные данные деятельности программ.
— Dalvik Cache — очистка Dalvik Cache, оптимизированные dex файлы для каждого приложения. Если очистить, файлы создадутся заново, обычно это необходимо при обновлении прошивки или гаппсов.
— Wipe Data — очистка раздела /data , удаляться все ваши программы их данные, личные настройки..
— Wipe System — очистка раздела /system устройства, по простому удаление прошивки.
— External Storage — очистка внешней памяти SD карты устройства.
— Internal Storage — очистка внутренней памяти устройства.
Не отмечайте пункт System, если вы не планируете затем устанавливать полную прошивку или не уверены в своих силах. Если вайпнуть систему и не прошить новую прошивку, устройство не запустится.
(3) Форматирование пользовательского раздела (/data)
Причины по которым вам могут посоветовать сделать формат:
— Продажа аппарата. Это действие гарантирует полное удаление данных с телефона связанных с предыдущим владельцем на устройствах, у которых накопитель объединен с разделом /data.
— После/до установки авторских, модифицированных прошивок.
— Зависание при включении, спонтанная перезагрузка, постоянная перезагрузка, даже после заводского сброса.
— Сбои в работе приложений, даже после заводского сброса.
Все симптомы вызваны зачастую ошибками файловой системы. А заводской сброс не всегда означает именно форматирование раздела, т.е создание новой файловой системы, а не просто удаление с раздела папок/файлов.
- Загрузить меню recovery
- Выбрать пункт меню: Wipe.
- Нажать кнопку: Format Data.
- Набрать на клавиатуре слово: yes, и нажать кнопку: Go.
- По завершении процесса можно вернутся в основное меню, нажав кнопку: Дом.
- Для перезагрузки устройства в обычный режим выбрать: Reboot — Reboot System.
(4) Процедура выборочного стирания
Разберем на примере. Предположим необходимо привести смартфон на текущей прошивке, без каких-либо обновлений, модификаций и перепрошивок в идеальнейше-чистое (нулевое) состояние, и удалить не только пользовательские данные но и весь контент с устройства и вставленной SD-карты. Произойдет потеря абсолютно всех данных. Позаботьтесь о резервной копии своих документов, фото, видео, музыки и прочего.
- Загрузить меню recovery.
- Выбрать пункт меню: Wipe.
- Нажать кнопку: Advanced Wipe.
- Отметить пункты: Cache, Data, Internal Storage, external microSD.
- Свайп вправо запустит процесс стирания данных или форматирования разделов и накопителей.
- Для перезагрузки устройства в обычный режим выбрать: Reboot — Reboot System.
Некоторая часть информации была позаимствована вот тут — тык.
Источник
How to Recover Cache Files on Android SD Card
This page includes a manual method and an automated way — using EaseUS file recovery software to restore deleted Cache files and images from Android SD card. If you accidentally cleared the Cache files on your cellphone memory card, follow this page to fix this issue immediately.
Table of Contents
About the Author
Reviews and Awards
«I accidentally cleared cache on my SD card storage for my LG smartphone, by which half of my gallery photos were deleted. How do I recover all photos and apps data?»
Android cache files can be saved both on Android internal memory and external SD card. If you completely deleted the folder without doing backups, your data in Android internal memory or some of the external memory SD card will be removed.
So what should you do once you lost files on the memory card?
- First, stop using the Android SD card.
- Next, find a reliable file recovery solution to restore the lost files.
How to Restore Deleted Cache Files on Android SD Card
If the cached files and images are on the SD card, you can follow the two provided methods here to restore deleted cached images and files from the Android SD card.
Manual Method — Recover Deleted Cache ImagesВ
The provided method here is a third-partition solution, which may be able to bring your lost cache images back, but the recovered images may not show the original size.
Step 1: Open «My Files» or «Storage» on the Android phone.
Step 2:В Go to the Android folder, locate and open a folder named «Data».
Step 3:В Open a folder named com.sec. gallery3d inside the Data folder.
Step 4: Then you’ll see a Cache folder there, open it and you’ll see some thumbnails of the deleted files.
Step 5: Change the extensions of these files to .png, .jpg, .jpeg, etc.
Step 6: After this, you can get your cache image files back and view them in the «Gallery» again.
Automated Method — Recover Cached Images and Files from Android SD card
# 1. Download reliable file recovery software
To do so, you’ll need to download a reliable data recovery software for help. EaseUS hard drive data recovery software — Data Recovery Wizard supports to scan the Android SD card and find all lost files for you.
If you use a Mac machine, download the Mac version.
# 2. Connect Android SD card to PC
You need to take out your Android SD card from the phone and use a card reader to insert the SD card into the computer.
# 3. 3-step recovery of deleted Cache files on Android SD card
Wait for the SD card to show up on the computer and follow to start Android SD card data recovery:
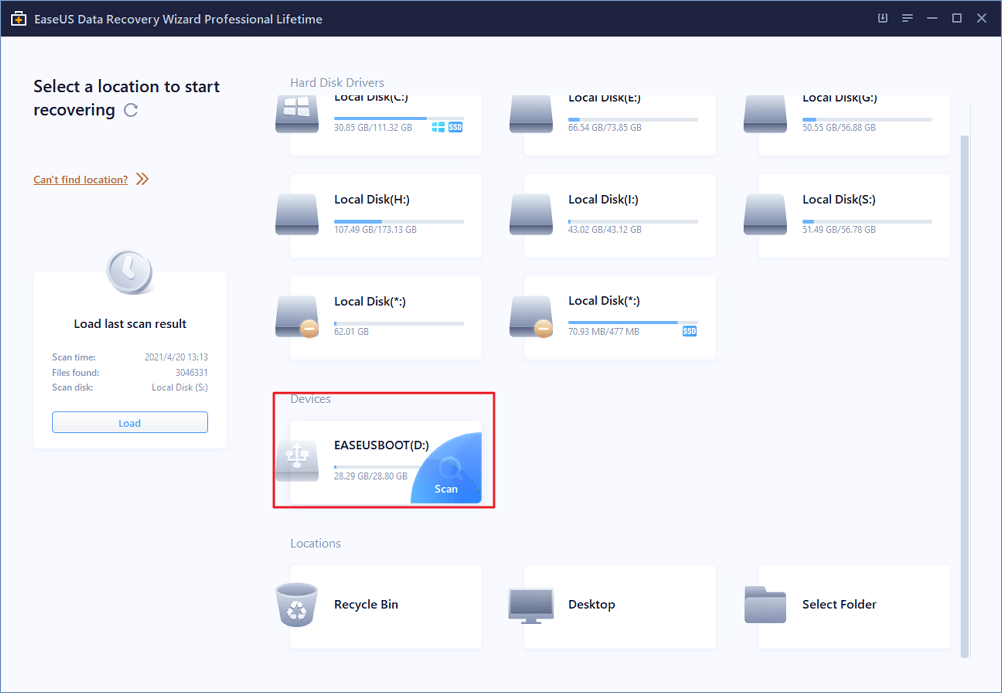
Step 1. Select SD card to scan
- Downoad and install EaseUS Data Recovery Wizard on your Windows PC.
- Use the proper way to connect your SD card to the computer. Let Windows recognize the card and assign it a drive letter.
- Launch EaseUS SD card recovery software. All connected drives will display here. Select your SD card according to its drive letter under the Devices section. Click «Scan» to start finding lost data on your SD card.
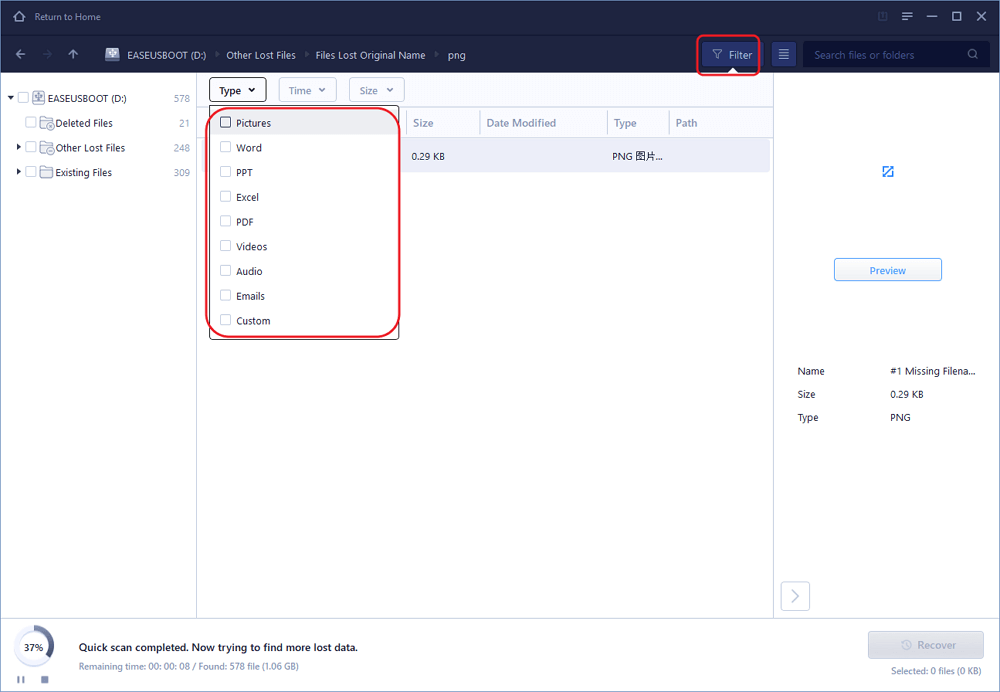
Step 2. Check for scan results
After the scanning process, you can click «Filter» and specify one or several file types to show up, like Pictures, Word, Excel, PDF, Videos and so on. This will help you quickly find wanted files of one kind.
Step 3. Preview and recover data
- After the scan, you can check and preview found files by double-clicking each one of them.
- Choose desired files and click Recover.
- Choose a different location to save the recovered files instead of the orginal SD card.

How to Restore Deleted Cache Files on Android Internal Memory
If the cached data you deleted is stored in the internal memory on the Android phone, you can apply EaseUS MobiSaver for Android to restore cache data. This toolВ covers multiple scenarios that result in data loss from the Android phone. Here are some features for you to check:
- Support recover data lost after accidental deletion, virus attack, device failure, and more.
- Scan and preview all Photos, Contacts, Messages, and more on your Android.
- Recover lost files and data in 3 steps, hassle-free and time-saving.
- 100% secure and works well on all operating systems.
Download EaseUS MobiSaver for Android now and follow the guide below to recover cache files on Android.
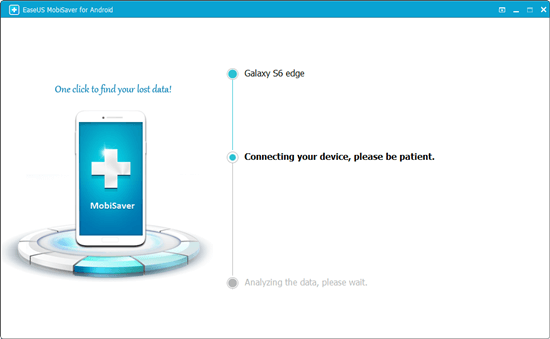
Step 1. Connect your Android phone to computer
Install and run EaseUS MobiSaver for Android, connect your Android phone to the computer. Click the «Start» button to connect your device.
NOTE: As the software can only access the rooted Android device, you need to make sure that your phone has been rooted before recovery.
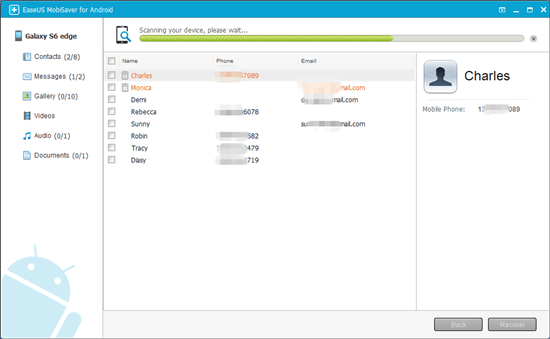
Step 2. Scan Android phone to find the lost data
After connected your Android phone, the software will quickly scan the device to find all the existing and lost data. You can easily find the lost files you want by choosing the correct file types.
Step 3. Preview and recover data from Android phone
Preview all the recoverable files one by one and then you can select those you want quickly. Here you can turn on the «Only displayed deleted items» option to list the deleted files only. Finally, you can click the «Recover» button to get the selected files back once.
The Bottom Line
To sum up, the provided methods on this page can’t 100% work for restoring your deleted or lost Cache files, especially some apps’ caches.
So the best way to protect files from deleting is to create a regular backup of essential files on your cellphone. It’s also important to be careful while you are planning to clear cellphone storage and cache files.
Источник
How To Recover Cache Files From Android: Recovering Deleted Cache Guide
Did you accidentally clear all the cache files on your Android device? Click the link to know how you can recover deleted cache files from your device with just a few clicks!

David Darlington
Sep 14, 2021 • Filed to: SD Card Solutions • Proven solutions
Cache files are the files are that are stored temporarily on a local storage drive to make the retrieval of a previously opened content (graphic, webpage, etc.) easier. It speeds up the retrieval process of data from any remote source or the internet.
Cache files are important as it makes data fetching faster thus making the system perform more efficiently. It increases the speed of the whole system.
Part 1: What Are Cache Files? Why Does My Phone Have Them?
Most of the phones have a low capacity which can easily fill up, compared to computers. All the applications you use on your phone regularly generate files to store information. These temporary files are called as cache files and occupy a fair space of your phone storage.
All the websites, games, and apps in your mobile utilize the cache files to offer a better user experience. These cache files work in the background when you open an app or a new browser window. Each program/ application has its own cache files. Cache files of a particular program can be used only by that program and no other applications, i.e. cache files of a game is of no use to an app like WhatsApp.
Part 2: Why Is There A Need To Recover Cache Files On An Android?
Cache files are often deleted by the users on an android to clear space. Also, most of the file cleaning apps tend to clear these files automatically. Nowadays, apps themselves delete unused cache files for better storage management.
These days people are very much dependent on mobile phones be it for any area of life. So a person’s mobile will contain loads of important data like documents, emails, photos, videos, etc., related to work, home, bank, and many more. So, when clearing the cache files there is a great chance for useful data to get corrupted or deleted. Important documents, photos, videos, etc. can get deleted along with the cache files. So it is important to know how to recover deleted cache files on Android if you find yourself in that spot.
Part 3: How To Recover Deleted Cache Files From An Android SD Card
Dr.Fone — Data Recovery (Android) is an Android video recovery software that assures you of 97% file recovery efficiency with the ability to recover Android messages, contacts, photos, and videos. Yes, follow the instructions below to recover deleted/lost videos on Android:
Note: If your Android is 8.0 or later, root your device to recover the deleted files.
1. Open Dr.Fone on your computer, go to Data Recovery, and select Recover Android Data.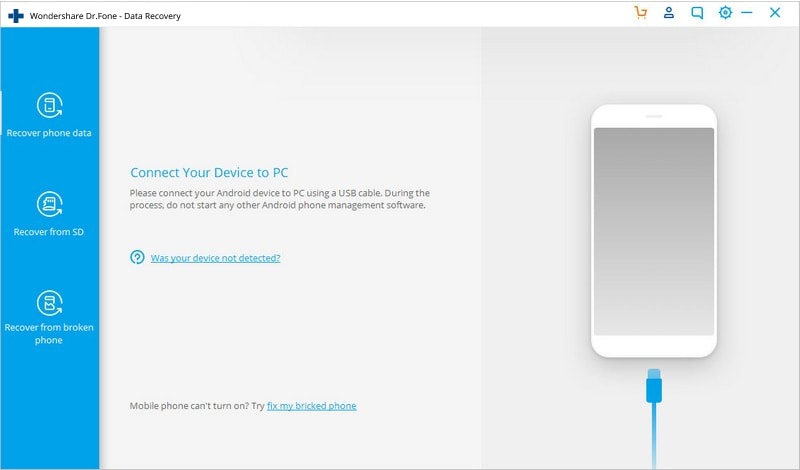
2. Connect your Android device to your PC. Select Videos from all supported file types.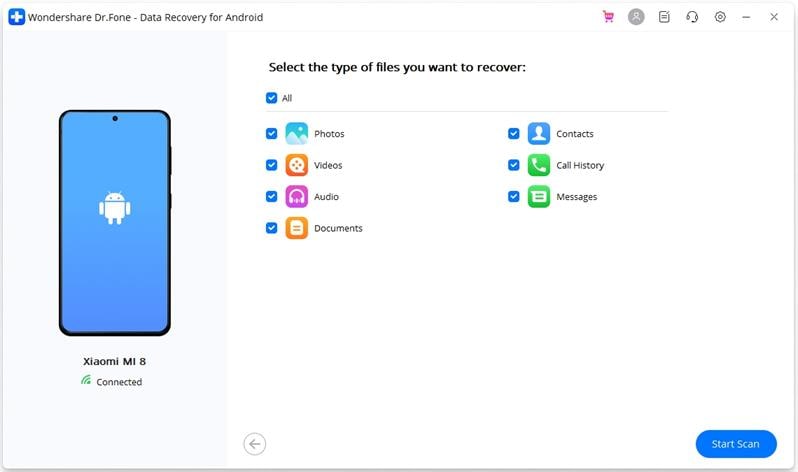
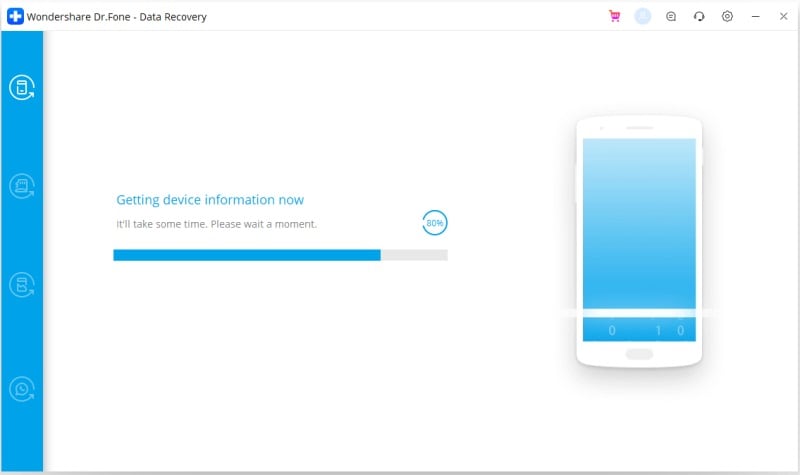
3. Let the software start to scan your Android device.
4. All the hidden or deleted files will be displayed in the interface. Select the video files for recovery.
5. Mark the boxes below the specific videos you want to restore to your computer.
Conclusion
Cache files are important for the better performance of our Android devices. The deletion of these files may lead to slow performances or in fact loss of important data. In such cases the recovery of these lost files is necessary and one should go for the most reliable and trusted apps in the market like the Recoverit Data recovery software which is widely used in the market.
Источник


