- What is Hidden Cache Android & How to Clear Hidden Cache Android: Step By Step Guide [2021]
- What is Hidden Cache Android & How to Clear Hidden Cache Android: Step By Step Guide [2021]
- What are Cache Files?
- What is Hidden Cache Android
- What happens When You Do Not Clear Hidden Cache Android
- How To clear hidden cache android
- Easiest Way to Clear hidden cache android
- Steps to Clear Hidden Cache in Android Using Cache Cleaning Application
- Clear Hidden Cache in Android on Google Chrome App
- To clear cache in Android on Google Chrome, use the following steps.
- Clear Hidden Cache in Android on Mozilla FireFox Browser
- Clear Hidden Cache in Android from Other Individual Apps (Third-Party)
- How Often Should You Clear Hidden Cache in Android
- Frequently Asked Questions about What is Hidden Cache Android & How to Clear Hidden Cache Android
- What is a hidden cache?
- Is it safe to delete hidden cache?
- How do I view hidden cache on Android?
- Will clearing cache delete pictures?
- Why should I clear cache on Android?
- Can you clear all cache on Android?
- What happens when cache is cleared?
- How do I get rid of hidden cache on Android?
- Should I delete Android cache?
- What happens when we clear cache in android?
- Is hidden cache safe to delete?
- Can you clear all cache on Android?
- Displaying Cache data or Offline mode support in android application
- MindOrks
- Saving Files
- This lesson teaches you to
- You should also read
- Choose Internal or External Storage
- Obtain Permissions for External Storage
- Save a File on Internal Storage
- Save a File on External Storage
- Query Free Space
- Delete a File
What is Hidden Cache Android & How to Clear Hidden Cache Android: Step By Step Guide [2021]
posted on September 5, 2021
Last Updated on 1 month by Anoob P
Are you wondering what is hidden cache Android? In this post, we will look at what is hidden cache Android and How to Clear Hidden Cache Android in 2021.
I’ve been a fan of Android smartphones for a very long time and a few years back, I bought the Samsung Note 8.
This is my Samsung Note 8.
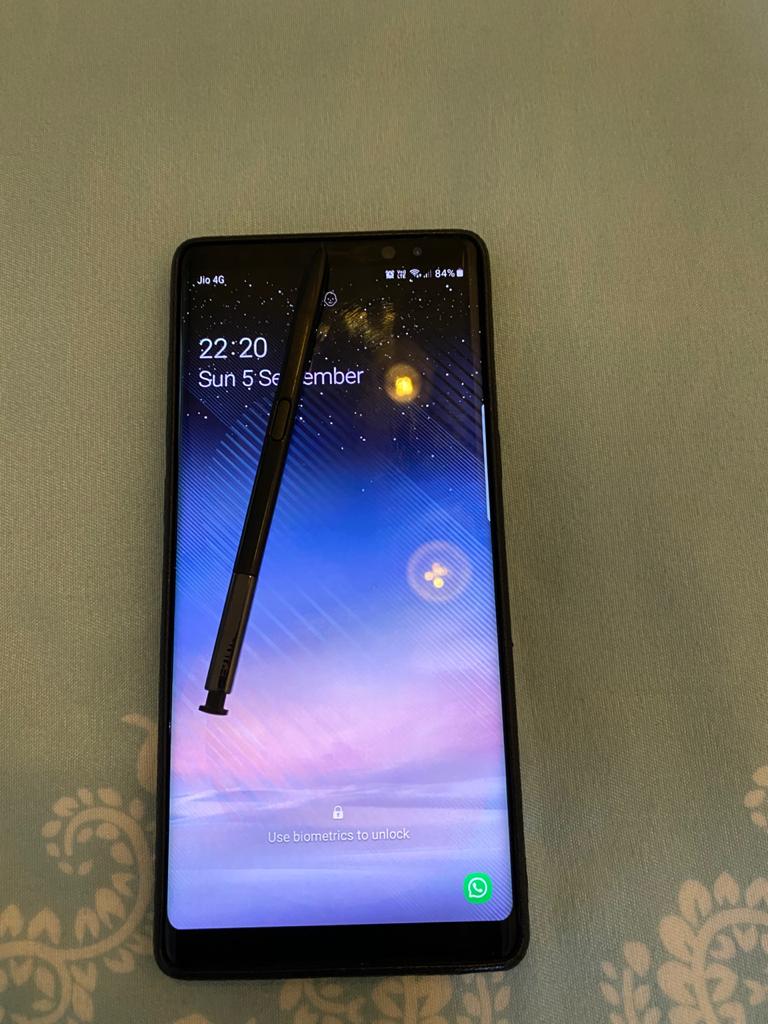 samsung note 8
When I purchased this phone, this was the most high-end smartphone in the market and so far I have not experienced any issues with it.
However, with my other Android phones, I have always seen that the phone starts lagging after every few months.
One of the reasons why Android phones start to slow down is because of hidden cache Android users generally ignore.
Before we get to clearing cache in your Android phone, if you are interested in the whole concept of making money online, you can check out some of my other posts including 10 Easy Ways to Earn Money Online without Investment, How to Earn Money from YouTube, how to earn money from Facebook and how to start a blog and make money.
I recently helped a client of mine generate $1000 in income from his YouTube channel that was not making any money and even you can do the same.
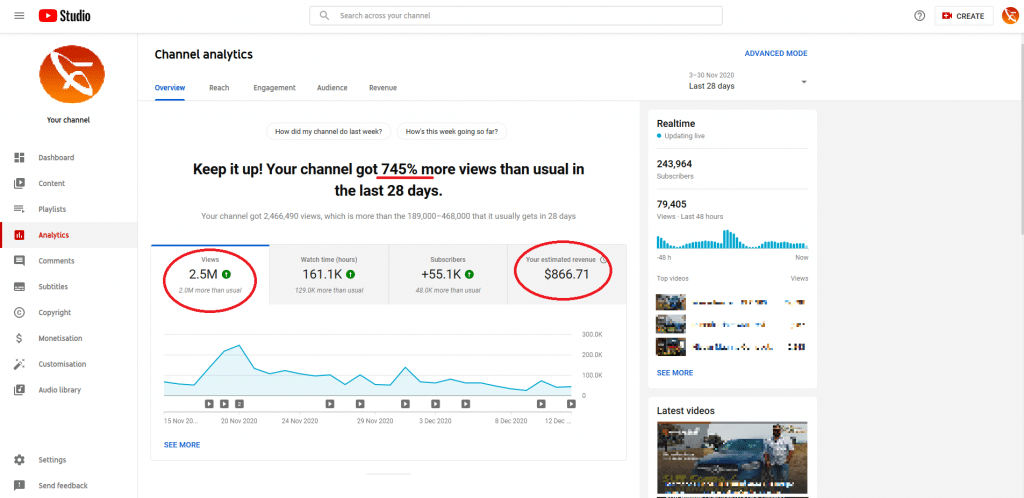
Earlier, I had co-founded a video company and raised $2 million in funding and then got fired from the company I started. I had done lot of testing and research on how to monetize YouTube and now I use the same skills to help other YouTubers.
You can read my full story here if you are interested.
I have also written a detailed post about How to Start an Online Business That Changes Your Life (without Luck) & lessons in entreprenuership I learnt the hard way–you can read it if you have the time.
What is Hidden Cache Android & How to Clear Hidden Cache Android: Step By Step Guide [2021]
Table of Contents
What are Cache Files?
Cache files are small, temporary files that your smartphone or computer downloads for use in the future.
When you visit most websites or launch apps, the browser of your device downloads images and other files from the web browser and stores it in the cache folder for future use.
Cache helps browsers or apps load these elements faster the next time you visit the same website.
Cache is not just limited to images or videos, it can also include temporary files, scripts etc. that are required for the functioning of the website.
What is Hidden Cache Android
“Hidden caches” are cache files that are stored in non-default cache directories, such as AudioCache.
During day to day use as you use browsers and apps on your smartphone, cache starts getting piled up and causes clutter in your phone.
Think of it the same way as if you do not clean your room, over a period of time, dust and dirt accumlate and it starts looking pretty messy.
This effect of this hidden cache pile up will be most visible in older versions of Android phones which are running on slower chips.
What happens When You Do Not Clear Hidden Cache Android
Android phones are generally laggy and even high end smartphones tend to slow down over a period of time.
As you use your phone’s browser and apps on your Android device, cache and temporary files start accumulating in the phone’s memory.
In addition to phone related issues, hidden cache on your phone will also load the previous rendered version of the webpage which means you might not be viewing the latest version of content on the website.
How To clear hidden cache android
There are many ways to clear hidden cache for Android users, I will show you the easiest and most direct way to do it and the way for slightly more technical users to clear hidden cache.
Easiest Way to Clear hidden cache android
The easiest Way to Clean Hidden Cache for Android users is to install a Cache cleaning app that will automatically remove cache and cookies from all browsers and your other apps.
I have been using 1Tap Cleaner Android App and I recommend you also to install and use it.
Most of the cache clean android apps monetize using ads so you also need to be very careful when using them.
Just download the cleaner app, run it, remove the cache from your phone and you can delete the cache cleaner app.
Steps to Clear Hidden Cache in Android Using Cache Cleaning Application
Step 1: Download the 1 Tap Cleaning App
Step 2: Launch the App
Step 3: Click on “Cache Cleaner”
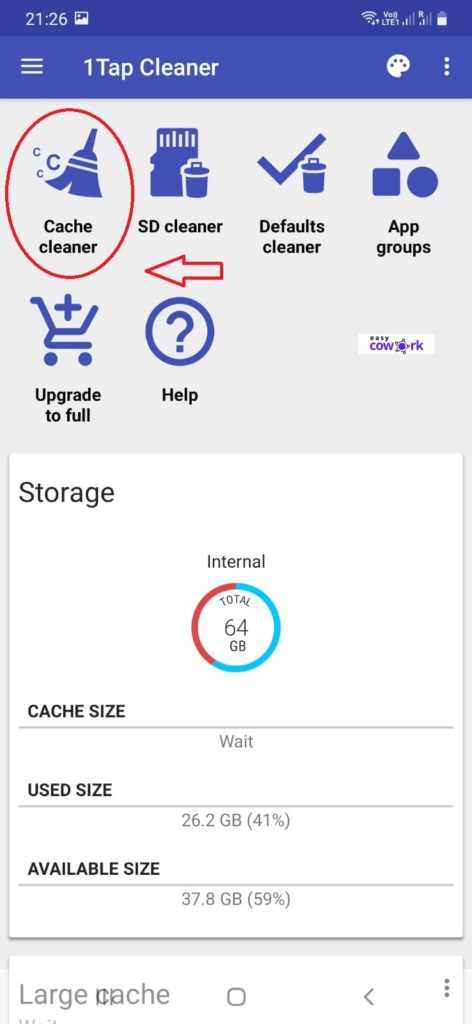 Step 3
Step 4: Click on Red Clean Button at Bottom
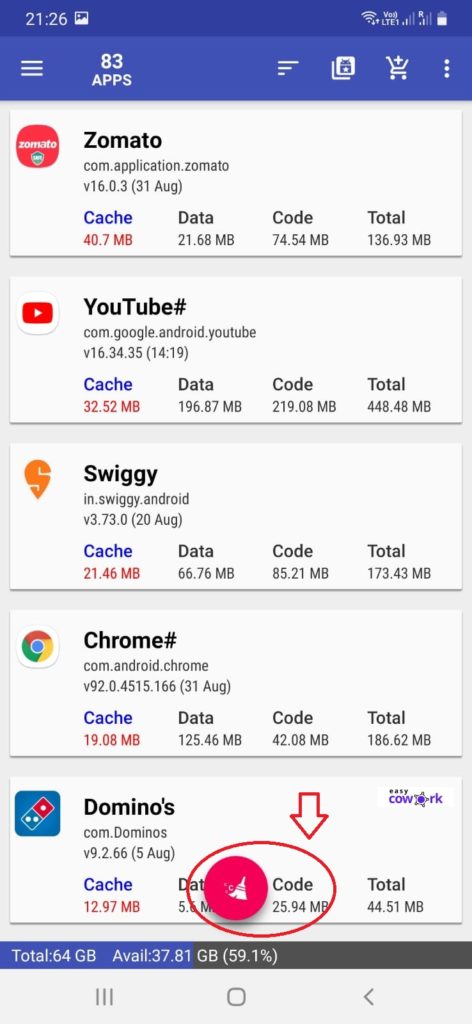
Step 5: Confirm clear all cached files
 Step 5
And you are done!
Clear Hidden Cache in Android on Google Chrome App
Most Android users use Chrome App as the default browser on their phone.
Therefore, it is natural that most of cache will be from the Chrome browser app.
To clear cache in Android on Google Chrome, use the following steps.
Step 1: Open Chrome Browser
Step 2: Click on the Three Dots at Top Right Side
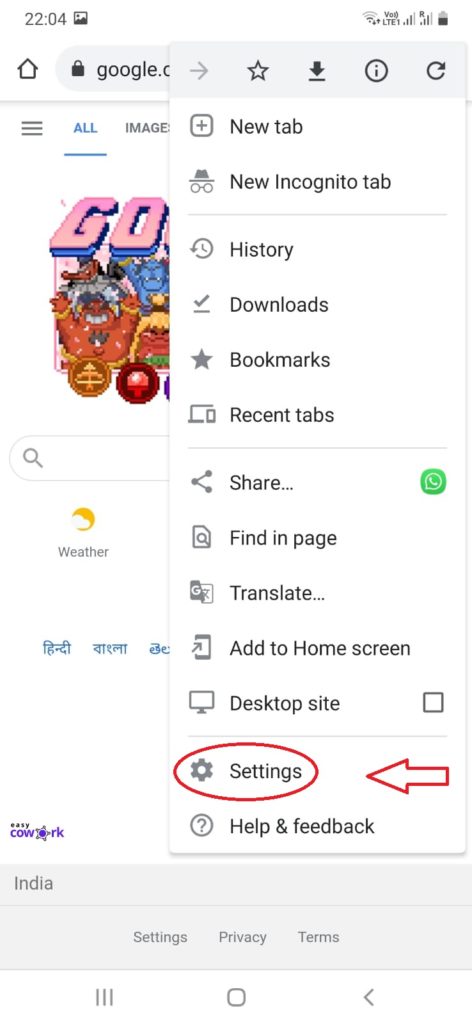 step 2
Step 3: Tap Settings
Step 4: Select Privacy & Security
Step 5: Select “Clear browsing Data”
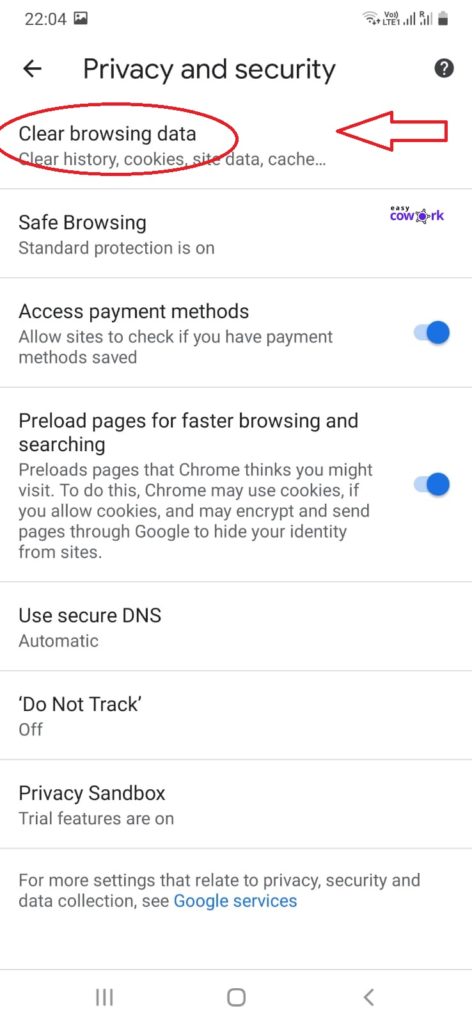 step 5
Step 6: Under Basic, Select “All Time” from Drop Down
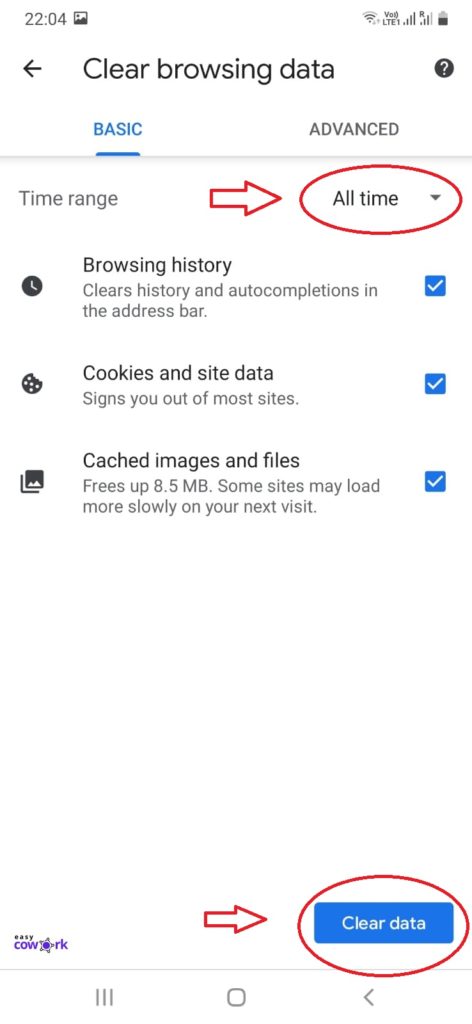 step 6
Step 7: Click on the blue “Clear data”
Bonus Step: If you want to completely remove all cache from Chrome App, go to “Advanced” in Step 6 and then follow the instructions.
Clear Hidden Cache in Android on Mozilla FireFox Browser
Step 1: Open Mozilla FireFox Browser
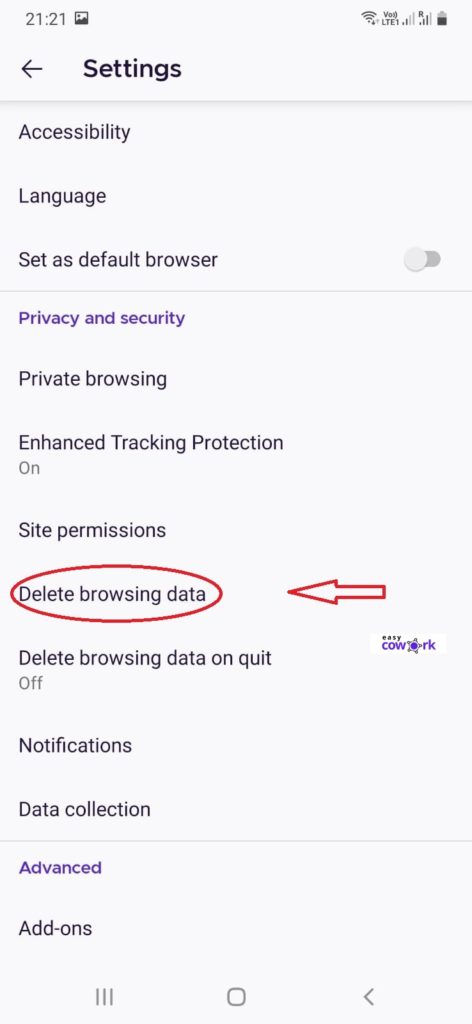
Step 2: Go to Settings
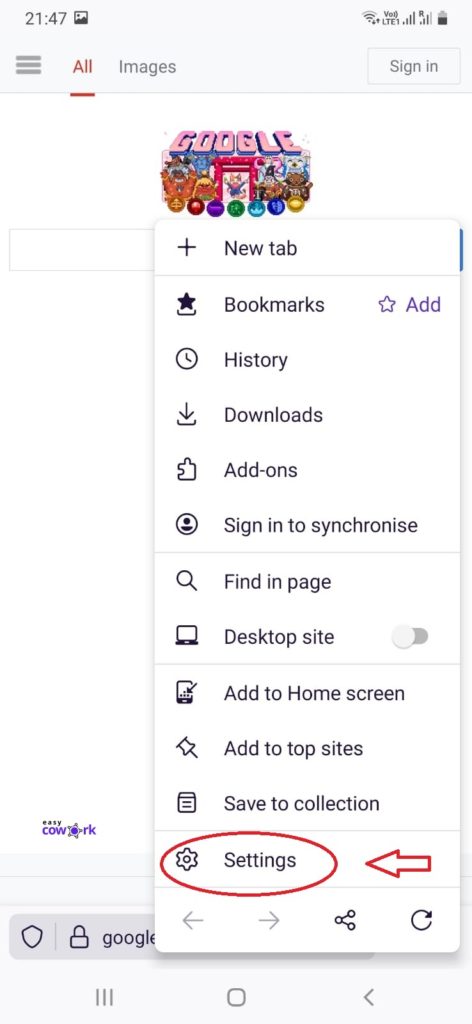 Step 2
Step 3: Go to “Delete Browsing Data”
 Step 3
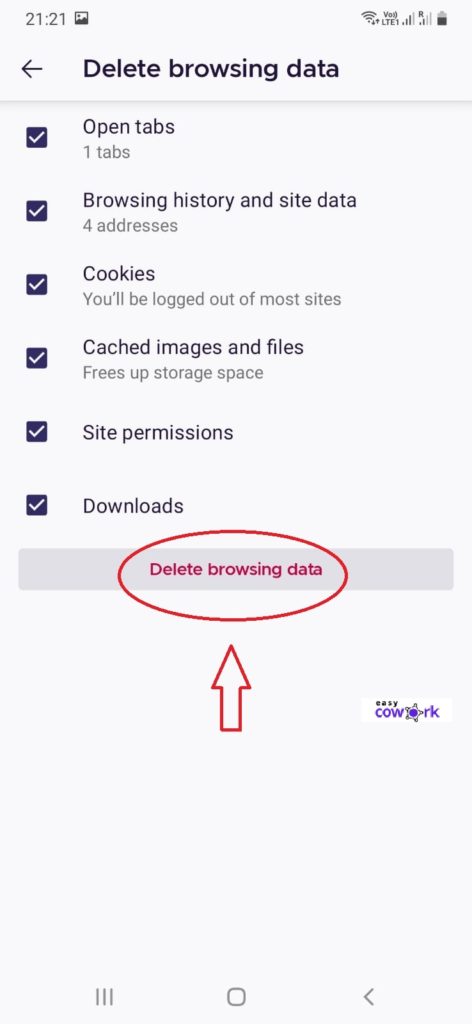
Step 4: Click on “Delete Browsing Data” at Bottom
 Step 4
Clear Hidden Cache in Android from Other Individual Apps (Third-Party)
Step 1: Open “Settings”
Step 2: Open “Apps”
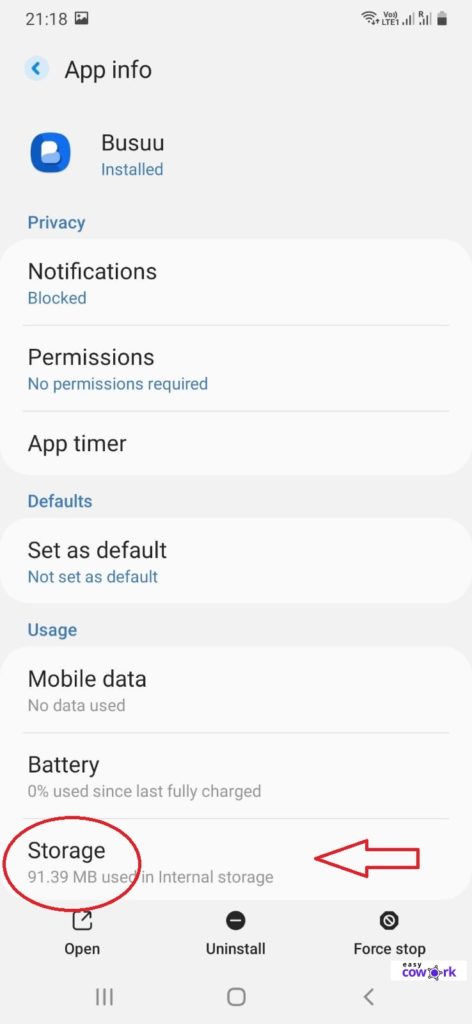
Step 3: Select the Desired App
Step 4: Under the App Settings, go to Storage
 Step 4
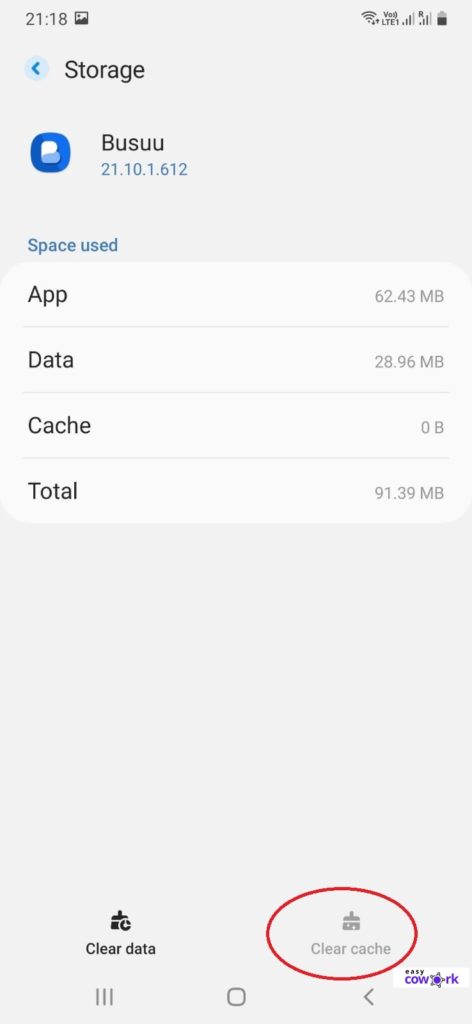
Step 5: Click on Clear Cache
 step 5
That’s it you are done!
How Often Should You Clear Hidden Cache in Android
It depends on your type of phone and Android Operating system.
I have noticed that the older the Android version, more cache starts affecting the speed of the phone and cause lag.
If you are using an older phone with an Android OS (like me), I recommend clearing cache every two weeks.
If you are using a phone with a newer version of Android such as Android 9.0, Pie which was launched on August 6, 2018 or later, you can clear your cache every month and your phone should still be running fine.
Frequently Asked Questions about What is Hidden Cache Android & How to Clear Hidden Cache Android
What is a hidden cache?
“Hidden cache” includes cache files that are in non-default cache directories, e.g. videoCache.
Is it safe to delete hidden cache?
Yes, it is safe to delete hidden cache as long as you do not delete any other important files of the operating system.
How do I view hidden cache on Android?
You can view hidden cache on Android using any File Explorer app.
Will clearing cache delete pictures?
No Clearing cache will not delete pictures as long as you do not delete the actual picture in the phone gallery.
Why should I clear cache on Android?
Clearing cache will increase space on your Android device and make the device faster.
Can you clear all cache on Android?
Yes, you can Tap on Storage, click on “Cached Data” and then click “Clear cached data” to clear all cache on Android.
What happens when cache is cleared?
When cache is cleared, the small temporary files that were created by the app will get removed and you will recover space and make your device faster.
How do I get rid of hidden cache on Android?
You can delete app cache from settings of your Phone or use a third party cache removing app such as 1Tap Cleaner.
Should I delete Android cache?
Yes, you should delete Android cache time to time to keep your Android phone running smooth.
What happens when we clear cache in android?
When you clear cache in Android, history of the usage of the particular apps get deleted and the app will have to load all the elements from start. Noticably, it will not create any issues for the user.
Is hidden cache safe to delete?
Yes, hidden cache is safe to delete.
Can you clear all cache on Android?
Yes, under Settings, you can go to Storage and then click on Clear Cache to remove all cache on Android.
Источник
Displaying Cache data or Offline mode support in android application

Problems without caching
1. Fetching data over a network connection is an expensive operation. Sometimes due to poor network connectivity, it takes a lot of time to display result( which is a bad experience in terms of mobile application).
2. Sometimes requirement may come with offline support or to display previously fetched response when there is no internet connectivity.
Thanks to Caching mechanism. We can solve the above requirements if we cache some data.
In my project, I have used the dagger, so I have written all the code for caching in ApiModule class. If you want to skip then directly go to below link
How to enable cache
1. define cache memory size
2. Create a cache object ( provide application context )
Provide this cache object in OkHttpClient
Now we will create 2 interceptors ( onlineInterceptor and offlineInterceptor). Interceptors are a powerful mechanism that can monitor, rewrite, and retry calls.
OnlineInterceptor which will be used when the device is connected to the network
OfflineInterceptor which will be used when the device is not connected to the network
Now its time to add cache interceptor to OkHttpClient.
Finally, add OkHttpClient to Retrofit
Using this retrofit instance, we can make an API call and the caching mechanism will work.
Few points to remember
Soon I will post more articles on android, core java.
till then happy learning… 🙂
MindOrks
Our community publishes stories worth reading on Android…
Источник
Saving Files
This lesson teaches you to
You should also read
Android uses a file system that’s similar to disk-based file systems on other platforms. This lesson describes how to work with the Android file system to read and write files with the File APIs.
A File object is suited to reading or writing large amounts of data in start-to-finish order without skipping around. For example, it’s good for image files or anything exchanged over a network.
This lesson shows how to perform basic file-related tasks in your app. The lesson assumes that you are familiar with the basics of the Linux file system and the standard file input/output APIs in java.io .
Choose Internal or External Storage
All Android devices have two file storage areas: «internal» and «external» storage. These names come from the early days of Android, when most devices offered built-in non-volatile memory (internal storage), plus a removable storage medium such as a micro SD card (external storage). Some devices divide the permanent storage space into «internal» and «external» partitions, so even without a removable storage medium, there are always two storage spaces and the API behavior is the same whether the external storage is removable or not. The following lists summarize the facts about each storage space.
- It’s always available.
- Files saved here are accessible by only your app by default.
- When the user uninstalls your app, the system removes all your app’s files from internal storage.
Internal storage is best when you want to be sure that neither the user nor other apps can access your files.
- It’s not always available, because the user can mount the external storage as USB storage and in some cases remove it from the device.
- It’s world-readable, so files saved here may be read outside of your control.
- When the user uninstalls your app, the system removes your app’s files from here only if you save them in the directory from getExternalFilesDir() .
External storage is the best place for files that don’t require access restrictions and for files that you want to share with other apps or allow the user to access with a computer.
Tip: Although apps are installed onto the internal storage by default, you can specify the android:installLocation attribute in your manifest so your app may be installed on external storage. Users appreciate this option when the APK size is very large and they have an external storage space that’s larger than the internal storage. For more information, see App Install Location.
Obtain Permissions for External Storage
To write to the external storage, you must request the WRITE_EXTERNAL_STORAGE permission in your manifest file:
Caution: Currently, all apps have the ability to read the external storage without a special permission. However, this will change in a future release. If your app needs to read the external storage (but not write to it), then you will need to declare the READ_EXTERNAL_STORAGE permission. To ensure that your app continues to work as expected, you should declare this permission now, before the change takes effect.
However, if your app uses the WRITE_EXTERNAL_STORAGE permission, then it implicitly has permission to read the external storage as well.
You don’t need any permissions to save files on the internal storage. Your application always has permission to read and write files in its internal storage directory.
Save a File on Internal Storage
When saving a file to internal storage, you can acquire the appropriate directory as a File by calling one of two methods:
getFilesDir() Returns a File representing an internal directory for your app. getCacheDir() Returns a File representing an internal directory for your app’s temporary cache files. Be sure to delete each file once it is no longer needed and implement a reasonable size limit for the amount of memory you use at any given time, such as 1MB. If the system begins running low on storage, it may delete your cache files without warning.
To create a new file in one of these directories, you can use the File() constructor, passing the File provided by one of the above methods that specifies your internal storage directory. For example:
Alternatively, you can call openFileOutput() to get a FileOutputStream that writes to a file in your internal directory. For example, here’s how to write some text to a file:
Or, if you need to cache some files, you should instead use createTempFile() . For example, the following method extracts the file name from a URL and creates a file with that name in your app’s internal cache directory:
Note: Your app’s internal storage directory is specified by your app’s package name in a special location of the Android file system. Technically, another app can read your internal files if you set the file mode to be readable. However, the other app would also need to know your app package name and file names. Other apps cannot browse your internal directories and do not have read or write access unless you explicitly set the files to be readable or writable. So as long as you use MODE_PRIVATE for your files on the internal storage, they are never accessible to other apps.
Save a File on External Storage
Because the external storage may be unavailable—such as when the user has mounted the storage to a PC or has removed the SD card that provides the external storage—you should always verify that the volume is available before accessing it. You can query the external storage state by calling getExternalStorageState() . If the returned state is equal to MEDIA_MOUNTED , then you can read and write your files. For example, the following methods are useful to determine the storage availability:
Although the external storage is modifiable by the user and other apps, there are two categories of files you might save here:
Public files Files that should be freely available to other apps and to the user. When the user uninstalls your app, these files should remain available to the user.
For example, photos captured by your app or other downloaded files.
Private files Files that rightfully belong to your app and should be deleted when the user uninstalls your app. Although these files are technically accessible by the user and other apps because they are on the external storage, they are files that realistically don’t provide value to the user outside your app. When the user uninstalls your app, the system deletes all files in your app’s external private directory.
For example, additional resources downloaded by your app or temporary media files.
If you want to save public files on the external storage, use the getExternalStoragePublicDirectory() method to get a File representing the appropriate directory on the external storage. The method takes an argument specifying the type of file you want to save so that they can be logically organized with other public files, such as DIRECTORY_MUSIC or DIRECTORY_PICTURES . For example:
If you want to save files that are private to your app, you can acquire the appropriate directory by calling getExternalFilesDir() and passing it a name indicating the type of directory you’d like. Each directory created this way is added to a parent directory that encapsulates all your app’s external storage files, which the system deletes when the user uninstalls your app.
For example, here’s a method you can use to create a directory for an individual photo album:
If none of the pre-defined sub-directory names suit your files, you can instead call getExternalFilesDir() and pass null . This returns the root directory for your app’s private directory on the external storage.
Remember that getExternalFilesDir() creates a directory inside a directory that is deleted when the user uninstalls your app. If the files you’re saving should remain available after the user uninstalls your app—such as when your app is a camera and the user will want to keep the photos—you should instead use getExternalStoragePublicDirectory() .
Regardless of whether you use getExternalStoragePublicDirectory() for files that are shared or getExternalFilesDir() for files that are private to your app, it’s important that you use directory names provided by API constants like DIRECTORY_PICTURES . These directory names ensure that the files are treated properly by the system. For instance, files saved in DIRECTORY_RINGTONES are categorized by the system media scanner as ringtones instead of music.
Query Free Space
If you know ahead of time how much data you’re saving, you can find out whether sufficient space is available without causing an IOException by calling getFreeSpace() or getTotalSpace() . These methods provide the current available space and the total space in the storage volume, respectively. This information is also useful to avoid filling the storage volume above a certain threshold.
However, the system does not guarantee that you can write as many bytes as are indicated by getFreeSpace() . If the number returned is a few MB more than the size of the data you want to save, or if the file system is less than 90% full, then it’s probably safe to proceed. Otherwise, you probably shouldn’t write to storage.
Note: You aren’t required to check the amount of available space before you save your file. You can instead try writing the file right away, then catch an IOException if one occurs. You may need to do this if you don’t know exactly how much space you need. For example, if you change the file’s encoding before you save it by converting a PNG image to JPEG, you won’t know the file’s size beforehand.
Delete a File
You should always delete files that you no longer need. The most straightforward way to delete a file is to have the opened file reference call delete() on itself.
If the file is saved on internal storage, you can also ask the Context to locate and delete a file by calling deleteFile() :
Note: When the user uninstalls your app, the Android system deletes the following:
- All files you saved on internal storage
- All files you saved on external storage using getExternalFilesDir() .
However, you should manually delete all cached files created with getCacheDir() on a regular basis and also regularly delete other files you no longer need.
Источник


