- How to create a new Apple ID
- Create an Apple ID on your iPhone, iPad, or iPod touch
- Create an Apple ID when you set up your device
- Create an Apple ID using the App Store on your device
- Create an Apple ID on your Mac
- Create an Apple ID on your Windows PC
- Create an Apple ID on another device
- Create an Apple ID on the web
- If you see a message that you need to sign in to iTunes
- Learn more
- Check your Apple ID device list to see where you’re signed in
- See where you’re signed in
- Use your iPhone, iPad, iPod touch, or Apple Watch to see where you’re signed in
- Use your Mac to see where you’re signed in
- Use your PC to see where you’re signed in
- Use the web to see where you’re signed in
- Add a device to the list
- Remove a device from the list
- Use your iPhone, iPad, or iPod touch to remove a device
- Use your Mac to remove a device
- Use your PC to remove a device
- Use the web to remove a device
- Permanently remove a device from your account page
- IOS DEVICES SERIAL NUMBER
- How to find the serial number, IMEI/MEID or ICCI
- iTunes
- No device around case
How to create a new Apple ID
Use the same Apple ID to enjoy all Apple services. All you need is your full name, date of birth, an email address, and phone number.
Not sure if you have an Apple ID, or forgot what it is? To find your Apple ID, enter your name and email address at iforgot.apple.com.
Create an Apple ID on your iPhone, iPad, or iPod touch
Create an Apple ID when you set up your device
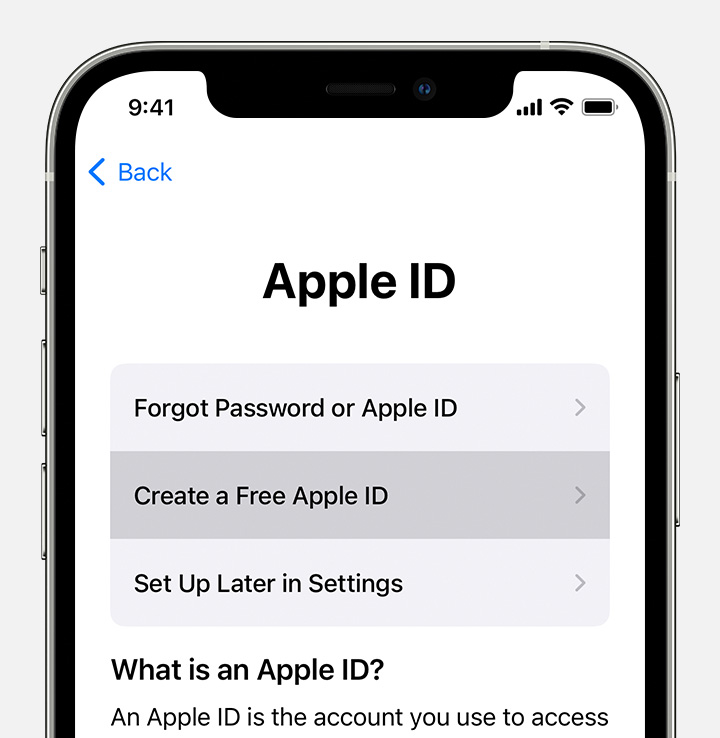
- Tap «Forgot password or don’t have an Apple ID?».
- Tap Create a Free Apple ID.

- Select your birthday and enter your name. Tap Next.
- Tap «Use your current email address», or tap «Get a free iCloud email address.»
- When prompted, follow the onscreen steps to verify your email address and set up two-factor authentication. If you choose to skip this step, you’ll be prompted to do this later in Settings.
Create an Apple ID using the App Store on your device
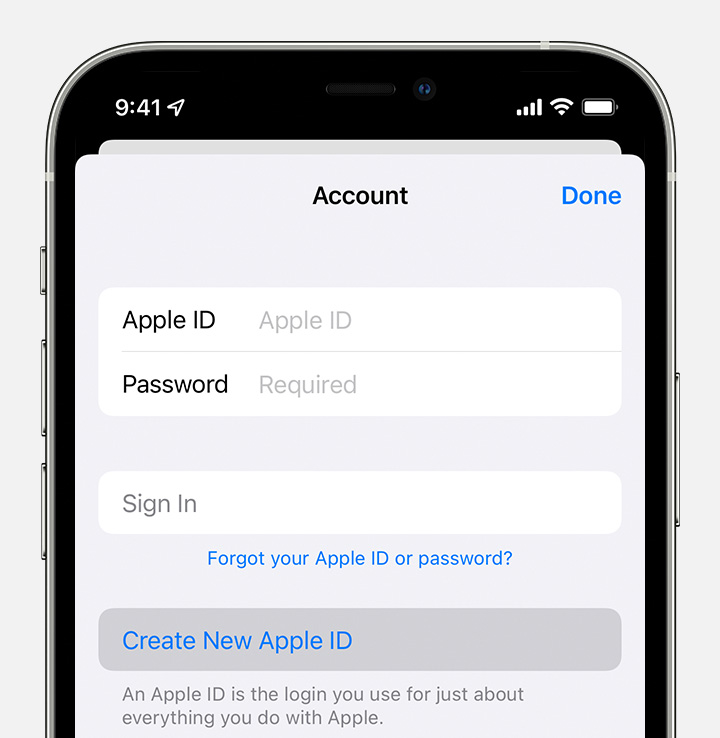
- Open the App Store and tap the sign-in button .
- Tap Create New Apple ID. If you don’t see this option, make sure that you’re signed out of iCloud.
- Follow the onscreen steps. The email address that you provide will be your new Apple ID.*
- Enter your credit card and billing information, then tap Next. You can also choose None. Learn what to do if None isn’t showing or you can’t select it. You won’t be charged until you make a purchase.
- Confirm your phone number. This can help to verify your identity and recover your account if needed. Tap Next.
- Check your email for a verification email from Apple and verify your email address.
After you verify your email address, you can use your Apple ID to sign in to the iTunes Store, App Store, and other Apple services such as iCloud.
* In China mainland, you might be required to provide a +86 phone number for your Apple ID. You can change the number later, or change your country or region to a location that doesn’t require it. This number is only used for verification purposes.
Create an Apple ID on your Mac
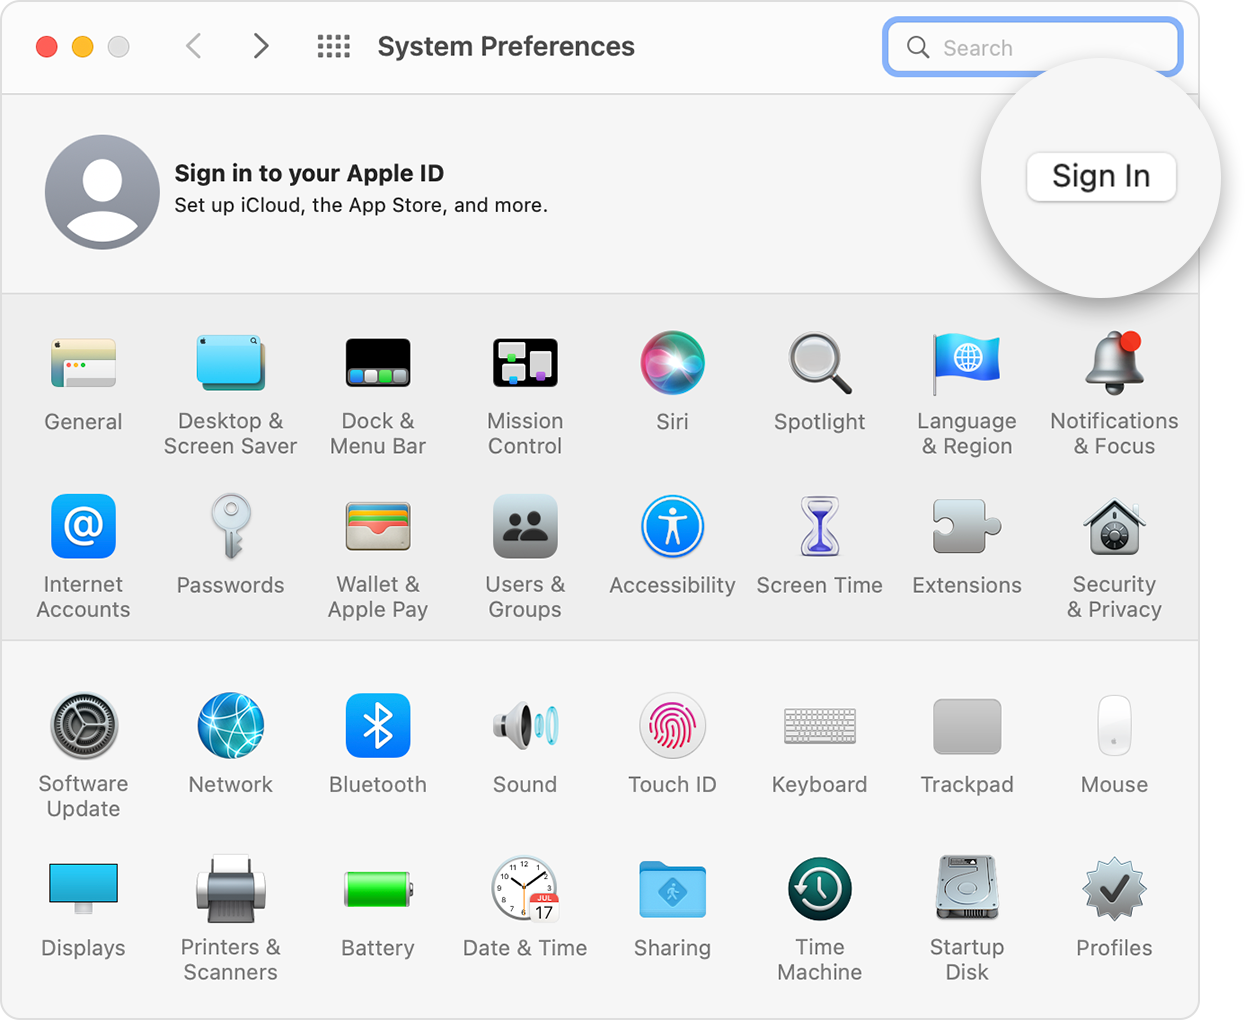
- Choose Apple menu > System Preferences.
- Click Sign In.
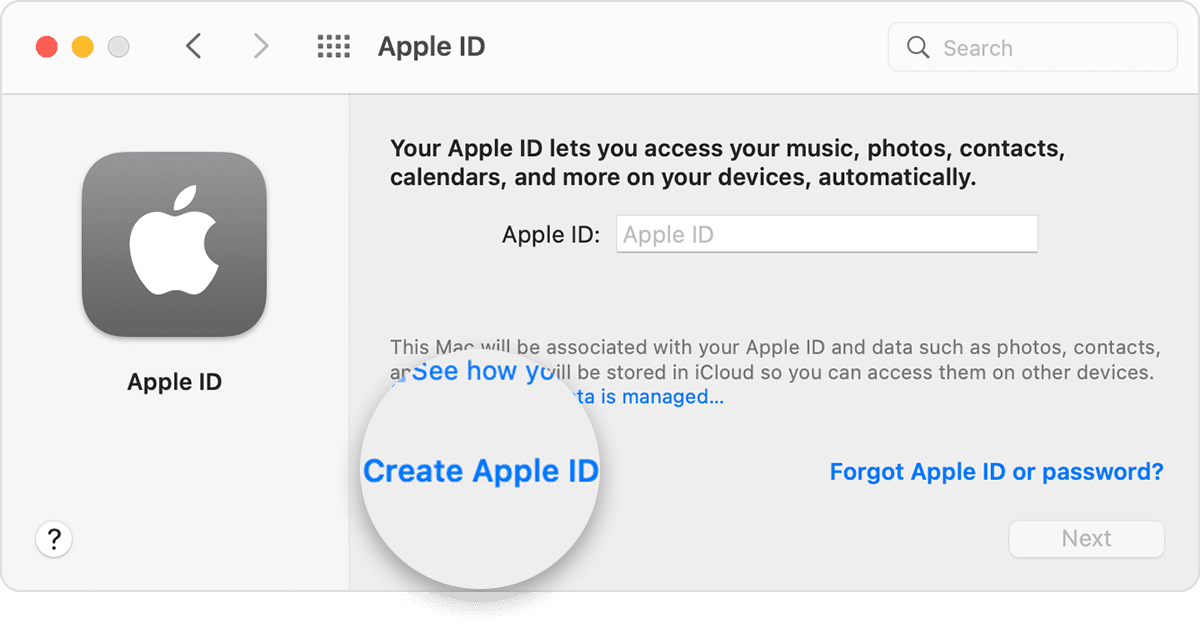
- Click Create Apple ID, then follow the onscreen steps. The email address that you provide will be your new Apple ID.*
- Enter your credit card and billing information, then click Continue. You can also choose None. Learn what to do if None isn’t showing or you can’t select it. You won’t be charged until you make a purchase.
- Check your email for a verification email from Apple and verify your email address.
After you verify your email address, you can use your new Apple ID to sign in to the App Store and other Apple services such as iCloud.
* In China mainland, you might be required to provide a +86 phone number for your Apple ID. You can change the number later, or change your country or region to a location that doesn’t require it. This number is only used for verification purposes.
Create an Apple ID on your Windows PC
- Open iTunes for Windows. Make sure that you have the latest version.
- From the menu bar at the top of your computer screen or at the top of the iTunes window, choose Account > Sign In. Then click Create New Apple ID.
- Follow the onscreen steps. The email address that you provide will be your new Apple ID.*
- Enter your credit card and billing information, then click Continue. You can also choose None, and learn what to do if None isn’t showing or you can’t select it. We’ll charge you only when you make a purchase.
- Check your email for a verification email from Apple and verify your email address.
* In China mainland, you might be required to provide a +86 phone number for your Apple ID. You can change the number later, or change your country or region to a location that doesn’t require it. This number is only used for verification purposes.
Create an Apple ID on another device
To create an Apple ID on an Apple TV, Android device, smart TV, or streaming device, you can usually follow the steps provided onscreen and enter your full name, date of birth, an email address or phone number, and a payment method. If you set up the Apple TV app on your smart TV, you might be redirected to activate.apple.com to create your Apple ID. You can also use the steps below to create your Apple ID on the web.
Create an Apple ID on the web
- Go to appleid.apple.com and click Create Your Apple ID.
- Follow the onscreen steps. The email address that you provide will be your new Apple ID.*
- Enter a phone number that you can always access.
- Check the boxes to subscribe to Apple Updates if you’d like. This keeps you up to date on the latest news, software, products, and services from Apple.
- Click Continue.
- Follow the onscreen steps to verify your email address and phone number.

After you verify your email address, you can use your new Apple ID to sign in to the iTunes Store and other Apple services such as iCloud.
* In China mainland, you might be required to provide a +86 phone number for your Apple ID. You can change the number later, or change your country or region to a location that doesn’t require it. This number is only used for verification purposes.
If you see a message that you need to sign in to iTunes
If you created a new Apple ID on the web and see a message that you need to sign in to iTunes, follow the steps below for your device:
- On an iPhone, iPad, or iPod touch: Open Settings, then tap «Sign into device» and sign in with your Apple ID.
- On a Mac: Choose Apple menu > System Preferences, then select Apple ID and sign in with your Apple ID.
- On an Apple TV: Sign in to the App Store, iTunes Store, or Apple Music with your Apple ID.
- On a PC: Sign in to iTunes with your Apple ID.
- On an Android device: Sign in to Apple Music on Android with your Apple ID.
Learn more
- An Apple ID is the account you use to access Apple services like iCloud, the App Store, the iTunes Store, Apple Music, and more.
- If you see a message that says that the email address that you entered is already associated with an Apple ID, you might have already created an Apple ID. Try signing in with that email address. If you don’t remember your password, you can reset your password to regain access to your account.
- Already have an Apple ID? Sign in to all Apple services on your device.
- Learn how to change or remove your Apple ID payment information.
- Learn about how two-factor authentication protects your Apple ID.
Store availability and features might vary by country or region.
Источник
Check your Apple ID device list to see where you’re signed in
Learn which devices appear in your Apple ID device list, how to see your device’s details, and how to remove a device, if necessary.
See where you’re signed in
Use the steps below to see the devices that you’re currently signed in to with your Apple ID.
Use your iPhone, iPad, iPod touch, or Apple Watch to see where you’re signed in
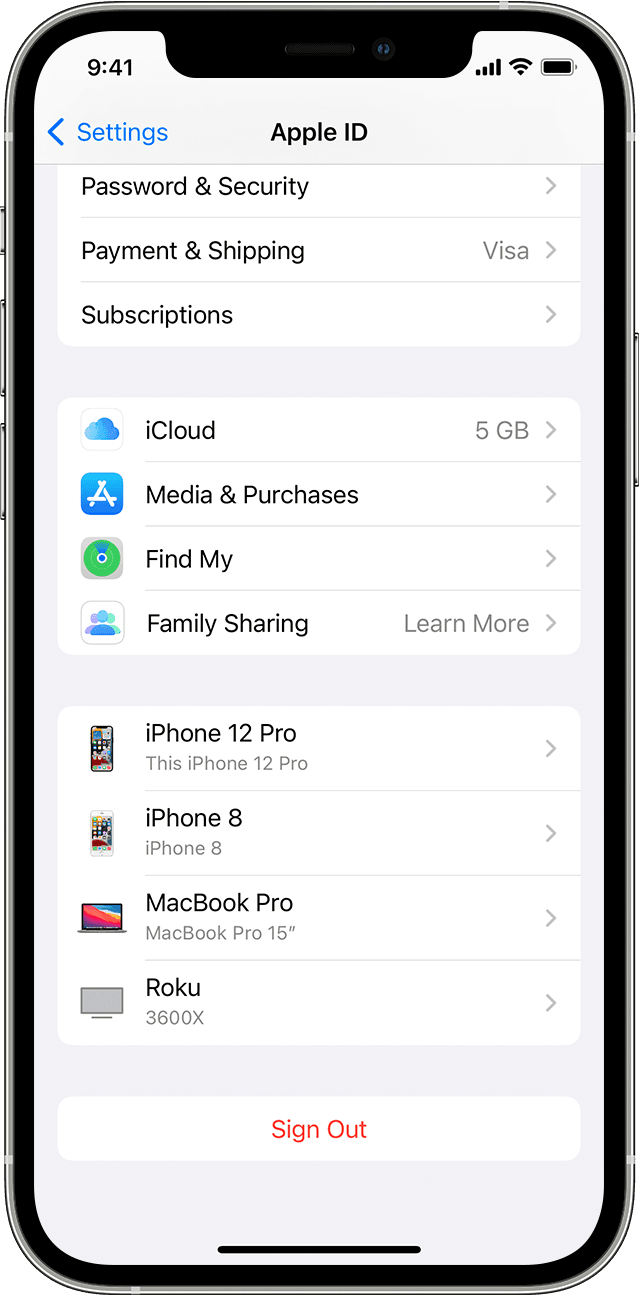
- Tap Settings > [your name], then scroll down.
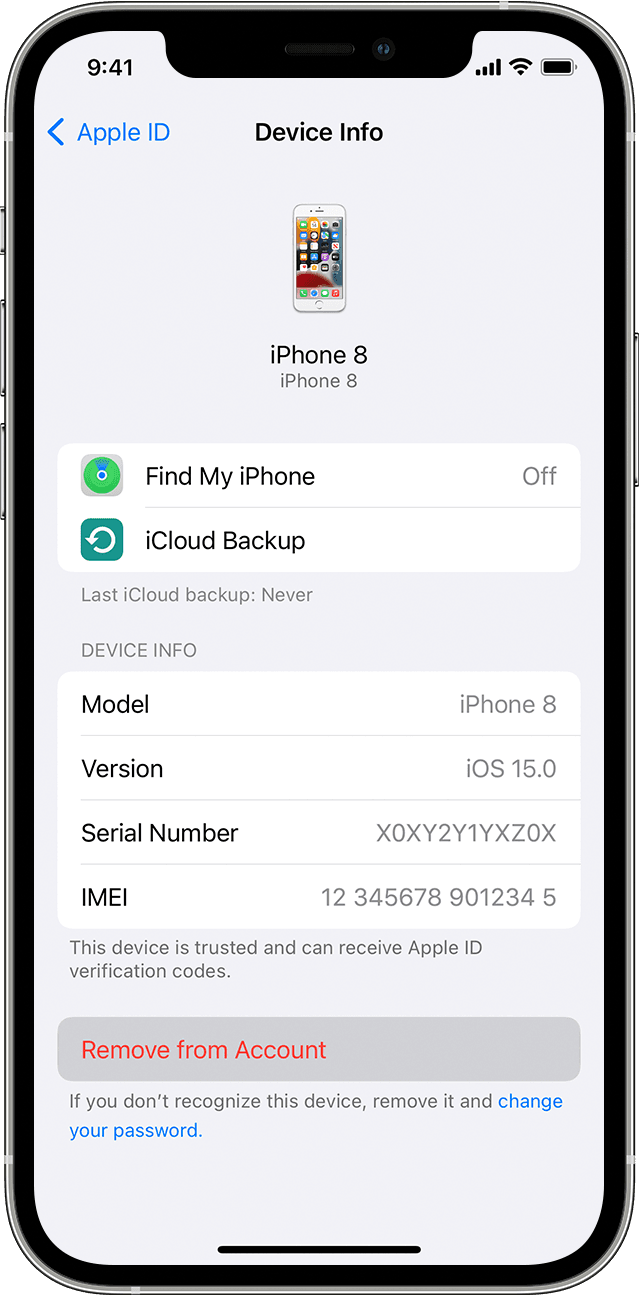
- Tap any device name to view that device’s information, such as the device model, serial number, OS version, and whether the device is trusted and can be used to receive Apple ID verification codes. The information might vary depending on the device type. You might need to answer your security questions to see device details.
![]()
Use your Mac to see where you’re signed in
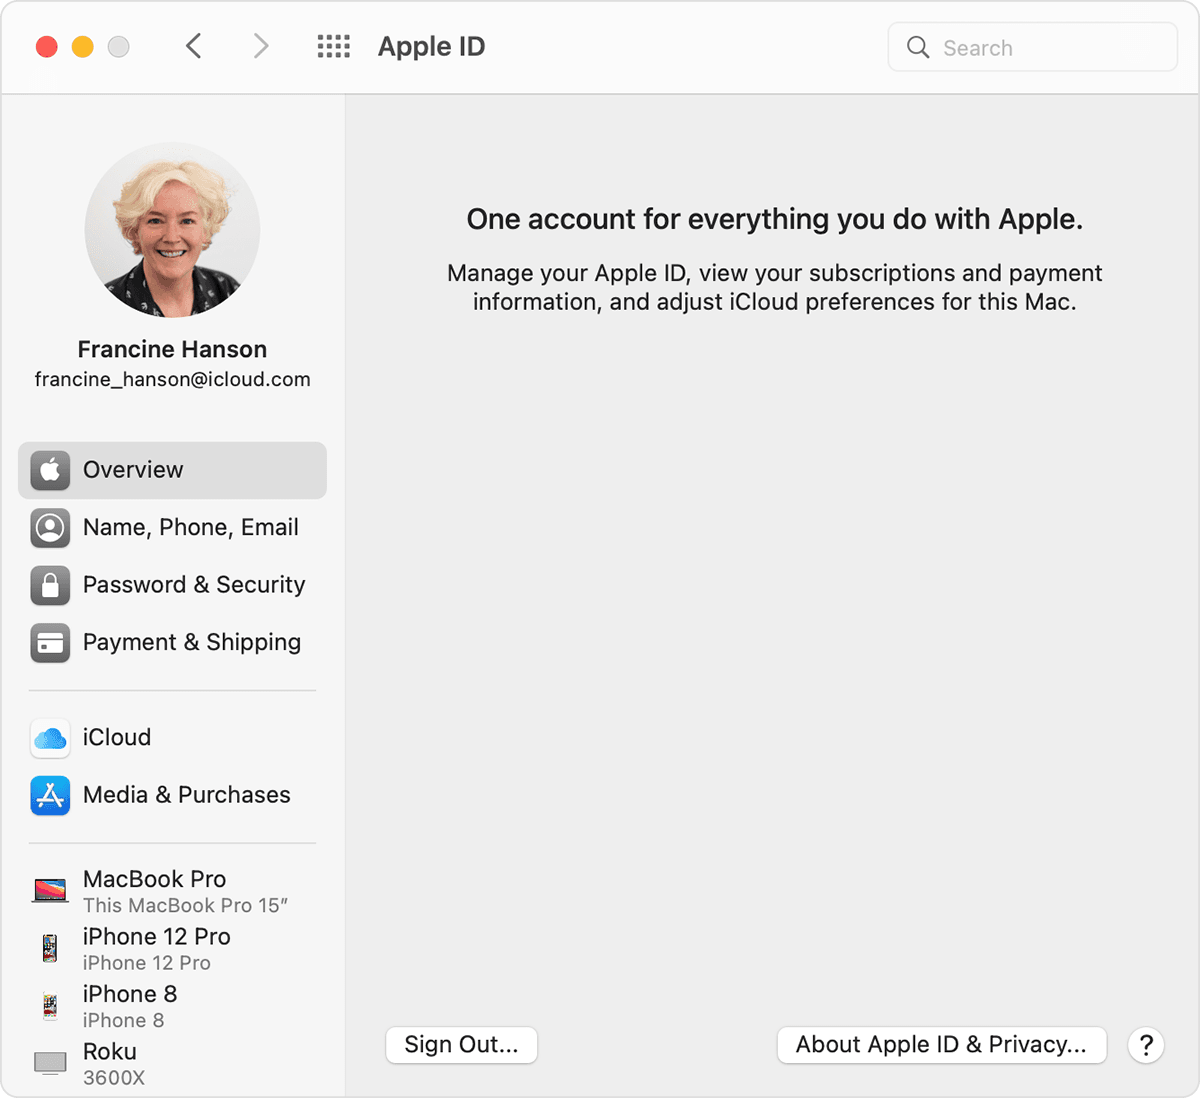
- Choose Apple menu > System Preferences.
- Click Apple ID.
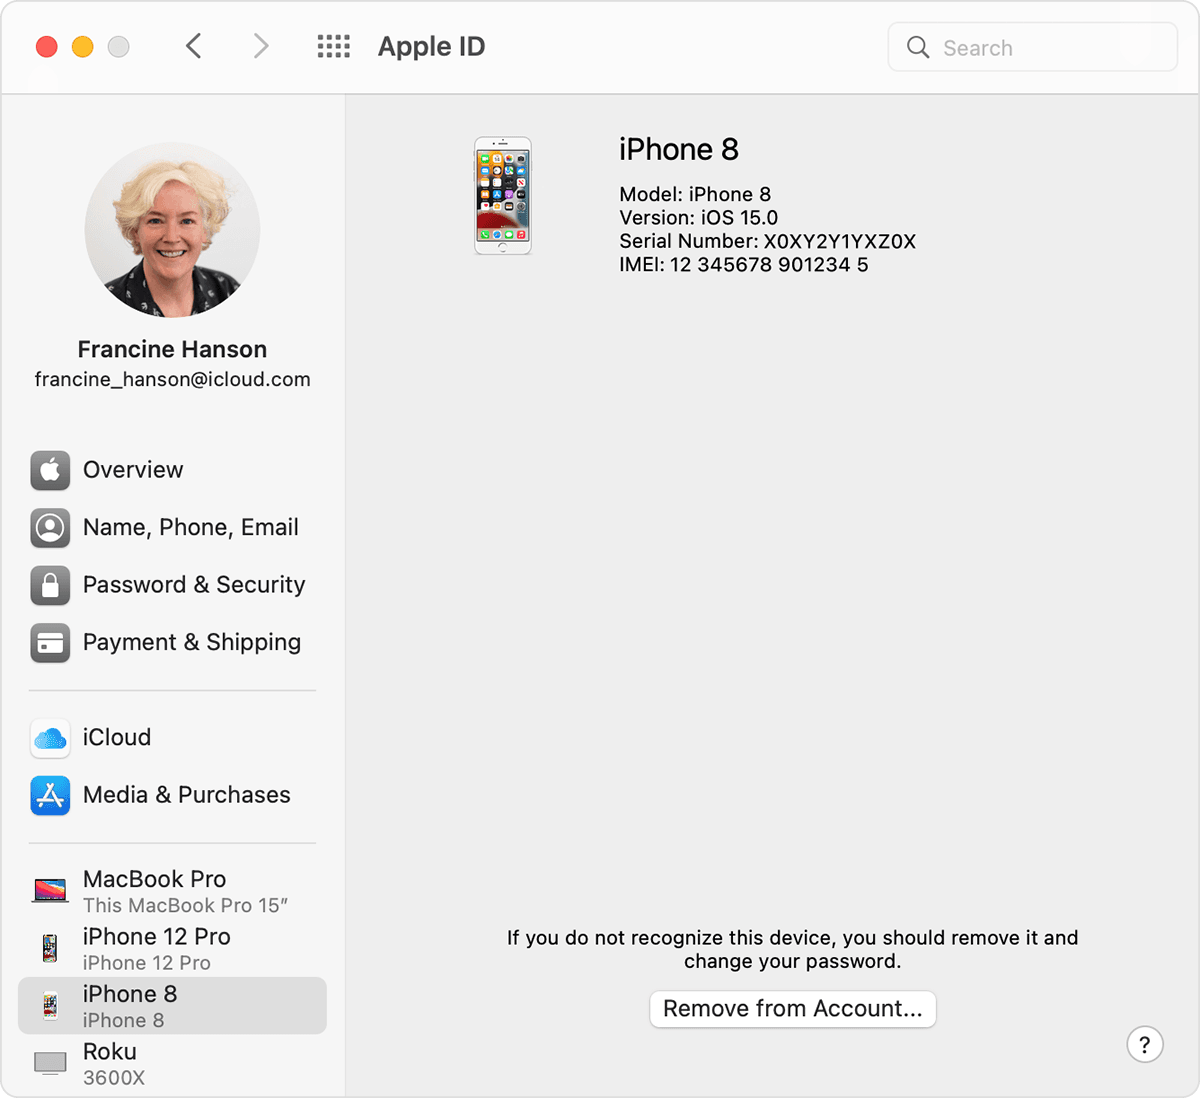
- Click any device name to view that device’s information, such as the device model, serial number, and OS version. The information might vary depending on the device type. You might need to answer your security questions to see device details.
Use your PC to see where you’re signed in
- Open iCloud for Windows.
- Click Account Details, then click Manage Apple ID.
- Click any device name to view that device’s information, such as the device model, serial number, and OS version. The information might vary depending on the device type.
Use the web to see where you’re signed in
From the Devices section of your Apple ID account page, you can see all of the devices that you’re currently signed in to with your Apple ID, including Android devices, consoles, and smart TVs:
- Sign in to appleid.apple.com,* then select Devices.
- If you don’t see your devices right away, click View Details and answer your security questions.
- Click any device name to view that device’s information, such as the device model, serial number, and OS version. The information might vary depending on the device type.

* Depending on how you created your Apple ID, you might be required to provide additional information.
Add a device to the list
To add a device to the list, you need to sign in with your Apple ID. After you sign in on a device with your Apple ID, that device appears in the list. Here’s where you need to sign in:
- For iOS or iPadOS, sign in to iCloud, iMessage, FaceTime, iTunes & App Stores, or Game Center on the device. You can also see your paired Apple Watch.
- For macOS or Windows 10 and later, sign in to iCloud on the device.
- For Apple TV HD and later, sign in to the iTunes and App Store on the device.
- For Apple TV (3rd generation) and earlier, sign in to the iTunes Store on the device.
Your AirPods will appear in the Find My app, but they won’t appear in your Apple ID device list. You can remove your AirPods from your account using Find My. Devices running iOS 7 or earlier or OS X Mavericks or earlier won’t appear in your device list.
Remove a device from the list
If your device is missing, you can use Find My to find your device and take additional actions that can help you recover it and keep your data safe. If you aren’t using your device anymore, or if you don’t recognize it, you might want to remove it from the list.
If you set up two-factor authentication for your Apple ID, removing a device will ensure that it can no longer display verification codes. It also won’t have access to iCloud and other Apple services, including Find My, until you sign in again with two-factor authentication. The device won’t reappear in the list unless you sign in again.
Use your iPhone, iPad, or iPod touch to remove a device
- Tap the device to see its details, then tap Remove from Account.
- Review the message that appears, then tap again to confirm that you want to remove the device.
- Want to permanently remove the device from your account page?
![]()
Use your Mac to remove a device
- Choose Apple menu > System Preferences.
- Click Apple ID.
- Click the device to see its details, then click Remove from Account.
- Review the message that appears, then click again to confirm that you want to remove the device.
- Want to permanently remove the device from your account page?
Use your PC to remove a device
- Open iCloud for Windows.
- Click Account Details, then click Manage Apple ID.
- Click the device to see its details, then click Remove from Account.
- Review the message that appears, then click again to confirm that you want to remove the device.
- Want to permanently remove the device from your account page?
Use the web to remove a device
- Sign in to appleid.apple.com, then select Devices.
- Click the device to see its details, then click «Remove from account.»
- Review the message that appears.
- Click again to confirm that you want to remove the device.
- Want to permanently remove the device from your account page?
Permanently remove a device from your account page
If you’re still signed in with your Apple ID on the device, it might reappear on your account page the next time your device connects to the Internet. To permanently remove the device from your account page, sign out of iCloud, iTunes & App Stores, iMessage, FaceTime, and Game Center on that device, or erase that device.
Источник
IOS DEVICES SERIAL NUMBER
Take a look at the below article, which will help you in locating iOS device’s serial number, IMEI/MEID, CDN, and ICCID.

READ BEFORE YOU BEGIN
- These numbers can be found in several places like Settings, iTunes, on the physical device and on the original packaging.
- Serial number or the IMEI/MEID number can be used to identify your device once you’re contacting Apple support with some queries.
How to find the serial number, IMEI/MEID or ICCI
- At the very beginning, open the Settings.
- Find and select General.
- Finally, go to About.
- Here, you’ll find a detailed specification regarding your device!

Do you still have some difficulties with seeing the needed number? Go to the next sections.
iPhone
- iPhone 11
- iPhone 11 Pro
- iPhone 11 Pro Max
- iPhone XS
- iPhone XS Max
- iPhone X
- iPhone 8
- iPhone 8 Plus
- iPhone 7
- iPhone 7 Plus
- iPhone 6s
- iPhone 6s Plus

On these iPhones the serial number can be found in Settings, while the IMEI/MEID on the SIM tray. When you need to identify your mobile while being on a line with APPLE helpdesk, however, you’re not able to open the Settings menu, you can use the IMEI/MEID instead of the serial number.
- iPhone 6
- iPhone 6 Plus
- iPhone SE
- iPhone 5s
- iPhone 5c
- iPhone 5
For the above six iPhones it is possible to find the serial number in Settings and the IMEI/MEID (the MEID is the first 14 digits of the IMEI) on the back.
Similarly, once you need some support but you are not able to open the Settings menu, you can use the IMEI/MEID instead of the serial number.
- iPhone 3G
- iPhone 3GS
- iPhone 4 (model GSM)
- iPhone 4s
For the four, oldest iPhones the serial number and IMEI/MEID is located on the SIM tray. Both serial number and IMEI are engraved on the back.
iPad and iPod touch
The serial number for the APPLE iPad, iPad Pro and iPod touch is located on the back of the device. In case of iPad cellular model, it is possible to find there also IMEI number. If you are wondering what the MEID is, it’s the first 14 digits of the IMEI.
iTunes
Can you believe that your device’s serial number can be also found in iTunes? Check out the below instruction and learn how to find this number via iTunes!
- Firstly, connect your device to your computer.
- Open iTunes, unless it’s opened automatically.
- Then, locate your device.
- Select the Summary tab.
- Great! Here are all the wanted information!
IMPORTANT:
For an iPhone, click Phone Number to find the IMEI/MEID and ICCID.
For an iPad (cellular model), click b to find the CDN, IMEI/MEID, and ICCID.
No device around case
First method
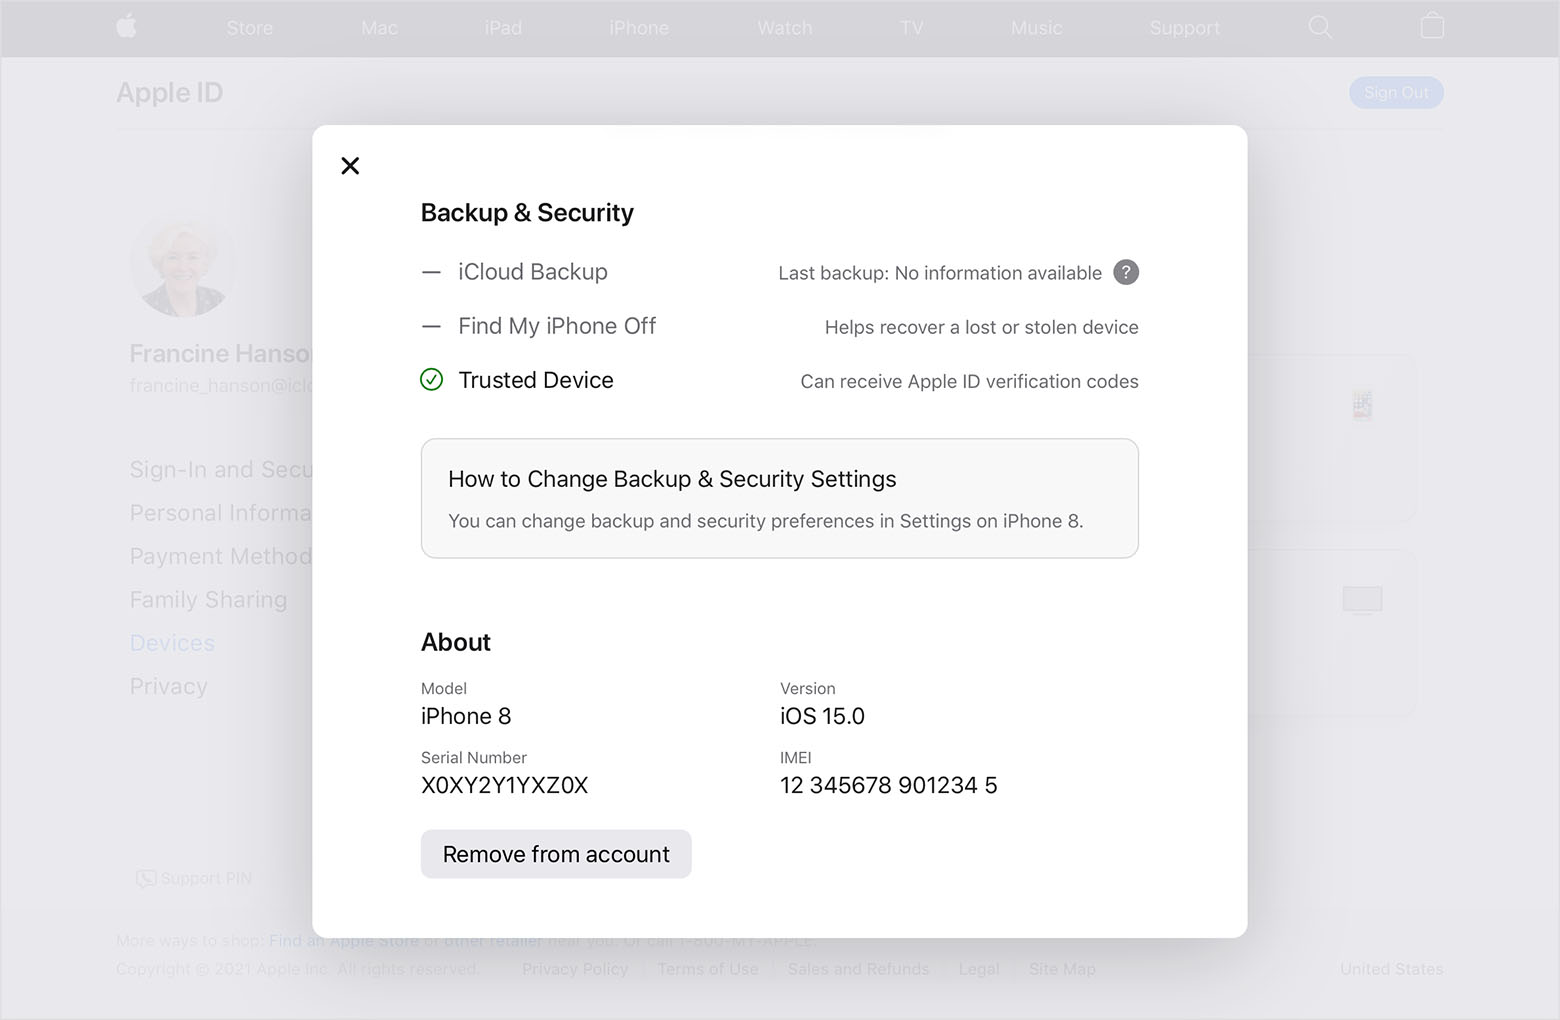
- First of all, open the browser on your computer and go to the Apple ID account page (appleid.apple.com)
- Secondly, sign in with the Apple ID related to the particular device.
- Find and select the Devices tab.
- At the very end, select that device.
- Well done! Here you can find the device’s serial and IMEI/MEID number.
Second method
Effective only if you have iOS 10.3 or later device, that’s signed in to the same Apple ID.
- Open the browser on and go to the Apple ID account page (appleid.apple.com)
- Log in with the proper Apple ID.
- Select this Device.
- Then, go to the Settings>[Your name].
- Scroll down to see all devices singed to this Apple ID.
- Finally, select the wanted device name and view the serial and IMEI/MEID numbers.
Barcode’s method
If none of the below options were suitable for you, yet you still have the original package of your device there is one more possibility to find these numbers! It is truly the simplest way to locate IMEI/MEID or serial number.
- Find and take the device’s package.
- Turn it over and here, on the Barcode you have all sufficient information!
Источник


