- Getting Started with Espresso – Android UI Automation
- What is the Espresso Testing Framework?
- Should You Use an Automation Testing Framework?
- Understanding Espresso Android
- Espresso’s API Components
- Sample Test Case for Espresso Android
- Code Explanation
- Espresso Test Android Cheat Sheet
- Why Use Espresso Instead of Appium?
- Введение в Android Espresso
- Добавляем Espresso в проект
- Главные компоненты в Espresso
- Простой тест с использованием onView()
- Простой тест с использованием onData()
- DataInteractions
- Espresso и RecycleView
Getting Started with Espresso – Android UI Automation
By Akshay Pai, Community Contributor — June 5, 2020


The Android operating system dominates the mobile phone market with a massive 75% market share. From attending meetings to playing games, to collaborative artwork, it can be done on an Android device. Naturally, creating and testing Android applications is quite the rage these days.
Naturally, the development of Android has also ramped up. In fact, 3739 apps are added to Play Store every day. This means that developing an Android app that will get noticed, downloaded, and used consistently has become fairly challenging. App developers need to use the best possible tools at their disposal to give their apps a fighting chance in the digital market. One of these tools that all Android developers and automation test engineers need to use is the Espresso automation framework.
This article will provide a beginner’s guide to using Espresso, helping them get familiar with a framework that is mandatory in order to build Android applications correctly.
What is the Espresso Testing Framework?
Espresso is a testing framework that helps developers write automation test cases for user interface (UI) testing. It has been developed by Google and aims to provide a simple yet powerful framework. It allows both black-box testing as well as testing of individual components during development cycles.
Espresso is highly robust. It allows developers to test both Android native views as well as hybrid web-views. Test cases using this framework can be written in Java or Kotlin ensuring no new skill development is required to use it.
Using this framework, testers will be able to leverage a plethora of features. Synchronized test executions, intent validations, and capabilities to run recipes are some of its prominent features.
This tutorial delves into why an automation test framework needs to be used, when it should be used and how to get started with Espresso.
Should You Use an Automation Testing Framework?
Android App Automation Testing reduces costs and saves a lot of time during development cycles. The initial investment in terms of both cost and time is high for test automation. However, studies and analysis over the years have proven that the ROI on Automation Testing is always higher.

Image Credit: QF Test Analysis
The analysis above shows how automated testing reduces cost over multiple development cycles. Another analysis from Abastrata shows how they were able to reduce the cost of testing per hour from $78 to $17.5.

Image Credit: Abstracta Automation vs Manual
So, keeping these metrics in mind, there is no doubt that testers should use an Automation Test Framework.
Understanding Espresso Android

Espresso automation involves understanding the paradigm in which it has to be used. As a developer, one needs to first understand that it’s purely an Android app UI testing framework. This explains why the Espresso Android framework is built without tight coupling to Android APIs such as getView() and getCurrentActivity().
The first step while starting with Espresso is to assume that you are a user. Create test cases by first identifying which UI element has to be tested and then initiating some action on it (basically interacting with it). This makes sense as it causes testers to write automation test cases that mimic user interactions with the UI.
Espresso’s API Components
Now that we are familiar with Espresso’s design model, let’s look at the four components that make up its high-level components.
1. Espresso
This is the starting point for all test cases. This component provides entry points or methods to start the interaction with the app’s view. Each app’s view has two components.
First is the part of the view that belongs to the app. Testers will be able to interact with it by using the onView() and onData() methods. The second part of the view consists of the components that are provided by the OS ( home screen button, back button, etc). Espresso also provides APIs to interact with non-app components. For example, the pressBack() method to initiate going back.
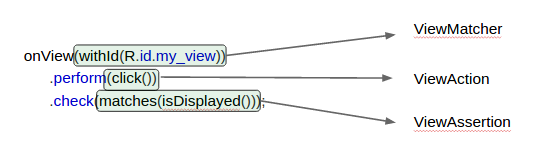
2. ViewMatchers
Views are always in a hierarchy called the View Hierarchy. For the test cases to navigate the view hierarchy, ViewMatchers are used. Technically, they are a collection of objects and they implement the Matcher interface. Testers will be able to pass one or more of these objects to the OnView() method provided by Espresso Component.
3. ViewActions
These components define the action that has to be performed on any given View. Espresso allows testers to send more than one ViewAction as a collection to the Interaction method. An example of a view action would be the click() method which helps a test script click on a given View’s UI component.
4. ViewAssertions
Assertions complete a test case. They are the components that check if the test has passed or failed. In Espresso Android, the ViewAssertions can be passed to the Check() method from the ViewInteraction package. Matches assertion is the most commonly used check which verifies the final state of the view with what is expected.
Sample Test Case for Espresso Android
Based on the components discussed above, here is how one can write a test case with Espresso using:
1. Java
2. Kotlin
Code Explanation
Here’s what both the Java and Kotin test case above does.
- Firstly, it tries to find a view with a certain ID and a uniquely identifiable feature. In this case, the script is saying the text “Hello!” on the view is a unique feature.
- Next, the script performs two actions on that view. It first types “Hello!” on a text box that is present, and then it clicks on a button that exists.
- Finally, it calls the assertion matches() to check if the view shows “Hello!” once the click is performed. The result will be a successful test case if the view has the desired text on it. Otherwise, the test case fails.
Espresso Test Android Cheat Sheet
Thanks to Google, testers have a clear cheat sheet that they can refer to while developing test cases with Espresso. The cheat sheet below provides references to most of the instances that come with the Espresso Components discussed earlier.

Image Credit: Espresso Framework by Android Developers – Google
Why Use Espresso Instead of Appium?
Espresso and Appium complement each other. Both are test frameworks used for automation but they differ in where they are applicable. Appium helps with testing how well an app responds to various scenarios and how it handles various user flows. Espresso on the other hand helps you test an Android app’s UI and UI component behavior.
Read more about Appium vs Espresso to thoroughly understand the technical differences.
Despite using Appium, it is highly recommended to use Espresso as well to ensure that there is end to end coverage of test cases.
This Android Espresso tutorial strives to offer core information and starting points for action with the Espresso Testing Framework. The initial learning curve might seem a bit steep, which is true for any sort of automation testing. However, with time, it will pay off and you will be saving a lot of time and money.
SDETs and QA teams can use the Espresso Framework on a cloud-based real device lab like BrowserStack to run their Automation tests.
Источник
Введение в Android Espresso
Эспрессо — это фреймворк, который предоставляет простой API для тестирования пользовательского интерфейса программы.
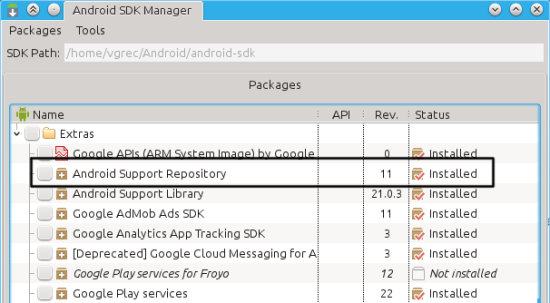
Начиная с версии 2.0, эспрессо является частью Android Support Repository, что делает добавление Espresso в проект более легким.
Но, прежде чем перескакивать к API Эспрессо , давайте рассмотрим чем этот фреймворк отличается от других:
1) API тестов Espresso выглядит как обычный английский текст, что позволяет быстро научиться работать с ним.
2) Имеет маленький API
3) Espresso быстро запускается
4) Поддержка Gradle+Android Studio
Добавляем Espresso в проект
1. Прежде всего мы должны установить Android Support Repository
2) Добавьте зависимости в файл build.gradle:
3) Наконец, добавьте команду запуска тестов в defaultConfig:
Главные компоненты в Espresso
Espresso состоит из трех основных компонентов:
- ViewMatchers – позволяетнайти View на экране
- ViewActions – позволяет взаимодействовать с View
- ViewAssertions — проверяет состояние View
Для простоты, вы можете использовать эти шпаргалки:
• ViewMatchers — «что-то» найти
• ViewActions — «сделать что-то»
• ViewAssertions — «что-то» проверить
Например, когда вам нужно будет что-то проверить (как, некоторый текст отображается на экране), вы будете знать, что для этого вам понадобится ViewAssertion.
Ниже приведен пример теста Espresso и показано расположение главных компонентов:
Простой тест с использованием onView()
Предположим, у нас есть приложение, где пользователь должен ввести свое имя.
После того как он вводит имя, он нажимает на кнопку «Далее» и перенаправляется на другую активити, на которой отображается приветственное сообщение.

Напишем тест для этого приложения:
Обратите внимание, что мы не указываем явно какие с какими View мы взаимодействуем (EditText или Button), мы просто говорим, что мы ищем View с конкретным идентификатором.
Кроме того, при нажатии на кнопку «Далее» а также при проверке текста, мы не должны писать специальный код, чтобы рассказать эспрессо, что мы перемещаться на другую активити.
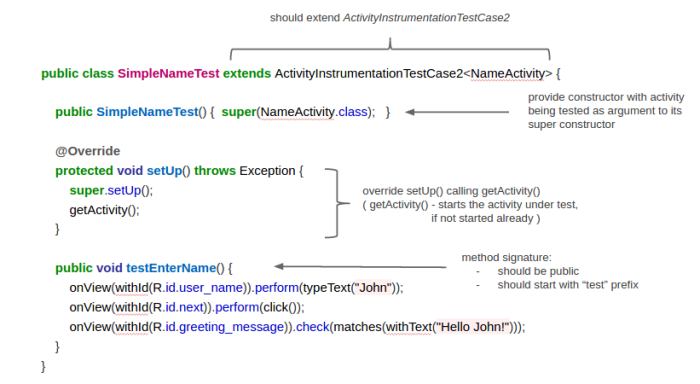
Теперь, если мы действительно хотим запустить этот тест, то он должен быть помещен в класс. В Gradle, тесты хранятся в папке: ваше_приложение/src/androidTest/java.
Это пример класса теста, и его основные характеристики:
Простой тест с использованием onData()
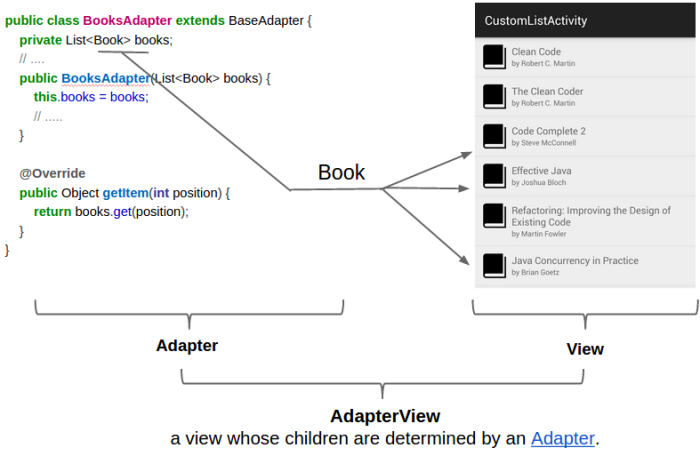
Всякий раз, когда у вас есть ListView, GridView, Spinner или другие View, основанные адаптере, вы должны будете использовать метод onData () для того, чтобы взаимодействовать с элементом из этого списка. Метод onData () ориентирован на непосредственно данные, предоставленные вашим адаптером. Что это значит, мы сейчас увидим:
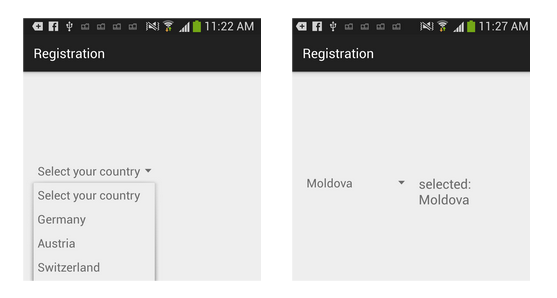
Представим, что у нас есть приложение, в котором мы должны выбрать страну из Spiner’а. При выборе пункта название выбранного пункта отображается рядом со Spiner’ом:
А вот тест для тестирования этого приложения:
Как мы видим, Spinner основан на массиве строк. Если вместро строк используется собственный класс, то мы должны указать на это. Рассмотрим тест на примере списка книг:
Вот так теперь выглядит тест:
Откуда взялся метод withBookTitle вы можете посмотреть в исходниках на GitHub, ссылка на который расположена в конце статьи.
DataInteractions
Espresso имеет несколько полезных методов для взаимодействия с данными.
atPosition() – может быть полезен, когда элементы расположены в определенном порядке и вы точно знаете на какой позиции находится данный элемент.
inRoot() — используется при не стандартных окнах. Один из сценариев использования это функция автозаполнения (подсказки) у EditText. Пример:
onChildView() – этот DataInteraction уточнить запрос, позволяя взаимодкействовать с конкретным View из списка. Например, у нас есть список элементов и у каждого элемента есть кнопка удаления. Вы хотите нажать кнопку «Удалить» у конкретного пункта в списке:
inAdapterView() — нужен для взаимодействия с конкретным классом адаптера. По умолчанию Espresso работает со всеми видами адаптеров. Это может быть полезно при работе с ViewPager’ом или Fragment’ами, когда вам нужно взаимодействовать с тем адаптером, который отображается на экране или же, если на вашем экране больше одного адаптера. Пример:
Espresso и RecycleView
RecyclerView — это UI-компонент, предназначенный для визуализации набора данных в виде ListView или GridView и призван заменить их обоих. RecycleView не является наследником AdapterView, поэтому мы больше не сможем использовать метод onData() для взаимодействия с элементами списка.
К счастью, есть класс, называемый RecyclerViewActions, который представляет из себя небольшой API для работы на RecyclerView. RecyclerViewActions является частью отдельной библиотеки, которая называется espresso-contrib, которая также должна быть добавлена к build.gradle:
Уберем некоторые библиотеки из зависимостей, чтобы избежать конфликтов:
Источник


