Best strategy to load images using Glide — Image loading library for Android

Feb 21, 2019 · 4 min read
Glide is an Image Loader Library for Android developed by bumptech and is a library that is recommended by Google. It has been used in many Google open source projects including Google I/O 2014 official application.
Many of us use glide for image loading but only some of us know its real power. If we dive into the features of glide, the article will go into TL;DR category. Instead I like it to be short and sweet 😉
I have been working on glide since long and the app I am working on relies on images heavily, images in recycler view, view pager, nested recycler views and every single image is a url.
To make app smooth, we had to brainstorm on cache strategy.
How Glide Cache Works
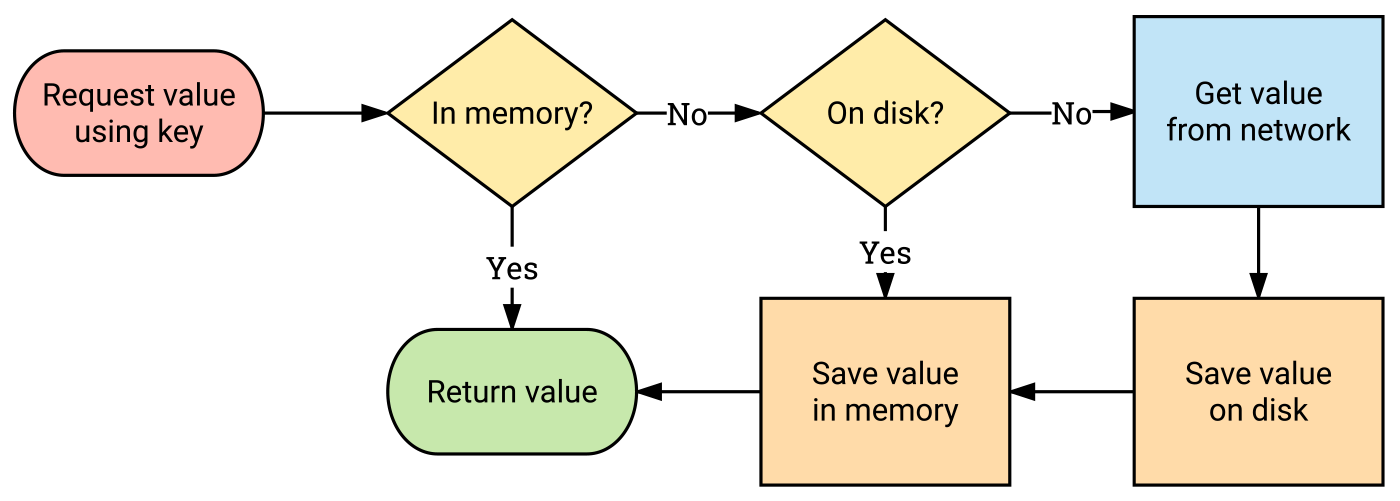
By default, Glide checks multiple layers of caches before starting a new request for an image:
- Active resources — Is this image displayed in another View right now?
- Memory cache — Was this image recently loaded and still in memory?
- Resource — Has this image been decoded, transformed, and written to the disk cache before?
- Data — Was the data this image was obtained from written to the disk cache before?
If all four steps fail to find the image, then Glide will go back to the original source to retrieve the data from the URL.
Best Image Loading and Caching Strategy

ONE — Enable Disk Cache
Applications that use the same resource multiple times in multiple sizes and are willing to trade off some speed and disk space in return for lower bandwidth usage may want to consider enabling disk cache.
You can find more details here.
To enable it we will write the following code.
TWO — Add Image Signature
Guess, what if the image on same URL is changed? Glide will show the old image from cache.
But glide is something from heaven 😍 — it comes with the solution.
Make sure whenever the image on server is changed, it also notifies client. Let it be the latest date time stamp.
Now it can be used for versioning in cache as well. Whenever new signature is provided, it will fetch the new image and cache it as well. Details.
Just add it to the request options.
THREE — Override Image Size (Optional)
If you need very specific size of the image and you are very sure of it, you can use the override request option. It is very useful for the thumbnails.
FOUR — Add Thumbnail Url
Glide’s thumbnail() API allows you to specify a RequestBuilder to start in parallel with your main request. The thumbnail() will be displayed while the primary request is loading. If the primary request completes before the thumbnail request, the image from the thumbnail request will not be shown.
If you only have a single remote URL, you can still benefit from the thumbnail API by using Glide’s override() or sizeMultiplier() APIs to force Glide to load a lower resolution image in the thumbnail request
FIVE — Setup Monthly Schedule for Cleaning
In case when image url is changed and old one is never used but it is still in cache and eating up the phone memory, what to do?
Glide don’t provide the solution for this but you can set up a monthly schedule to clear up all the cache. Details.
SIX — Setup Cache Limit (Optional)
Glide allows applications to use AppGlideModule implementations to completely control Glide’s memory and disk cache usage. Glide tries to provide reasonable defaults for most applications, but for some applications, it will be necessary to customise these values. Be sure to measure the results of any changes to avoid performance regressions. Details can be seen here.
These were the 6 easy steps to achieve better strategy for image caching. Implement and let me know if you find it helpful.
If you have any suggestions or better approach, please do let me know in comments below, I will add them to the article.
Thank you for reading and don’t forget to clap if you liked it 🙂
Источник
Руководство по фоновой работе в Android. Часть 2: Loaders
Это вторая из серии статей об инструментах и методах фоновой работы в Android. Ранее уже были рассмотрены AsyncTask, в следующих выпусках — ThreadPools с EventBus, RxJava 2 и корутины в Kotlin.

В предыдущем тексте мы упомянули, что у AsyncTasks есть несколько проблем. Давайте вспомним две из них:
- AsyncTasks ничего не знают о жизненном цикле Activity. При неправильном обращении вы в лучшем случае получите утечку памяти, а в худшем — сбой.
- AsyncTask не поддерживает сохранение состояния прогресса и повторное использование результатов загрузки.
Смысл первой проблемы вот в чем: чтобы обновить UI в методе onPostExecute, нам нужна ссылка на конкретный view или на всю Activity, к которой он относится. Наивный подход в том, чтобы хранить эту ссылку внутри самого AsyncTask:
Проблема в том, что как только пользователь поворачивает устройство, Activity уничтожается, и ссылка устаревает. Это приводит к утечке памяти. Почему? Вспомним, что наш метод doInBackground вызывается внутри Future, исполняемого на executor — статическом члене класса AsyncTask. Это делает наш объект AsyncTask, а также Activity, строго достижимыми(потому что статика является одним из корней GC), а следовательно, неподходящими для сборки мусора. Это в свою очередь означает, что несколько поворотов экрана могут вызвать OutOfMemoryError, потому что Activity занимает приличный объем памяти.
Исправить эту ошибку можно с помощью WeakReference:
Хорошо, от OOM мы избавились, но результат выполнения AsyncTask в любом случае потерян, и мы обречены вновь его запускать, разряжая телефон и расходуя трафик.
Для того, чтобы исправить это, команда Android несколько лет назад предложила Loaders API («Загрузчики»). Посмотрим, как использовать это API. Нам нужно реализовать интерфейс Loader.Callbacks:
Как можно заметить, метод onLoadFinished очень похож на onPostExecute, который мы реализовывали в AsyncTask.
Нам нужно создать сам Loader:
И вызвать initLoader() с id нашего Loader:
Пожалуйста, обратите внимание: WeatherForecastLoaderCallbacks — вложенный класс нашей Activity; LoaderManager хранит ссылку на этот объект Callbacks — а значит, и на саму Activity тоже
Немало кода, да? Но мы тут получаем важное преимущество. Во-первых, Loader оказывается переиспользован при повороте экрана (или других изменениях конфигурации). Если экран повернули, onLoadFinished будет вызван с передачей результата, загруженного нами ранее.
Другое преимущество в том, что у нас не происходит утечка памяти, хотя доступ к Activity у нас остается, позволяя обновлять интерфейс.
Круто, у AsyncTask обоих этих преимуществ не было! Давайте теперь разберёмся, как всё это работает.
Тут-то и начинается главное веселье. Я думал, что LoaderManager хранится где-то внутри Application, но настоящая реализация оказалась куда более интересной.
LoaderManager создается при создании экземпляра Activity:
FragmentController.createController — это просто именованный конструктор для класса FragmentController. FragmentController делегирует создание LoaderManager в HostCallbacks (вложенному классу нашей Activity), реализация выглядит так:
Как видите, LoaderManager для самой Activity инициализируется лениво; экземпляр LoaderManager не создается до тех пор, пока впервые не понадобится. Доступ к LoaderManager нашей Activity происходит по ключу ‘(root)’ в Map LoadersManagers. Доступ к этой Map реализован так:
Однако это не последняя запись поля LoaderManager. Посмотрим на метод Activity#onCreate:
Метод restoreLoaderNonConfig в итоге просто обновляет host controller, который теперь является членом класса нового экземпляра Activity, созданной после изменения конфигурации.
При вызове метода initLoader() у LoaderManager уже есть вся информация о Loaders, которые были созданы в уничтоженной Activity. Так что он может опубликовать загруженный результат немедленно:
Здорово, что мы разобрались с двумя вещами сразу: как мы избегаем утечек памяти (заменяя экземпляр LoaderCallback) и как доставляем результат в новую Activity!
Возможно, вас интересует, что ещё за зверь такой — mLastNonConfigurationInstances. Это экземпляр класса NonConfigurationInstances, определённый внутри класса Activity:
Объект создаётся с помощью метода retainNonConfigurationInstance(), а затем к нему напрямую обращается Android OS. И он становится доступен для Activity в методе Activity#attach() (а это внутреннее API Activity):
Так что, к сожалению, главная магия остаётся внутри Android OS. Но поучиться на её примере нам никто не запретит!
Давайте подытожим, что мы обнаружили:
- У Loaders неочевидное API, но они позволяют сохранять результат загрузки при изменении конфигурации
- Loaders не вызывают утечки памяти: просто не делайте их вложенными классами Activity
- Loaders позволяют в фоновой работе переиспользовать AsyncTask, но можно и реализовать свой собственный Loader
- LoaderManager оказывается переиспользованным между уничтоженными и вновь созданными Activity благодаря сохранению в специальный объект
В следующей статье мы поговорим, как организовывать фоновую работу на Executors, и подмешаем туда немного EventBus. Stay tuned!
Как вы заметили, это перевод моей англоязычной статьи. Если статья вам показалось ценной, обратите внимание — в апреле пройдёт конференция Mobius, в программный комитет которой я вхожу, и могу обещать, что в этом году программа будет особенно насыщенна. На сайте конференции пока что опубликована только часть программы, потому что нам крайне тяжело выбрать лучшие — конкуренция остра как никогда. Уже можете изучить имеющиеся описания докладов, а скоро к ним добавятся новые!
Источник
How to Use Glide Image Loader Library in Android Apps?
Glide, like Picasso, can load and display images from many sources, while also taking care of caching and keeping a low memory impact when doing image manipulations. Official Google apps (like the app for Google I/O 2015) are using Glide. In this article, we’re going to explore the functionalities of Glide and why it’s superior in certain aspects.
Glide is an Image Loader Library for Android developed by bumptech and is a library that is recommended by Google. It has been used in many Google open source projects including Google I/O 2014 official application. It provides animated GIF support and handles image loading/caching. Animated GIF support is currently not implemented in Picasso. Yes, images play a major role in making the UI of an App more interactive and user-friendly too. So, as an Android Developer, we should take care of using images in App. We should handle the different aspects of an image like the slow unresponsive image, memory issues, loading errors, and many more. If you are not handling these aspects in your application, then your app will make a bad impression on your users.
How to Use Glide Android Library?
1. For using Glide in the android project, we have to add the dependency in gradle file. So, For adding dependency open app/build.gradle file in the app folder in your Android project and add the following lines inside it.
Glide also needs Android Support Library v4, please don’t forget to import support-v4 to your project like above as well. But it is not kind of a problem since Android Support Library v4 is basically needed in every single new-age Android project. Now sync your gradle once again. If you get any type of error then you may check the error on stackoverflow.
2. Now add InternetPermission inside the AndroidManifest.xml file. Open the manifest.xml file and add the following line.
3. Open the layout file for the main Activity. We need to add an ImageView to the layout. It doesn’t need to be fancy. The following code snippet shows you what I mean.
4. Now Navigate to the main Activity file and Add the following code block to the onCreate() method.
ImageView imageView = (ImageView) findViewById(R.id.imageView);
.load(“YOUR IMAGE URL HERE”)
In the first line, we are getting the ImageView instance from the layout. And then load the image from the above remote URL using Glide library.
Advanced Usage
For any real-time application, we must think of all possible cases. In the above code, we just store the image from the server link into the imageView.There are some more cases.
- Resize
.load(“YOUR IMAGE URL HERE”)
Here we are using Glide to fetch a remote image and overriding(resizing) it using before displaying it in an image view.
- Placeholder
.load(“YOUR IMAGE URL HERE”)
If your application relies on remote assets, then it’s important to add a fallback in the form of a placeholder image. The placeholder image is shown immediately and replaced by the remote image when Glide has finished fetching it.
- Handling errors
.load(“YOUR IMAGE URL HERE”)
We already saw how the placeholder method works, but there’s also an error method that accepts a placeholder image. Glide will try to download the remote image three times and display the error placeholder image if it was unable to fetch the remote asset.
GlideDrawableImageViewTarget imagePreview = new GlideDrawableImageViewTarget(imageView);
public boolean onException(Exception e, String model, Target target, boolean isFirstResource) <
public boolean onResourceReady(GlideDrawable resource, String model, Target target,
boolean isFromMemoryCache, boolean isFirstResource) <
- Effects
Blur image:
.load(“YOUR IMAGE URL HERE”)
.load(“YOUR IMAGE URL HERE”)
.bitmapTransform(new BlurTransformation(context, 25), new CropCircleTransformation(context))
.load(“YOUR IMAGE URL HERE”)
.load(“YOUR IMAGE URL HERE”)
.bitmapTransform(new RoundedCornersTransformation(context, radius, margin))
Источник


