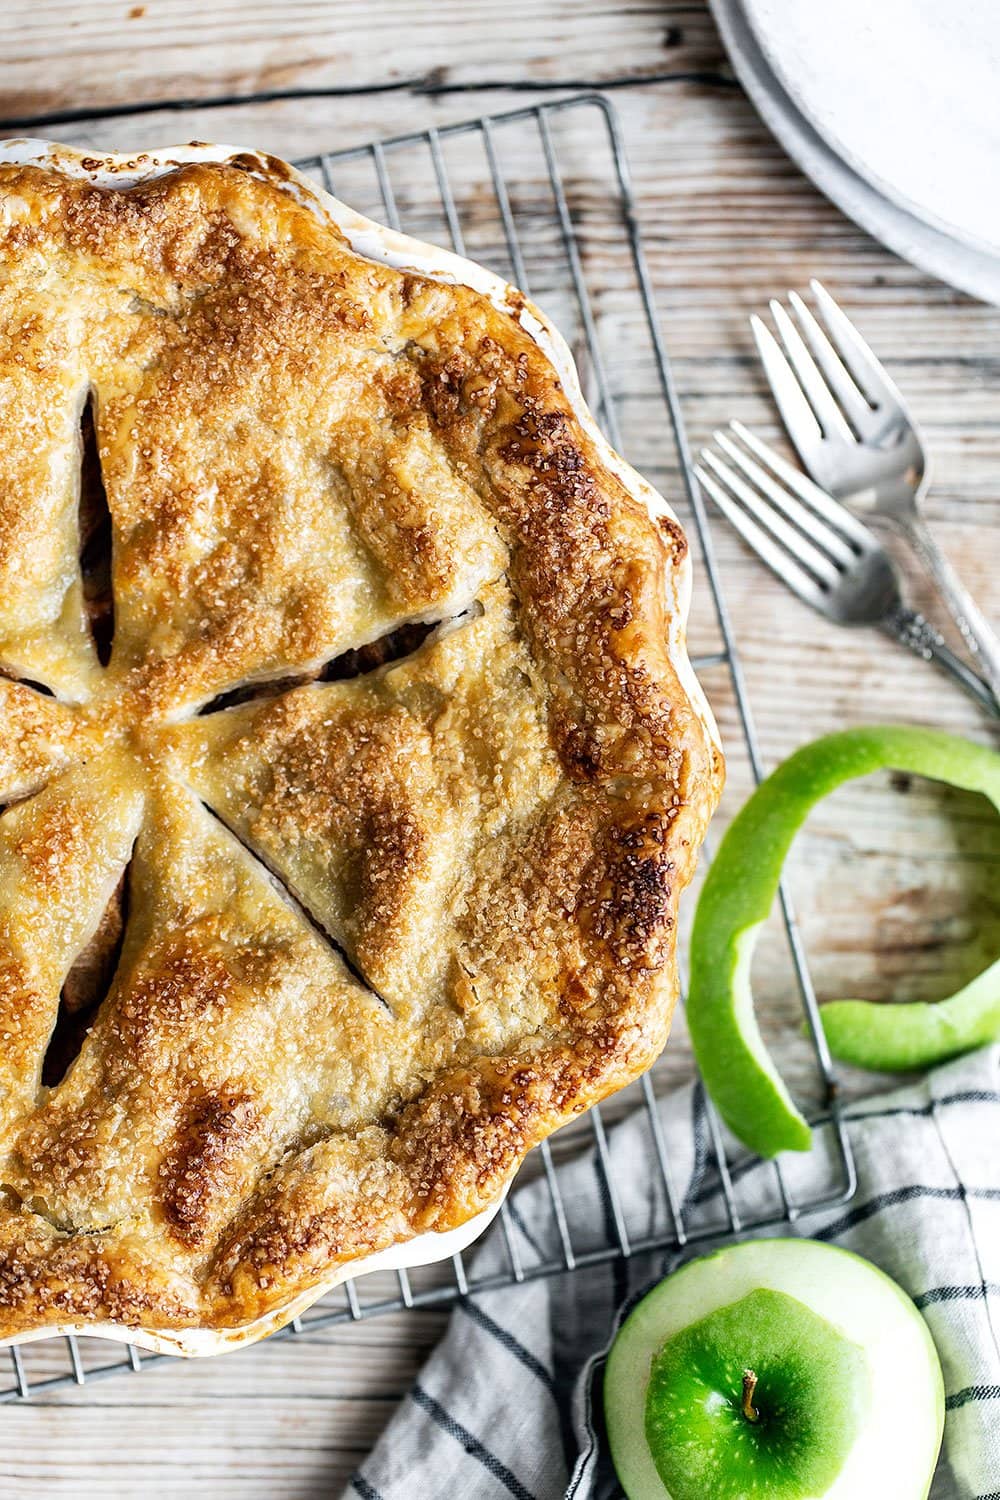
- Thanksgiving Apple Pie
- Tessa’s Recipe Rundown.
- How to Make Perfect Apple Pie
- Apple Pie Crust
- How to prevent soggy crust:
- Tips for Apple Pie Filling
- Best apples for apple pie?
- How to Tell when Apple Pie is Done Baking
- How to Store & Make Apple Pie Ahead of Time
- Can apple pie be frozen?
- Apple Pie Recipe
- Best Apples for Apple Pie
- How to Make Apple Pie
- Apple Pie Filling
- Apple Pie Crust
- How to Make a Lattice Pie Crust
- Make Ahead Instructions
Thanksgiving Apple Pie
Double Crust Apple Pie is warm, gooey, and has a sweet filling wrapped in a buttery and flaky homemade crust.
Yield: 10 -12 servings
Prep Time: 1 hour
Cook: 1 hour 15 minutes

Tessa’s Recipe Rundown.
Taste: Classic apple pie flavors, the perfect amount of sweetness, tartness, and spicy warmth.
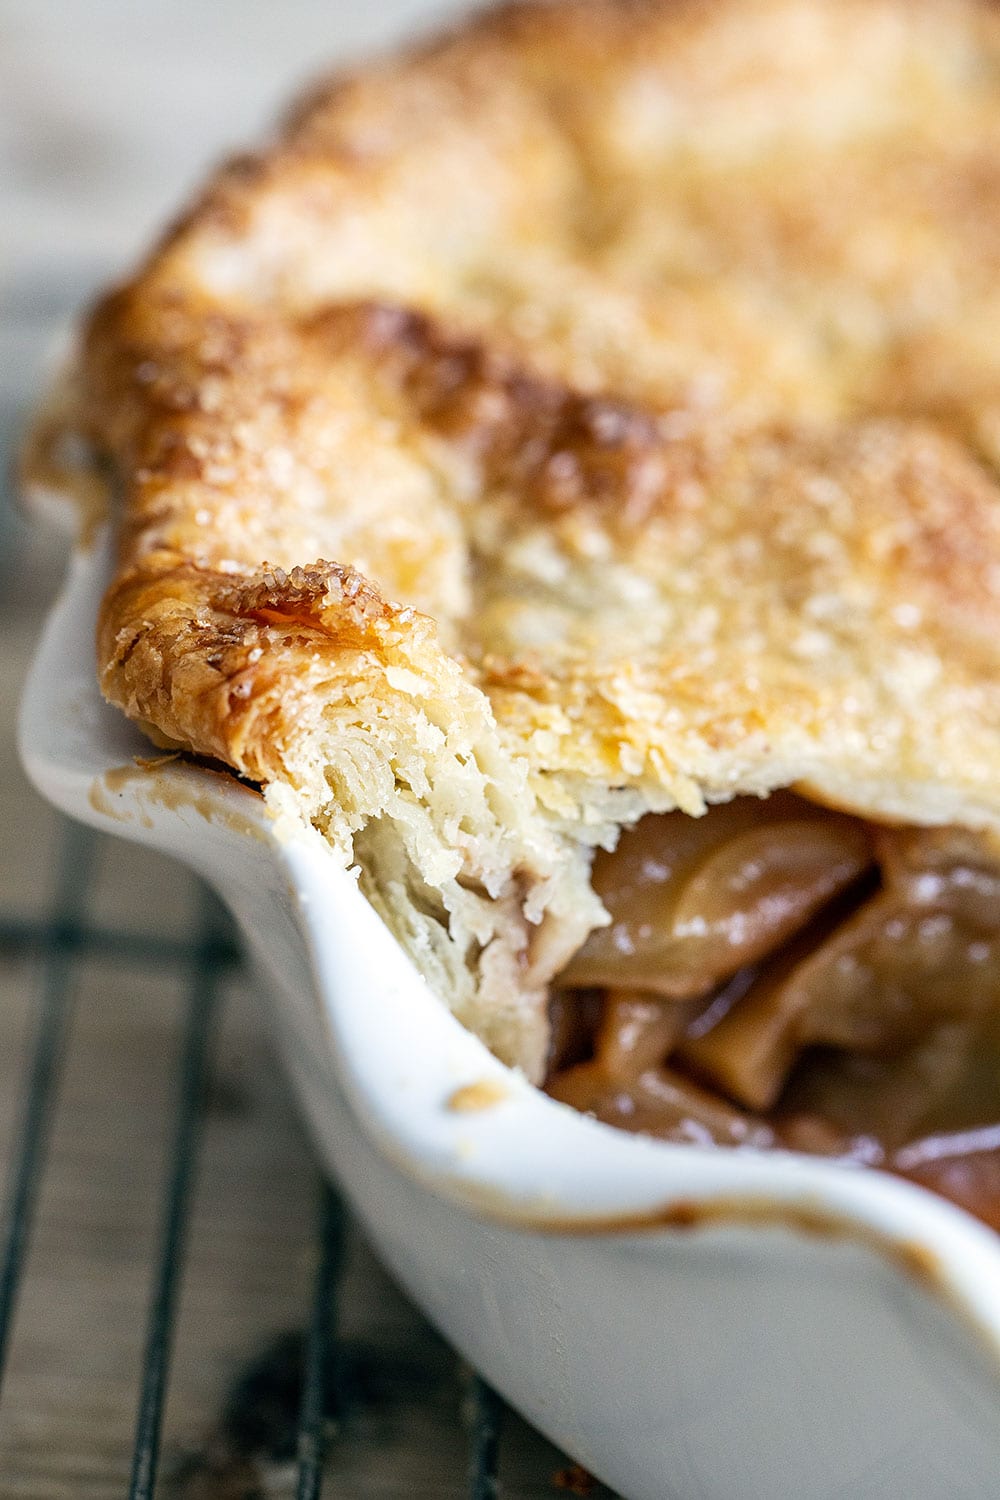
Texture: Perfect, tender apples floating in a gooey goodness with a delightfully flaky crust.
Ease: A little more advanced and time consuming, but the process is so enjoyable!
Pros: Stayed delicious for days, held its shape while baking.
Cons: The pie takes a long time to make, only for special occasions.
Would I make this again? Absolutely, this is my go-to apple pie recipe.


Apple pie… a dessert that’s ALWAYS good. It wouldn’t be Thanksgiving without it, right? So I thought after 9 years it was finally time to update my classic apple pie recipe.
So here it is: a tender, gooey, warm, spicy, tart, and sweet fresh apple filling wrapped in a beautiful buttery and flaky homemade crust.
This is a traditional double crust apple pie. Nothing crazy or fancy but I’ve listed a bunch of pie baking tips in the pink box below to guarantee your success.
Although apple pie is pretty straightforward, it’s easy for things to come out not quite right. Whether your crust gets soggy, the filling is too sweet or kinda of bland,
How to Make Perfect Apple Pie
Apple Pie Crust
For this recipe you’ll need a double batch of pie crust. You can use my Best Ever Pie Crust, or whichever crust recipe you know and love. When making pie I typically will prepare the dough in advance to save time. You can refrigerate your two disks of dough for up to 3 days before assembling the pie.
I have a ton of pie tips in my recipe post, and also in my free Pie Crust Troubleshooting Guide.
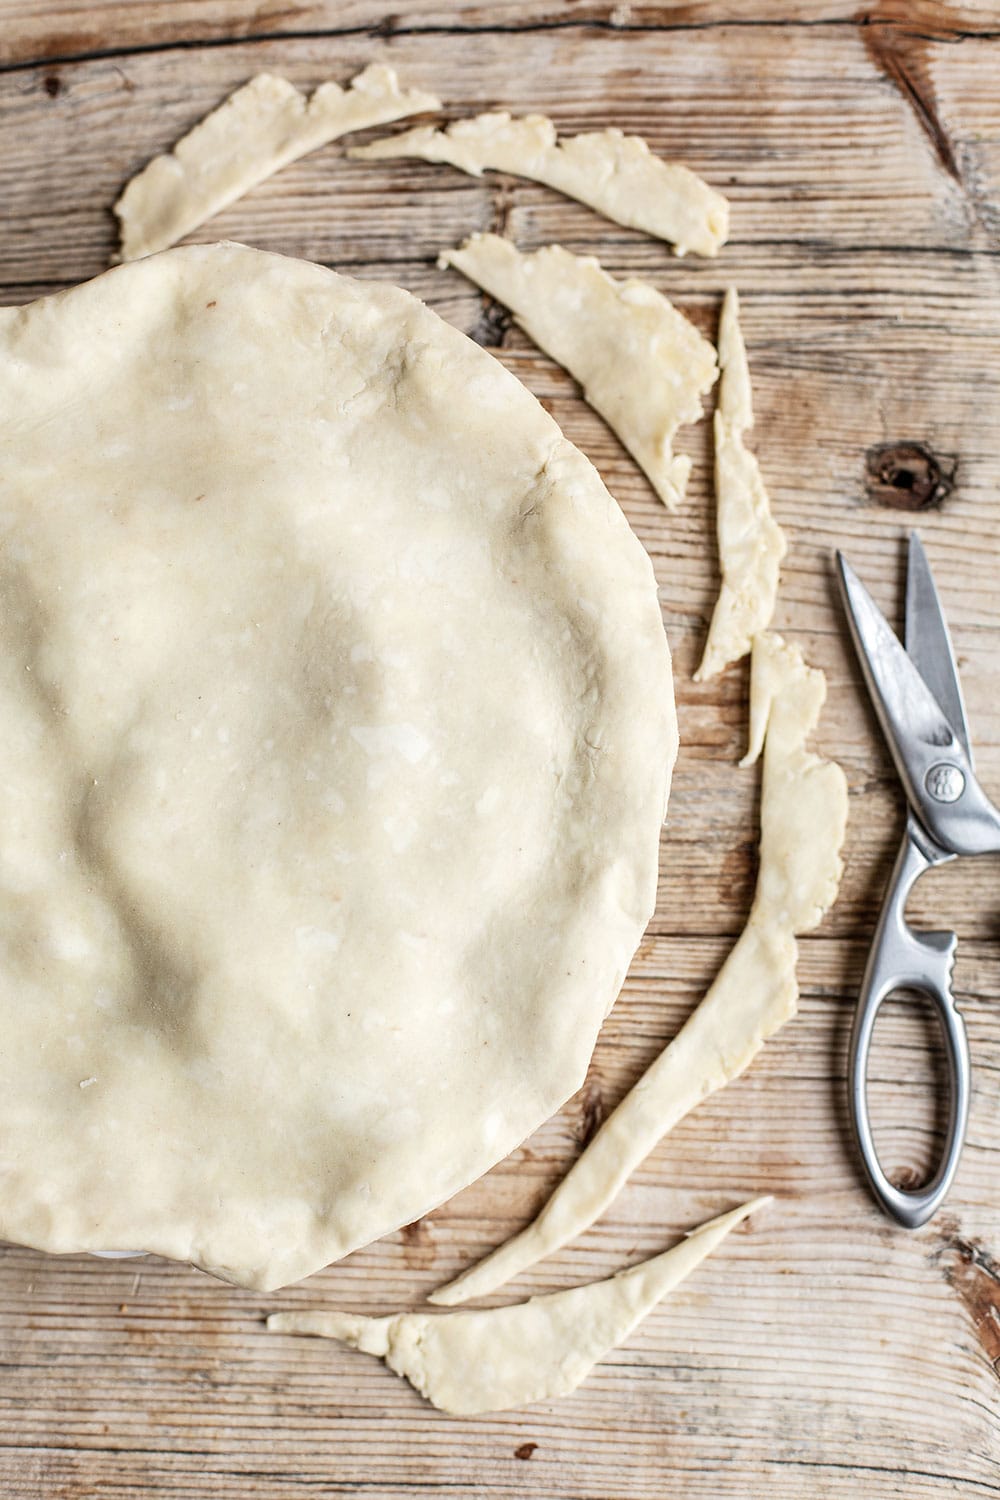
Don’t forget to cut vents in your pie crust before baking to allow steam to escape! This will prevent mini pie filling explosions or the crust from ballooning up. Be sure to cut the vents after brushing on the egg wash.
You can even make a Lattice Pie Crust if you prefer.
Lattice pies are handy for moisture rich fillings like this apple one. There’s a lot of water content that turns into steam and will need to evaporate as it bakes. Lattice by its design allows that steam to readily escape.
I have an entire article that includes step-by-step photos and a video of How to Make a Lattice Pie Crust.
How to prevent soggy crust:
There’s nothing worse than soggy bottoms in apple pie. It’s all too easy for this to happen since the filling has so much moisture. Here are two tips:
Bake your pie 30 minutes after filling and assembling. In the below recipe you’ll see after you fill and assemble the pie you refrigerate it for 30 minutes to relax the gluten. This prevents the crust from shrinking and ensures the butter is nice and cold for a flaky texture. If you keep it in the fridge for longer, the moisture from the filling will start to seep into the crust and create a soggy bottom.
If soggy bottoms are a common problem, bake your pie on the lower rack of your oven. Even better, bake it on a rimmed sheet pan (to prevent spillage) on top of a baking stone to ensure the bottoms are well browned.
Tips for Apple Pie Filling

Peel, core, and slice the apples into 1/4-inch to 1/2-inch slices and place in a large bowl. I usually prefer thicker pieces of apple so they don’t get mushy or mealy, but this does make for a “looser” filling texture. So feel free to slice thinner to your preference.
Toss the apples immediately with the sugars, spices, and salt. If time permits, allow the apples to macerate for 30 minutes or up to 3 hours, tossing occasionally. Macerating the apples will intensify their flavor and prevent the filling from being watery and the crust from getting soggy. However, this step can also be skipped if you don’t have the time.
The pie filling isn’t cooked before baking. I wanted the apples to shine in this recipe and maintain some tartness and texture. The filling is thickened with just a tablespoon of cornstarch. This prevents the filling from turning syrupy and mushy. However, if you prefer a thick filling feel free to add another tablespoon of cornstarch.
Best apples for apple pie?
I love Granny Smith apples in this recipe because they won’t get mushy or mealy during baking and their tartness cuts the sugar in the filling perfectly.
You can also use Braeburn, Pink Lady, McIntosh, or Honeycrisp or some mixture of your favorites.
How to Tell when Apple Pie is Done Baking
Bake until the crust is golden brown and the filling has an internal temperature of 195°F measured with a digital instant read thermometer. This will take about 1 hour and 15 minutes, but will depend on your pie pan and oven. Metal pans tend to cook faster than glass or ceramic.
How to Store & Make Apple Pie Ahead of Time

As I mentioned, the disk of pie dough can be wrapped in plastic and refrigerated for up to 3 days or frozen for up to 2 months. The rolled out crusts can also be covered and refrigerated overnight.
The baked cooled pie can be wrapped in foil for up to 3 days at room temperature. Reheat in a 350°F for 5 to 10 minutes to refresh if desired.
Can apple pie be frozen?
Yes! Apple pie freezes better unbaked. . Assemble the pie fully, double wrap in plastic, and then freeze for up to 1 month. Let the pie partially thaw at room temperature for about 1 hour, then bake as directed by the recipe, adding about 10 minutes to the baking time.
Источник
Apple Pie Recipe
This apple pie recipe is easy to make from scratch! With a flaky, buttery pie crust and a sweet homemade apple pie filling, this apple pie is guaranteed to be a favorite. It’s perfect for the holidays or a weekend dessert.

Homemade apple pie is a classic dessert that’s especially perfect for fall. But really, who wouldn’t love a slice of apple pie any time of year?
Making a pie from scratch can seem difficult, but it is actually really easy. If making pie dough from scratch intimidates you, don’t worry. I will walk you through the simple steps so that you can make your own scrumptious apple pie from scratch.
As I was testing this apple pie recipe, my whole family kept raving that it’s the best apple pie they’ve ever eaten. You’ll have to tell me which you like more, because I just can’t decide: the juicy cinnamon-spiced apple pie filling or the buttery, flaky pie crust.

For Thanksgiving and the holidays, this delicious pumpkin pie recipe is my other favorite (and it’s really easy, too!). You’ll also love my blackberry pie and cherry pie recipes. For an easy-to-make apple dessert try my Apple Crisp recipe.
Best Apples for Apple Pie
The best apple pie starts with good baking apples. You want to use apples that are firm enough to hold up to the heat of baking, so that they don’t cook down into mush.
I like to use a combination of sweet and tart apples in apple pie for the best flavor and texture. My favorite is a combination of Granny Smith and Honeycrisp apples. The Granny Smiths add tartness, and the Honeycrisps are on the sweeter side, so you get the perfect balance of sweet and tart flavors.
Tart varieties of apples that are best for pie include Granny Smith, Northern Spy and Cripps Pink. Sweeter varieties of apples that are best for pie include Honeycrisp, Jonagold, Golden Delicious, Braeburn, Pink Lady, Crispin (Mutsu), Jazz and Fuji. Learn more about apple types.
How to Make Apple Pie
Apple Pie Filling
This easy apple pie recipe starts with my easy homemade apple pie filling. The first step is to peel and slice your apples. You want the apple slices to be about 1/4-inch thick. You will need about 8 cups of sliced apples (6-8 apples) to fill a deep dish pie dish.
Place the sliced apples in a large bowl. To the bowl, add the rest of the apple pie filling ingredients:
- Vanilla Extract: A little bit of vanilla extract adds sweetness and flavor to the pie.
- All-Purpose Flour: The flour helps to thicken the pie filling.
- Granulated Sugar: You can adjust the amount of sugar depending on the sweetness of your apples and how sweet you like your pie.
- Brown Sugar: I like to use brown sugar as well as granulated sugar because it adds a richer flavor with caramel notes.
- Cinnamon: A little bit of cinnamon is essential for the best apple pie filling!
- Nutmeg: You’ll add just 1/4 teaspoon of nutmeg, for flavor.
- Salt: Salt is essential in baking to balance out the sweetness.
Stir to combine the ingredients. Then you’ll let the filling sit at room temperature while you make the pie crust. As the filling rests, the sugar will start to bring out the juices from the apples. You’ll stir the filling again after it sits to make sure everything is well combined.

Apple Pie Crust
For the pie crust, we are using my easy pie crust recipe – you don’t have to chill the dough before rolling it out, and it rolls out like a dream. The trick to the best flaky pie crust is to use very cold butter and ice cold water, and to work quickly to keep the butter cold. But don’t stress! You really can’t mess up pie crust.
I like to make pie dough in my food processor, because it is quick and easy. You can also make the pie crust by hand, using a pastry blender. The steps to making the pie crust are simple:
- Combine the dry ingredients: flour, granulated sugar and salt. You can use the pulse function of your food processor to mix them together.
- Cut in the butter: Make sure to use butter that is cold, straight from the refrigerator. You can even freeze your butter for a few minutes to make it colder. Cut the butter into cubes and add it to the food processor. Pulse about 10 times, until the largest pieces of butter are the size of peas.
- Add ice-cold water: Pulse until the dough begins to come together.
My recipe makes enough dough for a top and bottom pie crust. You’ll cut the dough in half and shape it into two disks. Refrigerate one disk for the top crust, and roll out the other for the bottom crust. Fit the bottom crust into your pie dish so it reaches all the way up the sides of the dish.
Give the apple filling a stir and transfer it to the bottom crust in the pie dish. If it seems like your apples won’t fit, use your fingers to arrange them a bit and help them better fill the space.
Roll out the second pie crust for the top of the pie. You can place it on the pie whole, you can make a lattice pie crust, or you can use a cookie cutter and arrange the dough shapes on top of the pie filling. If placing the dough round on the pie whole, be sure to cut a few slits in the top dough so that steam can escape as the pie bakes.
I like to sprinkle some coarse turbinado sugar on the top crust because it makes the pie look pretty. It also adds a delicious sweet crunch to the top crust. Before sprinkling on the sugar, lightly brush the crust with milk to help the sugar stick. The milk also helps the crust to brown nicely. (I use milk instead of an egg wash, which is a combination of an egg and milk or water, because I find it easier and just as effective).
While your oven preheats, chill the pie in your refrigerator to make sure the crust is cold. You’ll bake your apple pie for 20 minutes at 400° F and then another 40-50 minutes at 350° F. Check on the pie after it has baked for about 30-40 minutes total, and cover it loosely with foil to prevent the crust from browning too much. The pie is done when the filling is bubbly.
How to Make a Lattice Pie Crust
A lattice-top pie crust is the name for the woven crust that you see on the top of this apple pie. It’s fun and pretty to make a lattice top crust for your pie.
To make a lattice pie crust, roll out the dough for the top of the pie into a 12-inch diameter circle. Use a sharp knife, pizza cutter or pastry wheel to cut the dough circle into ½-inch strips.

Using every other strip from the circle, arrange half of the dough strips going one direction across the pie. Leave a little bit of space in between each strip.

Weave the other half of the dough strips through the first set, over and under, pulling back the first set of strips as needed to weave. I find it easiest to start in the center of the pie when weaving, and pull back every other of the first set of dough strips.

Once you finish weaving in strips on one side of the pie, begin weaving the remaining strips of dough on the other side of the pie.

When you are finished weaving, trim off any excess dough from around the edges of the pie. Fold the edges under and crimp or flute as desired.

Make Ahead Instructions
If you want to make this apple pie ahead for your Christmas or holiday meal, I recommend baking it the day before, letting it cool completely, and then storing it at room temperature, wrapped tightly with plastic wrap. To make two days ahead, cool completely, wrap tightly, and store in the refrigerator. Take the pie out of the refrigerator 1-2 hours before serving to let it come to room temperature.
To store apple pie: You can store your apple pie at room temperature for one day. This apple pie can be stored in the refrigerator for 4-5 days.
To freeze apple pie: Let the pie cool completely and then wrap it tightly. Freeze for up to 3 months. Thaw for 24 hours in the refrigerator before serving.
Источник


