- If your computer doesn’t recognize your iPhone, iPad, or iPod
- Additional steps for Mac
- Install custom enterprise apps on iOS
- Manually install and trust an enterprise app
- Install a configuration profile on your iPhone or iPad
- Install a profile
- About profiles installed by Mobile Device Management
- Update your iPhone, iPad, or iPod touch
- Before you update
- Update your iPhone, iPad, or iPod touch wirelessly
- If you see an alert when updating wirelessly
- If you need more space when updating wirelessly
- Customize automatic updates
- About eSIM on iPhone
- What you need
- How to set up an eSIM
- Scan a QR code
- Install an assigned cellular plan
- Use a carrier app
- Enter the information manually
- Transfer an eSIM from your previous iPhone
- If you can’t set up an eSIM
- Erase your eSIM
If your computer doesn’t recognize your iPhone, iPad, or iPod
If you connect your device to your computer with a USB cable and your computer doesn’t recognize your iPhone, iPad, or iPod, learn what to do.
If your computer doesn’t recognize your connected device, you might see an unknown error or a «0xE» error. Follow these steps and try to connect your device again after each step.
- Make sure that your iOS or iPadOS device is turned on, unlocked, and on the Home screen.
- Check that you have the latest software on your Mac or Windows PC. If you’re using iTunes, make sure you have the latest version.
- If you see a Trust this Computer alert, unlock your device and tap Trust. If you can’t unlock your device because you forgot your passcode, find out what to do.
- Unplug all USB accessories from your computer except for your device. Try each USB port to see if one works. Then try a different Apple USB cable.*
- Restart your computer.
- Restart your iPhone, iPad, or iPod touch.
- Follow these additional steps for your Mac or Windows PC.
- Try connecting your device to another computer. If you have the same issue on another computer, contact Apple Support.
Additional steps for Mac
- Connect your iOS or iPadOS device and make sure that it’s unlocked and on the Home screen.
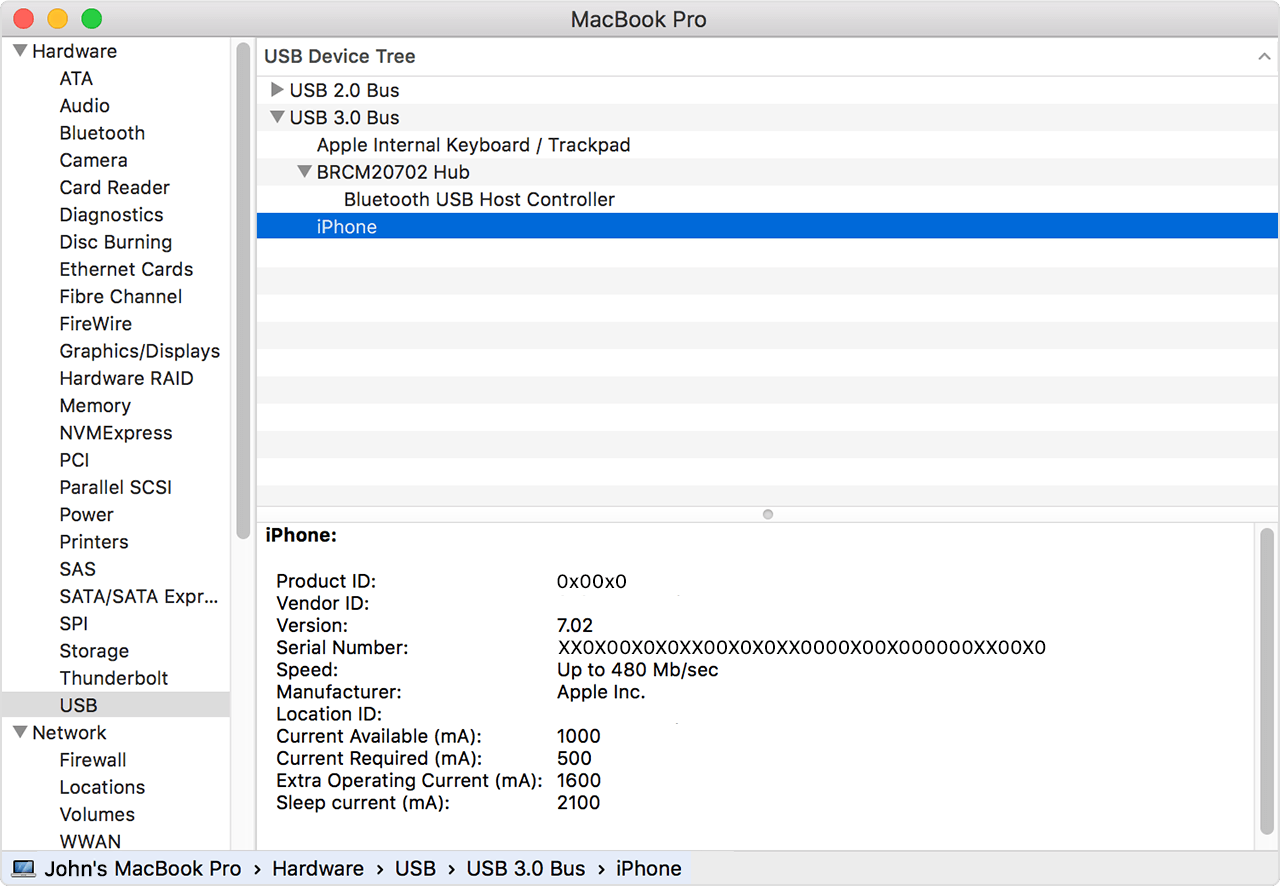
- On your Mac, choose Finder > Preferences from the Finder menu bar, then click Sidebar at the top of the preferences window. Make sure that «CDs, DVDs and iOS Devices» is checked.
- Press and hold the Option key, then choose System Information from the Apple menu . From the list on the left, select USB.
- If you see your iPhone, iPad, or iPod under USB Device Tree, get the latest macOS or install the latest updates. If you don’t see your device or still need help, contact Apple Support.


Information about products not manufactured by Apple, or independent websites not controlled or tested by Apple, is provided without recommendation or endorsement. Apple assumes no responsibility with regard to the selection, performance, or use of third-party websites or products. Apple makes no representations regarding third-party website accuracy or reliability. Contact the vendor for additional information.
Источник
Install custom enterprise apps on iOS
Learn how to install and establish trust for custom apps that your organization creates.
This article is intended for system administrators for a school, business, or other organization.
Your organization can use the Apple Developer Enterprise Program to create and distribute proprietary enterprise iOS apps for internal use. You must establish trust for these apps before you can open them.
If you install an app by Mobile Device Management (MDM), trust is automatically established. If you manually install an app, you must also manually establish trust.
Apple recommends that you use an MDM solution to distribute the apps. This method is secure and doesn’t require user interaction. You can also install custom apps from a secure website that your organization operates. If you don’t install apps from your organization, download and install apps only from the Apple App Store. This is the best way to protect your iPhone, iPad, or iPod touch.
Manually install and trust an enterprise app
When you first open an enterprise app that you’ve manually installed, you see a notification that the developer of the app isn’t trusted on your device. You can dismiss this message, but then you can’t open the app.
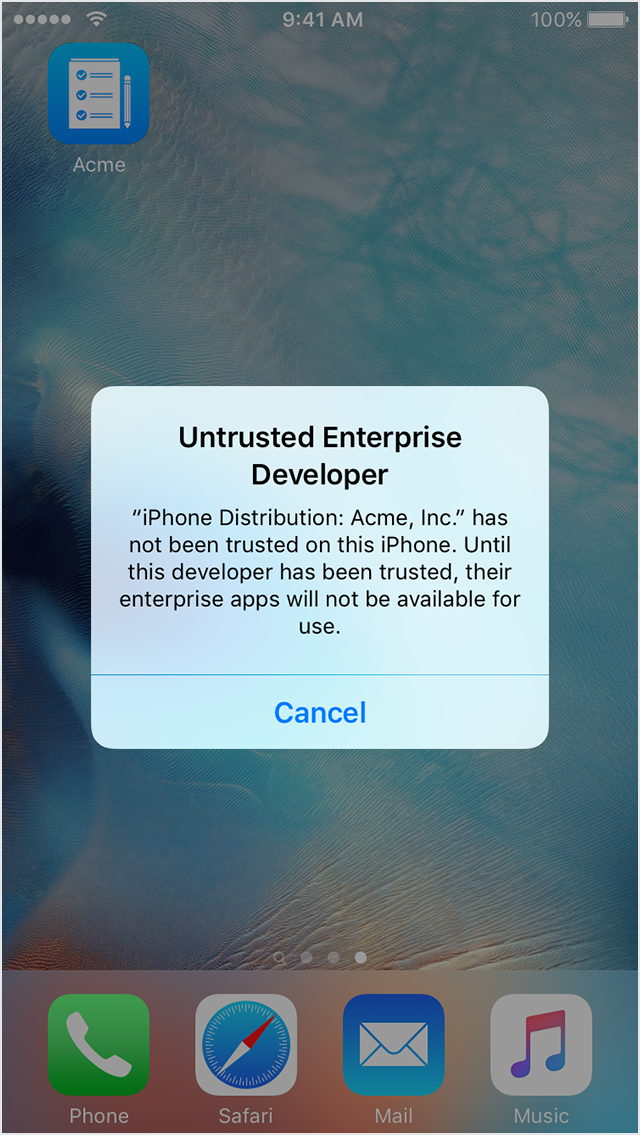
After you dismiss this message, you can establish trust for the app developer. Tap Settings > General > Profiles or Profiles & Device Management. Under the «Enterprise App» heading, you see a profile for the developer.
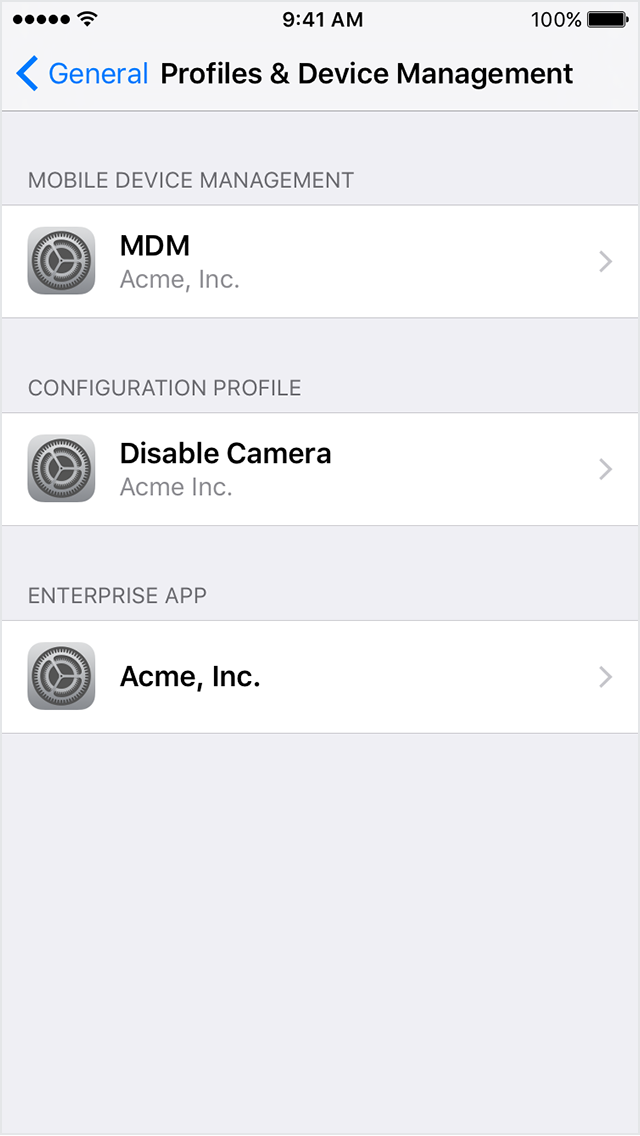
Tap the name of the developer profile under the Enterprise App heading to establish trust for this developer.
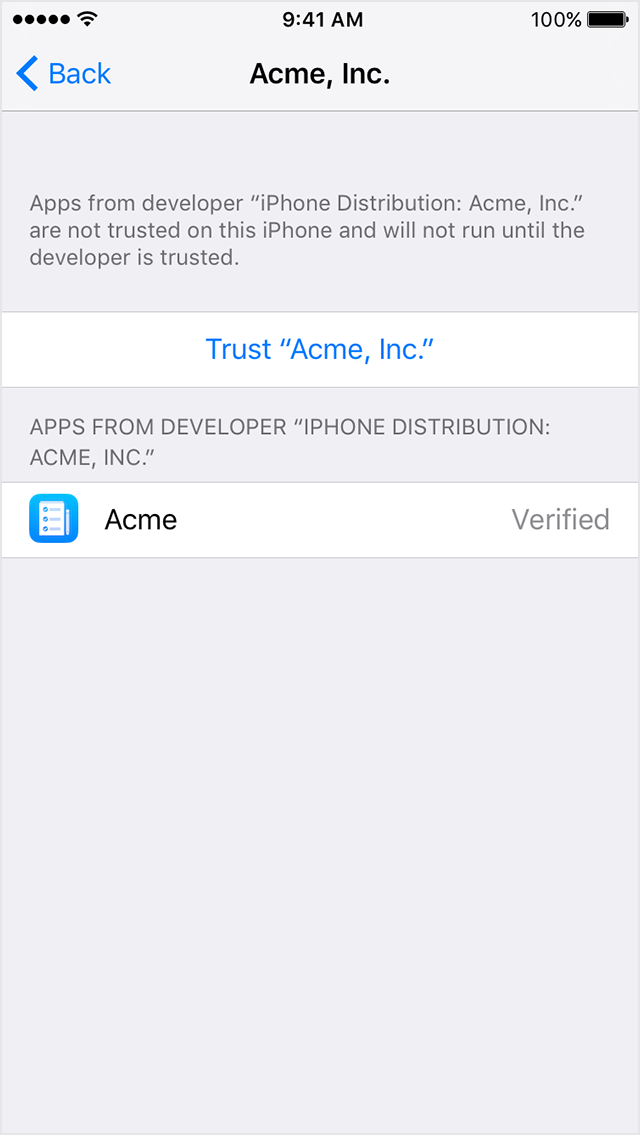
Then you see a prompt to confirm your choice. After you trust this profile, you can manually install other apps from the same developer and open them immediately. This developer remains trusted until you use the Delete App button to remove all apps from the developer.
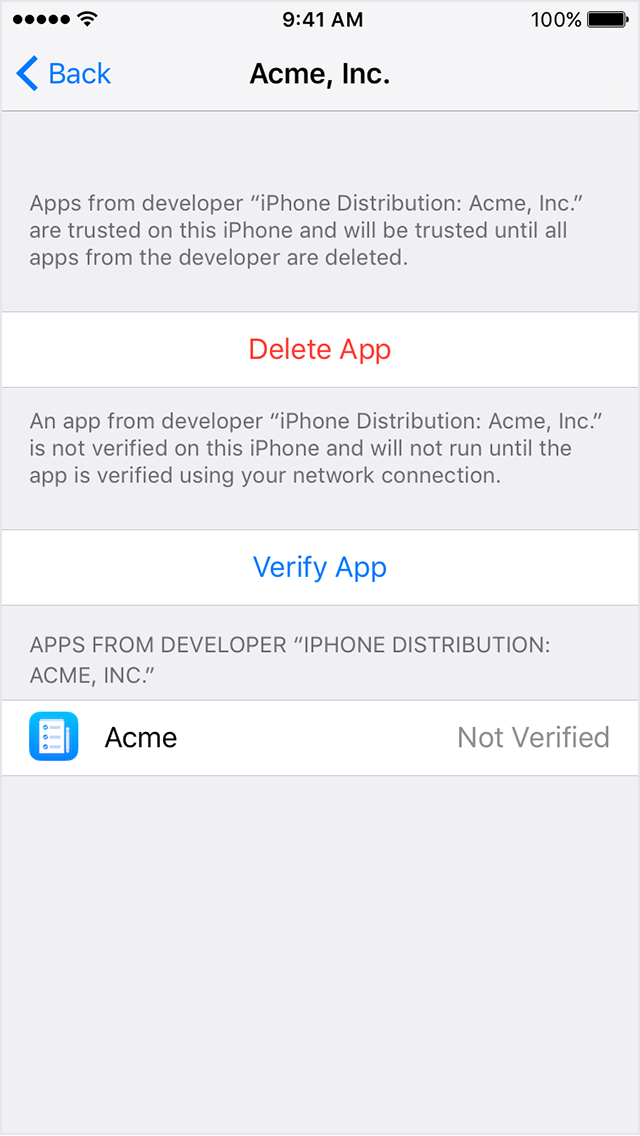
You must be connected to the Internet to verify the app developer’s certificate when establishing trust. If you’re behind a firewall, make sure that it’s configured to allow connections to https://ppq.apple.com. If you aren’t connected to the Internet when you trust an app, the device displays «Not Verified» instead. To use the app, connect to the Internet and tap the Verify App button.
After you verify an app for the first time, your iPhone, iPad, or iPod touch must reverify the app developer’s certificate periodically to maintain trust. If you can’t reverify, you may see a message that verification will expire soon. To maintain trust, connect your device to the Internet, then tap the Verify App button or launch the app.
Information about products not manufactured by Apple, or independent websites not controlled or tested by Apple, is provided without recommendation or endorsement. Apple assumes no responsibility with regard to the selection, performance, or use of third-party websites or products. Apple makes no representations regarding third-party website accuracy or reliability. Contact the vendor for additional information.
Источник
Install a configuration profile on your iPhone or iPad
Learn how to install a profile in iOS 12.2 or later and iPadOS.
When you download a configuration profile from a website or an email message in iOS 12.2 or later or in iPadOS, including profiles to enroll in Mobile Device Management, you need to go to the Settings app to install it. If a profile is not installed within 8 minutes of downloading it, it is automatically deleted.
Install a profile
After you download a profile,* you’ll see the message Profile Downloaded or Enroll in [organization name]. To install the profile, follow these steps:
- Open the Settings app.
- Tap Profile Downloaded or Enroll in [organization name].
- Tap Install in the upper-right corner, then follow the onscreen instructions.
* You can have only one profile ready to install at a time. For example, if you download a profile and don’t install it, and then download a second profile, only the second profile is available to be installed.
About profiles installed by Mobile Device Management
If you’re a system administrator, you can install profiles without any interaction from the user on devices enrolled in Mobile Device Management (MDM). To enroll a device in MDM, use Apple School Manager or Apple Business Manager, or manually install an enrollment profile.
Источник
Update your iPhone, iPad, or iPod touch
Learn how to update your iPhone, iPad, or iPod touch to the latest version of iOS or iPadOS.
You can update your iPhone, iPad, or iPod touch to the latest version of iOS or iPadOS wirelessly.
If you’re using iOS or iPadOS 14.5 or later, you might now see the option to choose between two software update versions. This option allows you to choose between updating to the latest version of iOS or iPadOS 15 as soon as it’s released, or continuing on iOS or iPadOS 14 while still getting important security updates for a period of time.
If you can’t see the update on your device, you can update manually using your computer. Learn how to update your device manually if you’re using a Mac with macOS Catalina or later, or if you’re using a Mac with macOS Mojave or earlier or a Windows PC.
Before you update
Back up your device using iCloud or your computer.
Update your iPhone, iPad, or iPod touch wirelessly
If a message says that an update is available, tap Install Now to update now. Or you can tap Later and choose Install Tonight or Remind Me Later. If you tap Install Tonight, just plug your device into power at night, and your device will update automatically overnight.
You can also follow these steps:
- Plug your device into power and connect to the internet with Wi-Fi.
- Go to Settings > General, then tap Software Update.
- If you see two software update options available, choose the one that you want to install.
- Tap Install Now. If you see Download and Install instead, tap it to download the update, enter your passcode, then tap Install Now. If you don’t know your passcode, learn what to do.
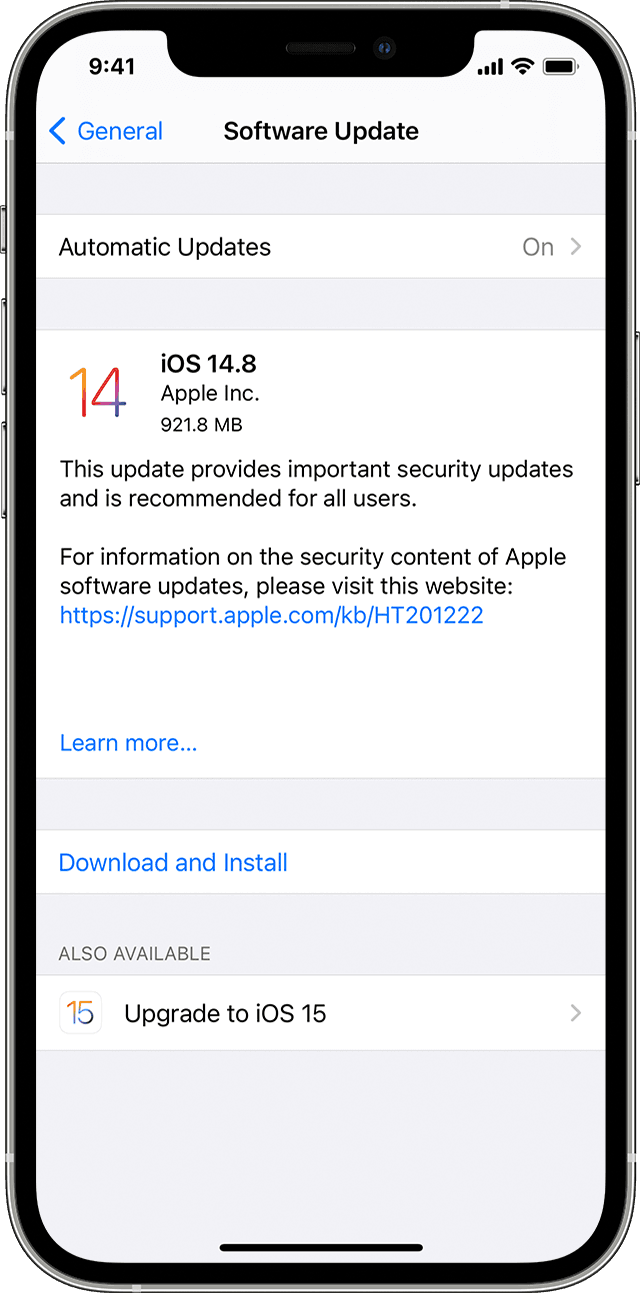
You might see that your device is up to date on its current version, and there’s an update available. For example, even if your device is up to date on the latest version of iOS 14, there might be an option to update to iOS 15.
If you see an alert when updating wirelessly
Some software updates aren’t available wirelessly. VPN or proxy connections might prevent your device from contacting the update servers.
If you need more space when updating wirelessly
If a message asks to temporarily remove apps because the software needs more space for the update, tap Continue to allow apps to be removed. After installation is complete, those apps are automatically reinstalled. If you tap Cancel instead, you can delete content manually from your device to add more space.
Customize automatic updates
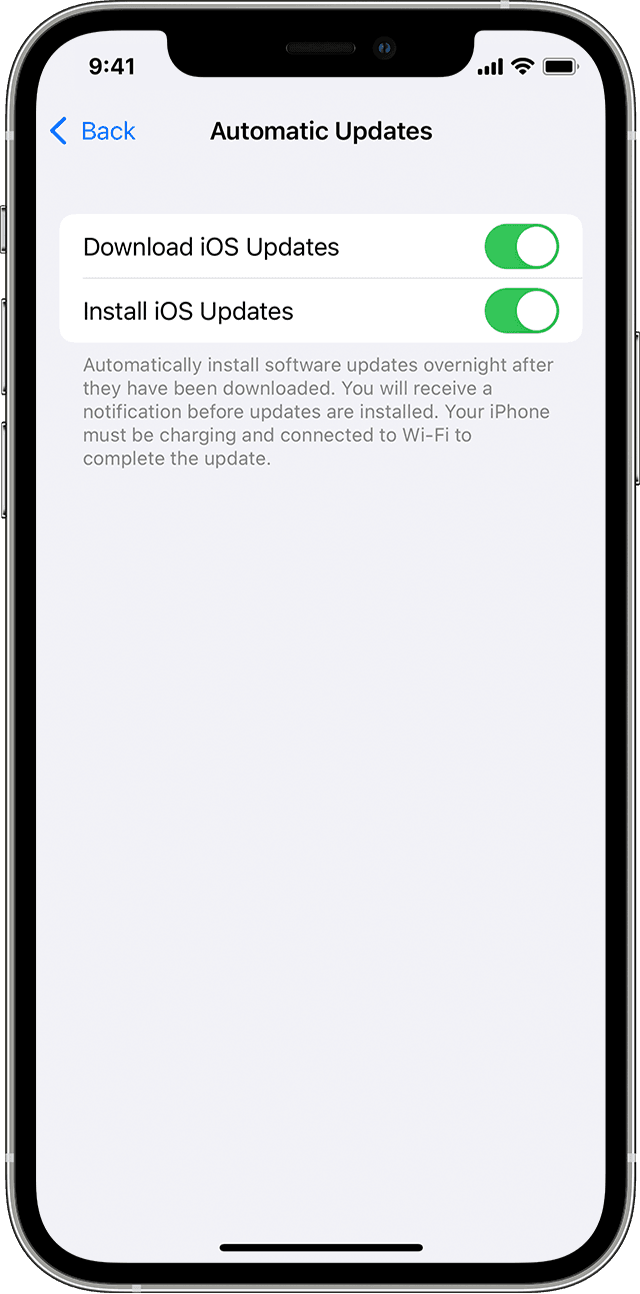
Your device can update automatically overnight while it’s charging. Here’s how to turn on automatic updates:
- Go to Settings > General > Software Update.
- Tap Automatic Updates, then turn on Download iOS Updates.
- Turn on Install iOS Updates. Your device will automatically update to the latest version of iOS or iPadOS. Some updates might need to be installed manually.
![]()
Upgrading to the latest version of iOS or iPadOS software provides the latest features, security updates, and bug fixes. Not all features are available on all devices or in all regions. Battery and system performance may be influenced by many factors including network conditions and individual use; actual results may vary.
Источник
About eSIM on iPhone
An eSIM is a digital SIM that allows you to activate a cellular plan from your carrier without having to use a physical nano-SIM. Learn about setting up an eSIM, transferring your SIM, what to do if you can’t set one up, and how to erase an eSIM, if you ever need to.
You can install multiple eSIM profiles on an iPhone that supports eSIM. If your iPhone is unlocked, you can subscribe to several cellular plans.
What you need
- An iPhone XS, iPhone XS Max, iPhone XR, or later
- A wireless carrier that supports eSIM
eSIM on iPhone is not offered in mainland China. In Hong Kong and Macao, iPhone 13 mini, iPhone 12 mini, iPhone SE (2nd generation), and iPhone XS feature eSIM. Learn about using Dual SIM with two nano-SIM cards in mainland China, Hong Kong, and Macao.
How to set up an eSIM
If you purchased an iPhone 13 model from an Apple Retail Store or Apple Online Store in the United States, your iPhone won’t arrive with a SIM card installed. To activate your iPhone, turn it on, connect to a Wi-Fi network, and follow the onscreen instructions.
Otherwise, if you do need to set up an eSIM, you can scan the QR code your carrier gave you, use your carrier’s iPhone app, install an assigned plan, enter the information manually, or transfer an eSIM from your previous iPhone:
Scan a QR code
- Open the Camera app and scan your QR code.
- When the Cellular Plan Detected notification appears, tap it.
- Tap Continue, at the bottom of the screen.
- Tap Add Cellular Plan.
If you’re asked to enter a confirmation code to activate the eSIM, enter the number that your carrier provided.
Install an assigned cellular plan
With iOS 13 and later, some carriers can assign a cellular plan for you to install. Contact your carrier for more information.
If a plan was assigned to you, follow these steps:
- When a notification appears that says Carrier Cellular Plan Ready to Be Installed, tap it.
- In the Settings app, tap Carrier Cellular Plan Ready to Be Installed.
- Tap Continue, at the bottom of the screen.
If you’re asked to «Transfer Cellular Plan» while setting up your iPhone, learn how to transfer your eSIM.
Use a carrier app
- Go to the App Store and download your carrier’s app.
- Use the app to purchase a cellular plan.
Enter the information manually
If necessary, you can manually enter your plan information. To enter your plan information manually, follow these steps:
- Go to Settings.
- Tap either Cellular or Mobile Data.
- Tap Add Cellular Plan.
- Tap Enter Details Manually, at the bottom of your iPhone screen.
Transfer an eSIM from your previous iPhone
To transfer an eSIM to your new iPhone, you can scan the QR code your carrier gave you, use your carrier’s iPhone app, or install an assigned cellular plan. When your cellular plan is activated on your new iPhone, the plan on your previous iPhone will deactivate.
If you can’t set up an eSIM
- Make sure that carrier or carriers support eSIM.
- Open Control Center: Swipe down from the upper-right corner of the screen. Then make sure that your carrier appears in the status bar. If not, try turning Airplane Mode on and off.
- Go to Settings > General > About and look for any numbers under EID. If there are no numbers, contact Apple Support.
- If you still can’t set up your eSIM, contact your carrier.
Erase your eSIM
If you need to erase your eSIM, follow these steps:
- Go to Settings.
- Tap either Cellular or Mobile Data.
- Tap the plan you want to erase.
- Tap Remove Cellular Plan.
If you erase all content and settings from your iPhone, you can choose to erase your eSIM as well or keep it. If you want to cancel your cellular plan, you still need to contact your carrier.
Источник


