- The basics of Unit and Instrumentation Testing on Android
- Getting started
- What is the difference between Unit and Instrumentation Tests
- Creating your first Unit test
- Running the Unit tests
- Create your first Instrumentation Test
- Running the instrumentation test
- Running UI Tests
- Finally
- Developing Android unit and instrumentation tests — Tutorial
- 1. Introduction into Android testing
- 1.1. Testing Android applications
- 1.2. What to test on Android applications
- 1.3. Tooling support for Android testing
- 1.4. Android project organization for tests
- 2. Android unit testing
- 2.1. Unit testing in Android
- 2.2. Required dependencies in the Gradle build file
- 2.3. Running the unit tests
- 2.3.1. Using Gradle
- 2.3.2. Using Android Studio
- 2.4. Location of test reports
- 2.5. Activating default return values for mocked methods in android.jar
- 3. Exercise: Create unit test
- 3.1. Preparation: Create Android project
- 3.2. Add JUnit dependency
- 3.3. Create test
- 3.4. Run unit tests
- 4. Writing tests to run on the Android device
- 4.1. Instrumentation tests
- 4.2. How the Android system executes tests
- 4.3. Mocking objects in Android
- 4.4. Location of instrumentation tests
- 4.5. Define dependencies and testInstrumentationRunner in the Gradle build file
- 4.6. Using the @RunWith(AndroidJUnit4.class)
- 4.7. Run the tests on Android
- 4.8. Location of test reports
- 4.9. How to replace the application for instrumentation tests
The basics of Unit and Instrumentation Testing on Android

Nov 10, 2015 · 8 min read
There has been a lot written about unit testing and instrumentation testing on the internet. However, I felt that there is a need for a very basic explanation of how to add Unit tests and Instrument tests to your android Application. In this article I’m going to give you the bare basics of writing both Unit and Instrumentation tests, no mocking, no injection patters, nothing.
Getting started
Take any existing project you have with some decent amount of code. You will need:
- Android studio 1.4+
- Android SDK 6 (API 23)
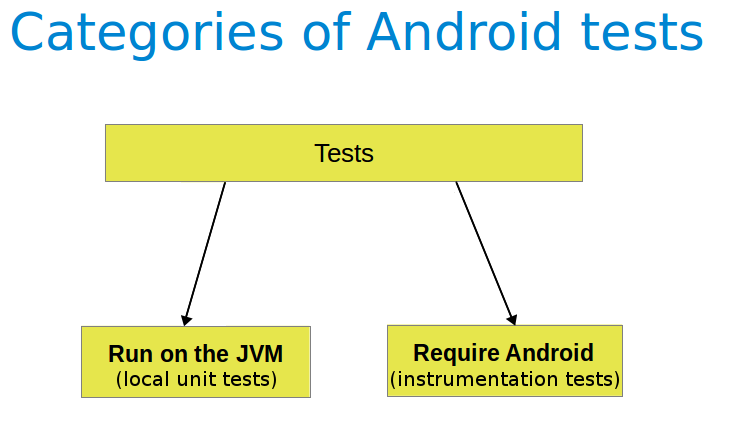
What is the difference between Unit and Instrumentation Tests
Often Unit tests are referred to as “local tests” or “local unit tests”. The main reason for this seems to be that you want to be able to run tests without a device or an emulator attached.
Unit tests cannot test the UI for your app without mocking objects such as an Activity.
Instrumentation tests run on a device or an emulator. In the background, your app will be installed and then a testing app will also be installed which will control your app, lunching it and running UI tests as needed.
Instrumentation tests can be used to test none UI logic as well. They are especially useful when you need to test code that has a dependency on a context.
Creating your first Unit test
Lets start with the unit tests as they are fairly easy to set-up and less prone to quirks.
Start by adding a dependency on JUnit 4 in your project. The dependency is of type `testCompile` which means that the dependencies is only required to compile the test source of the project. By default, also includes the compiled production classes and the compile time dependencies.
After you add the dependency, make sure to synchronize your project.
Android studio should have created the folders structure for unit tests by default, if not make sure the following directory structure exists. You can check if the directory structure exists or create it in Explorer or Finder.
You should ideally place your unit tests code in the same package as the package in which your code reside in your source. This is not required, but it is considered a good practice.
If you want to test the following code:
We will begin by creating DateUtilsTest in our test directory under the package com.alimuzaffar.examplecode.util. The directory structure will look as follows:
Our DateUtilsTest class will be as follows:
Running the Unit tests
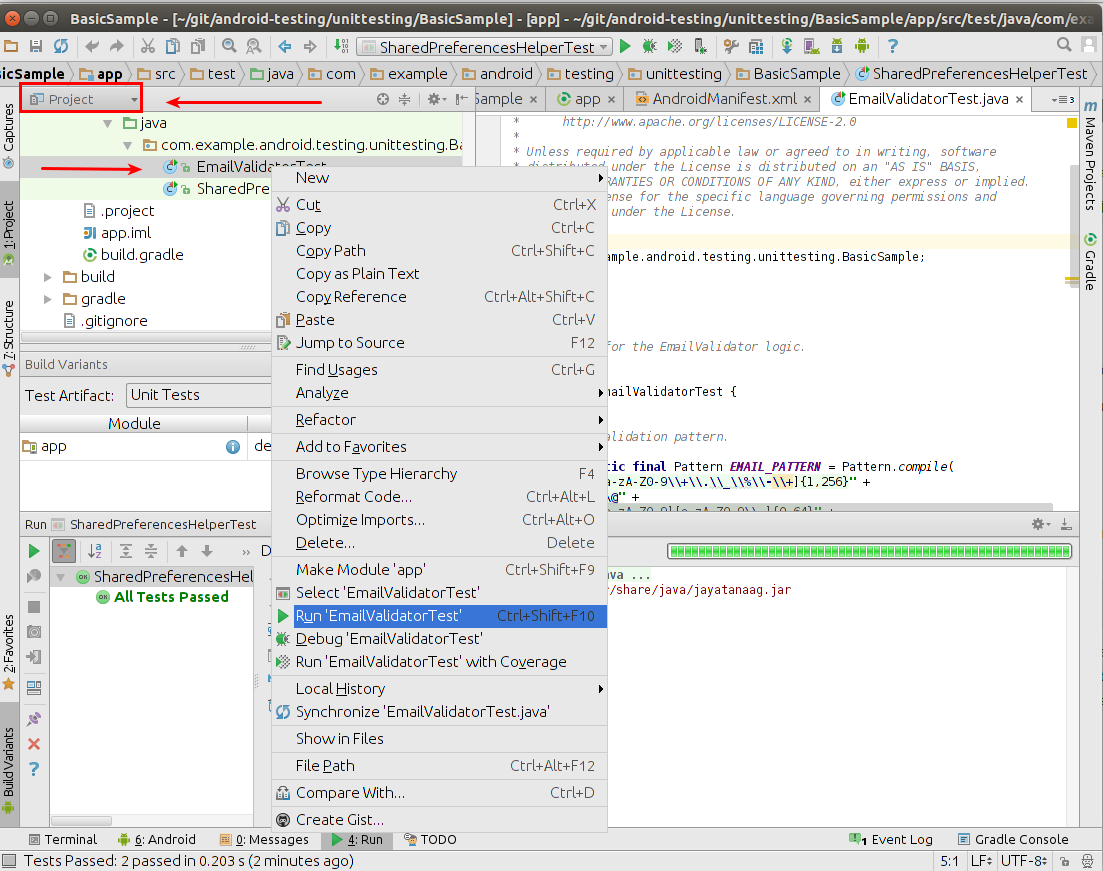
In order to run the Unit tests, you need to make sure that Gradle is synchronized and then from the Build Variants, under Test Artifacts select “Unit Tests”

The project structure changes a bit and the test classes under the test directory should become activated. Your project structure should look something like this:

In order to run the unit test, select the unit test you want to run and select Run ‘ ’.

When the unit tests are run, successfully or otherwise, you should be able to see this in the run menu at the bottom of the screen.

Create your first Instrumentation Test
To write instrumentation tests, we don’t need to add any new dependencies. By default, instrumentation tests are most suited for checking values of UI components when an activity is run. However, as I mentioned earlier, instrumentation tests work by using a test app to control your app. For this reason any actions you take on the UI thread will throw an exception. There are two ways around this. One would be to use @UiThreadTest annotation, or using espresso.
Since espresso seems to be the way forward, we’ll use espresso to take actions on the main thread such as button clicks, change text etc. Add a dependency on espresso:
Instrumentation tests are created in an androidTest folder. Just like unit tests, under androidTest, you should create the same package structure as that of your app.
If you want to test a simple activity, you should create you test class in the same package as your Activity.
In order to test the activity, we use an instance of the ActivityInstrumentationTestCase2 class. We can setup our test in the setUp method and then write a test to make sure our setup was successful.
Note: All test methods need to start with testXXX or be annotated with the @Test annotation.
Running the instrumentation test
In order to run the instrumentation test, you need to select Android Instrumentation Tests under Test Artifact in the Build Variants window.

You should see the project structure change and the classes under the androidTest folder should now be visible.

In order to run the test, do a clean build of your project (this is not required, but you can have some odd issues when you switch between Unit Tests and Instrumentation Tests and this just helps reduce issues). Then right click on the Instrumentation test you want to run and select Run ‘ ’.

When the project is built, you should be prompted to run it on an emulator or a device. In my experience it should work on most versions of Android, however, with espresso, instrumentation tests seem to mostly work on Android 5.1+.
Running UI Tests
So far, we have been able to get a reference to the activity and from it, a reference to various UI components. If you want to read from UI components or do other operations that don’t require the UI thread, you should be able to do this like so:
You don’t have to create a different method for each test, however, it is a good practice. If you want to read and write from the database, you can do this like so:
If you need a reference to the context, then remember, we got one in our setUp() method. Or else, you can just use getActivity().
If you do try to change the value of a View or do any other operations that must be executed on the main thread, you’ll get an error:

There are 2 solutions to this, you can either annotate your method with android.test.UiThreadTest annotation.
The second option is to use the new espresso framework.
The typeText action will only work on EditText and other Views that can be edited (cannot be used on TextView). There are other actions you can perform such as replaceText() and click(), closeSoftKeyboard() etc.
Finally
That in short are the basics of testing on Android. Using these simple techniques, you won’t be able to provide vast code coverage, but you should be able to do any where between 20% — 40% code coverage at lease depending on how complex your app is and how well the code is structured. In order to do more, you will start to look into refactoring your code and mocking objects.
Yay! you made it to the end! We should hang out! feel free to follow me on Medium, LinkedIn, Google+ or Twitter.
Источник
Developing Android unit and instrumentation tests — Tutorial
This tutorial describes how to write unit and instrumentation tests for your Android application. It describes how to execute these tests via Android studio and Gradle. This tutorial assumes that you are familiar with Android programming in general.
1. Introduction into Android testing
1.1. Testing Android applications
Android applications run on a variety of devices. Also the Android framework and the surrounding open source frameworks evolve at a high speed. To ensure that you application works well, it is import to write software tests. This helps you to enhance and maintain the Android application.
Unit testing for Android can be classified into:
Local unit tests — tests which can run on the JVM.
Instrumented unit tests — tests which require the Android system.
Local unit tests run much faster compared to the time required to deploy and run tests on an Android device. Prefer writing local unit tests and only run tests on Android, if you require a real Android system.
If you write local unit test and have dependencies to Android API, you need to replace them, e.g., via a mocking framework like Mockito.
1.2. What to test on Android applications
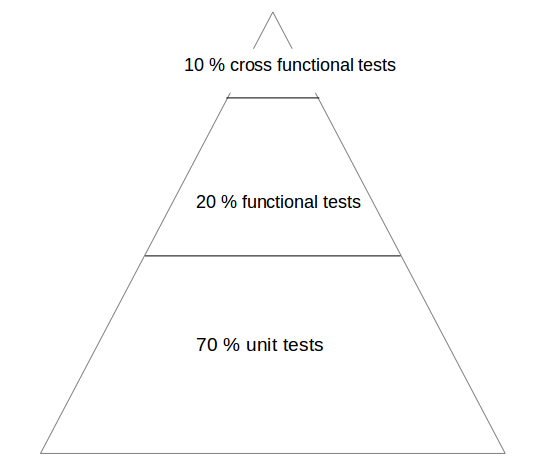
Your test should focus on the business logic of your application. A good rule of thumb is to have the following distribution of tests:
70-80 % unit tests to ensure stability of your code basis
20-30 % functional tests to ensure that the application really works
some cross functional tests if your application integrates intensively with other Application components
You should test your application at least on one device with the lowest possible configuration. In addition you should test on one device with the highest available configuration, e.g., pixel density, screen resolution to ensure that it works fine on these devices.
1.3. Tooling support for Android testing
The Android Testing Support library (ATSL) project from Google provides tooling for Android testing. For example, it ( AndroidJUnitRunner ).
If you run local unit tests, a special version of the android.jar (also known as the Android mockable jar ) is created by the tooling. This modified JAR file is provided to the unit test so that all fields, methods and classes are available. Any call to the Android mockable JAR results, by default, in an exception, but you can configure Android to return default values. See Activating default return values for mocked methods in android.jar for details.
The library provides a JUnit 4-compatible test runner ( AndroidJUnitRunner ), the Espresso test framework and the UI Automator test framework. Espresso test framework can be used to test the User Interface of your application. UI Automator allows to write cross application functional tests.
AndroidJunitRunner provides access to the instrumentation API, via the InstrumentationRegistery .
InstrumentationRegistry.getInstrumentation() , returns the Instrumentation currently running.
InstrumentationRegistry.getContext() , returns the Context of this Instrumentation’s package.
InstrumentationRegistry.getTargetContext() , returns the application Context of the target application.
InstrumentationRegistry.getArguments() , returns a copy of arguments Bundle that was passed to this Instrumentation. This is useful when you want to access the command line arguments passed to the instrumentation for your test.
It also gives access to the life cycle via the ActivityLifecycleMonitorRegistry .
1.4. Android project organization for tests
The following is the default directory structure for your application and test code:
app/src/main/java — for your source code of your main application build
app/src/test/java — for any unit test which can run on the JVM
app/src/androidTest/java — for any test which should run on an Android device
If you follow this conversion, the Android build system runs your tests on the correct target (JVM or Android device).
If you receive the following error message: «error duplicate files in path. Path in archive: LICENSE.txt» you can add the following to your app/gradle.build file.
2. Android unit testing
2.1. Unit testing in Android
A unit test verifies in isolation the functionality of a certain component. For example, assume a button in an Android activity is used to start another activity. A unit test would determine, if the corresponding intent was issued, not if the second activity was started
A unit tests for an Android application can be:
local unit test — which runs on the JVM
Android unit test — which runs on the Android runtime
If they run on the JVM, they are executed against a modified version of the android.jar Android library. In this version all final modifiers have been stripped off. This makes it easier to use mocking libraries, like Mockito.
The local unit tests of an Android project should be located in the app/src/test folder.
2.2. Required dependencies in the Gradle build file
To use JUnit tests for your Android application, you need to add it as dependency to your Gradle build file.
2.3. Running the unit tests
2.3.1. Using Gradle
Run your unit tests with the gradlew test command.
2.3.2. Using Android Studio
To run a unit test, right-click on your test class in the Project window and select Run.
2.4. Location of test reports
The Test reports are created in the app/build/reports/tests/debug/ directory. The index.html gives an overview and links to the individual test pages.
2.5. Activating default return values for mocked methods in android.jar
By default, all calls to methods in the modified android.jar file throw exceptions. This default should ensure that your unit tests only test your code and do not depend on any particular behavior of the Android platform. If you want to configure a certain behavior, you can use a mocking framework to replace these call.
You can also instruct the Gradle build system to return default values for method calls in the `android.jar`with the following configuration in your Gradle build file.
3. Exercise: Create unit test
In this exercise you learn how to create a simple JUnit4 test for an Android project.
3.1. Preparation: Create Android project
Create the Android project as described in Android temperature converter.
3.2. Add JUnit dependency
Ensure you have the dependency to Junit in your app/build.gradle file.
3.3. Create test
In your app/src/test directory create the following two test methods for the ConverterUtil class.
3.4. Run unit tests
Ensure your unit tests are correctly implemented by running test tests. They should run successfully.
4. Writing tests to run on the Android device
4.1. Instrumentation tests
The Android testing API provides hooks into the Android component and application life cycle. These hooks are called the instrumentation API and allow your tests to control the life cycle and user interaction events.
Under normal circumstances your application cannot control the life cycle events and the user drives the application. For example, if Android creates your activity the onCreate() method is called. Or if the user presses a button your corresponding code is called. Via instrumentation you can control these events via your test code. For example, your instrumentation test can start the activity. Afterwards, it can call the finish() and restart the activity to test if the instance state of the activity is correctly restored.
Instrumented unit tests are unit tests that run on Android devices and emulators instead of running on the Java virtual machine. These tests have access to the real device and its resources and are useful to unit test functionality which cannot be easily mocked by mocking frameworks. An example is a test which validates a Parcelable implementation.
An instrumentation-based test class allows you to send key events (or touch events) to the application under test.
With user interface testing framework like Espresso, the developer rarely has to use the instrumentation API directly.
4.2. How the Android system executes tests
The InstrumentationTestRunner is the base test runner for Android tests. This test runner starts and loads the test methods. Via the instrumentation API it communicates with the Android system. If you start a test for an Android application, the Android system kills any process of the application under test and then loads a new instance. It does not start the application, this is the responsibility of the test methods. The test method controls the life cycle of the components of the application.
The test runner also calls the onCreate() method of the application and activity under test during its initialization.
4.3. Mocking objects in Android
The mocking framework Mockito can also be used for instrumentation tests. This allows you to replace parts of the Android system which are not interesting for the test. The Android framework provided in the past specialized mocking classes but these are not necessary anymore.
4.4. Location of instrumentation tests
As described in Android project organization for tests the unit tests of an Android project should be located in the app/src/androidTest/java folder.
4.5. Define dependencies and testInstrumentationRunner in the Gradle build file
To use JUnit tests for your Android application you need to add the dependency to JUnit to your Gradle build file. You also need to specify android.support.test.runner.AndroidJUnitRunner as testInstrumentationRunner in the build file.
4.6. Using the @RunWith(AndroidJUnit4.class)
It is also recommended annotating the test with the @RunWith(AndroidJUnit4.class) annotation. AndroidJUnit4 extends JUnit4, so if you use pure Junit4 syntax and ActivityTestRule it is not required. But you need it, if you want to run, i.e., Espresso tests with ActivityTestRule and JUnit4.
4.7. Run the tests on Android
Run your local unit tests via Gradle with the gradlew connectedCheck command.
To run your local unit tests via Android Studio, right-click on your test class in the Project window and select Run.
4.8. Location of test reports
The test reports are created in the app/build/reports/androidTests/connected/ directory. The index.html gives an overview and links to the individual test pages.
4.9. How to replace the application for instrumentation tests
You can replace the application class for the instrumentation tests by overriding the AndroidJUnitRunner and its newApplication method.
Источник


